|
|
|||||||||||||||||||||||||||||||||
|
Thread OP
|
Great Planes Phazer EDF ReviewIntroduction
When you're onto something good, why change it? I assume that is the general theme of many a product meeting within the Great Planes organization during the development of the Phazer. If you haven't had the opportunity to experience either the Evader or F-16 firsthand, let me be the first to tell you that they are both great looking planes that perform well, are easy to transport, and go together in very quick fashion. The Phazer follows suit with it's predecessors design philoshphies, and is even powered by the same Hyperflow fan unit which easily gets the Phazer up on step and into the 90MPH range with ease. Visually, the Phazer breaks ranks from the other Great Planes offerings with it's delta wing design and it's very bright red and white color scheme. Let's take a closer look at the individual components and how it handles.
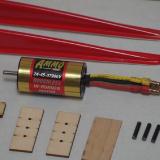
Kit ContentsThe Phazer is a very well thought out ARF and as such the part count is relatively small. As with the Evader and F-16, the fuselage is of fiberglass construction with the formers pre-installed, and the magnetically connecting hatch pre-done. The paint finish is very nicely done, and the fiberglass construction is very good for a mass produced model in my opinion. The wings are of built-up balsa construction and covered with in white and red Monokote which should you need can be purchased at just about any local hobbyshop. Also included with the kit are a bungee launcher, Ammo brushless motor, Hyperflow fan unit, a balancing jig, decals and the instruction manual. The hardware pack consisting of the bungee hook and other related items (push-rods, etc) are all of good quality hardware and I didn't feel the need to replace anything after inspecting the contents of the kit.
Kit includes/features:
Kit requirements:
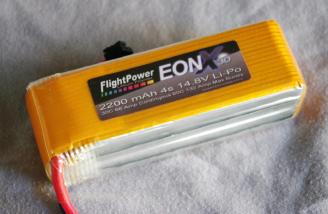
Provided for reviewThe folks at Great Planes were kind enough to send along their recommended electric power setup for this review. The overall ease of construction with the package Great Planes has put together greatly simplifies construction time as all your connectors match right up, no soldering of the ESC, motor, or anything is required which is a very nice thing in my opinion.
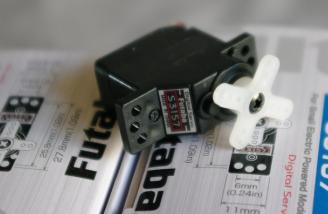
AssemblyAssembling the Phazer is a pretty straightforward task and should you set your mind to it, you could easily have it ready to fly in 4-5 hours. The majority of the time I spent building mine was focused on the fan unit and making sure I got things as smooth as possible there. Otherwise, after you have the fan and ESC installed all that is really left todo is install your 2 servos and glue the wings in place.
EDF Assembly / InstallThis is the 'meat and potatoes' portion of this build. Start by assembling the fan unit per the Hyperflow instructions. They are some of the better instructions I have encountered in just how to put together, install, and break in a new EDF unit. Make sure you test everything out of the plane as it will be installed in the airframe to ensure that all the provided equipment works as advertised before you mount it in the fuselage. While the motor can be removed once it's mounted in place, it can be a tricky exercise. Remember, the rounded nose cone is optional and quite frequently I will opt to not install mine as it causes more vibrations then I am willing to accept. If you do use Loc-tite (or something similar) be sure that you don't allow it to make contact with any of the plastic components as it will potentially weaken it over time. Use glue with enough cure time so as to not rush your self and remember don't force things. Take your time here, be mindful of not allowing glue to get where it shouldn't be and last, remember that you have enough time to set things down for a second so you can take a deep breath and refocus.
WingThe pre covered wing installation starts by dropping the aileron servos in place. Mount the servos on the trays, drill and glue the horns in place, then bring it all together with the provided control rods. I utilized the stock configuration as I didn't want to stray from the provided hardware for this review but I personally would feel a bit better if the rods were of a one piece construction with some type of quick connector utilized for easy adjustment. After you have the servos in place, quickly glue the alignment pins in place, run the wing spar thru the fuselage and push each wing half in place to test the fit. Mine was very snug and kind of difficult to push on at first but once fully seated there were no gaps between the wing and fuselage so I opted to move forward. I personally used 15 minute epoxy to hold the wing in place, but others are using silicone or even good quality tape to hold the wing in place, so depending upon your personal preference there are plenty of options for securing the wing.
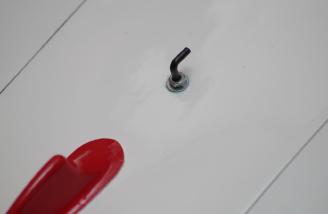
FuselageAs I mentioned previously, the fuselage is pretty much done out of the box. Short of attaching the bungee hook and a few other things related to the radio gear and battery installation all major work is done for you.
Radio / Battery InstallationPer the instructions, after knocking out a couple excess pieces of balsa, and laying down some velcro adhesive, I mounted my R617FS receiver just aft of the 4s battery pack rail. The battery is mounted to a plate in the front of the fuselage, which is captured on the front side under a former and secured on the rear by a screw. Overall it's a very secure setup and a nice upgrade over the original Evader design.
CompletionFinishing up the model consists of running in the fan unit, balancing the model, checking control surface throws, and finally installing your decals should you so desire. As with the fan unit installation take your time with each step, as this will help you avoid any issues on the maiden flight. Ensure that your radio is configured correctly for a delta wing configuration and verify that when you dial in trim, the corresponding control surface does the right thing. The manual outlines this process nicely. Finally pay attention to the CG. I made my maiden flight without adding the ballast they suggested in the manual (without it, it balances at the very rear of the CG envelope and bleeds speed very rapidly in the corners) but on subsequent flights I added it and the plane handled noticeably different. That said, I prefer just to the rear of the suggested starting point but recommend you start with the manual suggestion and move your way around form there. Just remember - More stability = more forward CG.
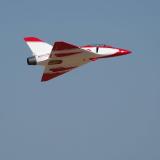
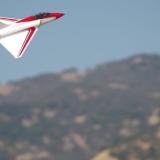
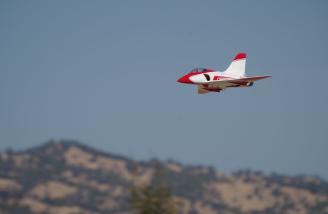
FlyingBasicsIf you have never flown a delta wing aircraft before it can be in interesting experience the first chance you get to fly one. Not to say they are difficult to fly, but they certainly have some unique characteristics about them. First, I'll mention the tendency to want to drop the nose a bit going through the corners. As you get used to flying a delta, you will learn to anticipate this and automatically feed in a bit of up elevator to compensate. The Phazer is no different so just be ready for it and it will be a non-issue. Secondly, it is of my experience that delta wing configurations are very stable, slow down very nicely for some cool high-alpha work and ultra slow landing speeds. It came as no surprise when the Phazer delivered in each of those categories but I did notice it does take a while for the Phazer to slow down to some other deltas I've flown when pulling the throttle back but I think that has to-do with the fact that overall the Phazer is a very clean airframe. I'd say the speeds are close to the advertised 90mph, but I have no radar to accurately gauge these things. By the seat of my pants (and the peanut galleries as well), the Evader looks a bit faster ..... but not that much!
Taking Off and LandingTakeoffTakeoff is one of those times that, especially during a maiden, things can get a bit tense. Here you are with your $250 fiberglass airframe that looks all pristine and you are about to sling it off the end of a bungee, it's natural you are a bit nervous. Relax, take a deep breath it'll work out just fine. I can say with great confidence that the provided bungee is one of the best methods to launch a model of this size sans landing gear I have come across yet. It works so well in fact, that I recommend it to all of my friends (those whom have very little experience, to master scratch build modellers) and I continually get feedback as to how well it works out for them. In summary: hook the plane, put some good tension on the line, arm your motor, and let 'er rip!
LandingI prefer to bring the plane in at a bit of a nose high attitude some where between a high-alpha and a regular approach. This helps bleed of speed nicely and at the same time keeps the control surface authority nice and crisp just about all the way down the runway. It's best to setup on a long final and utilize throttle setting adjustments to regulate your final touchdown point. If you do end up coming in a bit too hot don't worry, the Phazer's skids hold up nicely to most surfaces. I've had a couple landings that we're on the blazing side of hot and the skids held up to it nicely (if you are really picky about how your Phazer looks a little red touch up paint will fix you right up if the skids get scuffed).
Aerobatics/Special Flight PerformanceAt speed with high rates selected, the roll rates are very quick on the Phazer, while the stock power system on 4s is plenty to complete nice big loops (with a bit of speed behind you). The vertical is good for an EDF, and when combined with it's small size and quick speeds, let's just say you'll be glad it's painted in those bright white and red colors sooner than later. Inverted flight is very neutral and only a slight bit of stick is needed to keep the nose centered on the horizon, but that might just be an artifact of my CG being a bit towards the read end of the spectrum.
Is This For a Beginner?No, the Phazer requires previous R/C experience.
Flight Video/Photo Gallery
ConclusionIf you're looking for a nicely detailed EDF that will fit easily in just about any car that has a wide envelope of flight, the Phazer might be just what you're looking for. I've had lots of fun with the Phazer so far and continue to enjoy just how easy it is to get in the air with the provided bungee system. With the price point, quality of product, and Great Planes support network behind it, I think the folks in Champaign have another great product on their hands. Likes:
Dislikes:
ImagesView all Images in thread
|
||||||||||||||||||||||||||||||||
|
Last edited by gp125racer; Nov 15, 2012 at 08:24 PM.
|
|||||||||||||||||||||||||||||||||


|
|
|
|
|
|
|
Great review! I had seen these advertised and really didn't think much about it, but after seeing this, I think I'm going to grab one. It would look good with a "scale" paint job from say a Mirage or something like that.
I wouldn't worry about the bungee launch, it's a no brainer, very easy to do. Red |
|
Latest blog entry: Impulse - Wing build begins!
|
|
|
|
|
|
Thread OP
|
Don't let the bungee turn you off Mike! I was a bit apprehensive at first too as i didn't have much experience with them but it really does work great!
Don |
|
Latest blog entry: D100
|
|
|
|
|
|
|
I've used the same bungee launcher with my Evader and it works great. I'd much rather use the bungee than try to hand launch one of these. Here's my "secrets" to a great bungee launch --- Mix Rudder over Aileron at 50%. That way you can control the plane with the left stick from the instant you turn it loose till you can get your right hand back on the right transmitter stick. This also helps on landings when your need some rudder input. Rather than nothing happening, you get a little bank in the desired direction. For extra insurance, you can create a launch mode with 3% up elevator that you can turn off after you get a little altitude.
McD |
|
Latest blog entry: LEDs on my T-28
|
|
|
|
|
|
|
Great video editing!!
|
|
Latest blog entry: www.gunnphotoservices.com
|
|
|
|
||
|
|
Quote:
I will have to try that. I usually program a launch mode with some up elevator, but I like the idea of mixing aileron/rudder too. Thanks for the tip. |
|
|
|
||

|
|
|
|
|
I like the Kit myself...the only thing i hated was one of the extension wires quite working After i installed everything(Yes i tested it all before installing) I ended up having to put three new wires in and Resolder the connectors . I have not had a chance to maiden mine as of yet....I have a 2700 Nano 65C 4S pack i am thinking as thats all i have on 4S at hand....Although the 2200 3S Seems to have quite the thrust....
Mal |
|
|
|
|
|
|
|
|
This is a great airplane! I would suggest a 2200 mah 4s, the 2700 might feel a bit heavy but the delta should handle it.
I fly mine with full custom ducting, eflite delta v rotor cut down to fit the hyperflow housing which is modded to fit a bl15 3600kv inrunner on 1800mah 5s. and the cheater is covered With white iron on covering Its ballistic lol soon will test on 6s! Edit: Here's a link to the other phazer thread it might be usefull plus there are more pics lol https://www.rcgroups.com/forums/show....php?t=1698334 |
|
|
Last edited by imyohero; Dec 14, 2012 at 12:11 PM.
|
|
|
|
|
|
A bigger version of it would be sick.
|
|
|
|
|
|
||
|
|
Quote:
|
|
|
|
||
| Thread Tools | |


| Similar Threads | |||||
| Category | Thread | Thread Starter | Forum | Replies | Last Post |
| New Product | Great Planes Phazer EDF Sport Jet EP ARF | super kupfer | Electric Ducted Fan Jet Talk | 714 | Sep 20, 2021 12:17 AM |
| For Sale | Great Planes Power Plane and Hinge tool | gavoss | Aircraft - General - Miscellaneous (FS/W) | 4 | Jun 13, 2012 12:10 AM |
| Sold | Great Planes Power Plane electric balsa planer | nero1156 | Aircraft - General - Miscellaneous (FS/W) | 2 | May 21, 2012 06:53 PM |
| For Sale | great planes super skybolt bi plane | 5150evh | Aircraft - Fuel - Airplanes (FS/W) | 0 | Apr 22, 2012 11:20 PM |
| For Sale | RC Plane Great Planes Escapade Sport GP/EP (Plug-N-Play) $175 | Diverrcpilot | Aircraft - Electric - Airplanes (FS/W) | 0 | Mar 24, 2012 02:50 PM |