|
|
|
|
Thread OP
|
Mini-HowTo
Painting the EPP eagle
Here's how I painted my EPP eagle using spray cans and paper patterns.
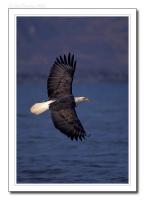
Materials: -Tracing paper or Vellum -Super 77 glue -Fusion brown (espresso) -Fusion khaki -Fusion black -Fusion yellow -scissors I used these photos as reference. |
|
|
Last edited by Maybz; Sep 18, 2007 at 11:32 PM.
|
|
|
|
|
|
|
Thread OP
|
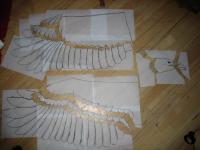
1 -I Drew a simple feather pattern on Vellum (tracing paper). You can use the same pattern for both wings. I chose to use a different pattern for the top and the bottom of the wing. Cut the pattern at key color change points. Also make a simple 'swoosh' shape that closely follows the shape of your feathers.
|
|
|
Last edited by Maybz; Sep 18, 2007 at 09:47 PM.
|
|
|
|
|
Thread OP
|
2. TOP FEATHERS - It's best to work from light to dark, starting with the lightest colors first. I used Super77 to tack the cutouts to the foam. Lightly spray the paper and let the glue dry for 10~20 seconds before applying. If you stick it too soon you will get glue residue on the foam, too late and it simply won't stick. I started by painting the long feathers first. I laid down a khaki base and then started adding shape using the swoosh template and brown paint.
|
|
|
Last edited by Maybz; Sep 23, 2007 at 07:36 PM.
|
|
|
|
|
Thread OP
|
3. TOP FEATHERS - I kept adding layers of darker colors - eventually adding black at the feather tips and along the sides. I used the same swoosh pattern throughout the entire process - although I had to make a better one from cardboard after the paper one gave out. Occasionally stop to wipe the dripping paint from the template. Lastly, I added a single khaki stripe to each feather using the slit template.
|
|
|
Last edited by Maybz; Sep 23, 2007 at 07:39 PM.
|
|
|
|
|
Thread OP
|
4. TOP FEATHERS - After finishing the big feathers I moved on to the outer LE feathers. I covered up my work with the paper pattern and a light coat of 77. Krylon Fusion sticks very well to the foam so no worry about peeling paint. I used brown and black in this area and then followed up with some khaki highlights. I also added black shadows between the major color changes.
|
|
|
Last edited by Maybz; Sep 23, 2007 at 07:40 PM.
|
|
|
|
|
Thread OP
|
5 TOP FEATHERS - I did the wing root/LE last and started by applying a brown base coat. To give the effect of lots of little feathers I moved the root paper pattern forward a few inches and then sprayed right along the edge of the paper. I then repeated this all the way forward to the LE. I then went back and did the same thing using black - but with much lighter applications. Once satisfied with the results I did my best to repeat everything on the right wing top.
|
|
|
Last edited by Maybz; Sep 23, 2007 at 07:40 PM.
|
|
|
|
|
Thread OP
|
6 BOTTOM FEATHERS - for the bottom side I decided to start at the root (remember, this whole thing is an experiment). I laid down a brown base coat using a criss-cross pattern to try and add more 'feather' effect. I then started adding small feathers using the same technique as before - shifting the paper pattern a few inches and then spraying right along the edge. I used brown first and then went back again with black. It doesn't take much paint to get the effect - light coats will usually do the trick.
|
|
|
|
|
|
|
|
Thread OP
|
7 BOTTOM FEATHERS - I moved on to the middle section next using only a light dusting of brown followed by brown accent lines. I used my slit pattern to make the accent lines.
|
|
|
Last edited by Maybz; Sep 23, 2007 at 07:44 PM.
|
|
|
|
|
Thread OP
|
8 BOTTOM FEATHERS - The big feathers came last this time. I used the same technique as the top side but with less paint and fewer colors. I started with brown edging to set the spacing, then added khaki filler lines, then went back with more brown and finally black at the tips and shadows. I used the swoosh and slit cut for everything. The bottom wings are lighter than the top both for realism and for easier orientation when flying (in theory at least). Again, I reused the paper patterns to mask finished areas.
|
|
|
Last edited by Maybz; Sep 19, 2007 at 09:13 AM.
|
|
|
|
|
Thread OP
|
9 BOTTOM FEATHERS - last step on the bottom was to go back and add black shadow lines between major feathers groups. I used the same paper patters but left a deliberate gap between them where I wanted a black line. Your swoosh should be pretty paint-soaked at this point so you might let it dry before starting on the other bottom wing half. After finishing both sides I went and sprayed all around the the LE and TE with black to cover any remaining white foam.
|
|
|
Last edited by Maybz; Sep 23, 2007 at 07:45 PM.
|
|
|
|
|
Thread OP
|
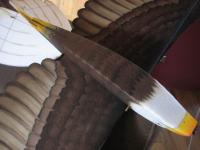
10 - BODY AND TAIL FEATHERS - I forgot to take pictures while painting these parts but by by now it should be easy to see how I did it just by looking at the finished pictures. The process is the same as the wing. I started with the yellow beak and feet using paper templates to mask the white areas. The beak tip has some orange on it and I chose to paint the motor also just to hide it better. The main body is brown with black feather accents using the same edge-painting process. The tail feathers are mostly bare foam with just a few khaki accent lines (yup, same swoosh pattern). I also added some khaki accents around the edge of the beak and between the brown and white using the same paper patterns but moved 1/4".
|
|
|
Last edited by Maybz; Sep 19, 2007 at 09:17 AM.
|
|
|
|
|
Thread OP
|
Here are a few more pics of the finished project along with more reference shots. Total time was 5~6 hours including making a second pot of coffee and quick trip to Ace to get more paint. I used no Sharpie pens or masking tape and was back in the air the same day that I started.
|
|
|
Last edited by Maybz; Sep 23, 2007 at 07:46 PM.
|
|
|
|
|
Thread OP
|
Here's some vid I shot this evening at the park...
https://www.rcgroups.com/forums/show...85#post8203666 |
|
|
Last edited by Maybz; Sep 19, 2007 at 12:18 AM.
|
«
Previous Thread
|
Next Thread
»
| Thread Tools | |
| Similar Threads | |||||
| Category | Thread | Thread Starter | Forum | Replies | Last Post |
| Question | EPP Eagle? | IPFlyer | Foamies (Kits) | 4567 | Mar 22, 2023 08:57 PM |
| Question | Painting EPP | zippogeek | Foamies (Kits) | 9 | Mar 21, 2015 11:57 AM |
| Discussion | EPP Eagle | fuzzyhead | Foamies (Scratchbuilt) | 2 | Sep 28, 2008 09:54 AM |
| Discussion | decorating and painting EPP | poker_run | Foamies (Scratchbuilt) | 5 | Aug 12, 2007 09:03 AM |
| Discussion | Painting EPP? | Tram | Foamies (Kits) | 12 | Jun 27, 2007 12:06 AM |


