|
|
|
|
Thread OP
|
Build Log
Tarot Ironman 650 hybrid build log
Well, after having excellent success with Tarot frames, on my 20+min FY690S build. I decided to see if I could build a long(er) flight time quad using the popular Tarot Ironman 650 frame...with a little "twist."
Since the 650 and 690 both use 16mm arms, and considering Tarot introduced a "new and improved" motor mounts for the 690. I opted for the 690 motor mounts in lieu of the 650 mounts. A couple reasons why. 1st, I really dislike the 650 motor mounts, not only the "clamp over arm" style. But, also because they limit the prop size. So, what am I shooting for? Well, a 32-35+min fpv craft, with a projected AUW of Here's some eCalc results.  Tarot Ironman 650 frame New style Tarot FY690S motor mounts (2 red, 2 black) Extra battery tray (rehab'd into an fpv cam mount) SunnySky V3508-29 380KV motors iPeaka iQ 40A Opto ESC's Naza-m V1 w/ gps 20" x 6 Zinger wooden props All of this will be run on 4S LiPo's. Yep...4S! Low rpms's + larger props should produce the long flight time I'm after. But a little "different" 4S than most. Due to not being able to find 4S packs in the mA and weight I would like, I decided to "make" my own 4S packs. 4x 2S Turnigy nano-tech 6600mAh 65C will be used. One 2S pack mounted under each arm, close to the frame. The front 2 packs wired in series to make 1 "4S' pack and the same on the rear arms. These 2 "4S" packs will then be wired in parallel to double the mAh's. Thus making one 4S 13200mAh 65C pack, weighing only 1100 grams and all distributed evenly across all 4 arms. The frame, motor mounts and extra battery tray was ordered from Tarot-rc.com, even though the links above go to other websites (Tarot-rc.com is murderously slow coming up on my computer). Prop size is yet to be determined, as I'll have to see what the M2M distance will be with the hybrid motor mounts. I'm thinking 20-22" range in 6 pitch, although I would like to go lower in pitch (3.8 to 5 range) to reduce possible heat issues. It is most likely that I will, also, need to use longer than stock arms, to fit 20 or 22" props. Props of this size will have to be wooden and will be purchased from Zinger propellers, since I can't find a maker of T-motor style props that large. Edit: see post 2 for M2M distance and props size. Edit #2: As of 12-28-13, Tarot-Rc.com has started making 20" and 22" T Style CF props. Once I get a little hang time with the wooden zingers, I'll order some CF's. I'm sure the time and efficiency will go up. With a projected amp draw, on 2x "4S" LiPo's of 18-ish amps. Naza will be the FC of choice, with gps...which I already have this, too. To start with, my standard Spektrum AR8000-x Rx will be used. However, a UHF Rx will ultimately be installed. 5.8ghz vTx initially, but 1.2ghz after all the flight times get figured out. I intend to keep a very meticulous build log, with lots of photos, as I did with the above FY690S build. Stay tuned..........it should yeild an interesting build. |
|
|
Last edited by RDTague; Jan 01, 2014 at 09:12 PM.
|
|
|
|
|
|
|
Thread OP
|
Everything that came in the frame kit + new FY690S motor mounts and extra battery tray.
   These motors did not work out. Too slow. SunnySky V3508-29-380KV's in route from BuddyRC.com These motors did not work out. Too slow. SunnySky V3508-29-380KV's in route from BuddyRC.com Motor mounts with 2 elongated hole to fit the Multistar bolt pattern. Also, I removed the front CF piece to prevent the wires from pinching. (I had to do this on my FY690S, too.) Motor mounts with 2 elongated hole to fit the Multistar bolt pattern. Also, I removed the front CF piece to prevent the wires from pinching. (I had to do this on my FY690S, too.)Difference in stock motor mounts vs new FY690S mount = 60mm.   Stock motor mounts = 465mm M2M (max prop of 17"). New FY690S motor mounts = 545mm (max prop size of 21") A whopping 4" difference in props size.   Now to do a little research on which props. I'll probably go with 20" because I like a little "wiggle room" on prop spacing. I would LOVE to find some T Style CF 20", however I imagine I'll have to go with wooden Zingers or Xoars. Now to do a little research on which props. I'll probably go with 20" because I like a little "wiggle room" on prop spacing. I would LOVE to find some T Style CF 20", however I imagine I'll have to go with wooden Zingers or Xoars.Frame w/ all 4 new FY690S motor mounts yields a new wheelbase of 775mm.   Typical cheap Tarot landing gear required replacing the tiny set screws to hold the "T" mount with M2.5 screws drilled all the way thru the CF tube. 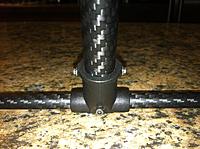  Bare frame w/ new motor mounts & dual battery trays = 616 grams. This weight is, now, not accurate, since I changed battery mounting. However, I'll leave the pic up, for those who may want to use it.  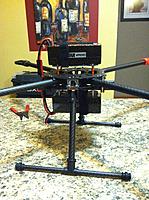  Having not found, IMO, a good way to mount the PCB, I decided to drill 4 holes in the lower plate and install 6mm standoffs. Note: the tall, aluminum standoffs shown in this pics were for the old lower battery tray.  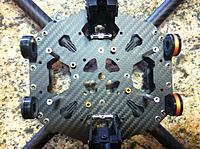 Here's the end result. The PCB is mounted on the bottom plate. 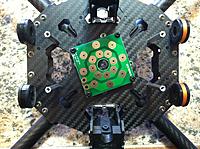 iPeaka iQ 40A Opto ESC's (flashed with SimonK FW)  ESC's mounted up.  Bare frame w/ 2x 4S 5000 40C ROAR GensAce LiPo's = 1782 grams.This weight is, now, not accurate, since I changed battery mounting. However, I'll leave the pic up, for those who may want to use it.  Plate added to top plate for the Naza FC to attach to.  Naza - m V1  Rehab'ed stock 650 motor mounts. They are now used for battery trays. One on each arm. A total of 4 - 4S (2500 or 3500mAh) LiPo's will be used in parallel (10,000 or 14,000mAh). The weight is evenly distributed this way and it frees up much needed frame space.   Here's a mock up of the new battery mounts location. The 5000mAh batteries in the photo are just for picture purposes, smaller ones will ultimately be used. 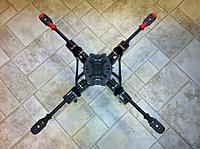 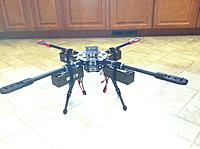 I added a small screw thru the new motor mount and arm, to ensure the mount would not twist. Swinging 20" props, there's gonna be a lot of torque in forward flight.  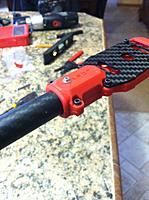 The stock battery tray, on top, now serves as the perch for the GPS. I believe the GPS is best when centered in the craft.  Seemingly, the most common question asked in my FY690S build was, "Where did you get the load rail standoffs?" Here's what they are. M2.5 x 10mm standoffs, (female to female ends). M2.5 x 10mm screw with the head cut off. Blue loctite the "stud" in both, the standoff and load rail eye mount. The standoffs were purchased from Tarot-rc.com. However, McMaster-Carr.com has a ton of standoffs, even male to female so you don't have to cut the head off a screw. I had these on hand, so that's what I used.  Well, here she is, minus the props, fpv cam and LiPo's.   It was a pain in the arse trying to figure out where to put everything. The top plate is home to: FC, gps and ESC's. The bottom plate is home for the: Rx, telemetry module, vTx and pcb. While it looks like a rats nest of wires now, as soon as the fpv cam is mounted, I'll tidy up the wiring with zip ties.  The weight below is everything minus the props and LiPo's. 1664grams. Add another 120g's for props and 1100g's for LiPo's. It should weigh in about 2900 grams. I projected 2800, so I guess I wasn't too far off.  Here's how I mounted the 420 Pilot Cam. I used the extra battery tray. Since this is a fpv rig only, I'm not too concerned with vibrations in the video...providing it is clear enough for me to fly fpv. This way, I eliminated the need for the load rails, too.   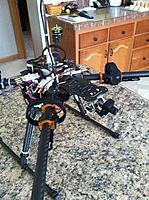 Just waiting on the props to arrive.
|
|
|
Last edited by RDTague; Jan 01, 2014 at 09:14 PM.
|
|
|
|
|
|
Looking forward to seeing your next build RDT.
|
|
|
|
|
|
|
|
|
sub,d
|
|
|
|
|
|
|
|
|
Looking good RDT!
|
|
|
|
|
|
|
|
|
Looks very nice, except batteries... Those are HUUUUGE....

|
|
|
|
|
|
||
|
Thread OP
|
Quote:
By comparison: GensAce 4S 5000mah 40C = 138 x 46 x 49 (562g) Zippy 4S 5000mAh 30C = 149 x 51 x 37(526g) |
|
|
|
||
|
|
|
|
Thread OP
|
Since I'm still waiting on my motors to get here (hint hint Singapore Post
 ), I decided to figure a way to mount the PCB on this tiny frame. ), I decided to figure a way to mount the PCB on this tiny frame.Here's what I did: Drilled 4 holes in the lower plate (using M3 x 5mm pan head screws, I can still fold the arms in, if I wanted).  4x M3 x 6mm standoffs installed. I had these in my toolbox, I think they came from Tarot-rc.com, but I can't remember, as I've had them for some time now.  The PCB is ready to wire up.  The only "problem" I have is: I'll need to add short standoffs to the load rail mounts in order to clear the pcb. This is no problem, as I had to do the same thing on my FY690S in order to clear the ESC's. |
|
|
|
|
|
|
|
|
Why is it that they jump from 18x6.1 up to 26x8.5
Bet it won't be long before they make them... but the wait is always excruciating for sure. RD, I was curious on you choice between the mounts you are using vs the ones that have the set screw that goes through the arm. I've been looking at both and would like to know you reasoning. Thanks in advance |
|
|
Last edited by DirtyThirty; Dec 04, 2013 at 11:55 PM.
|
|
|
||
|
Thread OP
|
Quote:
On my 650, however, I will drill thru the mount and arm to include the bolt/nut assembly. I need to ensure the mounts are perfectly level 1st, which is easier to do with the motors and props installed. |
|
|
|
||

