|
|
|
|
|
krokko - I used corrugated plastic sheet from the 4D modelshop on my TM's tank - it can be persuaded around the curves at front and rear with the careful use of a heatgun. It's here.
|
|
|
|
|
|
|
|
||
|
Thread OP
|
Quote:
just ordered a sheet! rgds/krokko |
|
|
|
||
|
|
||
|
Thread OP
|
Quote:
I got it today, but it's too short! did you put two pieces together, or...? rgds/krokko |
|
|
|
||
|
|
|
|
|
krokko - I can't recall exactly, but I know I used two pieces - longest one from underside of tank at forward cabane position to underside of tank at rear cabane position. I then used another piece on the underside to fill in the gap. I can try and take a photo tomorrow if that would help.
|
|
|
|
|
|
||
|
Thread OP
|
Quote:
rgds/krokko |
|
|
|
||
|
|
|
|
Thread OP
|
"small things left"
hi again,
took a couple of pictures with the wings mounted. need to measure for the flying/landing wires. intend to use what was included in the kit, flat steel rods...... need to silver solder 16 links to them. (pack my bag and go over to my friend with the equipment and the knowledge). still a lot to do; the tank, the instrument panels, the tailwheel (no skid), painting, door handles, and moore,,,,,,,,, rgds/krokko |
|
|
Last edited by krokko; Nov 30, 2012 at 07:46 AM.
|
|
|
|
|
Thread OP
|
OK
links silver soldered, flying/landing wires in place. Desperate need to design fixtures so I can remove the wingpairs without demounting all the wiring!! Still need to verify the wing angles after the wires has been fitted. rgds/krokko |
|
|
|
|
|
|
|
|
Looking good now krokko! I'd suggest that you put some sort of safety keeper on the flying wire clevises at least - you don't want one of those to pop off in flight! Taking camera to workshop this afternoon - will post a photo of my tank later today.
|
|
|
|
|
|
||
|
Thread OP
|
Quote:
I will secure the links before any flying takes place. Right now figuring out the best, and easiest way, to fix the wingpairs, maybe welcro in combination with some keepers of plywood, ?? rgds/krokko another thing; do you know the correct incidence on the wing and the stab. I measured mine today; stab 0, upper wing 0, lower wing +2 I browsed the instructions from Flair, but couldn't find any information. rgds |
|
|
|
Last edited by krokko; Nov 29, 2012 at 10:28 AM.
|
|
|
|
|
|
|
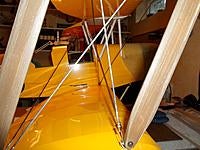
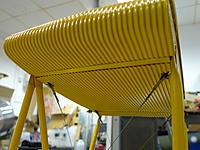
Hi krokko - my wing pairs have an 'N' shaped false strut fitted on the root end for transport which just slip over the locating dowels. BTW, it's NOT a Flair Moth. The only problem with this setup comes when it's time to remove that 'N' strut - without it, the wing pairs act like jelly! Suggest you make something similar to that provided with the big Hangar 9 Tiger Moth - there's a few threads around about it. Sorry, I don't know the wing incidences - can you not measure off the plan side view? Here's two pics of my tank - sorry, I was mistaken in thinking the top was all one piece - it's near scale, but I'm no perfectionist! I need to add a few more details over this winter, like filler and fuel gauge.
|
|
|
|
|
|
||
|
Thread OP
|
Quote:
thanks for the pictures! Flair doesn't provide any scale 1:1 plan! I think the incidence is right but if somebody comes up with something different, I'll have a look at it. About the wing jig; I have the Hangar9 big tiger and I had to design my own wing jig which work alright, but, the design is different from the Flair. I will come up with something. Right now the Tiger is setup with wires and everything, I would like to put on a jig before removing the wings. We'll see, it will be OK! Your tank solution looks ok, I'll check out how I can do it. (not being a through scale builder myself). rgds/krokko |
|
|
|
||
|
|
|
|
|
You COULD to make up some "rigging plates" for ease of disassembly...
Dear Krokko:
The PIPE Here again - I'm in the process of making up a "quickie" type of JPEG drawing, to illustrate what I'm recommending to help keep your Tiggie's wings "in rigged position" while you're disassembling it for transport... ...so, IF you can imagine having a pair of "parallelogram"-shaped plates (I think "parallelogram" is best explained for you at the Svenska page for it at Wikipedia ) that can be inserted between the fuselage and the wing roots of your Tiggie's wing panels, before you completely remove the wing panels from where they fit into the places on the center section and fuselage - and have slots near their "corners" that can fit from below into the upper wing's inner wingspar ends, and from above into the lower wing spar's similar ends, you MIGHT begin to see what I'm getting at with the "rigging plate" idea for your Tiggie. As I finished typing this, I pulled up a appropriate view of one of the Aeromodeller British-done scale drawings of the Tiger Moth, saved a section of it that shows the wing mounting area of the fuselage (without the wings in place!) and drew in a red outline to actually illustrate WHAT the "parallelogram"-like shape for such a "rigging plate" might look like. Please check on the image for a RED OUTLINE of a roughly "parallelogram" shape with vertical slots on the top and bottom edges of it, exactly where the plate would "bracket" each wingspar's exposed inner end to hold them in their proper locations to maintain the "rigging tension" for safe removal of each wing panel from the fuselage, with each "rigging plate" STAYING on the wing-root end of each wing panel "set" for safe storage of them. You might have save some good ideas to go further with this idea, like getting the "rigging plates" to fold in half horizontally for much easier insertion (OR removal) of them in place when assembling or disassembling your Tiggie for flight or "the trip home"...but I thought I'd at least TRY to describe what I've seen for similar "rigging plate" hardware some of my fellow RC Scale fliers at big US meets like the Old Rhinebeck RC Jamboree use for their great-looking scale models... ...hope the graphic helps, and gives you some ideas for making those "rigging plates" I was thinking of for your Tiggie. Yours Sincerely, The PIPE..  ..!! ..!!
|
|
|
Last edited by The PIPE; Nov 29, 2012 at 08:42 PM.
|
|
|
||
|
Thread OP
|
Quote:
the flair Tiger doesn't have any pins in the wings, they sit all in the fuselage, so, it's impossible to fit the jig on to the wing root before unscrewing the wingbolts totally. Instead I need something that sits into the wing approx 10cm to avoid the wires and keeping the wings apart, I did one jig for my H9 Tiger, roughly similar to your sketch, that was quite doable and is working well OK, I'll continue and try to figure out a solution! rgds/krokko |
|
|
|
||
«
Previous Thread
|
Next Thread
»
| Thread Tools | |
| Similar Threads | |||||
| Category | Thread | Thread Starter | Forum | Replies | Last Post |
| Help! | Flair 1/4 scale DR-1 CG | rcshirt | Glow to Electric Conversions | 1 | Nov 28, 2012 03:26 PM |
| Wanted | Pilot Tiger Moth 1/6.2 scale 57" wingspan** | Joe Pierson | Aircraft - Fuel - Airplanes (FS/W) | 2 | Apr 29, 2012 03:59 PM |
| For Sale | Flair Tiger Moth ¼ scale kit | wfortney99 | Aircraft - Fuel - Airplanes (FS/W) | 1 | Oct 09, 2006 11:24 AM |
| Flair 1/4 scale classics Tiger Moth kit(s) | MTT | Aircraft - Fuel - Airplanes (FS/W) | 0 | Feb 04, 2004 12:55 PM | |


