|
|
||||||||||||||||||||||||||||||||||||||||||||||||||||||||||||||||||||||||||||||||||||||||||
|
Thread OP
|
Hobby Lobby JPower AMX Light Attack Jet ARF ReviewIntroduction
Most of us have our perennial favorite jets; you know, the ones that we just love to see manufactured as radio controlled models. Though I am definitely in that crowd, I also love to see a new model appear that sends me Dogpiling for the answer to the question "What is it!?" Hobby Lobby gets the credit for bringing the JPower AMX Light Attack Fighter to US shores, and I can just about guarantee you have NOT seen this one modeled before. And the best part about it is that it comes out of the box with almost everything you need for a healthy blast of EDF flying.
The full size AMX is a fairly new design. It originated from the Italian Air Force and its need for both a single seat and two seat combat aircraft for surface attack missions. A joint development program between Italy and Brazil eventually began production of the AMX. Three different companies share the actual production, with final assembly taking place both in Italy and Brazil. The main role of the AMX is ground attack in visual and marginal weather conditions, and it is powered by the Rolls-Royce Spey Mark 807 non-afterburn turbofan engine.
Kit Contents
The AMX is available from Hobby Lobby in two different versions: The ARF version includes the complete power system, as well as four servos and a 3S 1300 mAH lipoly battery, and the RTF version adds a six channel receiver. Both versions even include a basic three cell lipoly battery balancing charger. The servos, two for ailerons and two for elevator, and power system are pre-installed. A brief black and white illustrated assembly manual covers the high parts of the build.
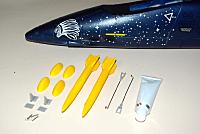
In The Box
Required for Completion
Assembly
The Hobby Lobby web site says assembly will take about an hour. I took two because I needed to stop and take photos. The assembly manual lacks detail but then not much is really required to assemble this plane. I used five minute epoxy for attaching the wings and tail surfaces and the ubiquitous canopy glue on the, uh, canopy!.
One thing I noticed as I readied the parts for assembly was that the wings were not much longer than the horizontal stabilizers! Now, that seems like a vital part of the recipe for speed!
Wing
The aileron servos come pre-glued into pockets on the wings. The servo leads get routed to the wing root in small channels cut into the foam. The push rods must be assembled. The included control horns were adequate, although the aileron control horns could be a little tighter. The space between the two "jaws" was quite a bit greater than the thickness of the control horn, making for a good bit of lateral "slop" in the connection. The ailerons come pre-hinged to the trailing edges of the wings. JPower uses tape as the hinge material. The aileron control horns come already mounted.
Protruding plugs on the wing roots mate up to the fuselage and get "plugged" into matching recesses. I found the fit a little too tight, so I very lightly sanded the plugs, which helped them seat firmly into the fuselage recesses. I noticed two small dimples on the wing root face and decided that it would probably be a good idea to add some carbon spars to increase the rigidity of the wings. I used some scrap carbon rod I had lying around and cut pieces ten inches long for the leading edges and about 6 inches long for the trailing edges. I slowly inserted them into the dimples, taking care to keep them square as I pushed them in. Once both were fully inserted, I test fitted the wings to the fuselage and created matching holes for the carbon rods on the fuselage and used five minute epoxy to permanently attach the wing halves.
Fuselage
The AMX fuselage comes out of the box ready for flight except for a few minor details. One minor imperfection I noticed and decided to correct was the magnetic retention system on the battery hatch. The small metal shims that the magnets grab were all askew. The result was an ill fitting canopy. I carefully levered them out of the foam and then reattached them so they were square and in such an orientation that the hatch fit flush with the fuselage.
I used a very thin bead of canopy glue to attach the canopy to the battery hatch/cockpit but not before sequestering a mini fighter pilot into the ejection seat. The bottom of the fuselage contains a wide but shallow channel into which all wiring is routed. The speed controller is also located in this channel. A thin piece of plastic covers this channel, with cooling holes cut into the plastic to provide some vital in flight air to the ESC. The fan and motor are accessed via a hatch on the bottom rear belly of the fuselage.
Tail
The vertical stabilizer and twin horizontal stabilizers all fit tightly into molded recesses into the rear of the fuselage. The fit is snug and the molds are good. Attaching these three pieces is as easy as mixing up a batch of epoxy and gluing them into their slots. To avoid any empennage misalignment, it is important to ensure they are all firmly seated into their respective recesses before the epoxy sets up. I fabricated mini spars for the horizontal stabilizer halves much the same as I did for the wings. I also decided to use some 3M Blenderm tape to increase the stickiness of the elevator hinge tape that was already in place.
Though the aileron control horns were already installed out of the box, the elevator horns were not. A few minutes with a pin vice saw the holes drilled. I attached them with the included fasteners. The dual elevator control rods are assembled exactly the same as the aileron rods. The AMX does not come with provision for a rudder, but it would be simple to bash one into place.
I really dig the colorful graphics on the JPower AMX, and the vertical stabilizer is perhaps the brightest one you may ever come across in a parkflyer sized EDF!
Radio Installation
I filled all twenty model memories in my Spektrum DX7 quite a while ago, but my confidence and trust in this 2.4 Ghz radio system continues to grow. I selected the Spektrum AR6100e (revision 1.6 firmware) six channel receiver for the AMX. Though not listed as a true full range receiver, I am here to tell you that I have been flying these particular units in more than a few of my EDFs, and I have yet to have have even one tiny hiccup. The 6100 fits tidily into the radio compartment, with plenty of room to spare.
The ailerons servos need extensions to reach the receiver, as do the twin elevator servos. JPower includes a reversing Y-cable for the elevator servos. The good part about that is you only need one channel for the elevator, and the cable reverses the signal to one of the servos due to it being mounted on the "other side" of the fuselage, but it can be difficult to independently adjust each elevator servo's sub trim and end points.
Completion
The final few details are the fun ones in my opinion. The AMX comes with a set of missiles and several small, bulbous foam pieces. The missiles obviously get glued to the wing tips but the other pieces had me scratching my head for a few moments. I decided that they belonged on the underside of the wings as some form of aeronautical flight enhancement devices. To protect the belly of the AMX during landings on less than soft surfaces, I applied some 3M Scotchgard brand paint protection film. The included battery fits perfectly into the battery compartment, and with it, the CG falls perfectly within the recommended range of 65-70mm. I was surprised to see a relatively 1300 series lipoly battery used in an EDF application but it really helps keep the wing loading and all-up-weight to a minimum. The payback is excellent performance out of the 64mm fan and motor.
As I was preparing to launch the AMX for the first time, a final check of my control surfaces revealed a significant disparity between the two elevators. I was a bit puzzled; I was sure I had properly neutralized both halves. I readjusted them a final time and took to the skies. On subsequent flights however, I began to notice that one of the elevator servos was not holding its center value. Every couple of flights, I have found it necessary to readjust it to neutral. A call to Hobby lobby, known for its first class customer service, resulted in a replacement servo being sent out. I love those guys!!
Flying
Taking Off and Landing
Hand launching an EDF can be a little tricky. But that is definitely NOT the case with the AMX. In fact, if you have held back from getting into hand launched EDFs because you are apprehensive about hand launch technique and sacrificing your aircraft, wait no longer: The AMX is the easiest EDF I have ever tossed! Its high wing design yields a perfect grip which makes for supremely easy launches. And the included EDF power system also deserves a special mention for making the launches easy; It performs superbly! Push the throttle forward, give it an easy overhand toss and the AMX will instantly head skyward with nary a wing rock or moment of vertical hesitation! Though I have not tried it, I have a funny feeling it just may be able to do a ROG takeoff!
The only thing easier than launching the AMX is landing it. I like to turn onto final and then chop the throttle completely. The lightly loaded wing of the AMX will keep it floating for a long time, and you can flare it to almost a standstill before it will gently plop to the ground.
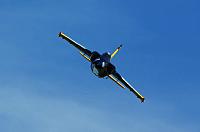
Aerobatics/Special Flight Performance
Though the AMX is an aileron only ship, it can still perform most typical jet aerobatics. I have my high rate aileron throws set up pretty aggressively, and at WOT, the roll rate is fantastic. In light winds, the AMX tracks very smoothly and is confidence inspiring. This stability enables very low level passes at full throttle. I am kicking myself for not adding a rudder during the build and plan to add one soon. Knife edge passes are sure to be a thing of beauty! I really enjoy doing a full throttle climbout until the plane is just a dot in the sky, chop the power, roll it inverted and pull it into a power-off dive. The airframe makes a very cool whistling noise as it comes across the airfield in a power off pass. During our several photo shoot outings, I was amazed to find the AMX would fly very slow figure eights without dropping a wing or stalling. I know the secret to the excellent flight envelope of this plane is the light wing loading. The 4S 1300 lipoly pack keeps the plane very light, although it comes at the cost of flight durations in the four minute range.
Power System Performance
The included power system, which includes a JPower 64mm fan, brushless outrunner, 25 amp speed controller and 11.1 volt 1300 mAH lipoly battery, is both appropriate and very capable. It provides around 275 watts of EDF power, which does quite a nice job of propelling the 19 ounce AMX airframe. Though the 1300 series battery might be considered small by some, it helps keep the AMX very light. Yes, of course you can start boring out the battery compartment to shove a larger sized pack in it but you will add weight. II wholeheartedly suggest first trying this one just as it is, right out of the box. It is well engineered and flies very well with the stock components.
In flight data was compiled using my Eagletree eLogger V3. The eLogger is a great way to really see what your power system is doing in the air, where it counts. The JPower AMX power system provides around 250-300 watts of power from the 1300 mAH 3S lipoly battery. The average current is around 12-13 amps, peaking at 28 amps. The second graph shows that I used approximately 1,000 mAH out of the lipo, and the flight duration was four and a half minutes. There is SO much data that you can compile and analyze with the Eagletree system!
Is This For a Beginner?
Certainly not! Most EDFs are fast right out of the box, and the AMX is no exception. But rephrase the question to read "Is the AMX a good beginner EDF" and I will answer YES! Easy launches, easy landings and plenty of power in between all add up to a perfect electric jet for a newbie to earn on which to earn his or her EDF wings. JPower includes just about everything you need to get started with this kit, save a radio transmitter. The included balancing charger, though basic, will do the job until you can find some greenbacks to upgrade to a more full featured unit.
Flight Video/Photo Gallery
Downloads
Hobby Lobby and JPower AMX, in HD 101.63 MB
Conclusion
I absolutely LOVE this EDF! The AMX is both surprisingly and satisfyingly fast! It will climb aggressively and then scream back across the field in a scorching high speed pass! The included stock power system performs perfectly and will keep you coming back over and over for "just one more flight"! Though the one servo kept losing center, Hobby Lobby's world class customer service was quick to make it right. Easy launching, easy landing and plenty of high speed thrills in between! In fact, I was so enamored with the JPower AMX that I quickly ordered a spare airframe in order to play around with setting up one with an even higher wattage power system in it! By the time you are reading this review, Hobby Lobby may have taken delivery of their next load of AMXs from JPower. I encourage you to scoop one up quickly. It is simply a fantastic EDF! Pluses
Minuses
ImagesView all Images in thread
|
|||||||||||||||||||||||||||||||||||||||||||||||||||||||||||||||||||||||||||||||||||||||||
|
Last edited by Angela H; Jan 27, 2009 at 01:43 PM.
|
||||||||||||||||||||||||||||||||||||||||||||||||||||||||||||||||||||||||||||||||||||||||||


|
|
|
|
|
|
Thread OP
|
I LOVE to help you spend your dollars on cool RC stuff!

|
|
Latest blog entry: H&M Performance Electric 60 size ...
|
|
|
|
|
|
|
Those yellow "bulbous" thingies...
I believe those are meant to be placed on the belly to help take some of the landing abuse...if you notice, one of your aerial shots shows a small oval indent just a little ways behind the trailing edge of the wing and down on the belly...my guess is there's 3 more of those ovals down there too!
|
|
|
|
|
|
|
|
Thread OP
|
Hmmmm...I'll have to take a closer look.
BTW, I ALWAYS forget to thank my two review "teammates", Terry and Don, for their excellent assistance in gathering media. Trust me, it takes a team of people to get good photos and video!  Tnx guys! |
|
Last edited by Bajora; Jan 27, 2009 at 07:11 PM.
Reason: changed "there" to "their"
|
|
|
|
|
|
|
GREAT review Jon!
 The little AMX is one of the easiest and smoothest EDFs to launch, land and fly. You can also obtain just the bare airframe parts like I did and add your own equipment by purchasing the individual components from Hobby Lobby; comes out to well under $100 including the fan unit. The little AMX is one of the easiest and smoothest EDFs to launch, land and fly. You can also obtain just the bare airframe parts like I did and add your own equipment by purchasing the individual components from Hobby Lobby; comes out to well under $100 including the fan unit.Just go easy on the control throws (especially the ailerons!) and it is real stable and predictable. Doubletap |
|
|
|
|
|
|
|
|
|
|
|
|
|
|
|
|
|
Awesome review JB. I had a lot of fun shooting the media for this review. The AMX is gorgeous no matter which way the nose is pointed. Can't wait to get mine in the air.
Terry |
|
|
|
|
|
|
|
Thread OP
|
Just get her done my friend!! We can get Don to shoot some media of the pair racing around the skies! That'd be COOL!
|
|
Latest blog entry: H&M Performance Electric 60 size ...
|
|
|
|
|
|
|
Very nice video, shows what the performance of the plane is as if I was actually at the field flying it.
Carguy |
|
|
|
|
|
|
|
|
When is part 2 coming out where you replaced motor/fan/esc/lipo for that OMG! feeling when it is launched forthe second time. 1400 motorfan with extra intakes and widening those ducts. This is one of the planes you encounter and you have all of these products with no idea show up where to be installed by you. After lifting off, you have this rush coming to try and stop the power from being used in s mis guided attempt! Rock on JON!
|
|
|
|
| Thread Tools | |


| Similar Threads | |||||
| Category | Thread | Thread Starter | Forum | Replies | Last Post |
| Hobby Lobby JPower A-7 Corsair II ARF RC Jet | Bajora | Foamy EDFs | 141 | Oct 05, 2021 08:09 PM | |
| Hobby Lobby's F9F Panther EDF Jet ARF Review | Michael Heer | Foamy EDFs | 802 | Oct 07, 2012 06:42 PM | |
| Build Log | AMX Light Attack Fighter Jet - Hobby Lobby | gquiring | Foamy EDFs | 161 | Mar 24, 2009 07:46 AM |
| Discussion | AMX Light Attack Fighter Jet | NJAIRSTRIKE | Foamy EDFs | 1 | Oct 29, 2008 08:56 PM |
| Cool | AMX Light Attack Fighter Jet | RCG_Jason | Vendor Talk | 8 | Oct 25, 2008 08:39 AM |