|
|
|||||||||||||||||||||||||||||||
|
Thread OP
|
Hobby Lobby's Tiny Tiger Moth ARF ReviewIntroduction
The Hobby Lobby Tiny Tiger Moth is a special Hobby Lobby version of Green R/C Models Tiger Moth. Green R/C Models has developed a number of �bolt together� ARF semi-scale planes. Most covered entirely in transparent plastic film, this is the first in the series that I�ve seen finished in a more conventional opaque film. The transparent films show-off the well-built airframes very well, but the bright Tiger Moth Yellow of the Tiny Tiger Moth lends a much better sense of scale. This is a small airplane, even by park flyer standards, with a wingspan of a mere 26.5 inches.
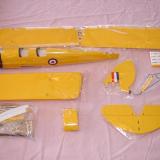
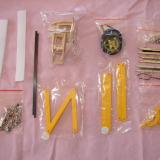
Kit ContentsOpening the Tiny Tiger Moth kit box is a real pleasure. The contents are carefully packed and free from shipping and handling damage. Most noticeable is the bright yellow plastic film covering and the black and yellow landing gear. The roundels are factory applied. The covering job held up very well in shipping needing a touch of a hot covering iron in only a few places. None of the flying surfaces were warped out of the box. All the hardware needed to complete the plane is included except the motor mounting bolts.
AssemblyThe included three page instructions are easily the low point of the package. Each of the three pages contains about twenty-two photos with some assembly notes in the margins between the photos. There are major differences between the assembly instruction and the plane that is included in the box. On a positive note, the center of gravity location is provided. I have never seen changes on this scale made by an ARF manufacturer. Most ARF designs are �locked down� once the production begins. It's great to see that improvements continued to be made to the model; I only wish the manual had kept up with those changes. The instructions would make this a hellish first ARF for the beginner, but the Tiny Tiger Moth is not a beginner�s plane. Anyone that has assembled two or three ARFs won�t have much trouble getting through it.
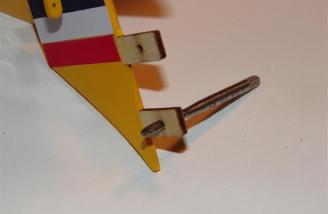
TailThe tail is a bolt on affair. I decided to use 4-40 nylon machine screws rather than the included steel fasteners.
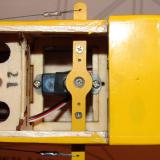
Radio Installation
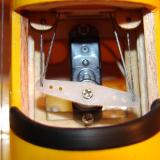
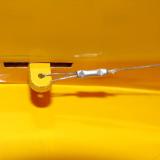
Tie a single string from the bottom of one side of the elevator thru one side of the servo arm and on to the bottom of the other side of the elevator. Do not tie it at the servo arm; just let it pass through the hole. Do not tie it off at the elevator on this side yet. Do the same with the upper elevator connections. You should now have only 2 connections that are not tied off yet. With out concern for the elevator being centered (the elevator servo should be centered however), pull the string on the down elevator connection till the springs have a fair amount of tension and tie it off. Repeat this on the up side connection; try to keep the tension about the same on both up and down. Now you should have the cables tied and tensioned but the centering will be off. It is a simple matter of moving the control surface to the centered position (without moving the servo arm). The strings should slip through the servo arm hole, when you are satisfied with the centering, put a drop of glue on each of the holes in the control arm where the string passes through. Be aware that you do have to get the tension of the two runs fairly close. The elevator servo will be off-center if you fail to do so. See the photo below.
The ailerons use a conventional strip aileron linkage.
WingsThe top wings connect to the center section with a pair of carbon fiber beams. The fit in the wings is fairly snug and it is difficult to tell what�s going on through the opaque covering. Keeping in mind that there is some dihedral in each panel helps to visualize how the beams should be inserted in each panel. After a fair amount of trial fitting and wiggling, the top wing panels are joined with the center section so snugly that I choose to pass on using any adhesive. A small strip of clear tape on the bottom of each of the joints is enough to ensure nothing wiggles free. The instructions detail a plane where the cabanes are glued to the top wing and fuselage�further confusing the issue.
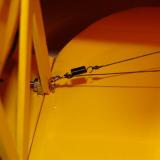
I rigged the wings as follows: The cabane struts are installed on the outboard side of the hard points on the bottom of the top wing center section. The rearward connections get eyelets for the flying wires too. The interplane struts are mounted on the inboard side of the hard point mounting locations on the top wing and on the outboard side of the mounts on the bottom wings. Each of the interplane strut joints gets a flying wire eyelet too. Hand tight is fine for now. Using the interplane struts to hold everything together, adjust the top wing position square with the bottom wing and fore and aft to align with the cabane strut location �nicks� in the fuselage covering. When it looks about right, use a couple of pieces of tape to hold the cabanes in place on the fuse and snug up the screws on the interplane struts. Double check the alignment of the top wing and adjust as needed. Then drill and screw each of the four cabane strut mounting locations through the holes in the struts. Do one at a time, checking and correcting the alignment after each one. Give all the screws a final tightening and a dab of thread locking compound.
Flying Wires
To Mount Flying Wires:
That was easy wasn�t it?
Final Assembly
Some of the pre-drilled holes in the firewall are very close, but none are perfectly aligned with the holes in the aluminum mount. I used a pair of very close holes and two 4-40 nylon fasteners. You could easily drill another pair of holes in the plywood mount to accommodate four fasteners, but it really isn't necessary. Two other plywood mounts are included too. I suspect that each is compatible with popular sizes of stick mounts used by numerous park flyer power setups. I should also note the setup ease of the Jeti Advance PLUS 4 speed control (HL now recommends the 8A instead, please use the 8A!) Just set the programming card jumpers to the desired values, plug it in, apply power, and wait for the beep�DONE! It can�t get any easier and still be programmable.
The landing gear is a work of art. It is a shame that the included wheels are not up to the same standard. The axle bores require bushing to fit properly. A beefier, more scale looking wheel would have finished off the plane nicely too.
The instructions provide the center of gravity location of 51.2 mm from the leading edge of the top wing center section. I suggest starting out 2 or 3 mm forward of that location for the initial flights. Control throws are not provided in the instructions. The TLAR method was used to setup the throws for the initial flight. The plane came in at its advertised weight of 8.5 oz.
Flying
Take-offThe wheel size of the Tiny Tiger Moth requires a hard smooth surface for the model to ROG. The ground handling is on par with any tail-dragger. If you let it get away from you or get ham-fisted on the rudder, it will ground loop quite readily. Finesse is the order of the day for a scale-like take-off. The power system can make take-off runs incredibly short and almost instantly solve any problems the pilot might have with the take-off run. The Potensky POT 30 Watt Outrunner Brushless Motor provides much more power than this tiny airplane requires. Getting impatient after two aborted scale-like take-off attempts, I threw the coals to it.
General Flight CharacteristicsThe Tiny Tiger Moth quite literally leapt into the air in about three to four feet and headed skyward. I quickly pulled the throttle back to about three-quarters and watched as the plane continued to climb. A nice cruise was obtained at just a touch above half throttle. The Tiny Tiger Moth responds well to control inputs at all speeds. None of the �guided missile� feeling that one might expect from a aircraft of this size. Being a biplane, it has the wing area to comfortably carry its 8.5 oz weight without having to maintain ballistic airspeeds to remain airborne. The Tiny Tiger Moth moves right out at full throttle. It tends to climb a bit at high speed, just like one might expect. When the nose is pointed up, that�s the direction it heads. After a few circuits around the flying field, I started slowing the plane to test the low speed limits. It will tip stall if slowed down too much. It is a relativity mild tip stall, it drops a wing tip, but doesn�t snap roll.
Downloads
The Tiny Tiger Moth in flight. 8.33 MB
AcrobaticsThe full-house controls of the Tiny Tiger Moth contribute to its acrobatic ability almost as much as the power setup. All the basics are handled as expected from a biplane. I�m particularly fond of how the plane looks exiting a roll. Non-scale like maneuvers are only a push of the throttle stick away. Multiple consecutive loops from level flight can be done for as long as the pilot can keep the plane tracking through them. The rolls get very axial for a biplane at high speed.
LandingThe Tiny Tiger Moth lands very well for a small plane. Landings are a piece of cake on asphalt or concrete surfaces. A typical baseball diamond infield of fine stone should present no problems either. As with the take-off, the pilot needs to pay attention to the plane�s ground handing after touchdown. The plane is light enough that landing in grass should be just fine provided the pilot stalls the plane just prior to touchdown and allows it to flop in.
Is This For a Beginner?The assembly and flying characteristics of the Tiny Tiger Moth would make a fine third or fourth plane for the average park pilot. The instructions are too incomplete to make successful assembly possible for a novice and the flight envelope is well beyond that of a beginner.
ConclusionLike the Hobby Lobby web page says at the top of the Tiny Tiger Moth page--�a real gem�. All of the recommended equipment performed without a single problem. Assembly is little more than installing the radio gear and bolting on the wings and tail. It is in the details where building and flying experience are needed. I would prefer a pair of meatier wheels that fit the axle. An accurate set of instructions with clearer and larger photos would be another plus, but the modeler who is capable of flying the Tiny Tiger Moth has no doubt developed his own way of doing things, making step by step instructions of somewhat dubious value. Hobby Lobby pulls-off a great looking small semi-scale plane that is a pleasure to fly with the Tiny Tiger Moth. ImagesView all Images in thread
|
||||||||||||||||||||||||||||||
|
|
|||||||||||||||||||||||||||||||


|
|
|
|
|
|
|
I have a Tiny Moth that I've been slowly putting together for
a few months now. This review will greatly accelerate the build (hopefully will be done before summer is out, what with work and all that). I want to extend my gratitude to the reviewer. However, I would like to take exception with the claims of HL and of the reviewer that the statement "this is for experienced builders" is enough to justify the fact that the included manual has nothing to do with the plane that's in the box. Being someone who has only built Guillows/Herr conversions, a GWS Pico Moth, and a Cox P47 warbird I cannot understand why the plane under review was allowed to be sold in this way. If the HL ad clearly stated that "this is for advanced builders due to the manual being for a different Tiger Moth" I would not have bought it. I decided to stick with it because I love the plane but I wish the manual had some semblance to the plane in the kit. Peter |
|
|
|
|
|
|
|
Thread OP
|
"this is for experienced
builders" I'm unable to find that quote in the review or on Hobby Lobby's web page. I made no attempt to justify the instructions. Truth is that if the modeler can't assemble the plane w/o step by step instructions, it is very unlikely that he has the flying skills to fly it. "only built Guillows/Herr conversions" ? That's no small accomplishment! ARFs will sometimes force you to do some things "their way". It is a small adjustment from actual building, but one you should be aware of. I still find myself doing it "my way". Even with planes that have very accurate and complete instructions. Please feel free to PM or e-mail if you have any questions about your Tiny TM. I traded e-mails with a couple other modelers and we all ended up with nice flying planes. |
|
|
|
|
|
|
|
|
Here's my 2 cents.
I just finished the Tiny Tiger Moth. Tim's review certainly made the build much easier. That's because, in my opinion, the instructions which come with the kit are pretty much useless. Yes, without instructions one would eventually put this together, but this is supposed to be an ARF not a cross-word puzzle. The plus about this plane, in my opinion, is the scale appearance. Unfortunately, for me, that's where the pluses end. I bought the stock Hobby Lobby set up, motor, battery, esc, and still had to add weight to the nose to get near the stated cg. The two cell configuration is underpowered. in my opinion. I'm going to try 3 cells if I can get them to fit. I completely agree with Peter's observation, the HL made ommissions when marketing this plane. HL built one to make a video; why not take that opportunity to provide revised plans instead of leaving the obsolete instructions in the box. I try it again, but with a 3-cell battery. If I can't get a little more power into the Tiny, it may just end up on the shelf as a display. I sure looks scale, but that's about it. |
|
|
|
|
|
|
|
Thread OP
|
Hi Greg,
You'll be very suprised how much power is available on 3 cells. The little plane really hauls on 3 cells. It's not hard to imagine that it would be tail-heavy with a 2-cell pack. Did you get them out under the motor mount? I found that a necessity. Instructions are some of the toughest writing to get done and get done right. I'm guessing that there isn't a lot of real payoff in rewriting the instructions. Most of the flyers that can fly the Tiny TM will very likely do things "their way" anyway. |
|
|
|
|
|
||
|
Thread OP
|
Quote:
If "indoors" is a golf dome and you have sufficent stick time with the plane that you can point it EXACTLY where you want it...sure. I wouldn't even attempt it in a gym. |
|
|
|
||
|
|
|
|
|
Thanks for writing the article
Thanks for writing the article I just finished building mine and reading this article made it possible. It looks beautiful and therefore it would be a tough maiden
 Any word on how many watts yours pulls. I went with a rimfire motor on 2S pulling ~4.5 amps on a 8x4 prop. Also what are good initial throw settings Any word on how many watts yours pulls. I went with a rimfire motor on 2S pulling ~4.5 amps on a 8x4 prop. Also what are good initial throw settings
|
|
|
|
|
|
|
|
Thread OP
|
The review setup pulled around 5 A on 3s with the rec. prop. Just noticed some of the equipment listed in the spec. box has been editied. HL made changes to the rec. power setup after I started the review. Mine uses a 3s 300 mAh lipo and 4 amp Jeti Controller.
Make sure you are at or, even better, a bit forward of the recomended CG. I've moved mine forward since the madien, but haven't test flown it with the new CG. I setup the alierons for all I could get w/o binding/stalling the servo. Rudder and elevator until they looked about right. I can plug it in tonight and get some measuements if you like. |
|
|
Last edited by Tim Wolff; Jan 19, 2007 at 02:03 PM.
|
|
|
|
|
|
Thanks for the tip on CG I will move it forward. I am pulling around 4.5A on the smallest Rimfire motor using 8x4 and 2S 20C 300 lipo (~30 watts). From the pull of the prop it seems decent enough to fly. I just need to adjust the CG, remove some binding from ailerons and wait for the weekend

|
|
|
|
|
|
||
|
|
Quote:
What battery did you use and where did you mount it? From the pictures, it looks like the maximum width of the internal fuselage is around 1 1/4" and barely over an inch at the firewall cutout which really limits battery choices. I was hoping to sqeeze in a 600-800Mah 2S to get decent flight times. Randy |
|
|
|
||
|
|
|
|
Thread OP
|
Sorry, that 900 mAh was a boo boo. I used a 3s 300 mAh Poly-Quest Twenty pack.
Mounting pic: https://www.rcgroups.com/forums/atta...mentid=1097358 |
|
|
|
|
|
|
|
|
I see! I have some old PQ 3S 600Mah packs that are close to the same width and length but thicker than the 300s that I'll probably break up into 2S packs. Unless I can find another battery that will fit.
Thanks for the info. Randy |
|
|
|
|
|
|
|
|
Can someone please post pictures of all the Flying Wire Eyelets and detailed pictures of how the flying wires are mounted. I don't think I have enough eyelets when compared to the pictures in the review. I have a total of 7 of the swivel eyelets and 2 of the little brass epoxied eyelets. The pictures in the review are a little blurry and hard to make out where each wire is ran. Im having a hard time seeing the Depth in the pictures, its a bit of an optical illusion.
Thanks. |
|
|
|
| Thread Tools | |


| Similar Threads | |||||
| Category | Thread | Thread Starter | Forum | Replies | Last Post |
| Hobby Lobby's Alfa Brand Wildcat ARF Review | pda4you | Electric Plane Talk | 23 | Jun 15, 2011 11:31 AM | |
| Hobby Lobby's Uzi X Micro ARF Review | sun.flyer | Electric Plane Talk | 4 | Aug 10, 2006 06:09 PM | |
| Hobby Lobby's Twin Aventura Flying Boat Review | Caygeon Flyer | Waterplanes | 7 | Oct 27, 2005 01:11 AM | |
| Hobby Lobby's Scorpio Lipol-One ARF Review | Tim Wolff | Electric Plane Talk | 1 | Dec 08, 2004 12:41 PM | |