|
|
|
|
Thread OP
|
Horizon Hobby's Hangar 9 Brand P-40 ARF Review
!Introduction
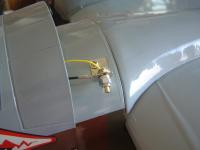
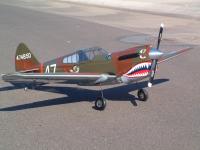
| spec2 | @917217 |> <b>Wingspan:</b> |< 65" |> <b>Wing Area:</b> |< 710 sq. in. |> <b>Weight:</b> |< 130 oz. |> <b>Length:</b> |< 52" |> <b>Wing Loading:</b> |< 26.4 oz/sq. ft. |> <b>Servos:</b> |< 5 Standard; 1 Retract |> <b>Transmitter:</b> |< JR6102 |> <b>Receiver:</b> |< JR 700 |> <b>Battery:</b> |< JR 1100 mAh 4.8 V. |> <b>Engine:</b> |< Saito 100 FS |> <b>Manufacturer:</b> |< <a href=http://www.horizonhobby.com>Horizon Hobby</a> |> <b>Available From:</b> |< <a href=http://www.horizonhobby.com/Horizon/StoreFinder/>local hobby shops</a> @917218:Mean look'n dude! Perhaps one of the most recognizable aircraft to come out of World War II was the P-51D Mustang because, among other things, the bubble canopy and under the wing scoop gave it a unique silhouette. Thanks in part to the American actor John Wayne and the movie industry, the unmistakable shark�s teeth on the P-40 also ranks as one of those most recognizable aircraft. The full-scale P-40 was quickly outdated as WWII progressed but, thanks to the American Volunteer Group (AKA �Flying Tigers�), this plane will stand as an icon of the beginning of WWII forever. Designed and developed in the 1930�s by Curtiss Aircraft and fine tuned by General Claire Chennault, the P-40 had its day in the sunshine, downing nearly 300 Japanese aircraft while suffering only a dozen losses. !Kit Contents @917219:Definitely The Favorite Plane of many, and easy to recognize. Hangar 9 has brought to life once again a warbird that will capture some of the glory of past years with their .60-sized rendition of a P-40, sporting the AVG color scheme and using Rudy Frasca�s full-scale P40E as a guide. This model comes with 90 degree rotating retracts, fiberglass cowl and belly pan as well as covered in 3 colors of UltraCote. One needs at least a 5 channel radio, one retract servo, 5 standard servos, a .61-1.00 engine and a 3.5� spinner to complete this bird along with the normal �other� things like glue, tools and an ability to read and follow the directions. <div class = "dashed"><big> This model includes 90 degr. rotating retracts & fiberglass cowl & belly pan!</big> </div> !Assembly As with most ARF�s the manual was the first item to be evaluated. The 52-page booklet is typical of Hangar 9�s quality and format. One picture per step � it can�t get much easier than that! The assembly order was somewhat different for a change. Yes, you glue the two wing panels together first, ailerons installed, followed by mounting the wing to the fuselage. Following that, the tail feathers are glued into position and the rudder and elevator permanently glued into position. The retract servo was then installed, followed by engine/tank installation. Radio was then installed and finally the aileron servos installed! Different huh? @917220:Nice and neat installation of aileron servos. !Wing The part fit for the wing halves was next to perfect and 30-Minute Z-Poxy was used to secure the plywood wing joiner. The clear plastic bags used to protect and ship the wing halves was used to protect the wing from any glue �fingerprints� and worked very well. By taping the bag about �� from the root rib, the majority of the mess while working with epoxy was confined to a narrow strip and easily removed with rubbing alcohol. One of the wing bolts cross-threaded into the blind nut in the fuselage. Of course the blind nut was installed by yours truly and given an extra coat of epoxy BEFORE this happened. To make a long, painful, and embarrassing situation short, the bolt was cut and the blind nut (which had come loose) discarded. A new blind nut was installed and the when all was said and done, the two wing tips were within 1/16� of each other as measured from the tail of the fuselage. @917221:A lot of trouble could have been eliminated if I had installed the blind nut properly. @917222:Fuel proofing a firewall is a wise procedure if you plan on flying any plane for a long time! I wanted to seal the covering that wraps around the firewall by only 1/16th of an inch! The interior of the firewall looked very solid and the glue joints secure, so the interior edges were not �painted� with epoxy � which normally is standard procedure with most of us! The next recommended step was to glue the tail feathers into position. Here is where experience sometimes overcomes the recommendations as found in the manual. While mounting the engine, the fuselage is frequently positioned on the floor, tail down, so the engine installation can proceed. Therefore I chose to mount the engine before the tail feathers were glued (again with 30-Minute Z-Poxy). !Tail Feathers When gluing the horizontal and vertical stabilizers, some of the covering must be removed so there is a wood-to-wood glue joint. The �recommended� method of doing this entails cutting the covering with a sharp knife or razor blade but NOT cutting into the wood. If the wood is creased, the wood may fail along that cut line. It has been my procedure in the past to use a soldering iron to melt the covering � and that has worked well so far. But Hobbico comes along and offers a new �tool� that I tried for the first time and really was impressed. The tool being discussed is their (P/N) is LXSD16 -- the Hobbico Hot Knife w/Solder Tip 25 Watt. All that was necessary was to use the supplied # 11 blade, plug in the soldering iron and let the blade glide over the covering � with almost no pressure � and the covering was cut, but not the wood! The alignment of both the stabilizers was excellent, and not requiring any additional adjustments. The two elevator halves were joined to the stabilizer with a �U�-shaped metal horn. Again 30-Minute Z-Poxy was used One pushrod was used to move the elevators. @917223:Both elevator halves are powered by one servo. @917224:Covering up the servo holes was accomplished with some clear UltraCote and Testor's paint. @917225: Very unscale-like location, but it does steer you around when on the ground - and don't forget to use UP elevator when taxiing. @917226:The rudder also holds the tail wheel assembly and is secured somewhat with a bracket mounted to the bottom of the fuselage. Lot of stress is placed on the rudder, so land 'softly':) !Retract Installation The retractable landing gear was already installed along with the wire struts. A servo-mounting tray had to be epoxied into place before installing the low profile retract servo. Our local hobby shop was out of the JR703 retract servo, so a Hitec HS-75BB was purchased and installed. By following the dimensions recommended in the instruction booklet, both retracts cycled perfectly, locking both in the up and down position. That was a first! @917227: The good news is I got this reading when the retracts were either up or down! Two pages in the manual address the issue most mechanical retracts have � getting �sloppy� after a month or so of flying. Some good advice was presented and how this condition can be eliminated with some timely maintenance. It was wisely recommended those two pages be kept for future reference. After the retract units were installed and adjusted, some scale-like plastic housings were installed. These were held in place with screws because they would have to be removed to access the retract unit(s) and make any adjustments and/or maintenance. @917228:Nice fit! @917229:These thin plastic housings are temporally mounted to give the plane a finished look. !Engine Installation For this project, a trustworthy Saito 100 was removed from an excellent flying Hangar9 Funtana 90 (sniff, sniff). The engine was mounted inverted and after eliminating the thought of cutting into that BEAUTIFULLY painted fiberglass cowl, two items were obtained that preserved those fierce-looking teeth. Saito offers a Right-Angle Exhaust Adapter (P/N SAI65140) and a Flexible Exhaust Pipe (P/N SAI182TD1112). With these installed, the entire muffler system is hidden from view � thanks in part to the large portion of the P-40�s cowl that extends below the firewall. I�ve also heard of just using the right-angle adapter and the stock muffler with the same results. @917230:Here are the two items used to eliminate cutting into the cowl. @917231:Pretty well hidden, wouldn't you agree? @917232:Used the stock motor mount and "special" exhaust arrangement to eliminate cutting into the cowl. @917233:Like the exhaust was designed for this bird. @917234:The supplied fuel tank was �ready to go� and didn�t require any additional work to become functional!Nice touch to say the least. A third fuel line was added so fueling could be easily accomplished. @tank_installation.jpg:Nice fit, throttle cable and battery underneath. @917235:To assist in starting the Saito 100, a <a href="http://www.sullivanproducts.com">Sullivan</a> Head Lock Remote (P/N M021) was installed and secured on the fuselage just behind the cowl. This eliminated cutting a hole in the cowl for a glow starter. @917236:All of the exhaust should be kept near the underside of this plane. @917237:One good-looking Warbird! @917238:To finish off the front end, a <a href="http://www.tru-turn.com">Tru-Turn</a> 3.5� Spinner (P/N TT-3512-B-120) with a FAI 120 slot for the prop was installed. This shape is a bit more in scale appearance than a normal 3.5� off the shelf spinner. !Cowl Installation Probably the biggest disappointment in this kit was the fit of the cowl and the spinner. As most of you know, our models are built with a degree of right thrust in them. That means the firewall is angled to the right. This is done for aerodynamic reasons and makes our models fly somewhat better, especially on take-offs or when full throttle is quickly applied. Well all that is good, but there wasn�t any compensation for this angle when the cowl was made! @917239:Very professionally painted. @917240:Thick fiberglass cowl should withstand the rigors of flight! @917241:Only hole needed was the high-speed needle valve extension. @917242:This is the business end of this bird. Therefore one side of the Tru-Turn spinner�s backplate is 1/16� of an inch from the cowl, but the other side is more like 3/16�! No amount of adjusting the cowl could correct this situation. Oh well, if this is the most serious problem of the plane, we may grumble, but not really complain. @917243:Pretty close on one side... @917244:But not on the other...no right-thrust built into the cowl or cowl mounting. !Radio Installation The total number of servos required for this plane is 6, all of which can be standard sized except the retract servo. Two servos (JR 537�s) were used in the wing for aileron control and each required a 12� extension. After hearing stories of the P-40 coming out tail heavy when using a Saito 100, the elevator and rudder servos were moved forward in the fuselage. Both of those servos were also JR537�s. Needless to say, two long pushrods had to be fabricated, as the kit assumed their short 2-56 wire pushrods would handle that chore. <div class = "dashed"><big> <center>After hearing stories of the P-40 coming out tail heavy when using the Saito 100, I moved the tail servos forward in the fuselage. By relocating them, no additional weight was required to balance!</center> </big></div> @917245:By relocating the elevator and rudder servos, no additional weight was needed to balance this plane! @917246:One pushrod was a Sullivan Ny-Rod and required some support to eliminate any bending when under flight loads. The spacious cavity above the wing permitted the receiver (JR700) to be secured ahead of the two servos and the 4.8 volt 1100 mAh receiver battery could be located under the supplied tank. With these components placed forward, no additional weight was needed to balance the P-40 at 3� from the leading edge (as measured against the fuselage). A Great Planes CG Machine was used to balance this bird, with the plane inverted, landing gear retracted, and the fuel tank empty. @917247:Nice room for some servos and receiver. Battery is under the tank. @917248:She balanced right at the recommended spot without adding any additional weight!! !Canopy The canopy arrived pre-painted and only needed to be cut to shape. The fit was excellent and some spare screws were used to hold it in place. When a canopy is glued into place, something goes wrong INSIDE that area, so over the years many of us have learned to secure a canopy with screws, not glue. Of course with screws, nothing ever happens that requires the removal � so the problem (if there is one) is solved. !Flying Weight There isn�t a whole lot a modeler can do to reduce the weight of an ARF and the P-40 is no exception, other than moving the radio gear around so that additional �dead lead� can be avoided while arriving at the required CG. Thanks to others who have assembled this plane and shared their experiences, our flying weight came out at a healthy 8 lbs 1 oz. And you may wonder how I obtained this information before assembling this plane? On <a href="https://www.rcgroups.com">RCGroups</a>, of course! The internet can be a wonderful source of information, but only if modelers take the time and share their experiences with each other. !Final Observations -- Dulling the Finish Before the first flight, the P-40 was given its moment to shine when pre-flight photos were taken. And shine it did! The 3-color cameo color scheme was very shiny � a bit too shiny for a warbird in my opinion. A couple of options existed� one is to take some flat Polyurethane and lightly spray the entire plane (but that will add weight, so be careful). The other is to take some 000 grade steel wool and lightly scuff the brown and green UltraCote. Be careful not to cut into the covering thereby permitting fuel to seep into the wood. The good news is that the majority of the exhaust should exit underneath the plane, so the top of the wing and fuselage can be given a �dull� coat! !Flying The initial flight tests were done on a calm warm Arizona afternoon. Wind was 5 MPH but blowing straight down the runway. The pit area was full of Scale aircraft because the next day the 1/8 Air Force was holding its annual contest. In spite of the many excellent aircraft present, a half dozen contestants found their way over to 'evaluate' the P-40. All of them had nothing but good words to describe this plane (too bad it was an ARF, or my chest would have swollen further!) A couple of them mentioned they either had one, or are still flying one of these planes. Cool, world class builders and pilots also flew this one - THAT SAYS A LOT for this airplane. !!Basics A MasterAirscrew 14-6 was the prop used, along with 10% Powermaster fuel. The Saito took the nudging of an electric starter to begin making noise - maybe that 3 month hiatus took it's toll. Once running, the needle valve didn't have to be touched so I guess not much changed since the last time it was used. !!Taking Off and Landing The first attempt at flying resulted in an embarrassing moment for yours truly. After making a relatively long (by slowly accelerating) take-off run, my left hand flipped the elevator switch from high rates to low rates as the tail was coming up and the P-40 was running on its main gear. The problem was......the retract switch was activated instead:(. Yes, they really do retract, even when the plane is using them to take off. The result was a long slide on its belly. I knew I should have test flown this plane on a grass runway:). No real damage other than a broken prop and a skinned up cowl, and a bit of damage to my pride. Replacing the prop with an APC 15-8 consumed a whole 5 minutes and it was back on the flight line. This time the Saito started by a mere flip of a chicken stick. The setting sun was directly in line with the runway and although the wind was calm, I decided to go with the flow and take off in that direction. Again, full up elevator was used as the throttle was slowly advanced. The plane wanted to favor a left of center course, but some gentle right rudder kept it straight. It only took a few seconds and the tail was up and she was running on the mains - and this time I kept my fingers off the switches and neutralized the elevator. A gentle rate of climb commenced and the throttle was reduced to less than a quarter. I don't think I had even reached 1/2 throttle when she broke ground. No amount of 'up' elevator was used, the plane just began to fly on its own! @917249:Good color contrast helps keep the P-40's orientation well defined. !!Aerobatics/Special Flight Performance Leaving a nice vapor trail behind and flying at or about 1/4 throttle, the P-40 was flying very scale-like. Remember the 'peanut gallery' watching were ALL scale pilots! The plane needed some left and up trim to fly level hands off. I asked a fellow modeler standing by me to fly the plane while I took some pictures - which he did and I did. After a couple of fly-bys I resumed flying and tried the various maneuvers a P-40 would do in combat. Wing-overs, loops, rolls and split 'ess' revealed this plane was rock steady. Then some stalls, Cuban 8's and inverted flight was successfully completed. I was surprised at the roll rate -a bit slow - but according to the 'peanut gallery', they were very scale-like. It was then I noticed the ailerons were at low rates:). The higher rates gave a very comfortable roll rate. Stalls turned into a steep spiral, but with the CG as far forward as it was, that was to be expected. I noticed the engine getting a bit louder and figured the muffler pipe had come loose and sure enough, it had. So it was about time to land and check out what else was coming loose. !!Landing Two approaches were attempted, the first was a forced abort when another aircraft landed on the runway and stayed there. The P-40 was about 5' over the threshold when I heard someone say, "My plane is on the center line about 1/2 way down the runway". Gently throttling up, the gears were retracted as I turned away from the runway and gently gained altitude - hey, that looked cool!!!! It must have as a couple of pilots commented on that unplanned maneuver. The next approach was a bit more normal and when it came time to set her down - she didn't. Now I was warned about this plane being a floater - but this was ridiculous - I kept clicking the down trim on the throttle, but it didn't matter - she kept right on floating. Finally getting the wheels in contact with the pavement - tail still high - the end of the runway caught up with the plane. It (the pavement) drops off maybe 3-4" to the overrun area and yes, my plane starting flying again. A gentle right turn returned the wheels to the ground and finally stopped. What a ride! There was some maintenance, so flying was postponed until the next day when the muffler could be secured and a check of all the nuts and bolts where given a good look over. One screw holding the cowl was lost as was one holding the windscreen. The landing gear was solid and exhaust was only found along the (center) bottom of the wing and fuselage. Hardly enough to see, but still needed some Simple Green and a terry cloth. @917250:Nice and stable @917251:Any Zeros around? Back in the shop, the cowl was removed only to reveal the muffler had been broken and had not come loose as was originally thought! About one inch from the 90-degree manifold the pipe broke cleanly. The only reason the remaining muffler was still with the plane was because the pressure line held it inside the cowl until it was discovered. The reason for the failure had to be related to the fact that the pipe was not securely fastened to the fuselage - gee, I wish they had told me that:(. It was an easy fix by merely turning the pipe around and refastening it to the manifold, but this time some wire was wrapped around the pipe and secured to the fuselage with a screw. The lost screw was the product of vibration and the fact that it was only screwed into 3/32" balsa. Upon examining the interior of that area of the fuselage, the one screw that fell out missed the interior pieces of plywood by 1/4"! The next flights were as much fun as the first one. Takeoffs can occur in less than 25 feet if you have a good headwind. The Saito 100 is more than enough power for this plane and you can do loops as large as you want, strafing runs right down on the deck or do some VERY scale-like touch and goes. I've got the landing technique down by crossing the runway threshold at 5-6 feet with the throttle set at full idle. Then as the plane passes by, two clicks of throttle trim slows the Saito enough to let the plane continue with a gentle rate of sink. Then just before touchdown, one more click down on the throttle and the P-40 will settle on its mains. I still do not like to flair and make a 3-point landing as too frequently the speed was a bit too fast and the model wanted to climb! In a good headwind, the ground speed can be almost zero and with only working the throttle, a vertical-type landing can be accomplished with almost no roll-out. Wind, by the way, doesn't seem to effect this plane at all - in fact it is just as solid in its response to my commands as it does on wind-free days. !!Flight Gallery +917255:A brief, first look at what the P-40 loves best -- realistic slow fly-bys. +917256:A great look at the P40's smooth ground handling, and low passes. +917257:Landing!! a beautiful on the mains touchdown, and ground handling. @917252: Surprise, a friend of mine was at the field one day! @917253: ST 75 and three bladed prop seemed like a good combination! @917254:Any Zeros' around? She's ready! !Conclusion The Hangar 9 P-40 is one beautiful piece of workmanship - the covering is colorful and realistic (just too shiny IMHO). Assembly is straightforward without any surprises. The retracts seem to be holding up after a dozen or so flights (but still has some side-to-side sway) and its flight characteristics can be described as smooth and solid. Would this be a good choice for your first Warbird? Or your first plane with retracts? In my opinion, if you can handle a plane like a 'Stik' this plane should be given a lot of consideration. I would recommend it highly! ImagesView all Images in thread
FilesView all Files in thread |
|
|
|


")


 Sullivan

 Tru-Turn


|
|
|
|
|
|
|
Hi ya tailskid-Wine Country Flyer here-I've read and printed your review on the H-9 P 40E that you did a year ago. Sounded so good that I bought one myself. Also bought the two exhaust parts you used. It does look like they were made for this plane. I also hate to add extra weight if I don't have to, so I'm planning on putting the tail servos where you did. One question--How did you figure out where to exit the push rods back at the tail feathers. Or better yet, a picture of each side where they exit to the tail feathers would be wonderfull.
Thank You Very Much-John Reade the Wine Country Flyer |
|
|
|
|
|
|
|
Thread OP
|
Both pushrods exited just to rear portion of the servo's location. See the pics for a better description.
By the way, I still get to fly her! Best Warbird so far from H9 |
|
|
|


|
|
|
|
|
I'm thinking of purchasing this arf as my next model. I mostly have 40 size planes and the best and biggest motors I have are a magnum 46xls and an asp .64 4-stroke. Would either of these power plants be ok for this airframe? After purchasing the model I won't have enough funds to purchase a new motor.
|
|
|
|
|
|
|
|
|
Unless you have a line on a squirreled away kit some where good luck finding one. This .60 size kit has been discontinued for sometime now.
But to answer your question... No. Neither of your engines mentioned would work well. They might get it in the air but short of maybe flying around in a circle then landing is about all the performance you'll get. Any thing other than a mild wind straight down the runway and you better stay on the ground. Hanger 9 had a smaller 50 size P-40 that would be much better suited to your engines. But alas, it was recently discontinued as well. I'm sure you could find one if you ask in the for sale section but beware of scalpers and resellers who could care less about the hobby and just want to milk the uninformed. Retailers blew out the remaining stock for $99.00. Some places had shipping charges as well. I saw a guy the other day asking $250+. Of course, what your willing to pay for one is up to you so good luck. Mike |
|
|
|

|
|
||
|
|
Quote:
Right from the Hobby People website it says 61 two stroke - 91 four stroke and from the ones Ive seen, that is the minimum you should try to use. Mike |
|
|
|
||
|
|
|
|
|
The VQ P40 is a brick , you will need a 60 min on two stroke and 90 4 stroke . I have two of these and (yes call me stupid) but at the time the Top Flight was not available in arf form .
The wood on the VQ , the fit , the covering ect is all sub par , its a decal type thick sticky covering that is a pain to repair . If your new to 60 and above size warbirds you may want to try your hand at a lighter wing loading P40 from FMS . Its about 55" , made of epo and an incredible easy to fly P40 . Or if your experienced the Top Flight arf is best in class with the best washout for this model in its class . There is a couple of Hanger 9 that show up on ebay and rc sales forums , you have constantly google them . Its a great flying sport scale model , farthest thing from real rc warbird P40 flight in that the wing loading is that of a sport plane similar to the popular H9 Corsair . Both did more good for new rc warbird pilots then years of old fogeys like me warning new-bees about warbirds . The reason was and is wing loading , they were very light , hence the popularity of many of the epo new electric warbirds . If you visit my blog I am flying a 79" epo P40 that weights 13 lbs lol |
|
|
|
«
Previous Thread
|
Next Thread
»
| Thread Tools | |


| Similar Threads | |||||
| Category | Thread | Thread Starter | Forum | Replies | Last Post |
| Horizon Hobby's Hangar 9 Brand Ultimate Trainer P-51 Mustang PTS ARF Review | raythomas | Beginner Training Area (Fuel) | 16 | Nov 09, 2021 02:32 PM | |
| Horizon Hobby's Hangar 9 Brand Harmon Rocket RV-6 .46 ARF w/ EVO 46 Review | dawnron1 | Sport Planes | 37 | May 12, 2018 08:22 PM | |
| Horizon Hobby's Hangar 9 Brand P-47 .60 sized ARF Review | tailskid2 | Scale Fuel Planes | 25 | Jun 11, 2013 03:24 PM | |
| Horizon Hobby's E-Flite Brand Cessna 182 ARF Review | RichN | Electric Plane Talk | 32 | Jul 14, 2008 09:13 PM | |
| Horizon Hobby's Hangar 9 Brand Twist . 40 & Evolution 46 ARF Review | Mendnwngs | Fuel Plane Talk | 13 | May 11, 2006 07:39 AM | |