| Thread Tools |
| This thread is privately moderated by Oxotnik, who may elect to delete unwanted replies. |
|
|
|
|
Thread OP
|
Build Log
Seagull 64" Bf-109E-3 Build-a-Blog
I recently had gotten a Hangar 9 Bf-109F-2, and unfortunately, it did not survive the first flight day. Maiden and three subsequent flights were fine (with typical trimming and such). Unfortunately, on the fifth flight, I was shooting touch-n-go's, and had a mishap which put the 109 into the trees. Ultimately the H9 109's nose and wings were turned into pulp. A total loss. I'm still angry at myself for not handling the emergency better. Wudda, Cudda, Shudda...
Anyway, I'm a huge Luftwaffe warbird fan. I just had to have a replacement 109. Since the H9 Friedrich is OOP, I couldn't simply get another. So, I looked around and decided that I'd get the Seagull Bf-109E. Unfortunately, the Seagull Emil is hideously ugly. The green polka dots make me wanna puke every time I look at it. I'd contacted another owner of the Seagull 109, and he vouched that it was a nicely constructed ARF and flies well, helping me decide that it'd be worth my money, time, and effort to get the Seagull 109 and to repaint it into a livery that I'd be proud to have and to fly. 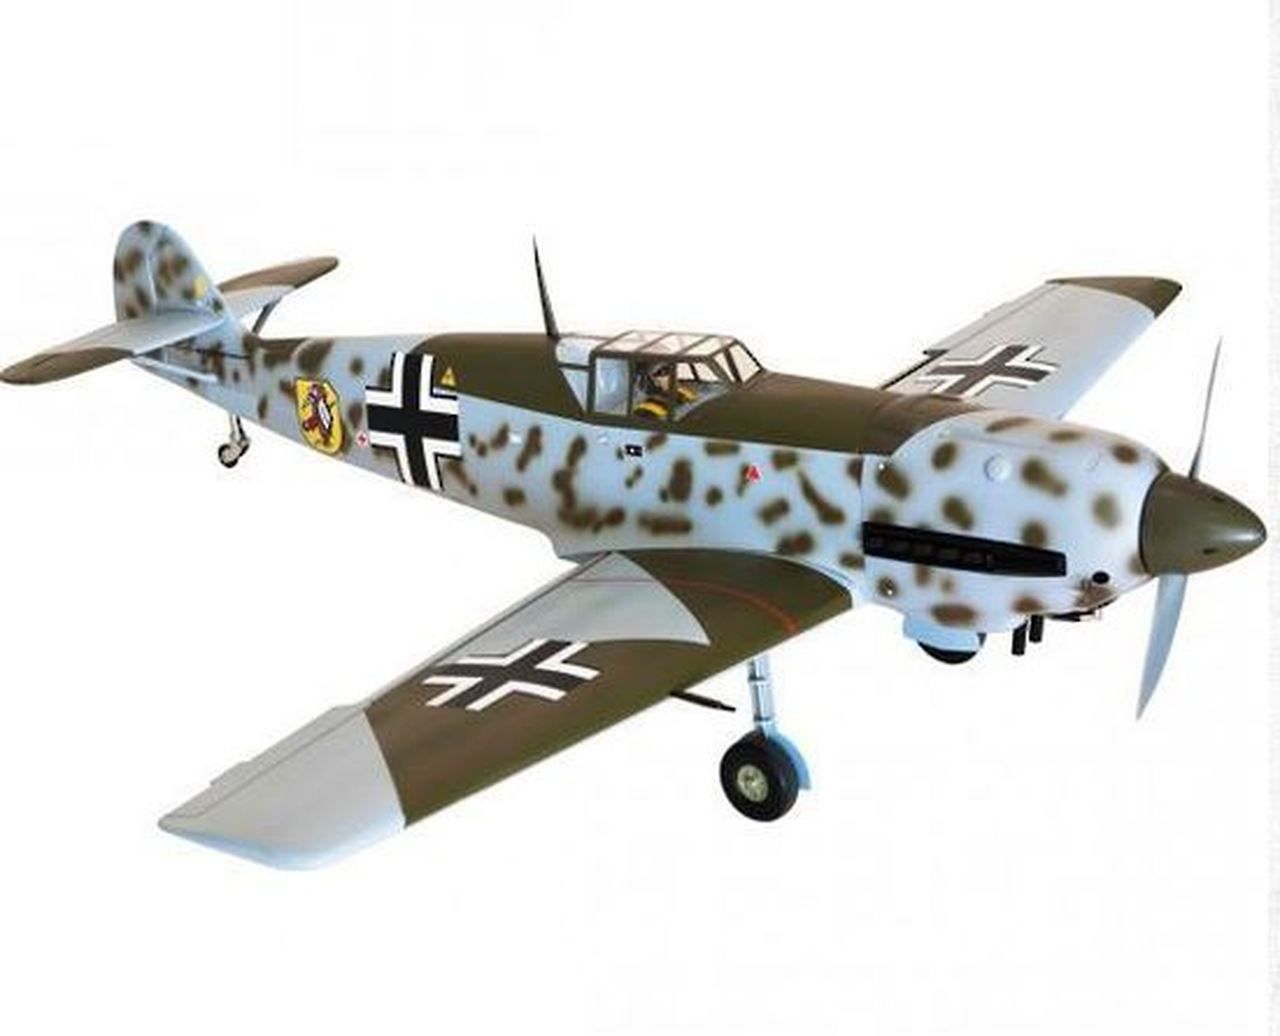 I am going to do a total repaint of the 109, turning it into Werner Moelder's JG53 Chevron and Triangle. The color palette will be RLM65 bottom, RLM 70 and 71 wing and h stab upper surfaces, RLM 02 sides with RLM 71 mottling. The spine will be RLM 70. The paints will be color-matched latex paints. I painted some RLM 02/65/70/71 squares, using Model Master 1/2-oz acrylics and had Home Depot make up some 8-oz sample batches, in matte finish. I was happy with the color matching.  Another huge problem with the Seagul Model is the two-blade spinnner. A friend of mine is designing and printing a 3-blade E-3 spinner for me. The planned power train for this E-3 will be the same that I flew in my H9 Friedrich (God rest her soul): Eflite Power 90-325kv MAS 16x10x3 prop 8S-5AH Battery (two 4S-5AH batteries in series) Avian 80A (8S compatible) ESC The onboard control system: FrSky X8R receiver (either two X8Rs or one X8R with a 4-channel SBUS expansion) 2S-3AH receiver battery 2S-compatible servos. As I go along, I'll update this blog as comments. |
|
Last edited by Oxotnik; Jan 07, 2021 at 09:27 AM.
|
|
|
|
|
|
|
|
Thread OP
|
A week or so ago, I airbrushed the wing and H Stab tops. The results were good, but it was a lot work getting the color consistency right. Plus, I had to stop airbrushing numerous times to unclog the nozzle.
I laid down the schwarz grun RLM 70. I was originally planning to leave the stock sort-of-RLM71, but I’ve decided now that I will overpaint the stock dark green with RLM 71. |
|
Last edited by Oxotnik; Dec 08, 2020 at 09:11 PM.
|
|

|
|
|
|
Thread OP
|
To make painting large surfaces easier, I bought an electric spray painter. Today, I used it for the first time lay down RLM 02 on the fuselage and V Stab and rudder and cowl. I got the paint a touch too thin, but it seems to have laid down nicely. I�ll know for sure after it�s dried.
Forgive the mess in my workshop garage. It�s in desperate need of a good spring cleaning. |
|
Latest blog entry: Seagull 64" Bf-109E-3 Build-a-Blog
|
|


|
|
|
|
Thread OP
|
I've laid on the RLM 71 to the wing tops, horizontal stab and ailerons, flaps, and elevator tops.
  I'd wet-sanded the schwarz grun because it'd laid on really course. In the process, I'd gotten a bit too heavy handed with the wet-sanding. I'm kinda liking hte faded look, but I'll probably repaint. |
|
Latest blog entry: Seagull 64" Bf-109E-3 Build-a-Blog
|
|
|
|
|
|
Thread OP
|
I repainted the wings. I like them much better.
 The color matched RLM 02 and 65 are spot-on for the fuselage and belly respectively. 
|
|
Latest blog entry: Seagull 64" Bf-109E-3 Build-a-Blog
|
|
|
|
|
|
Thread OP
|
The prototype E-3 spinner came off the printer this past weekend and I just completed the fit check. Perfect! The spinner and backplate were upscaled from the Durafly 1.1m 109E-4, based on the diameter increase of the backplate. With the fit check having been successful, the flight version will begin printing soon. Will print it in PLA. I don't see the need to go to a high-heat-resistant plastic. This spinner has been designed for an MAS 16x10x3 prop and an EFlite Power 90-325kv motor, which has a 10mm prop adapter and a 5mm center hole into which the spinner screw will be screwed.
  
|
|
Latest blog entry: Seagull 64" Bf-109E-3 Build-a-Blog
|
|
|
|
|
|
Thread OP
|
I painted the spine today. Before I show the photos, I'm going to show a couple CGI representations that I rediscovered in my archive of Moelders JG-53 photos. These look to be the closest representation of the primary source B&W photo of Moelders' E-3 that I've seen. So, I'll be using them for the painting of the fuselage.
This is B&W primary source photo that I'm using for this project. These are the two CGI representations that I'll be using . The two graphics seem to be reallyh insync with each other. The one difference that I saw was that one did the canopy frame in RLM70 and the other in 71. I'll be doing the frame in RLM 70. This is how the fuselage looks today.   The canopy is loosely sitting in place. I will darken the inside of the cockpit. I'm hoping to be able to put a pilot and a seat back in cockpit, but haven't thought much about that yet. Only the battery hatch top has been painted with RLM70. I will paint the rest of the nose and the cowl top after I've installed the engine and have positioned the cowl in the flight position. I will also do the mottling (fuselage and H Stab, after the 109 has been assembled. I'm not 100% happy with RLM 70 patch in front of the canopy. I will likely modify it some, when I break out the RLM 70 again, to finish painting the nose and cowl. I'm rather pleased with the spine. It's certainly not a perfect match to the B&W photo, but it's close enough, and I like it. :-) |
|
Last edited by Oxotnik; Dec 12, 2020 at 05:46 PM.
|
|
|
|
|
|
Thread OP
|
I had a break-through learning experience this afternoon. After having struggled to airbrush the latex color-matched paints, I acted on some advice today, and added Floetrol into the Windex-thinned latex paint, in a 1:3 ratio, Floetrol:thinned paint. I ran this flow-stabilized mixture through my Iwata gravity-fed gun and through my cheap Central Pneumatics gun. Both brushes worked fabulously, neither clogging or significantly reducing paint flow. I was able to paint fine details, and paint large areas. I turned a major corner today and made a significant jump up the learning curve, in my ability/skill to use an airbrush.
 
|
|
Latest blog entry: Seagull 64" Bf-109E-3 Build-a-Blog
|
|
|
|
|
|
Thread OP
|
Outfitted both wings today.
 The retracts are the EFlite 81-deg Bf-109F retracts, with the oleo struts. Aileron servos: HiTec D645MW Flap Servos: HiTec D485MW |
|
Latest blog entry: Seagull 64" Bf-109E-3 Build-a-Blog
|
|
|
|
|
|
Thread OP
|
As of today, I'm about 95% complete with painting on this project.
 Next steps: glue on the exhaust manifolds and the port-side air scoop. Then, airbrush the exhaust streaks. I'm really proud of the 3D-printed spinner. A friend in my RC Club designed and printed the spinner and backplate, using the Durafly 1.1m Bf-109E-4 spinner as the guide, using the increase in diameter as the scaling factor. It is printed in PLA. Two rounds of primer and wet sanding, resulted in a baby-bottom-smooth spinner.  This is the spinner after priming and sanding, before topcoating. 
|
|
Latest blog entry: Seagull 64" Bf-109E-3 Build-a-Blog
|
|
|
|
|
|
Thread OP
|
Finished at Last!!
So, I have finished with 109. She turned out pretty well. There are still a few scale misses, the worst being the position of the gear. The tail is not quite right either (the rudder is shaped incorrectly and the tail insignia is a bit too small). The cockpit/canopy is too long as well. I may correct the tail insignia in the future, but I doubt it. I feel that in my engineering judgement, I've gotten to a place where good enough is good enough. Here are some final photos (including a couple primary source photos, for reference).
Black-n-white, for comparison to the primary source photo 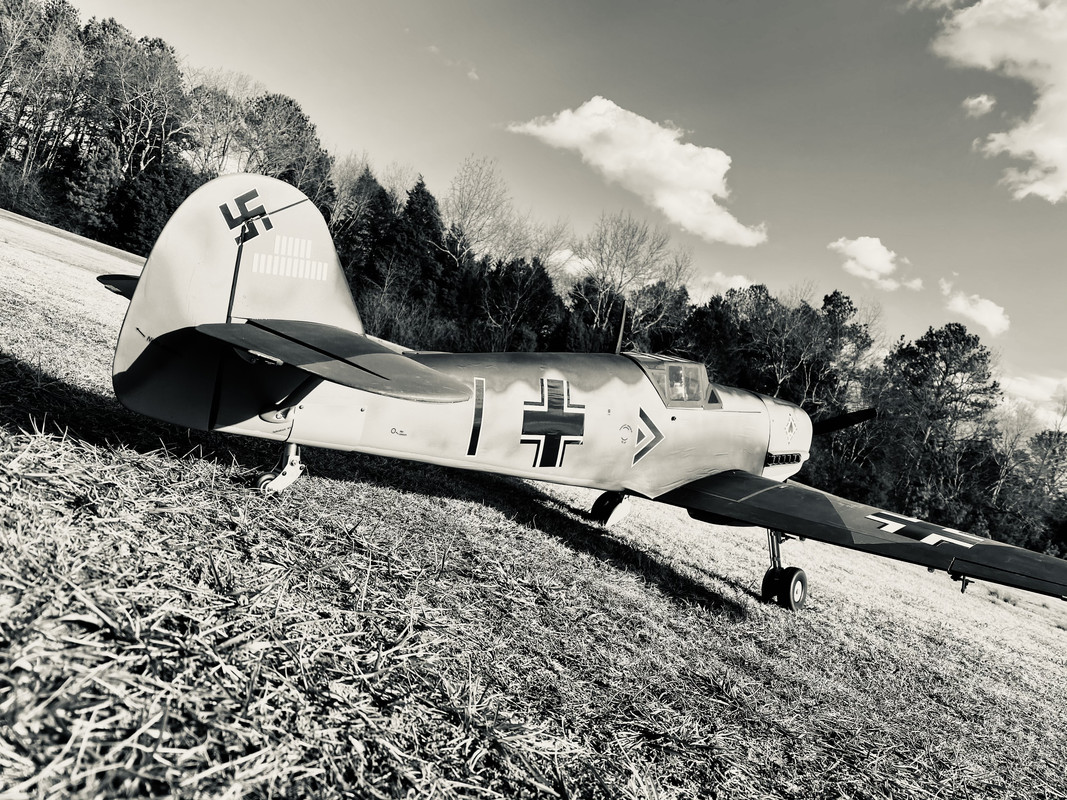 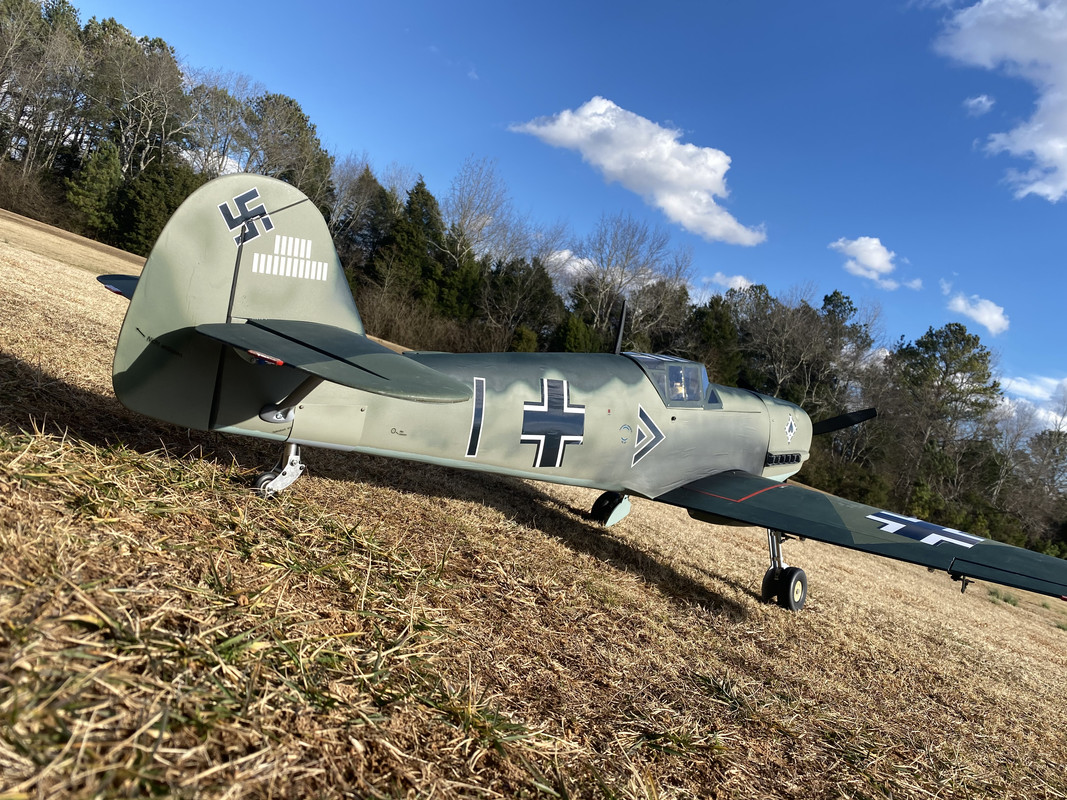 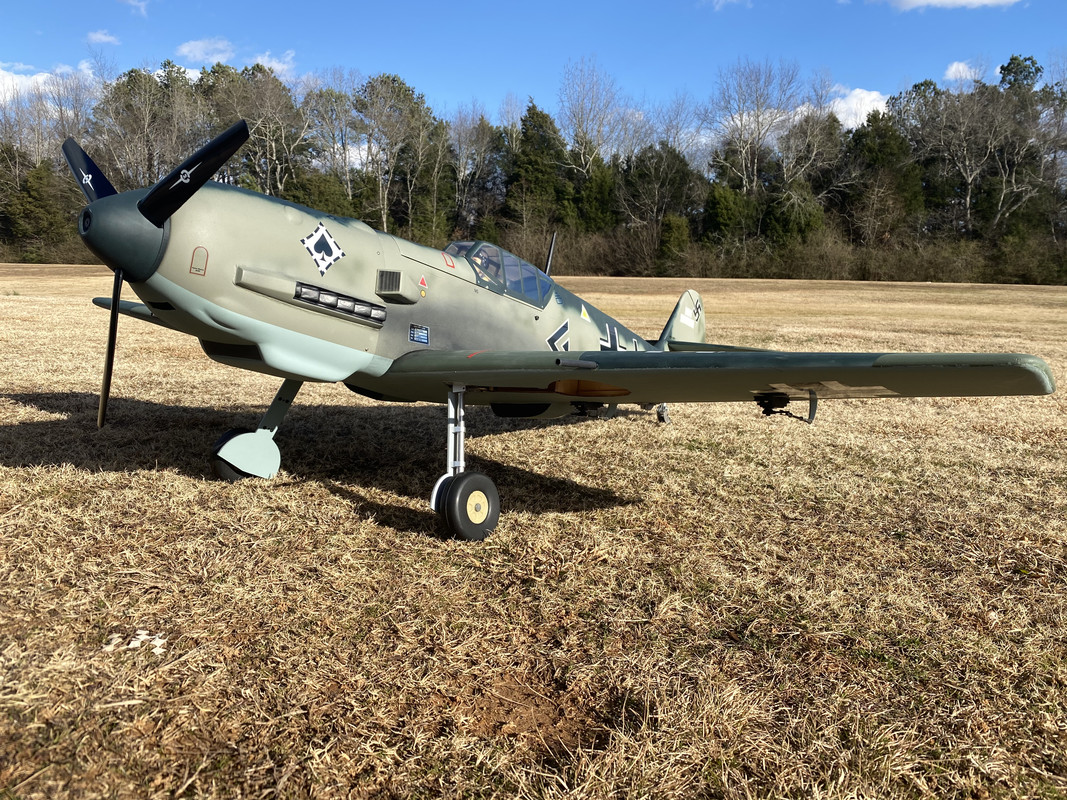 Flight Specifications: AUG: 14.4 lbs Wing Area: 5.32 ft^2 Wing Loading: 43.8 oz/ft^2 Wing Cube Loading: 18.8 oz/ft^3 |
|
Last edited by Oxotnik; Jan 21, 2021 at 09:55 PM.
|
|
|
|
|
|
Thread OP
|
Setting the CG
There was quite of bit of discussion in the Seagull Bf-109E thread about the CG. I'm going to summarize that in this comment.
The instruction manual recommended 135mm from the LE at the root. By eyeball, this can't be right. It's too far back. Other 109s of similar sizes have CGs set at less than 100mm. Several owners of this plane have flown with CG at 135mm. One had fully successful flights and never noticed any tail heaviness. The other stalled in a turn (probably entering a spin), couldn't recover from the spin, and crashed. I measured my wing (not perfectly accurately, I'm sure, but close enough), and as can be seen in the screenshot below, for 33% MAC (which is the absolute farthest back that I'd ever want to be), the CG should be 4.45" (113mm). For 25% MAC, the CG is bit less than 100mm. So, my CG should be between 100mm and 113mm. After adding 8.5oz of nose weight (and measuring my CG incorrectly initially), the CG of my 109 ended up at 96mm. So, I'll be a bit (maybe a good bit) nose heavy. I'm okay with that for the initial flights. If she's too nose heavy, I'll remove some of the nose weight. 
|
|
Latest blog entry: Seagull 64" Bf-109E-3 Build-a-Blog
|
|
|
|
|
|
Thread OP
|
My CG Machine
My 14.4-lb, 64" wingspan Bf-109e-3, with cannon jutting from the wings is a real PITA to be flipping around to measure the CG. I didn't have a good balancing stand in my workshop with which to balance my 109, and to be able to see where she was balancing. I could've built a vanessa CG machine for balancing, and I may in the future, bit I didn't want to do that right now. I decided to use a weight-measuring system to tell me the actual CG. To do a weight-based CG prediction, I set the datum where the Main Wheels touched the ground (which is also directly under the LE). I measured from the Tail Wheel to the Main Wheels. I then set the 109 wheels on three scales, shimming the wheels to get the wings level. I measured the weight at all three wheels. A little algebra, and the CG from the LE (the datum) is calculated. After initially swagging out the math by hand, I found a spreadsheet that used my same method (reassuring me that my philosophy had been correct, and saving me from having to write my own spreadsheet (which wouldn't have been tough, as the math is really quite simple). The catch to using this method is that the CG location has to be measured horizontal to the ground, then vertically down to the wing root.
Here's my weight-measuring setup with the scales.  And here's a screenshot of the spreadsheet. 
|
|
Latest blog entry: Seagull 64" Bf-109E-3 Build-a-Blog
|
|
|
|
|||
|
Thread OP
|
Successful Maiden - Flight
This past Saturday, the weather was finally decent enough to maiden the 109. After doing another very thorough inspection (pulling on control horns and checking throws and mechanical trimming) and the winds had dropped to about 7 mph (mostly down the runway from the left), I decided that it was time to do this thing.
As I've noted previously, I'm running a Power 90-325kv motor, MAS 16x10x3 prop, and 8S-5AH battery pack, which pulls 2270W of power (static) and provides about 150 W/lb. So, I knew that the 109 would have plenty of power. The CG was at 110mm -a bit noseheavy, but I was okay with that, especially for a maiden. Taxiing out, I could tell that I'd gotten the tail wheel aligned well because she was tracking straight. I taxied to the right and setup for the take off. No flaps. With up elevator, I eased into the throttle, keeping the tail planted until I felt that she had enough speed to allow the tail to rise. Easing off the elevator, the tail came nicely. As I started easing more throttle on, she started yawing a bit more than I had expected the left (p-factor). I was wary of over-correcting, and knew where the obstacles to the left side of the runway were; so, I arrested further yaw, but didn't realign here with the center line. I came up on the power pretty quickly then and she was flying. Immediately, I applied more throttle for the climbout and banked substantially back to the right, to clear the trees that were starting to reach out for the plane. Climbout was fine. Rock Steady. As she was easing around the climbout turn, onto the downwind leg, I noticed once again that Luftwaffe camo works really well. Even though the 109 is a nice size, in the turn she just looked like a dark blob. No problems though. On the downwind, I clicked in a roll trim and a little up. She didn't need much. I'd done a pretty good job of mechanically trimming her (which hasn't always been the case with other warbirds... LOL). While flying she felt heavy, which was to be expected with her 43 oz/ft^2 wing loading and 14.4-lb weight. Otherwise, she flew like she was on rails and was very predictable. She didn't feel overly nose heavy, but certainly twitchy (indicating that the CG was not real close to the neutral point). I made three circuits, I believe, setting up to land on the downwind of the 3rd circuit. Reducing power and easing into the Base, I dropped flaps to half (in hind-sight, this was a really dumb thing to have done, since I had not yet tested the flaps, but, luckily, she didn't do anything unexpected) and set up for turn to Final. On final, I reduced power some more and noticed that she seemed to be dropping altitude a bit too quickly; so, I eased back into the throttle and gained a bit more altitude, for a better descent path for landing. As she came across the threshold, I eased back on the throttle again and she started settling in. As I 've watched the flight video a few times, I'm questioning if I'd, maybe, let her almost get too slow for the distance that she was off the ground. She set down a touch hard, but not too bad, especially for a maiden flight.
Post Maiden-Flight Thoughts... I was very happy with the stability and power of the 109. Next flight, I'll need to be better prepared for the p-factor yaw with the 16x10x3 prop. I don't expect to make that same mistake again. Since she felt so heavy in the air, I think that I'll probably back of the expo some for the next flight. I was reunning 35% expo; I think that I'll reduce it to 20%, maybe, on the aileron and rudder. The high expo on the rudder may have contributed to my failure to adequately counter the p-factor yaw during the take off. Plans for next few flights: 1. Take her up high and do some stall tests and some flaps tests. 2. Take her up really high and see how well she rolls and Immelmanns. 3. Do some descending glide tests, to see how nose heavy she is. Maybe some invert, too, if I'm feeling good. 4. Program the GPS module on my radio. The GPS is installed but I forgot to program the telemetry into the JumperT16 radio. I'm curious to see what her top speed is. I'm thinking that it'll probably be around 75 mph. |
||
|
Latest blog entry: Seagull 64" Bf-109E-3 Build-a-Blog
|
|||
| Thread Tools | |


| Similar Threads | |||||
| Category | Thread | Thread Starter | Forum | Replies | Last Post |
| New Product | Seagull Models Messerschmitt Bf-109E 20cc | ncflyer79 | Electric Warbirds | 471 | Dec 12, 2022 12:56 PM |
| Discussion | We need a Bf 109E | Seacondor | Electric Warbirds | 62 | Jan 24, 2018 11:43 AM |
| Video | 1/72 Bf 109e-3 | Heliman420 | Electric Plane Talk | 3 | Nov 23, 2008 06:06 AM |
| Discussion | Hawker Hurricane and Messerschmitt Bf 109E 3-views? | Admiral Piett14 | Scale Kit/Scratch Built | 5 | Sep 15, 2006 10:35 PM |