|
|
|
|
|
Build Log
Pilot-RC 88" Yak 55M Rebuild
Time for another Pilot-RC rebuild...
In 2015 I fixed my ex 87" Yak-54, but this time it's a somewhat old Yak-55M in 88" size. Plane had basically fuselage cut in two from behind canopy and previous owner had started some repairs, but then decided it's not worth it (or just simply didn't have time to do it). The plane arrived at my garage together with QQ Somenzini Python that I recovered for a friend already. Whole rebuild process was started by removing the covering off. Heat gun is your best friend here and by using some heat, the covering comes off easily. Removing covering enabled me to really assess the situation with the fuselage. - There's some fuel & oil damage on the fuse. Worst section is the front of the fuselage, but also a bit of oily wood on bottom of the tail. - Wings and tail surfaces were in really good condition, only some broken balsa panels. - The fuse is broken in multiple locations in the front and middle section and there's also old repairs visible in the fuselage. - Canopy needs only a small piece of wood replaced. - Cowling is ok, but has plenty of old holes from gas engine installations. I contacted Pilot-RC for wood parts. It used to be much easier to get their crash "warranty" parts, nowadays they can't ship anything bigger, so for example fuselage panes need to be cut in two, which really isn't optimal in any way. ImagesView all Images in thread
|
|
|
Last edited by Late99; Jun 01, 2019 at 12:47 PM.
|
|
|
|
|
|
|
|
The plan...
I've been thinking for some time about what to do with the plane. Currently the plan is following:
- Scheme will be based on the red side of the Yak-110. It's a simple, but elegant & high visibility scheme. It's still somewhat unique and you shouldn't meet similar Yaks everyday (as you do with normal Pilot schemes). Cowling will need repainting, but Canopy should be ok as it is. - I will build this light for electric use. These Pilot planes are build really robust and for electric there's lot of places I could lighten it somewhat. Based on my 95" 3DHS Extra I also know pretty well on what kind of components I need to throw into the plane... - Seems that CG has been issue with these planes, typically tail weight has been needed. This particular plane had over 180g of weights in tail (with DLE61)! It might be sensible also to move rudder servo into tail. |
|
|
Last edited by Late99; Jun 01, 2019 at 12:49 PM.
|
|
|
|
|
|
Disassembly
Finally after several emails and plenty of waiting I received the wood parts! The "challenge" was that I wanted to rebuild the whole front area. It generally was in so bad shape, that rebuild wouldn't make sense if I couldn't get good wood there.
I had thought I can use few formers (around landing gear) from the old fuse, but eventually I decided to cut them myself also from new & good wood. As Pilot-RC wood parts are really only wood parts I needed to hack the old fuse to rescue landing gear aluminum blocks and carbon fiber wing tube. Also fuse needed to be cut in two as cleanly as possibly. ImagesView all Images in thread
|
|
|
|
|
|
|
|
|
Weights
To get understanding of the "original" weight of the plane, I weighted the parts before disassembly. This is quite important to have idea on how your build will go and what are optimal components for it.
Interesting finding was that the plane had 186g of lead in the tail. And part of this lead was freely moving inside rudder, huh. Also receiver battery tray was behind canopy, so this plane / design seems quite nose heavy. The plane was powered by DLE61, which shouldn't be exceptionally heavy. I inserted the weights next to my 95" 3DHS Extra 330 SC weights, just to get understanding where I should try to loose weight. Anyways I can't match the Extra weight, but it's interesting to see where weights comes from. |
|
|
|
|
|
|
|
|
Starting the build
Meanwhile I have been laminating the parts. There's lot of parts in the Pilot-RC design that are simply laminated together to make the plane durable. This is also a important step as Pilot-RC can't ship bigger parts anymore and I needed to attach side panels etc. from two parts.
|
|
|
|
|
|
|
|
|
The electronics...
If no surprising changes occur I will build this plane around Dualsky GA6000.8. I've got one on my Extra also and it has been working superbly.
For the electronics I have following components laying around: - 3 x Savox SV-1272SG HV servos for rudder & ailerons. These should be fast & powerful for this plane. - 2 x Potenza DS 19410 TG HV servos for elevator surfaces. - Gecko ZTW / Aerostar 150A HV ESC - Castle Pro BEC for powering receiver & servos - Spektrum AR8010T receiver with telemetry So what I will need to purchase are the motor & suitable prop. Most likely Xoar 24x12 would be the best option to go. |
|
|
|
|
|
|
|
|
Subbed
Interesting project. Looking forward to seeing how this turns out. |
|
|
|
|
|
|
|
|
Wood cutting...
Thanks! I'm eager to see this develop too. I've just been short on time for few days to work on this properly...
Unfortunately couple of formers (F2 & F3) and landing gear plates were still missing from the Pilot-RC wood kit. Basically I noticed this from pictures, but agreeing on all the required parts had already taken months and I thought I'll use the original parts, but basically the whole front of the fuse was more or less impregrated with oil and fuel so it's better to cut new parts. I used the original parts dismantled from the fuse as templates and then just cut the new parts from plywood. I don't have any nice saws, so this was a job for normal saw, dremel, angle grinder and multitool with sand paper. I also continued with laminating & gluing other parts and finally got to do some dry assembly of the front fuse. ImagesView all Images in thread
|
|
|
|
|
|
|
|
|
More wood cutting... And finally some assembly.
Next I tackled some easy parts. Namely created the slot for rudder servo in the tail. I basically glued plywood servo tray in suitable location in the tail. And to finish it smooth I added some balsa to make it level with the fuse.
Then I proceeded with crafting the rest of the missing wood parts of the front fuse. And the middle deck of the plane - where normally gas tank would sit needed some modifications to serve as proper battery tray. First it needed holes to allow strapping batteries in place and secondly I needed to make it stronger. Used some flat CF and balsa, they should make it sturdy enough for batteries. Finally I got to the jigsaw puzzle part. The front fuse goes together basically in two steps. First you need to assemble all the inner walls and three first formers. After you've got those in place you can glue to top panel in plane together with rest of the formers. In practice I did this several smaller steps as there are small pieces such as cowl attachment tabs you need to glue on and it's easier in this phase. ImagesView all Images in thread
|
|
|
|
|
|
|
|
|
And while you're waiting for glue to dry between different assembly steps, you can prepare some smaller stuff such as:
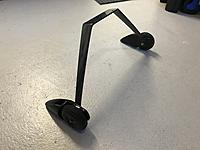
Assembling landing gear. I took all the parts loose, threw original wheel pants away as they were badly worn and I had black wheel pants from my ex Yak-54 available. After proper cleaning the gear was assembled. Prepping canopy... The front of the canopy is oracover, which has some wear due to gas engine vibrations and I needed to get it off so that I can re-cover it later. There's also some wood fixing to do with the canopy, but I just haven't time to fix that yet. Building new motor firewall. This was also one of the parts I didn't get from Pilot. I didn't have very sturdy plywood available so I simply laminated few plywood layers of plywood together. |
|
|
|
|
|
|
|
|
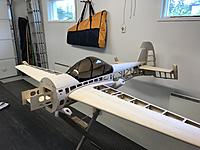
The progress is now much easier as were assembling big parts. First I glued side panels to front fuse. And after that it was time to test assembly the fuse parts together. After a bit of tweaking the fuse was finally glued back together.
These milestones do wonder for motivation to continue with the build! ImagesView all Images in thread
|
|
|
|
|
|
|
|
|
Looking good, the photo showing it stood next to your bench really gives as good idea of the size.
|
|
|
|
|
|
|
|
|
Finalizind wood work...
Thanks, yeah the more ready this starts to be, the harder it's to handle (due to size).
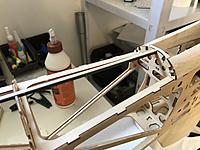
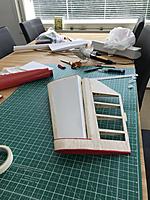
The typical problem with these Pilot-RC Yaks has been that bottom stringers break when you lift the plane. I did two tweaks to try to mitigate this. First I used flat CF / balsa "composite" stringers for three bottom stringers. Basically I just glued some flat CF together with normal balsa stringer to make stronger stringers. Secondly I sheeted the front part of the fuse bottom. As this plane will be electric no need for canister / pipe exit and if someone later on wants to convert it back to gas, then it's easy to cut the normal exit hole open. I hope these modifications will help to make the fuse a bit more durable and easier to handle. Smallish damage on the wings was also fixed, just changed one balsa sheet piece and used some light filler on small dents. Then I went multiple rounds of sanding on all pieces and test assembly to ensure that everything goes together well. And fabricated new air exit in rear part of the fuse. In electric planes you want to ensure good airflow in the fuse. I guess it's time to do some final tweaks (canopy latches) and start covering job! I also ordered the motor (Dualsky GA6000.8), but most likely it will arrive later in August...  Also cowl needs plenty of work still... Also cowl needs plenty of work still...
ImagesView all Images in thread
|
|
|
|
|
|
|
|
|
Covering part 1
As you want to have the seams of the covering as flush with the head wind as possible the typical order of the covering is to start from rear and top. And then move forward and bottom. This way seams automatically are aligned correctly.
In my case, however, this ment that I'll start with horizontal stabilizers. Those were good practice parts to prepare for wing covering. Nothing very special in the process. Whenever there is multiple parts where similar cutting is needed, I'll do paper templates. Also in this case for the front covering piece with curves. I also do all the hard / small corners and sides first and last the big surfaces. And I'll try to keep the temps on the iron as low as possible to not shrink covering too much at this phase. |
|
|
|
«
Previous Thread
|
Next Thread
»
| Thread Tools | |
| Similar Threads | |||||
| Category | Thread | Thread Starter | Forum | Replies | Last Post |
| Discussion | Pilot Yak 55M & Yak 54 | PhoenixFlyer | 3D / Fun Fly Fuel Planes | 0 | Apr 17, 2014 03:24 AM |
| Build Log | Toc (pilot-rc) 88" yak 54! | caseydood4 | 3D / Fun Fly Fuel Planes | 25 | Dec 31, 2013 05:35 PM |
| Discussion | Great Planes Yak 55M, 88 Inch | F-86FLIER4LIFE | Giant Scale Airplanes | 11 | Apr 20, 2012 05:39 PM |
| Discussion | Great Planes Yak 55M, 88 Inch | F-86FLIER4LIFE | 3D / Fun Fly Fuel Planes | 0 | Apr 10, 2012 01:37 PM |
| Discussion | RC-Factory Yak 55M | barnesyboy | 3D Foamies | 422 | Nov 30, 2011 08:43 PM |


