|
|
|||
|
|
Discussion
Make a Do-it-Yourself EDF afterburner
How to make a Do-it-Yourself Afterburner
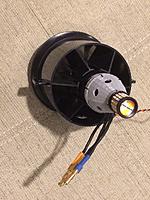
THIS IS NOT A KIT AND I'M NOT SELLING ANYTHING. This thread contains complete instructions on how to make a simulated afterburner for an EDF jet, along with software code for a controller that will independently drive one, two, or four exhaust nozzles, complete with optional flickering effects and brightness controlled by throttle position. There is no charge for the designs or for the software. I have twenty or so EDF models, most of which are of types that were/are equipped with afterburners. After buying several LED “centerburner” systems, I decided to see how hard it would be to make my own. Turns out it's not hard at all.
This project requires electronic soldering and component wiring skills and is not a good first electronic project. However, anyone with some experience will have no problem. It also requires access to a 3D printer to make the adapter to mount the lamp to the EDF motor. I have posted some adapter STL files for many popular systems on Thingiverse.com and there are services listed there that will print parts for you if you don’t have your own printer or a friend with one. Even a cheap consumer grade 3D printer will suffice as the adapters are neither large nor complex. Link to adapter files: https://www.thingiverse.com/thing:4042564 . If you want to design your own, there is simple design software available (such as the FREE https://www.tinkercad.com ). ================================================== ================================= The Flickering Controller The flickering controller is based on the Arduino microprocessor. These are inexpensive, small, and readily available from a number of sources, including Amazon. Typical board cost is $4 - $10, depending on the board and the source. Features:
It's been implemented on the following Arduino or Arduino clones:
https://www.rcgroups.com/forums/show...3&postcount=82 This controller requires some soldering to complete, but can be made in under an hour for a single output system. The afterburner firmware is loaded onto the Arduino board from a PC USB port using a free Arduino app (you will need to install drivers but they are free too). ================================================== =============================== This article only describes the electronic part; fabricating the adapter to mount the LED unit to the EDF motor is not covered. Anyone familiar with 3D printers should have no trouble making the mount, it takes about an hour to print on a typical consumer grade printer. While the adapter is printing you can be installing the controller and wires. Total cost of the electronic components for the system is $10 - $30 depending on where you buy the parts and how many tailpipes your plane has (4 costs more than 1).. ++++++++++++++++++++++++++++++++++++++++++++++++++ ++++++++++++++++++++++++++ The Lamp Although the controller will work with any lamp from 6V to 24V and up to 5A current (way more than any reasonable LED lamp needs), I found the following were easy to work with. First, I found a suitable high output amber bulb that has it’s own inbuilt voltage regulator. These use the exact same LEDs as the (expensive) commercially available afterburner systems. https://www.amazon.com/dp/B07SSXDW4G...t_details&th=1 It has a low cross-sectional area and provides minimal obstruction to the airflow. It is very bright (1400 Lumens per bulb). With a little fiddling assisted by a razor saw I was able to remove the yellow plastic bulb base and expose the inbuilt regulator and its connections. An alternative, cheaper bulb (less than $2 if you buy a 10-pack) is at: https://www.amazon.com/gp/product/B0...?ie=UTF8&psc=1 Not only is it cheaper, it is easier to remove the plastic base. It is, however, a bit bulkier. It requires a slight modification to the adapters linked earlier in the thread. With a little fiddling assisted by a razor saw I was able to remove the yellow plastic bulb base and expose the inbuilt regulator and its connections. ================================================== =============================== The Ready Made Controller I am no longer recommending this, but if you want something quick with minimal effort, it works fine. To control it without making a custom controller I found a 10 Amp ESC for BRUSHED motors. $14 for two from Amazon: https://www.amazon.com/gp/product/B0...?ie=UTF8&psc=1 The following section describes the brushed ESC controller: https://www.amazon.com/gp/product/B0...?ie=UTF8&psc=1 There are other sources with various prices, but they all seem to be identical. They were originally made for R/C trucks. Various brands seem to come in and out of stock but there always seems to be something available. It has a built in BEC too, which we definitely do NOT want since it is not up to the job of powering an EDF with retracts, servos, etc. The spec sheet shows a voltage limit of 9V when using the BEC, but it easily handles a fully charged 4S LiPo when the BEC is disabled. The ESC current drawn is only 300mA rather than 10A that the controller is rated for. To disable the BEC simply cut the red wire in the “servo” lead that goes to the receiver. THIS IS IMPORTANT! The black (ground) and white (signal) wires should remain intact, and the ESC will be powered by the red and black power input wires from the red JST connector. There is an on/off switch on the ESC. You can leave it in place or simply cut it off and connected the wires together so the ESC is permanently enabled. I decided to limit the voltage input to the controller to 4S LiPo voltage, so on a 6S (or more) system I’d take the input from the balance connector tap at the 4S position (nominally 14.8V but higher when fully charged). This is plenty to power the LEDs to maximum brightness. I ran the setup for 2 hours continuously with no ill effects to the ESC – it didn’t even get warm to the touch. The ESC was designed for surface vehicles and has “forward” and “reverse” output, with "off" when the stick is in the middle. The LED unit is insensitive to its input voltage polarity and will illuminate either way. If we just connect the ESC control lead to the throttle channel output with a Y connector, the LED will be full on at both zero throttle and full throttle. To prevent the LEDs coming on at low throttle I inserted a diode in the red lead from the ESC to the bulb (you can use either red or black lead, I used the red one for no particular reason). This blocks the current flow when the ESC output is “reverse”. Given that JR/Spektrum and Futaba use opposite throttle signal conventions (and I don’t know about Frsky, Taranis, Jeti, etc,) you will have to determine by trial and error which way around to connect the diode. You can’t damage anything by getting it wrong, you'll just light the LEDs at the wrong end of the throttle stick movement. Pretty much any diode with a current rating of 1A or more will work, even a dirt-cheap 1N4001 (https://www.amazon.com/gp/product/B0...?ie=UTF8&psc=1). I used a Schottky diode (15 for $9 from Amazon) because it has a lower voltage drop, but this is really unnecessary). With the system connected up as described, the centerburner is off when the throttle is below 50%, and progressively lights up as the throttle is advanced beyond this. You will need to make a suitable mount to attach the LED unit to the rear of your EDF motor. I 3D printed one, basically an ogival shape tapering down to the LED unit diameter. The details of the mount will depend on both the size and the type of the EDF motor (inrunner or outrunner). You will need to leave a hole for the EDF power leads to exit, and possibly some cooling holes too depending on your motor. Be sure to attach the mount securely to the EDF. The LED bulb can be held in place in the mount with C/A or epoxy. Be sure to secure all wires so they can’t get entangled with the fan. I have posted a bunch of 3D .STL files on Thingiverse for various EDF units (link is at the top of this post). ++++++++++++++++++++++++++++++++++++++++++++++++++ ++++++++++++++++++++++++++ EDIT: Suko has created some more detailed step by step instructions and posted them here: https://www.rcgroups.com/forums/show...p-Instructions |
||
|
Last edited by kallend; Feb 27, 2023 at 10:24 PM.
|
|||
|
|
|
|
|
|
|
Thanks Kallend sharing this trick! Just tried and it worked with a 3s brushless power system.
I tried but failed before using Y-connection between brushed ESC and brushless(power) ESC for my light, the key is what you described "to disable the BEC in brushed ESC". Will try again on 6s EDF system tomorrow. So far I use 3s to power brushed ESC. The 70mm LED ring is from banggood. https://usa.banggood.com/70MM-COB-LE...r_warehouse=CN Also from amazon: https://www.amazon.com/GrandviewTM-6...39127010&psc=1 Actually it is not necessary to cut the red wire to connector, just lift up the plastic stopper with tiny pointy tool like tip of Xacto hobby knife, and pull out the red wire on the servo connector. |
|
|
|
|
|
||
|
|
Quote:
EDITED TO ADD: A DIY flickering controller is described later in this thread. |
|
|
Last edited by kallend; Mar 07, 2020 at 11:18 AM.
|
||
|
|
||
|
|
Quote:
It is great we can make our own system for a fraction of the price, for an inrunner or outrunner with tailcone like FMS 1900kv 90mm system. Great summer project. |
|
|
|
||
|
|
|
|
|
Home Made centerburner
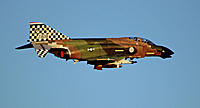
Here is what I made for my Freewing 90mm F4 Phantom. I only sanded the side of the LED light so that it is basically complete. I had a GWS brushed speed control that was forward only so I didn't see any need to take the LED light apart because no diode was needed. I also thought that using the original streamlined fairing would be better because the aluminum might act as a heat sink. Mine also flickered just a little bit when it first starts lighting up before it hits full throttle. Do you think I am on the right track?
|
|
|
|
|
|
||
|
|
Quote:
Also your method is very similar to mine. Mine is even simpler though! You would be surprised at how bright it is too! |
|
|
Latest blog entry: ESC Programming and why its worth...
|
||
|
|
|
|
|
Yes, use brushed ESC for car, tank or boat that has zero output at mid stick, and add the diode as described to block it when in reverse. Then the light doesn't come on until throttle > 50%
|
|
Latest blog entry: Do-it-Yourself EDF Afterburner and other...
|
|
|
|
|
|
|
I used a 1N4001 diode in my F-35. Works just as well as the Schottky, and I got 250 of them for $5 from Amazon. That should keep me in diodes for the rest of my life.
|
|
Latest blog entry: Do-it-Yourself EDF Afterburner and other...
|
|
|
|
|
|
|
Test flight with full after burner
I got my first flight with my home made center burner. Mine is using a HobbyKing RC electronic switch to turn the burner off and on. The burner is using the full 6 cell voltage. The brightness was the same with only 11 volts but 24 volts is more convenient. I will post the 3D printed part on Thingiverse later today. It is mounted on the 6 cell stock 90mm out-runner Freewing fan in my F4 Phantom II. I drilled four holes in the stock fairing to assist with motor cooling. The 3D part is a tight fit in the original opening and the LED bulb is glued in with Zap Goo. The only modification to the LED bulb was to sand the sides of the bulb mount to reduce the width to the same as the round part of the bulb. The jet exhaust were lined with A/C metal duct tape with the peel and stick backing from the fan unit to the tail cones. Thanks to Kallend for the great ideas to get me started.
|
|
|
|
|
|
||
|
|
Quote:
|
|
|
|
||
|
|
|
|
|
More LED options:
Got some of these a while back. Now tested with brushed esc seems brighter than car turning light LED: https://www.banggood.com/Multicolor-...r_warehouse=CN These LED chips are pretty close to the stated 10W and got pretty hot after brief running at <12 V, but shouldn't be an issue as it will be mounted with airflow from the fan. It is polarized but easy to solder. Tested and worked great. But so far I have only white light LED installed in Freewing Mig 21 (inrunner). Will see how it shows tomorrow during daylight. Also from Amazon, seems very bright, a little cheaper and almost as bright as Kallend's original pick: https://www.amazon.com/gp/product/B0...?ie=UTF8&psc=1 The amp and wattage reading from this is lower than Kallend's pick, but feels brighter. |
|
|
|
|
|
|
|
|
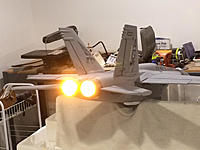
Put one in my new FMS F/A-18
I think the key to getting a good result in a bifurcated exhaust with a single fan is strategic placement of refecting surfaces in the duct - much cheaper than using a second LED cluster. |
|
Last edited by kallend; Jun 22, 2019 at 12:44 PM.
|
|
|
|
||
|
|
Quote:
Having written that, I decided use a spare bulb anyway in the F/A-18, with one directed down each tailpipe. Should be plenty bright! Will fly it tomorrow. |
|
|
Latest blog entry: Do-it-Yourself EDF Afterburner and other...
|
||
|
|
|
|
|
Here is the F/A-18 with the twin burners, taking off in bright sunlight.
(It's easy to look good after sunset or indoors looking straight down the tailpipe; the test is how does it look at midday in the Sun, from the side.) |
|
Latest blog entry: Do-it-Yourself EDF Afterburner and other...
|
|
|
|
||
|
|
Quote:
The lamps themselves are well aligned with the tailpipes so they really aren't blocking the airflow. |
|
|
Latest blog entry: Do-it-Yourself EDF Afterburner and other...
|
||
| Thread Tools | |
| Similar Threads | |||||
| Category | Thread | Thread Starter | Forum | Replies | Last Post |
| Discussion | Make an EDF suggestion! | Barry Leger | Electric Ducted Fan Jet Talk | 25 | Jan 28, 2017 12:22 AM |
| Discussion | What to make with spare parts from an EDF L-39? | RedheadRedneck | Crash Discussion | 0 | Jun 08, 2016 08:55 AM |
| Discussion | New to EDF's Trying to make an EDF Trainer | scote621 | Scratchbuilt EDFs | 12 | Oct 15, 2011 06:03 PM |
| How do I make an EDF-50 DD run in reverse without burning brushes? | birdofprey | Electric Power Systems | 3 | Dec 24, 2002 02:55 AM | |
| someone needs to make an EDF X-43, come on! Try it! | e-sailpilot86 | Electric Ducted Fan Jet Talk | 2 | Jul 29, 2001 10:26 PM | |


