|
|
|
|
Thread OP
|
Discussion
FrSky - Taranis X-Lite - S and Pro - X9 Lite - S - R9M Lite and Pro - MPM Lite Taranis X9 Lite Taranis X9 Lite review https://www.rcgroups.com/forums/show...postcount=2074 Note: The new internal ACCESS RF module used in the X9 Lite system can support D16 receivers (firmware updates required from FrSky webste). Battery removal https://www.rcgroups.com/forums/show...postcount=2242 Blank ACCESS Reg. ID issue https://www.rcgroups.com/forums/show...postcount=2606 FrSky ACCESS Receiver Registration, Binding and Sharing https://www.rcgroups.com/forums/show...postcount=1670 R9M Lite Pro https://www.rcgroups.com/forums/show...postcount=2545 How to bind with CrazyBee Pro (SPI receivers) https://www.rcgroups.com/forums/show...postcount=2539 Carry case for X9 Lite, Pelikan style https://www.rcgroups.com/forums/show...postcount=2438 also the Q X7 case will work if you want some extra space https://alofthobbies.com/frsky-speci...eva-cases.html External Module Power Does Not Stay On Some of the early system�s PMU (Power Management Unit) that controls power to the external module have programming that results in the power not staying on when existing external RF modules are used. FrSky agreed to change the PMU function to just a power off/on switch and has provided an update process with the 07-02-2019 firmware update. If the 07-02-2019 firmware update does not change the PMU programming contact your FrSky dealer for a solution. It is always best for your FrSky dealer to resolve issues. I cannot recommend the following because the system could be damaged in the process, but one user created this solution https://www.rcgroups.com/forums/show...postcount=2576 Information on ErskyTX that is an alternative to OpenTX. The X9Lite includes the support for using the 3, extra inputs. https://openrcforums.com/forum/viewtopic.php?f=7&t=4676 Using the extra X9 Lite main board inputs for pots and switches with ErSky https://www.rcgroups.com/forums/show...postcount=2683 Adding X9D slider https://www.rcgroups.com/forums/show...postcount=3075 Battery Charger Options XTAR Master VC2 Plus https://alofthobbies.com/222xtar-master-vc2-plus.html By Miami Mike, Balance charge wiring config https://www.rcgroups.com/forums/show...5&postcount=74 By P.I.Engineer, Center tap https://www.rcgroups.com/forums/show...postcount=2769 By P.I.Engineer, 2s li-ion battery holder https://www.rcgroups.com/forums/show...postcount=2804 By Whiffles, USB charging https://www.rcgroups.com/forums/show...postcount=2805 By jj604, Center tap https://www.rcgroups.com/forums/show...postcount=2806 Taranis X9 Lite S Review https://www.rcgroups.com/forums/show...postcount=3553 X-Lite Pro and S FrSky Taranis X-Lite Pro website https://www.frsky-rc.com/product/taranis-x-lite-pro/ The new FrSky ACCESS protocol https://www.frsky-rc.com/frsky-advan...tocol-release/ Note: The new internal ACCESS RF module used in the S and Pro system can support D16 receivers (firmware updates required from FrSky webste). Blank ACCESS Reg. ID issue https://www.rcgroups.com/forums/show...postcount=2606 FrSky ACCESS Receiver Registration, Binding and Sharing https://www.rcgroups.com/forums/show...postcount=1670 R9M Lite Pro https://www.rcgroups.com/forums/show...postcount=2545 How to bind with CrazyBee Pro (SPI receivers) https://www.rcgroups.com/forums/show...postcount=2539 External Module Power Does Not Stay On Some of the early system�s PMU (Power Management Unit) that controls power to the external module have programming that results in the power not staying on when existing external RF modules are used. FrSky agreed to change the PMU function to just a power off/on switch and has provided an update process with the 07-02-2019 firmware update. If the 07-02-2019 firmware update does not change the PMU programming contact your FrSky dealer for a solution. EU (LBT) systems in NEU (NonLBT) Boxes Some of the early systems had boxes incorrectly marked resulting in EU (LBT) systems in NEU (NonLBT) Boxes. This was usually discovered after the user did the ISRM D16 upgrade and found that the �Modules/RX version� screen showed NEU. The solution to this issue is to contact the FrSky dealer where the system was purchased and have the system switched to NEU (nonLBT) mode. ACCESS Receiver and External Module Firmware ACCESS receiver firmware 2.4: RX4R:https://www.frsky-rc.com/rx4r/ RX6R:https://www.frsky-rc.com/rx6r/ G-RX6:https://www.frsky-rc.com/g-rx6/ G-RX8:https://www.frsky-rc.com/g-rx8/ R-XSR https://www.frsky-rc.com/r-xsr/ XM https://www.frsky-rc.com/xm/ ACCESS external module R9M Lite https://www.frsky-rc.com/r9m-lite/ ACCESS receiver firmware 900mhz R9 https://www.frsky-rc.com/r9/ R9 Slim https://www.frsky-rc.com/r9-slim/ R9 Slim Plus https://www.frsky-rc.com/r9-slim-plus/ R9 MINI https://www.frsky-rc.com/r9-mini/ R9 MM https://www.frsky-rc.com/r9-mm/ Taranis X-Lite FrSky Taranis X-Lite (review and how to) Datos and I have received X-Lite evaluation units for review and will publish our in-depth reviews on the units in this thread. The production systems have a number of improvements compared to the evaluation units; the overall color scheme, material used for the bottom of the handles, a switch type for one switch and some changes with the gimbal adjustments. I will also keep this thread updated with the latest information including an index section to make it easier to find information. Datos and I will be available to answer questions as needed on the system. The following is my X-Lite review that I will fill in as I complete the review process. Issues I find with the evaluation unit that I know have been corrected on the production system will not be posted here. I�d be happy to add suggestions to the items to be reviewed. FrSky Taranis X-Lite Website https://www.frsky-rc.com/product/taranis-x-lite/ System Specifications Number of Channels: 16 channels Weight: 308g/ 376g (with battery) Operating Voltage Range: 6.0 ~ 8.4V Operating Current: 190mA@7.4V Operating Temperature: -20 ~ 60℃ Backlight LCD resolution: 128*64 Model Memory: 60 models (extendible by Micro/TF card Features Ergonomic and compact design M12 Lite gimbal -Digital high accuracy hall sensor gimbal -Mode conversion adjustments accessible without disassembly -CNC machined gimbal pedestal High-speed internal and external module digital interface -Internal: 450K, External: 420K -Super low latency (Total latency < 20ms, lowest to 12ms) -Compatible with new lite type external modules (R9M Lite, MPM Lite, etc.) Installed open source operating system� OpenTX Haptic vibration alerts and voice speech outputs (Headset jack and inbuilt speaker) Internal antenna and external antenna connector 128*64 outdoor readable backlight LCD Smart Port, Headset jack and TF card slot, Micro USB-B Port (*Charging function unsupported.) Easily accessible battery compartment, uses replaceable 18500 Li-ion batteries (*Batteries Not Included) (*Battery Information: Flat Top / Height: 50mm / Diameter: 18mm) Wireless function (Optional) -Compatible with FrSky Free Link App -Support wireless trainer system (* Need additional parts or order specific model) Overall Review I�ve been looking at pictures of the X-Lite since the end of 2017 and I�ve got to say none of them adequately prepared me for the experience of unzipping the EVA bag and holding the X-Lite in my hands for the first time. As I held it, I was impressed with how much effort must have gone into how the system feels in your hands, the ergonomics and the quality look and feel of the system. It is brilliant how they managed to package 16 channels and a full RF power telemetry radio into such a small nicely designed system. And an operating system that is second to none. All my detailed comments are below and I�ll add more information if I discover any issues. Unboxing My system had some other items with it so I do not have a picture of the normal box. The box include the EVA case and the normal FrSky sticker sheet. Inside EVA case for the evaluation unit is a padding piece and the external antenna. See unboxing images below. The external antenna is an extra cost item.. Carry Case The carry case is a semi rigid zipper design. The lower half has a removable molded part the shape of the X-Lite and a place to store the T external antenna. The upper half has a storage area with netting on the lower half. The case has no handle, but does have cloth loop attachment points on each end. Dimensions Width at the widest spot (lower part of handles), 7" Height from bottom of handles to top of system, 5" Comparison is size with Q X7 and Microsoft Xbox controller See image below. Weight Numbers For Reference 0.85 lb X-Lite (with batteries and antenna) 1.76 lb Q X7 (NiMh) 1.84 lb X9DP 2.03 lb 9C Futaba 2.16 lb X10 2.20 lb X10S 2.38 lb 16&18SZA Futaba 2.39 lb 12FG Futaba 2.54 lb Kraft 7C 2.65 lb 18MZA WC Futaba 2.87 lb X12S 2.87 lb Jeti Power Switch To power the system on, press and hold the power switch down. Four dots will populate across the screen and then the back light illuminates . Let go of the switch when the backlight illuminates for the welcome screen display. To power the system off, press and hold the power switch down. The screen will change to four dots that will disappear one at a time. Keep holding the button down until the dots are all gone and a ZZ snooze face is displayed. There is also a haptic buzz with the snooze face. . Momentary Switch The evaluation unit has a momentary switch on the right side back position. The production systems have a two position switch rather than the momentary switch. FrSky will make momentary switches available as a spare part. The case must be opened to replace the switch. The back and front switch are mounted on a small printed circuit board that is very close to the gimbal. I have not tried replacing the switch, but it looks like if the retaining nuts for both switches are removed the printed circuit board can be pulled down far enough to de-solder the back switch and replace it. Operating System Firmware - OpenTX 2.2.2 The system can operate with the factory installed version of OpenTX, but if you want to take advantage of the latest build features an update can be done to OpenTX version 2.2.2. If you chose to update to the latest OpenTx build see OpenTX 2.2.2 in the "OpenTX 2.2 branch" section at the top of this page http://www.open-tx.org/downloads.html The instructions are on the linked page including a link to the SD card contents. Note: Before flying the factory installed firmware make sure the default trim works on the right stick, if not an update will be needed. Download and install the OpenTX Companion. On the �Edit Settings� tab set the radio type to �FrSky Taranis X-Lite� and �Use releases (stable). I also check the �Append version number to FW name� box that avoids confusion on the firmware you download. Then download the X-Lite firmware you want. A SD card is not included with the system and the system can operate without a SD card, but it would be unwise not to use a SD card because it is needed to take advantage of all the OpenTX features, e.g. sounds including critical warning messages, data logging, scripts. Download and unzip the SD contents. Delete unneeded languages in �Sounds�. Format a micro SD card (32gig or less) as FAT32 and install SD contents. A 2gig card is more than large enough, but hard to find, so I use a 16gig card. Be sure to copy version file to the SD card. Looking from the front of the system the SD card is inserted into the SD card slot with the contacts facing down. The X-Lite uses a micro USB connection. I flashed the system my usual way "power off" using STM32 Bootloader. Depending on the OpenTX build on the system the new build might reset the system to the OpenTX defaults. The default reset may clear any existing models and set the system to mode 1. At least it did with the evaluation unit, but its OS was at least three weeks old and a FrSky build. For folks that want to use bootloader mode you start the system while holding the X control down in the center. Key Functions See the review from Datos below for detail. X-Lite Gimbals The M12 Lite gimbals use the same type of mechanical configuration as the other FrSky M type gimbals with the metal crossbars (centering arms) located on the back of the gimbal. But everything much, much smaller! The gimbals use digital Hall Effect sensors that digitize the stick position angle inside the Hall sensor and has a digital interface with the main board. The gimbal has a metal CNC mount with plastic mechanics and centered with the metal crossbar. The stick is metal and has an adjustable end for length. The gimbal mode can be changed from throttle on the right or left through rubber plugged holes on the back of the case. Once the stick mode is changed there is a setting in OpenTX that completes the change. The throttle brake tension can also be adjusted through rubber plugged holes on the back of the case. For a mode 2 system, looking from the back of the system and to the right side. The outside hole is the gimbal throttle stick brake and uses the short screw. The inside hole is the center spring disable for the throttle stick and uses the long screw. For a mode 1 system, looking from the back of the system and to the left side.. The outside hole is the center spring disable for the throttle stick and uses the long screw. The inside hole is the gimbal throttle stick brake and uses the short screw. Note: when adjusting the center spring disable hold the throttle stick full down to reduce the spring tension so the adjustment screw is not under stress. The spring tension for the X � Y axes feels light when you first pick up the system, but because the gimbals are so small it feels right after you use them some. With the stick in the factory set length It takes about 0.7 oz of force to move the stick the first 1/8� and 2.0 oz at full throw. That compares to 1.5 oz and 3.5 oz on my X10S gimbals. But again the gimbal is small and it feels fine to me. The gimbal stick shaft and threaded end is 2.5mm and it looks like that stick shaft might be a press fit into the gimbal. The four rubber plugs that cover the adjustment holes fit flush with the back surface and are pretty tight. Here is how the plugs fit https://www.rcgroups.com/forums/show...&postcount=165. I used a round wooden toothpick with the pointed end cutoff and shaped to a flat screwdriver like blade. With the flat part I was able to work it into the adjustment hole beside the rubber plug and pry it out without damaging the plastic or rubber plug. The evaluation unit has a slight ratchet feel as the brake action is added with the adjustment screw to the throttle stick, but the production systems will be smooth. No ratchet/detent action. Test to make sure the default trim is the right stick and shift/trim changes to left stick. Update 05/23/2018: These gimbals are quite small and light weight. When calibrating them with OpenTX it is best to move the sticks only directly right/left, return the stick to center and then directly up/down and like the other M series gimbals only touching lightly against the stops in each direction. S.Port How to here https://www.rcgroups.com/forums/show...28&postcount=3 Antennas There is an internal antenna and a mount provided for a optional extra cost external antenna. The antenna to be used is selected in OpenTX. See external antenna image below. The external antenna connector is recessed in the top of the system like the X10S only deeper. That reduces the amount space to grip the antenna base when installing. But from my range testing there will not be a need for a external antenna for LOS flying. Range Test Range check to RSSI 42 using external and internal antenna. The tests were done in range test mode where the X-Lite RF power is reduced to 1/30th of full range. The range test mode is a feature included with all FrSky radio systems that provides an excellent way to verify that the RF system is working correctly for the transmitter and the receiver. FrSKy recommends that in range test mode, that the distance achieved in the test be greater than 90'. Temperature 70 degrees, humidity 85%, had been raining, but street mostly dry. Tested with X8R equipped with whisker antennas placed free standing on a non-metallic stand about 5� off ground. Test in residential neighborhood that is not the best for testing, but is a benchmark area that I test all my systems and receivers to. Test with internal antenna in range test mode 207�. See map image below. More than adequate range for typical LOS flying of small aircraft and multirotor. Test with FrSky T external antenna in range test mode 303� See map image below. Range similar to Q X7, X12S and X10S in same test area. Update 05/19/18 I did another internal antenna range test in range test mode (1/30th of full range) today. At 207' I was at RSSI of 42, as before, but kept moving away to see where the failsafe distance would be. I made it to 300' with no failsafe on the way and a RSSI of 38. Case The front of the case, top and battery caps are coated with flat black soft touch coating that gives the system a quality look and feel. The back of the case arms are covered with rubber like feel grips. Above the grips on the back of the system is a matt finish that continues the quality look. The mini joystick, exit and shift key controls on the front of system have a soft rubber like feel. The trim cross has a shiny smooth silver coating and the power button has a matt silver finish. See high-resolution images below. Battery and Charging Options The system uses Li-ion 18500 flat top batteries. I originally needed batteries fast so I purchased a EBL charger and batteries from Amazon. Through no fault of FrSky my evaluation system ran into all kinds of shipping delays and in the end I had lots of time to get batteries. The EBL will be OK for testing the the a battery like the NCR18500A would most likely be a much better option. When removing the battery caps/handle bottom push in firmly on the end to release the retaining locks so the end cap turns easily. Edit 05/21/18: I've been using the EBL batteries with my testing and have charged them three times with The EBL charger and it all seems to work well. Edit 07/10/18: Upgraded to the XTAR Master VC2 Plus charger sold by Aloft Hobbies https://alofthobbies.com/222xtar-master-vc2-plus.html Display The display is 128*64 outdoor readable backlight LCD that is 1 9/16� wide. Indoors the backlight at 100 is quite bright. Being LCD the outdoor viewing is good. From what I�ve seen so far the data on the screen is presented the same as the Q X7 but just smaller in overall size. If a person has good vision the small size will be fine, but could be a problem for folks with poor vision. Even though the back lighting is good I find it easer to read in direct bright sunlight. Flight Testing Multirotor I use my Q X7 systems to fly my micro quads, but they use the 4 in 1 module, so for my first fight testing I�m using one of my Arris 250 quads that has a FrSky X4R SB receiver. See image below. I just copied my Q X7 settings manually to the X-Lite and used the top left front switch for mode and the back for alarm. Then all I needed to do is bind the Arris 250 to the X-Lite, discover sensors, and set the battery alarms in the logic switches and special functions. Outdoor flying was not good today so I flew a pack indoors and the X-Lite controls felt really good and all went well. Kind of strange in way how after three days of handling the X-Lite my Q X7s feel large, heavy and bulky. Fixed Wing Glow Power 06/05/18, Flight testing today with OpenTX nighty build N619. I made one fight on the external antenna and one flight on the internal antenna setting (external antenna removed). Testing was done with my 50" wing span glow powered test mule balsa aircraft with a X4R receiver. Both fights were uneventful with no issues radio control wise. The main plan was to get some data logs to analyze before more flights. The nearest I can tell measuring using Google maps, the maxim LOS was about 800', but three sides of our flying site is over flying treed areas so it is hard to know exactly how far out I was flying looking at the map. I also expect that the trees may absorb some of the signal even though I'm flying LOS. The maximum altitude most likely did not exceed 300' with the majority of the flying a lower levels. It has been raining the last few days, but the ground was dry. With the FrSky T external antenna there was one 46 RSSI event, two 48 events and ten 49 events and the rest all above 50. The highest RSSI was 96. The mathematical average for the RSSI was 71.32. With the internal antenna there were two 46 RSSI events, two 47 events and six 49 events and the rest all above 50. The highest RSSI was 96. The mathematical average for the RSSI was 66.44. During my fight testing I did not pay any attention to antenna orientation and flew the way I usually do and not always facing the aircraft. The 800' LOS was mostly on the base leg of the landing pattern when the aircraft is lower to the ground and over the treed area. My test mule was also used for my X10S flight testing at the same flying field and you can compare the X10S RSSI levels here https://www.rcgroups.com/forums/show...&postcount=454 Overall I think the X-Lite compares very well. The X-Lite ergonomics felt good during the flights, but the very, very light gimbal stick feel compared to my Horus and Q X7 systems took some time to feel comfortable. Using S1 for throttle idle trim of the glow engine idle worked excellent. See the section below for the how to. Using S1 Slider For Throttle Idle Trim For glow and gas engines it is helpful to move the throttle idle trim from the two thumb function of holding down the shift key and then using the cross button to trim the idle speed to the S1 slider. Using the S1 slider, idle trim can be adjusted without taking thumbs off the sticks. Using Mixes Here is a mix solution from �pressalltheknobs� RCG user with more information is here https://www.rcgroups.com/forums/show...Trim-Idle-Only [I3] Thr Weight (+100%) NoTrim *= S1 Weight(-12%) NoTrim Offset(88%) += S1 Weight(+12%) NoTrim Offset(12%) Note the first S1 mix in multiply and the second add. Using GVRs and Mixes Here is another solution from �Miami Mike� RCG user with more information here https://www.rcgroups.com/forums/show...&postcount=100 CH3 MAX Weight(+100%) += S1 Weight(-GV1) Offset(-GV1) *= I3:Thr Weight(+100%) NoTrim += S1 Weight(+GV1) Offset(GV1) First, choose a global variable to set the range for S1. In this example GV1 is used. Because of the combination of weights and offsets used, the percentage range of S1 will be four times the value of the global variable. For example, a GV1 setting of 5% will give S1 a range of -100% to -80%. Set the units to % and set the source to Flight mode 0 value in all flight modes above FM0. Also set Min and Max limits for that global variable to keep it within reasonable boundaries. Bluetooth Bluetooth will be available as an extra cost option. The evaluation unit has Bluetooth and I did a test connection with an Android Free Link beta version and the X-Lite connected to Free Link. But because it is beta without the dashboard all I could do is test the connection with configuring a S6R bound to the X-Lite. The Bluetooth controls are at the bottom of the hardware screen. System Configurations (SKUs) Red or black How to Documents On-line OpenTX manual http://openrcforums.com/forum/viewtopic.php?t=10905 R9M Lite Module and R9 Slim+ Receiver Testing and review here https://www.rcgroups.com/forums/show...&postcount=542 MPM Lite Module FrSky Multi Protocol Module review and how to https://www.rcgroups.com/forums/show...&postcount=909 High Resolution Images Unboxing photos, screen images, high resolution externa and internal images. ImagesView all Images in thread
|
|
|
Last edited by Jet_Flyer; Nov 28, 2021 at 06:10 PM.
|


|
|
|
|
|
|
Thread OP
|
Smart Port Flashing Of FrSky Devices
The X-Lite Taranis is equipped with a Smart Port (S.Port) next to the USB connector. OpenTX provides the ability to flash firmware to FrSky devices like recivers, redundancy bus, etc that support S.Port flashing. The following are the steps for S.Port flashing and assumes the system has been configured with a SD card: 1. On the X-Lite hold the cross key (trim pad) down on all four corners and press the X-Lite power on. 2. connect a micro USB data cable to the X-Lite USB port and a Windows computer USB port. After a few seconds two File Explorer windows will open, one for the SD card and one for the internal memory. 3. From the FrSky website download the device firmware needed. Unzip the file and copy the file to the FIRMWARE folder of the SD card. You may need to shorten the file name, see image below. 4. Using the File Explorer eject feature eject both drives and disconnect the USB cable. 5. On the X-Lite select "EXIT" and the system exits to the main system screen. 6. Using a male/male cable connect to the X-Lite S.Port and the S.Port of the device to be flashed. See image below, yellow wire is signal. 7. On the X-Lite long-press the mini joystick to the left. 8. Navigate to the SD card and the FIRMWARE folder. 9. Select the firmware file in the folder and long-press on it. 10. On the popup windows select "Flash S.Port" and press on it. See image below. 11. The flashing process begins with a progress bar. See image below. 12. When flashing is complete disconnect cable from X-Lite. When flashing receivers they should be rebound to the X-Lite to make sure the link bind takes advantage of the new firmware, Images are high resolution, click twice for full view. Mike |
|
|
Last edited by Jet_Flyer; May 23, 2018 at 12:54 PM.
|


|
|
|
|
|
Hi everyone! Here are some photos of my evaluation unit. Please, remember: this is an EVALUATION UNIT only as Mike already stated. Don't be too harsh when judging the build quality or choice of materials upon the pictures of this unit. Color schemes, some elements and shell all are subject to slight changes in future. All minor issues would be fixed in mass production.
My first impression would come up in the next reserved post. Mike has already described tech specs. |
|
|
Last edited by Datos; May 18, 2018 at 12:11 AM.
|


|
|
|
|
|
Hi again. As promised – my first impressions review of FrSKY Taranis X-Lite.
Notice: my review is based on the EVALUATION unit which is a subject to slight changes and polishing before it goes to a mass production. My unit has arrived couple of days ago and I’ve already had a chance to perform several flights. I am testing X-Lite with the smallest model I possess – KK 90GT quad equipped with tiny and perfectly fitting FrSKY R-XSR receiver. X-Lite arrived in small dedicated EVA case. The batteries were not included. Again, EVA case and box contents might be a subject to change and I won’t emphasize on it… My choice of batteries: Panasonic NCR18500A 2040 mAh X2. Any regular RC charger would deal with such cells. Currently, X-Lite doesn’t feature internal charger and I’ve also purchased 18500 cells holder with power lead contacts in order to charge it comfortably. Both batteries should be placed inside X-Lite grips with positive leads facing forward (up, inside the radio). Both are secured at place by specially designed battery caps with a contact spring and side contact openings on grips. Install the battery, align grip contacts with contact openings on battery caps, press firmly and rotate the cap unit it is closed. There were two additional things in EVA case: - Dedicated external antenna which is very cute  Small, made of a plastic and also has FrSKY logo (which means that there is a special mold created for this little detail). Small, made of a plastic and also has FrSKY logo (which means that there is a special mold created for this little detail). * Note that this external antenna is NOT a part of standard shipment. - A piece of heatshrink tube to apply to switches. *again – final product accessories and box contents are a subject to change. Design and Materials: I wish I had Mike’s black unit on hands – it would be much easier for me to describe (I prefer dark or muted color schemes). My red unit facing part goes from dark red to very bright red with some violet tint… Hard to explain… It is made of plastic with soft-touch feel. Shiny aluminum stick pedestals, aluminum plate with polished FrSKY name at the top... looks very attracting. All buttons are made of plastic as well as stick center parts. Aluminum grill inside speaker openings looks perfect. Back side of my unit is simple matt red. This plastic part has been molded with the addition of red paint (or using red plastic as a raw material). Back rubber on the grips is grey and does its job perfectly. Control Elements, Ports and screen: Front: - Sticks with adjustable length Tip length is adjusted with the help of a screw at the center. I am fine with the size of the tips and overall stick length. I even can use my style of flying using two fingers (pinch). - 4-way X button Main function of this button in the current version of OpenTX FW is adjusting trims as well as entering bootloader mode when this button pressed in the center while X-Lite is being switched on. I hope that OpenTX team would introduce some new ways of using this button. - 4-way control joystick with center press (ENTER) Most of the operations in the current FW version are performed with this joystick: -long left: entering system menu | fast scroll -long right: entering model menu | fast scroll -long up: statistics -short up: main screen view change | scrolling -long down: telemetry screen -short down: main screen view change | scrolling -center short press: enter -center long press: reset screen - Back button - FN button (does capital letters but is a subject for future changes) - Power ON | OFF button with blue|red|green LED - 128x64 TFT LCD screen Despite its physical size and standard resolution of 128X64 pixels – screen is very good. It doesn’t have any issues with brightness/ contrast or vertical lines like it was in early versions of X9D. Max brightness is more than enough for indoor use and there are no problems in direct sunlight due to transflective type of LCD: the brighter is the light source – the better is the contrast of the screen. All information is perfectly readable. Maybe, such size would cause some troubles for people wearing glasses, but not for me – it is small but very usable and neat. - Speaker Loud enough and sounds good. Just a fraction of distortions at max volume but no RF noise whatsoever. Very good. Top: - 3 X 3POS switches (1 short, 2 long). Are a subject to change. Switches are smaller than regular, especially two back ones. FrSKY suggests to use heatshrink tube to improve the tactile feel and increase their size. It is a matter of several flying sessions to get used to such switches and I don’t think that this is a problem for a radio with such form factor. - 1 momentary switch (short, back right) - 2 rollers (sliders) with no center detent Smooth and tight. Centers can be detected by center beeps in OpenTX FW. All switches and sliders are easy to reach and convenient to use with middle or forefingers. Yes, in overall X-Lite feels very different to a regular classic RC radio but anyone who ever possessed Sony Playstation or Xbox should get the idea of how comfortably it feels at the end. Bottom: - 3.5mm headphones output - microSD card slot - microUSB port!!! Finally!!! I’ve got tired of searching rare miniUSB cable each time I want to connect to any of my FrSKY radios… so, I welcome FrSKY decision of introducing much more universal type of connector. - S.PORT (external modules, sensors, receivers FW upgrade) Back: - External module bay with 8 contacts and bay cover. FrSKY has already announced upcoming R9M Lite 900MHz module for such type of module bay. I would receive it soon and report about that. - Stick tension, mode, ratchet adjustment screws (4) under special screw rubber covers Now it is very easy to change mode and adjust spring tension and ratchets… 4 screws under rubber covers at the back (2 for ratchets and 2 for spring tensions)… Not focusing much on this because the amount of adjustments is a subject to change. One more important notice from FrSKY about using stick back adjustment screws: Use only original and corresponding screws to switch mode 1 / mode2 + other screws for other functions. The long one is for disabling back to center function and the short one is for adjusting the spring tension. Please, do not mix the 2 types of screws. For my liking, sticks are ok. Some time to spend to get used to smaller size and I am good to go. Max spring tension is on softer side compared to X10 max tension but again – don’t forget the form factor and purpose. In overall, I like the design and feel of X-Lite in hands. It feels very solid, looks neat and very attractive. Handling is comfortable and might become the best type of RC radio for many. Many people would feel at home with this product just because it reflects the approach and grip of different gaming controllers. I would say that this is a perfect solution for everyday use with any type of smaller/moddle rc models and especially for different types of FPV quads. It is small, universal and consumes just a little space in the backpack. X-Lite shows that FrSKY does a good job of eliminating child issues, working on the maturity of a product from the start and listening to RC community members. No problems with LCD screen, no buzz from the speaker (speaker tests in this POST), microUSB port, two types of antennas, no need to open the radio to adjust sticks… most of those things were addressed by different pilots earlier and finally implemented in X-Lite – good. OpenTX FW nightly build version for X-Lite seems to be fully functional by now. I’ve done about 10 flights with my FPV quad using telemetry, special functions, logical switches, sounds, haptic and all other features except Lua scripts - everything works as expected. RSSI figures using internal antenna of X-Lite stay very similar to X10 with the same model. No unexpected behavior of the model itself or BetaFlight GUI RC tuning section. Everything works fine, no surprises in real life use. While conducting further X-Lite tests – you are free to ask any questions about it. Waiting for the final release date and final announcements from FrSKY. The game gets more interesting  As a bonus: some pictures of the internals. Very neat inside. * those are pics of insides of EVALUATION unit only. And I have also attached the picture of external module pinout, 1-8, starts from the right to the left |
|
|
Last edited by Datos; May 22, 2018 at 03:50 PM.
|


|
|
|
|
|
Thanks guys.
|
|
|
|
|
|
|
|
|
Thank you, Mike, for all thre excellent high-res shots!
|
|
Latest blog entry: Explore new (old) forms of flight! :)
|
|
|
|
|
|
|
Panasonic NCR18500A, 2040mAh cells.
Very good start Mike.
Here is my evaluation of the Panasonic cells from the other thread. I tested the Panasonic cells and I have to say, I�m very happy with the results. (The results are nearly identical to the info found online.) First thing I checked was the delivery voltage and they are both at 3.531v. This is normal, as I�m told, to meet current shipping regulations. No manufacturer's branding on the cells, and made in China. A stick on label states actual (?) capacity of 2000mah. Each cell... Charged to 4.2v, at 400mA charge rate. Discharged at 200mA rate down to 3.3v. (slight voltage rebound to 3.33v) * X-Lite Operating Current: 190mA@7.4V * Default Low Voltage Warning in OpenTx comes on at 3.3v per cell. (However LVW is user configurable). Both cells, virtually identical results. Run time = 9hr 12 min. Discharged 1875mA. Purchased from OrbTronic. https://www.orbtronic.com/18500-batt...sonic-flat-top Online Info. https://lygte-info.dk/review/batteri...een)%20UK.html |
|
Last edited by KC; May 17, 2018 at 09:46 PM.
|
|


|
|
|
|
Thread OP
|
Thanks added to the index.
So far so good with the X-Lite. I installed the batteries and it powered up OK. OpenTX was in mode 1 and the hardware in mode 2 so I had to change OpenTX and also to AETR. Mike |
|
|
Last edited by Jet_Flyer; Apr 16, 2019 at 08:27 AM.
|
|
|
|
|
|
Looks great! Thanks for all your hard work. How about a pic of the module bay with the cover off? Thanks!
|
|
|
|
|
|
|
|
|
Thank you in particular for this comparison with an X-box controller!
A few weeks ago, I borrowed my kid's X-box controller to get used to the shape incoming Taranis X-Lite. Immediately, I thought to myself: "This is awfully small."  It's a relief to see that the X-Lite is a good bit larger than an actual X-box controller! I'm sure this will improve ergonomics for many, especially pinchers like me. 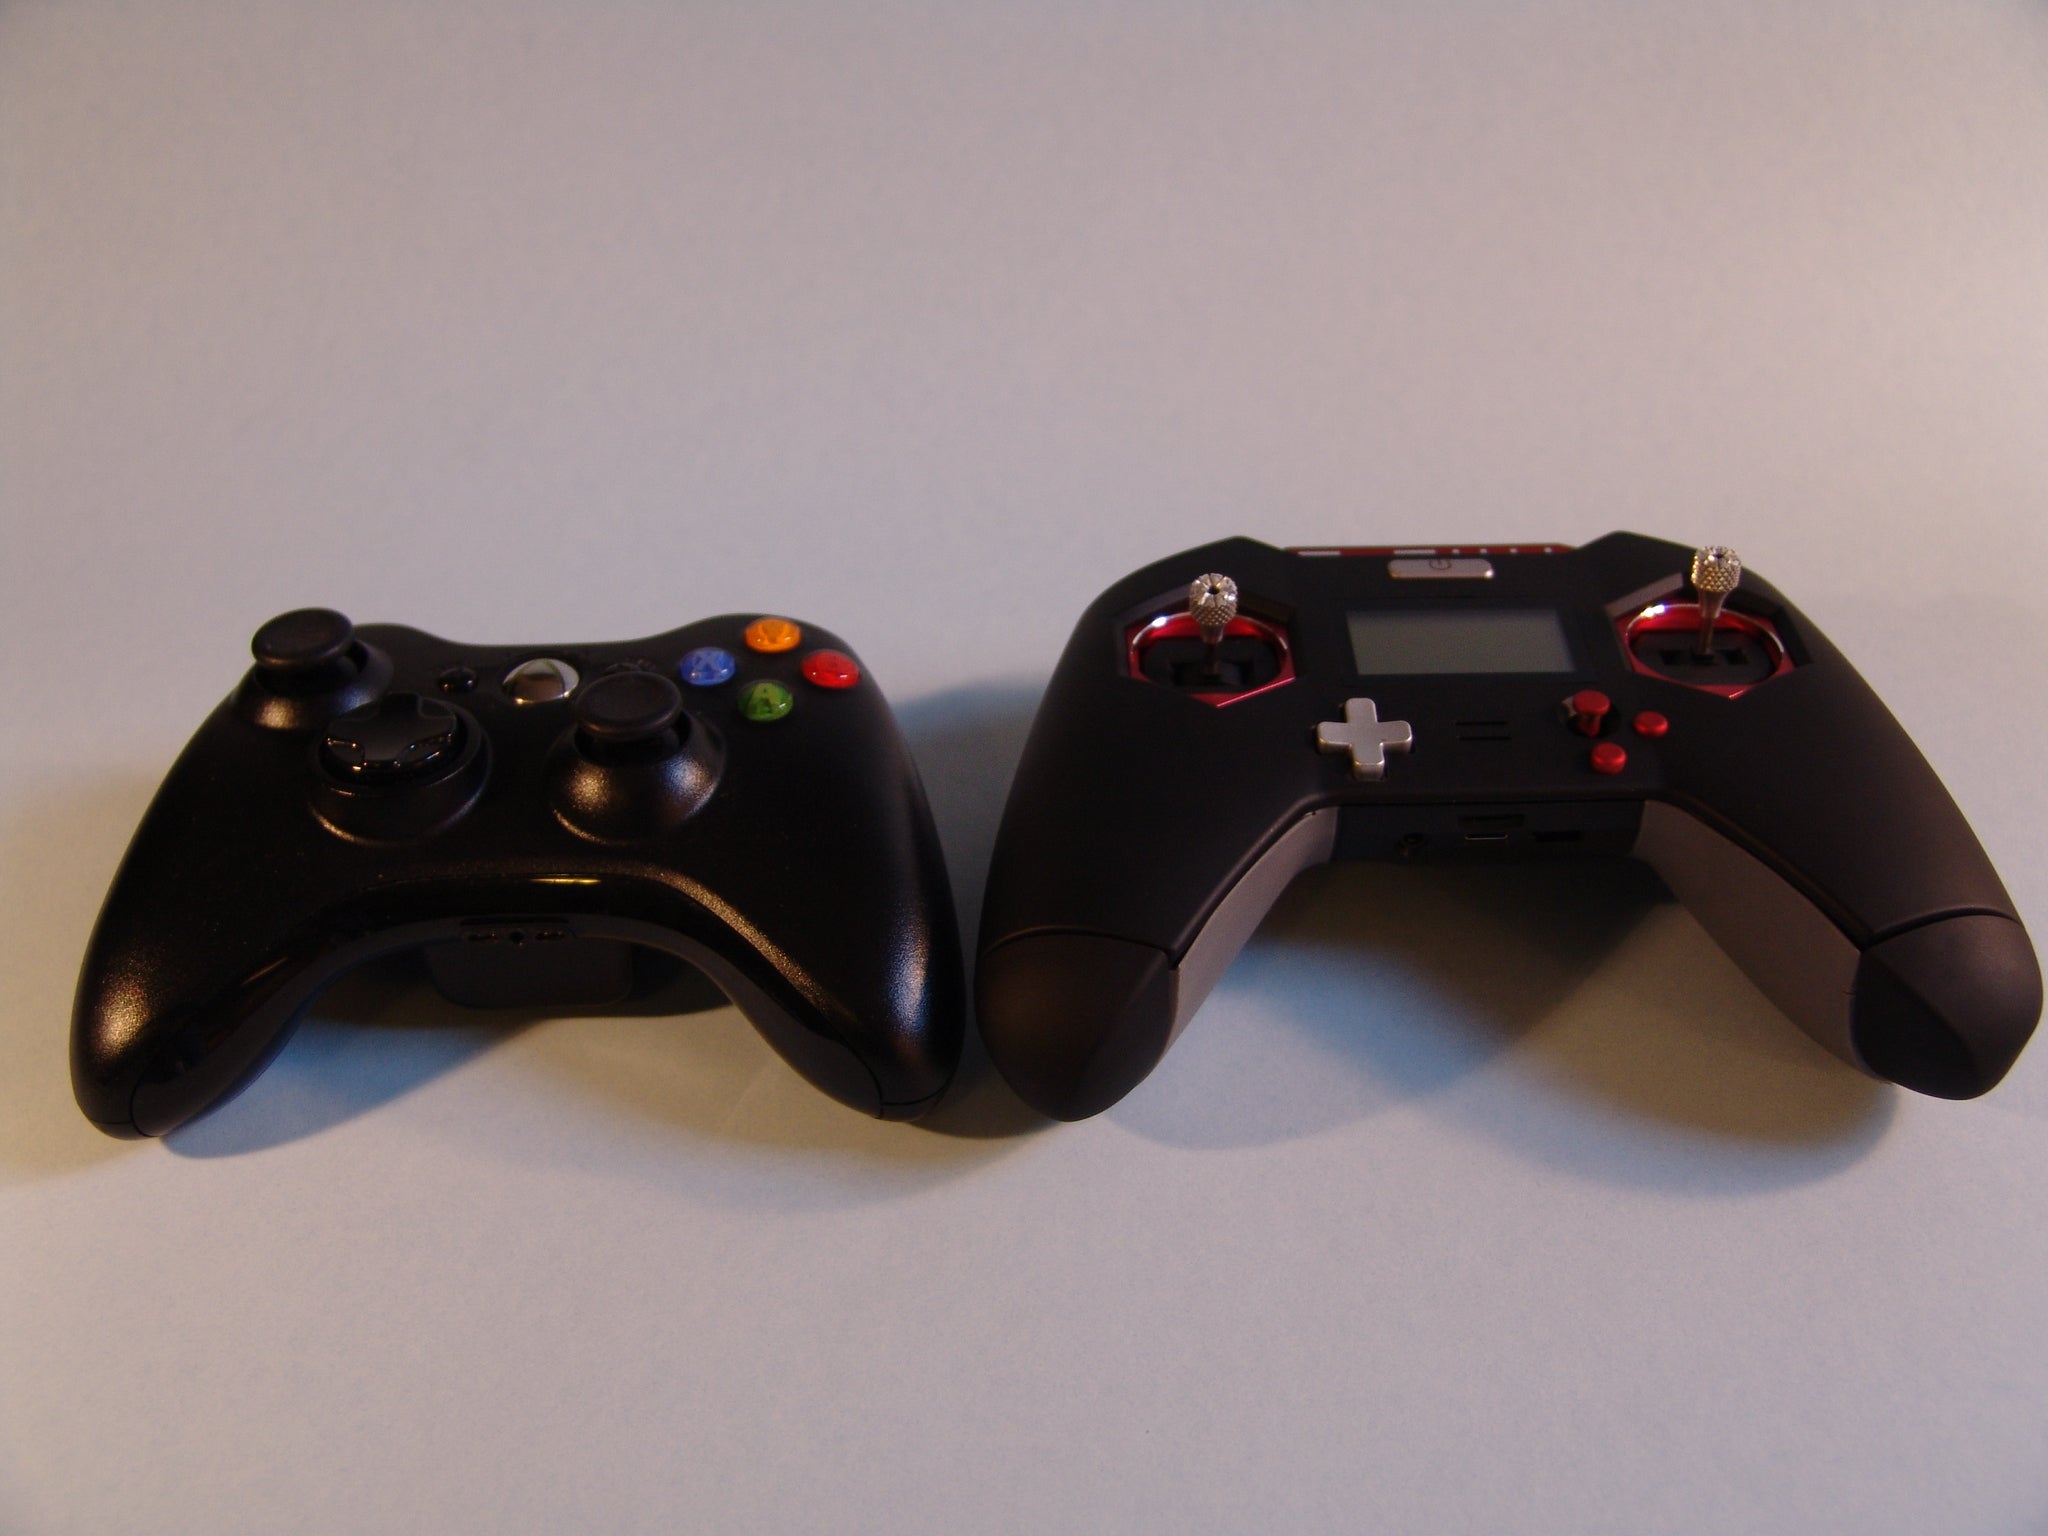
|
|
Last edited by Brainstorm; May 19, 2018 at 12:55 PM.
|
|
|
|
||
|
|
Quote:
The contrast (in size) between Taranis X-Lite and Horus X10 is quite striking!
|
|
|
Latest blog entry: Explore new (old) forms of flight! :)
|
||
«
Previous Thread
|
Next Thread
»
| Thread Tools | |


| Similar Threads | |||||
| Category | Thread | Thread Starter | Forum | Replies | Last Post |
| Discussion | Frsky X-Lite and other Taranis (X9 Lite, X-Lite S, X-Lite Pro) | Frimen | Radios | 5015 | Feb 27, 2024 10:10 PM |
| Discussion | FrSky Taranis, Taranis Plus, Taranis E - OpenTX 2.1.X | Jet_Flyer | Radios | 7369 | Oct 29, 2022 01:45 PM |
| Discussion | FRSky R9M Lite - Long range mini module for Taranis X-Lite | sevet | Radios | 42 | Dec 14, 2020 10:11 AM |
| New Product | FrSky New Arrival - Taranis X-Lite Compact Transmitter Release! | AndreaHuang | FrSky | 12 | Sep 19, 2018 09:30 PM |
| Discussion | FrSky Taranis X-LITE 2.4GHz ACCST 16CH RC Transmitter | scousethief | Banggood.com | 0 | Jan 26, 2018 06:42 AM |