|
|
|
|
Thread OP
|
Discussion
The Mobius Maxi Support Thread (Read InfoPosts 1-8 before posting)
Thread Usage Protocol
This thread is hosted by Mobius Maxi users, not the camera developer, and is part of a radio controlled model web site in a Forum dedicated to Aerial Photography. As such, the content of this thread is intended to focus on the topic of the Mobius Maxi Actioncam and it's operation and capabilities for aerial video purposes, NOT other cameras from the Mobius developer. A basic comparison of those other cameras can be found in this User Thread. There will be users interested in the Maxi for purposes other than aerial video, and you are welcome here for the purpose of helping you with the camera's operation. But issues with adapting the camera to uses other than aerial video are considered off topic, and should be discussed in other forums or threads, e.g.:
Finally, this thread is a "self-help" thread! The 8 "info posts" following this one contain much information that can answer many user questions. These info posts will be updated as needed with new information. It is my intent and expectation that thread posters will "do their homework" and access these posts before posting new questions. If you still have questions, the advanced thread search function should be used to help find posts that relate to your issue. This will not only help keep the thread from becoming bloated with redundant questions that have been asked and answered many times, it will also keep the thread more interesting to the target audience. If this is your first time reading this thread, please read the next 8 posts now to familiarize yourself with this thread's structure and resources. These "InfoThreads" will be continually updated with any new information of general interest, so always check here first before asking questions. Thanks in advance for your cooperation! |
|
|
Last edited by Tom Frank; Aug 29, 2021 at 01:35 PM.
Reason: minor text correction in link to FPV issues
|
|
|
|
|
|
|
Thread OP
|
Vendors and Specifications
The Mobius Maxi is a "big brother" to the Mobius Mini, with similar video capture and processing hardware. but with added capability, including larger capacity battery. This necessitated a larger case with better heat dissipation characteristics, resulting in the camera being similar size and weigh as the Mobius M2. The firmware will continue to mature and be refined as much as possible. The developer monitors this thread for user feedback on the camera's functionality.
Verified Vendors [B]You are advised to only buy your Maxi from a developer-verified source. Verified vendors not only sell the real Maxi camera, accessories, and some replacement parts, they have pledged a commitment to customer satisfaction, both before and after a sale, and are your first contact if any early problems are found and not caused by user abuse, crash damage, etc. If parts are not listed on their sites, use their web site contact link to request what you need. Payment via PayPal is usually available. The developer's China eBay direct seller (eletoponline365) is the official source for the camera's sold by re-sellers, and will usually have the lowest delivered prices as well as common replacement parts not listed in store web pages. They can also relay user feedback to the developer (email eletoponline@gmail.com). The other re-sellers may offer quicker delivery depending on your location. Prices can vary from one vendor to the other and depends on what is included in different accessory packages. The cost from the China direct seller eBay outlets will be nominally about US$75 with free shipping. Direct Seller: China: eletoponline365Re-sellers: China: BangGoodNon-verified sellers may be selling fake imitation cameras at seemingly bargain prices, and you should be wary of buying from them. NOTE: Both users and vendors are expected to abide by this forum and thread vendor communication protocol. Maxi camera and included accessory pics:  
|
|
|
Last edited by Tom Frank; Feb 21, 2022 at 10:18 PM.
|
|
|
|
|
Thread OP
|
Camera Configuration and Firmware
Camera Configuration and Firmware Information
It is strongly recommended that users with Windows PCs always use the mSetup graphical user interface (GUI) program to change camera settings and update firmware. This post has an overview of the Windows mSetup GUI software program authored by Isoprop, as well as the link for downloading it and his detailed Maxi User Guide. Maxi Smart Phone Apps The developer has written both Android and iPhone Apps (named MOBIUS MAXI WIFI) to enable configuring camera settings, live viewing the camera's FOV, and playing or downloading videos or images from the camera's memory card in the field. The Android App is available at the Google Play store. The iPhone App is available for download only at the Apple App store when accessed via an iOS mobile device (iPhone or iPad). This iTunes website shows a very preview of a few App screens, but you cannot download the App from there. If a problem with an App is found, email details directly to the developer at App@MobiusActionCam.com. NOTE: The camera WiFi signal is weak with a very short range and high latency. Do NOT attempt to use this function for FPV flying! New firmware and user settings can be loaded into the camera manually as a last resort (see below), but it requires specific file editing and handling procedures as well as multiple button press sequences on the camera. It is easy for user errors to cause these updates to fail! Also, there are numerous camera settings, some of which conflict with each other if both are toggled on at the same time. The GUI program will not permit these conflicting settings to be set, so do yourself a favor and use the GUI tools if possible. Optional Manual User Configuration Setting Procedure Via Config Text File Editing If a GUI tool is not available for your computer or you would rather just edit the configuration text file manually, it's easy to do, just follow these steps exactly: 1. Download the camera's configuration file to the flash card in the camera (HOLD DOWN MODE BUTTON, THEN ALSO HOLD DOWN POWER BUTTON [the LEDs will flash for several seconds] UNTIL THE YELLOW LED TURNS ON STEADY). 2. Turn the camera on, connect it to your PC, and access the camera root directory when it goes into the "removable disk mode". 3. Open the "SysCfg2C.txt" config text file with a simple (ASCII) text editor (e.g. the familiar "Notepad" text editor for Windows users). The file will look similar to this: Code:
DateTime= 2020/01/09-16:42 ;Date time setting,yyyy/mm/dd-hh:mm DateTime_Update=0 ;Confirm to update the Date/Time or not , 0: No, 1: Yes DateStyle=1 ;Set date format,0:YYYY/MM/DD, 1:MM/DD/YYYY , 2:DD/MM/YYYY VIDEO MODE 1 Video1_Size=16 ;Set Video1 Size,0:3840x2160(24fps),1:2704x1524(30fps),2:1920x1440(30fps),3:FHD(60fps),4:FHD(50fps),5:FHD(48fps),6:FHD(30fps),7:FHD(25fps),8:FHD(24fps),9:HD(120fps),10:HD(100fps), 11:HD(60fps),12:HD(50fps), ;13:HD(30fps),14:HD(25fps),15:HD(24fps)16:848x480(240fps) Video1_FOV=1 ;Set Field of view, 0:Wide FOV, 1:Narrow FOV Video1_Clip_Length=5 ;Set clip length, 0: 1 Min, 1: 3 Min, 2: 5 Min, 3: 10 Min, 4:15 Min, 5: Max to 4G Video1_Quality=0 ;Set VideoQuality, 0:Super Fine, 1:Fine, 2:Normal, 3:Extreme(Warning: may have some dropped frames for some memory cards or other issues if set to Extremely High Bitrate.) Video1_Movie_Voice=2 ;Set recording voice, 0: Off, 1: Low, 2: Normal, 3: High Video1_Ext_Mic=0 ;Set extern micphone, 0: Off, 1: On. Warning: please keep it disabled as default, unless you have a working external mic. Enable ex-mic will disable the camera mic. Video1_Loop_Record=0 ;Set loop record, 0: Off, 1: On Video1_Date_Stamp=2 ;Set DateStamp, 0: Off, 1: Date, 2: Date and Time Video1_Recording_LED=3 ;Set recording LED, 0: Both Off, 1: Front Off Rear On, 2: Front On Rear Off, 3:Both On Video1_Auto_Flip=0 ;Set auto flip on/off, 0: Off, 1: On Video1_Orientation=0 ;Set sensor Orientation, 0:Normal upright, 1:Inverted (rotate 180 deg.), 2:Mirror horizontally, 3:Mirror vertically Video1_Stabilizer=0 ;Set stabilizer, 0: off, 1: on Video1_Media_Format=1 ;Set Media Format, 0: MOV, 1: MP4 Video1_White_Balance=0 ;Set white balance mode, 0: AWB, 1: Daylight, 2: Cloudy, 3: Tungsten, 4:FluorH, 5:FluorL, 6:Customer1, 7:Customer2, 8:Customer3 Video1_AE/AWB_Lock=0 ;Set AE/AWB lock(quick press power button to set locks), 0: AE/AWB lock off, 1: Both AE/AWB, 2: Only AE, 3: Only AWB Video1_Sharpness=0 ;Set Sharpness, values from -128 to +127,In 1 increments,default value is 0 Video1_Saturation=0 ;Set Saturation,values from -128 to +127,In 1 increments,default value is 0 Video1_Contrast=0 ;Set Contrast,values from -128 to +127,In 1 increments,default value is 0 Video1_AE_Metering=1 ;Set AEMetering method, 0: Center area, 1: Multi spot, 2: Center spot, 3: Top, 4: Bottom ,5: High light priority, 6: Low light priority Video1_Exposure=0 ;Set Exposure value,range from -128 to +127,In 1 increments,default value is 0 Video1_Effect=0 ;Set Color Effect,0:Standard,1:Mono,2:Sepia,3:Vivid,4:Natural,5:Negative,6:Warm,7:Cool VIDEO MODE 2 Video2_Size=16 ;Set Video2 Size,0:3840x2160(24fps),1:2704x1524(30fps),2:1920x1440(30fps),3:FHD(60fps),4:FHD(50fps),5:FHD(48fps),6:FHD(30fps),7:FHD(25fps),8:FHD(24fps),9:HD(120fps),10:HD(100fps), 11:HD(60fps),12:HD(50fps), ;13:HD(30fps),14:HD(25fps),15:HD(24fps)16:848x480(240fps) Video2_FOV=1 ;Set Field of view, 0:Wide FOV, 1:Narrow FOV Video2_Clip_Length=5 ;Set clip length, 0: 1 Min, 1: 3 Min, 2: 5 Min, 3: 10 Min, 4:15 Min, 5: Max to 4G Video2_Quality=0 ;Set VideoQuality, 0:Super Fine, 1:Fine, 2:Normal, 3:Extreme(Warning: may have some dropped frames for some memory cards or other issues if set to Extremely High Bitrate.) Video2_Movie_Voice=2 ;Set recording voice, 0: Off, 1: Low, 2: Normal, 3: High Video2_Ext_Mic=0 ;Set extern micphone, 0: Off, 1: On. Warning: please keep it disabled as default, unless you have a working external mic. Enable ex-mic will disable the camera mic. Video2_Loop_Record=0 ;Set loop record, 0: Off, 1: On Video2_Date_Stamp=2 ;Set DateStamp, 0: Off, 1: Date, 2: Date and Time Video2_Recording_LED=3 ;Set recording LED, 0: Both Off, 1: Front Off Rear On, 2: Front On Rear Off, 3:Both On Video2_Auto_Flip=0 ;Set auto flip on/off, 0: Off, 1: On Video2_Orientation=0 ;Set sensor Orientation, 0:Normal upright, 1:Inverted (rotate 180 deg.), 2:Mirror horizontally, 3:Mirror vertically Video2_Stabilizer=0 ;Set stabilizer, 0: off, 1: on Video2_Media_Format=1 ;Set Media Format, 0: MOV, 1: MP4 Video2_White_Balance=0 ;Set white balance mode, 0: AWB, 1: Daylight, 2: Cloudy, 3: Tungsten, 4:FluorH, 5:FluorL, 6:Customer1, 7:Customer2, 8:Customer3 Video2_AE/AWB_Lock=0 ;Set AE/AWB lock(quick press power button to set locks), 0: AE/AWB lock off, 1: Both AE/AWB, 2: Only AE, 3: Only AWB Video2_Sharpness=-64 ;Set Sharpness,values from -128 to +127,In 1 increments,default value is 0 Video2_Saturation=0 ;Set Saturation,values from -128 to +127,In 1 increments,default value is 0 Video2_Contrast=0 ;Set Contrast,values from -128 to +127,In 1 increments,default value is 0 Video2_AE_Metering=1 ;Set AEMetering method, 0: Center area, 1: Multi spot, 2: Center spot, 3: Top, 4: Bottom ,5: High light priority, 6: Low light priority Video2_Exposure=0 ;Set Exposure value,range from -128 to +127,In 1 increments,default value is 0 Video2_Effect=0 ;Set Color Effect,0:Standard,1:Mono,2:Sepia,3:Vivid,4:Natural,5:Negative,6:Warm,7:Cool PHOTO MODE Image_Size=1 ;Set image size, 0: 2704x1524, 1: 2048x1536, 2:1600x1200,3:1920x1080,4:1280x960 Image_Quality=0 ;Set image Quality, 0: Super Fine 1: Fine 2: Normal Image_White_Balance=0 ;Set white balance mode, 0: AWB, 1: Daylight, 2: Cloudy, 3: Tungsten, 4:FluorH, 5:FluorL, 6:Customer1, 7:Customer2, 8:Customer3 Image_Sharpness=-64 ;Set Sharpness,values from -128 to +127,In 1 increments,default value is 0 Image_Saturation=0 ;Set Saturation,values from -128 to +127,In 1 increments,default value is 0 Image_Contrast=0 ;Set Contrast,values from -128 to +127,In 1 increments,default value is 0 Image_AE_Metering=1 ;Set AEMetering method, 0: Center area, 1: Multi spot, 2: Center spot, 3: Top, 4: Bottom ,5: High light priority, 6: Low light priority Image_Exposure=0 ;Set Exposure value,range from -128 to +127,In 1 increments,default value is 0 Image_Effect=0 ;Set Color Effect,0:Standard,1:Mono,2:Sepia,3:Vivid,4:Natural,5:Negative,6:Warm,7:Cool Image_Date_Stamp=2 ;Set DateStamp, 0: Off, 1: Date, 2: Date and Time Time_Lapse=0 ;Set TimeLapse interval, 0: Off, 1: 3Sec, 2: 5Sec, 3: 10Sec, 4: 30Sec, 5: 1Min Time_Lapse_Duration=0 ;Set Time Lapse Duration, 0: Unlimited, 1: 5Min, 2: 10Min, 3: 15Min, 4: 20Min, 5: 30Min, 6: 60Min Driver_Mode=0 ;Set shutter delay, 0: Off, 1: 2 Seconds, 2: 10 Seconds, 3: 10 Seconds double exposure Photo_Burst=0 ;Set Photo Burst, 0:Off , 1: 3 Photos, 2: 5 Photos, 3: 10 Photos System Setting Sleep_Time=1 ;Set auto-shutdown delay, 0: Off, 1: 30 Sec, 2: 1 Min, 3:3 Min, 4: 5Min pwn_auto_rec=0 ;Set Auto Record with external power, 0: Off, 1: On Plug_Out_Adapter=0 ;Auto Off with External Power Disconnected, 0: Immediately off, 1: Delay a set time, 2:Records until battery empty Delay_Time=0 ;Set Power Off Delay Time, the default value is 2 Seconds; 0: 2 Sec, 1: 5 Sec, 2: 10 Sec, 3: 30 Sec, 4: 60 Sec, 5: 2 Min, 6: 5 Min, 7: 10 Min G_Sensor=0 ;Set gsensor sensitivity, 0: Off, 1: Low, 2: Medium, 3: High BeepControl=1 ;Set Beep sound off/on, 0: Off, 1: On Light_Freq=1 ;Set Light Frequency, 0: 50Hz, 1: 60Hz TV_Mode=0 ;Set TVMode, 0: NTSC, 1: PAL TV_Full_Screen=0 ;Set Full Screen On/Off, 0: Off, 1: On Video_Osd=1 ;Set video preview OSD, 0: Off, 1: On Photo_Osd=1 ;Set photo preview OSD, 0:Off, 1:On Language=0 ;Set Language, 0: English, 1: Deutsch, 2: Fran?ais, 3: Espa?ol, 4: Italiano, 5: Russian Motion_Detect=0 ;Set Motion Detect, 0: Off, 1: On MD_Sensitivity=0 ;Set Motion Detect Sensitivity, 0:High, 1:Normal, 2:Low MD_Timeout=2 ;Set Motion Detect Record time, 0:5S, 1:15S, 2:30S, 3:60S, 4:3Minutes, 5:5Minutes Customer_wb1_rgain=100 ;Set White Balance red gain,64 is 1x gain, Range is from 0~255 Customer_wb1_ggain=0 ;Set White Balance green gain,64 is 1x gain, Range is from 0~255 Customer_wb1_bgain=100 ;Set White Balance blue gain,64 is 1x gain, Range is from 0~255 Customer_wb2_rgain=100 ;Set White Balance red gain,64 is 1x gain, Range is from 0~255 Customer_wb2_ggain=0 ;Set White Balance green gain,64 is 1x gain, Range is from 0~255 Customer_wb2_bgain=100 ;Set White Balance blue gain,64 is 1x gain, Range is from 0~255 Customer_wb3_rgain=100 ;Set White Balance red gain,64 is 1x gain, Range is from 0~255 Customer_wb3_ggain=0 ;Set White Balance green gain,64 is 1x gain, Range is from 0~255 Customer_wb3_bgain=100 ;Set White Balance blue gain,64 is 1x gain, Range is from 0~255 Wifi_Auto_On=0 ;Enable WiFi when camera is turned on, 0: Disable, 1: Enable Wifi_While_Recording=0 ;Keeping WiFi connected when camera is recording, 0: Off, 1: On.Warning:keep wifi on while recording will consume more power and generate more heat. Please keep it off as defaulted. Set to on only when needed. Wifi_PW_Update=0 ;Enable Wifi PassWord update, 0: Disable, 1: Enable PassWord= 1234567890 ;set PassWord,the PassWord valid character is 0~9,A~Z,a~z, length >=8 and <=10;If the password changed, Please enter the password manually when connecting to wifi for the first time FIRMWARE: Mobius MAXI2.40 5. Save the file back to the memory card. 6. Load the config file back into the camera with the same button press sequence used to extract it, and you're done! The config file will be deleted from your memory card automatically after it loads back into the camera. If you want to keep it on the card for re-use at a later time, set the attribute flag on the file to "read only" with your computer when you are finished editing it. This can be handy for making frequently used config changes in the field without a computer or smart phone App, or FPV/monitor setup to toggle the settings via the camera's OSD display method. Alternate Manual User Configuration Setting Procedure Via Camera's Video Out OSD The Maxi has an On Screen Display (OSD) mode that can display/change its configuration settings via the camera buttons. To use this you must have a TV, FPV system, or other monitor that can display an analog NTSC or PAL composite video signal. This method is a bit unwieldy navigating through the various menus to toggle settings, but there are times when this might be the only method available. You MUST have the Maxi USB Video Out cable to feed the OSD video to your display hardware. More details on this are in Isoprop's User Guide linked above. Firmware Firmware updates will contain bug fixes, new or improved features, or both. You are advised to always update the firmware if you want your Maxi to give you all it can. You are strongly advise to ALWAYS use the GUI tool for all camera firmware changes (see above). The GUI will determine if your camera firmware is out of date, download the latest firmware if you agree, and install it for you, taking all the potential for user error out of it. The firmware development and refinement is a continuing process, and the most recent OFFICIALLY RELEASED versions will be kept attached to this post as downloadable zip files. Any problems found with the Released Firmware should be reported to me via PM. The most up-to-date firmware is available for manual download at the bottom of this page. Optional Manual Firmware Update Procedure The following procedure is for manually updating your camera firmware. It is not necessary to do this if you can use the Windows GUI configuration tool (see above). It will determine if your camera firmware is out of date, download the latest firmware if you agree, and install it for you, taking all the potential for user error out of it. You are strongly advise to ALWAYS use the GUI tools for all camera firmware changes. ALERT:
2. Copy the actual firmware file (FWTP2C.BRN) from it's identifying folder into the camera's flash card root directory (the one that opens when the camera connects as a removable drive). This can be done with the card in the camera connected to the computer as a Removable Drive, or externally in a card reader. But do NOT rename the file. If you do, the camera will not install it! 3. Disconnect the camera and make sure it is off.. 4. Insert the flash card containing the new firmware file into the camera (if not already in the camera). 5. Connect the camera to a reliable external USB power source (generic 2-wire power or PC USB data source). Note this is now a requirement in lieu of powering the camera with the internal battery to assure fail safe FW uploads. The camera will automatically boot and begin loading the FW as confirmed by blinking of the BLUE and RED (rear) LEDs. DO NOT PRESS ANY CAMERA BUTTONS WHILE THE INSTALLATION IS IN PROGRESS which takes about 40 sec. to complete. 6. When the FW installation is complete, the RED LED will turn off for a few seconds and the YELLOW LED will then turn on solid, indicating the FW file is has been automatically deleted from the memory card. 7. You're done! The camera will be in the normal start-up standby mode ready for use. All the settings will have been restored to camera defaults following FW installation, however, so you'll need extract the SyCfg2c.txt file to the camera memory card, edit it, and load it back into the camera to change any settings. Firmware Download Site This can be downloaded and installed manually or by using Isoprop's latest mSetup.exe Windows configuration utility (see above InfoPost #6 for link). |
|
|
Last edited by Tom Frank; Sep 24, 2021 at 11:28 AM.
Reason: text re-formatting
|
|
|
|
|
Thread OP
|
FAQs and Other Information
1. How does the Maxi WiFi work?
|
|
|
Last edited by Tom Frank; Jan 21, 2020 at 04:00 PM.
Reason: Added WiFi description
|
|
|
|
|
|
This is the original Mobius GUI which was created in co-operation with the developer and Tom.
The program supports all Mobius cameras (Mobius, Mobius2, Mobius Mini, Mobius Maxi) as well as the #16, which was also developed by the Mobius team. Click HERE to download the GUI and/or User Guide. Note: Also available from the above link, for manual installation, is the Mobius Maxi WiFi App for Android (.apk file), written by the Mobius Maxi developers. The program is a native Windows application specifically written for the Windows operating system (XP and above) and does not require any 3rd party runtime system, for example Java or .NET, to be installed. The simple and extremely user-friendly program is fully plug-and-play and includes an integrated User Manual. The software will also identify all unknown USB cameras and devices with a capacity of 400GB or less. So, if the GUI doesn't recognize your camera, you don't have a #16 or a camera from the Mobius family! If you don't yet have the camera you may want to take a short peek at the integrated help, available by clicking the 'Help' button. Remember you can resize the dialog by dragging the gripper at the bottom right corner if you prefer a smaller image. The dialog fonts will automatically be resized to fit. The latest GUI software configuration tool together with the latest instruction manual (User Guide) may be downloaded by clicking on the link above or on one of the images below. I strongly recommend you enable automatic program and firmware updates which will allow you to always benefit from the latest available tools. This is specially worthwhile during the first few weeks after the initial release. Here are some screenshots of the GUI (Graphical User Interface) 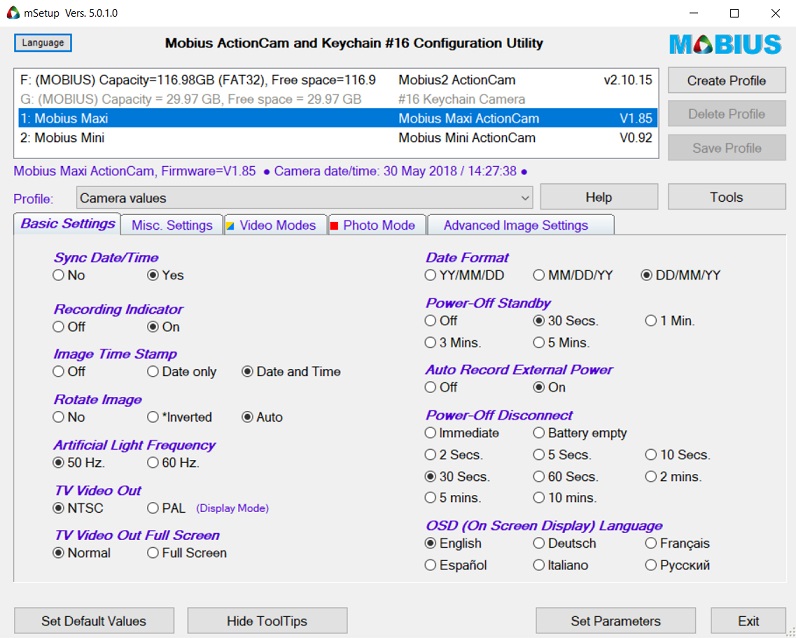 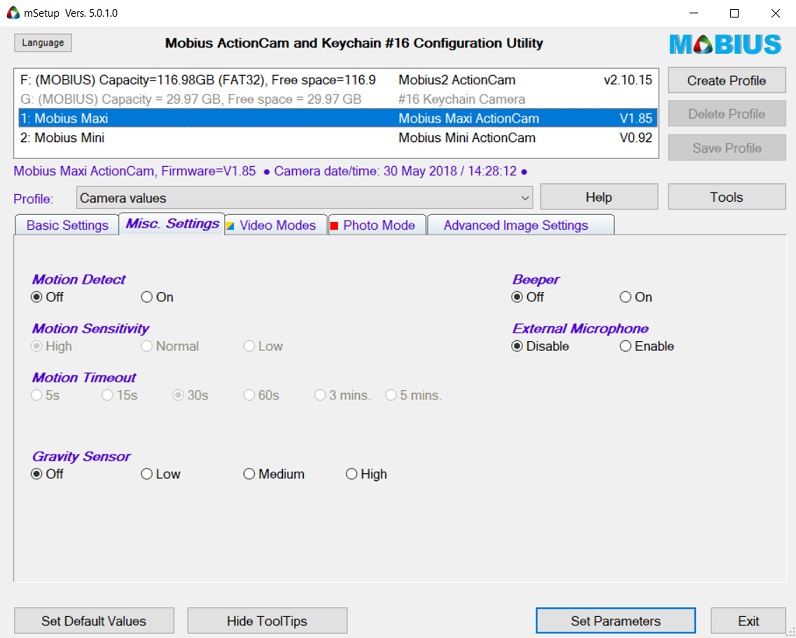 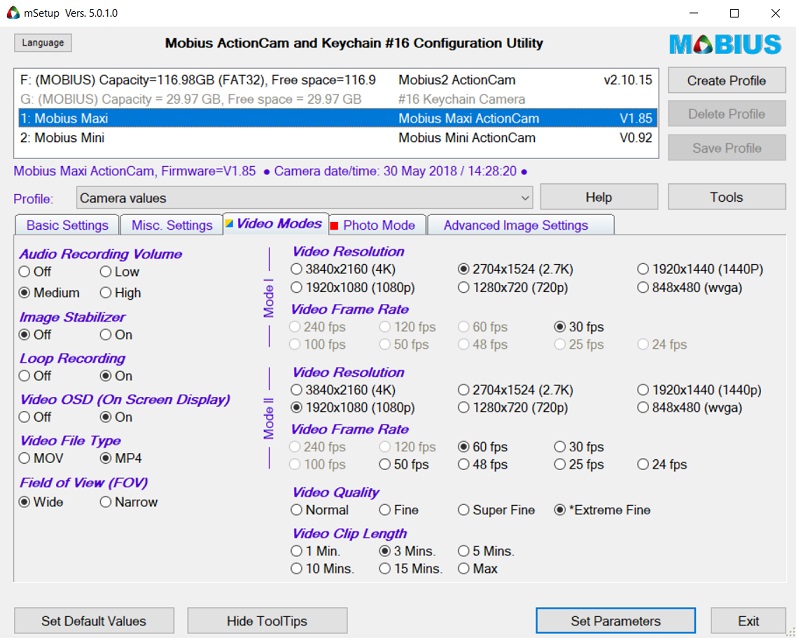 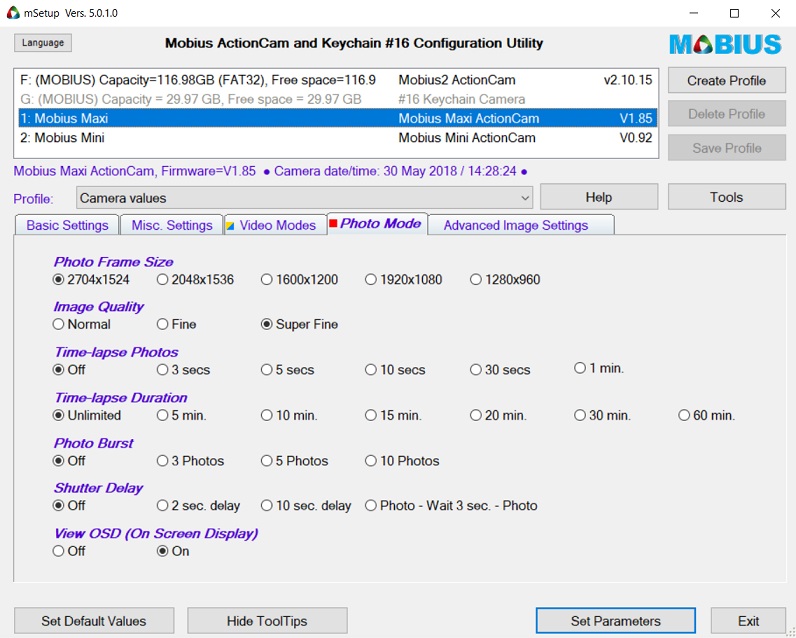 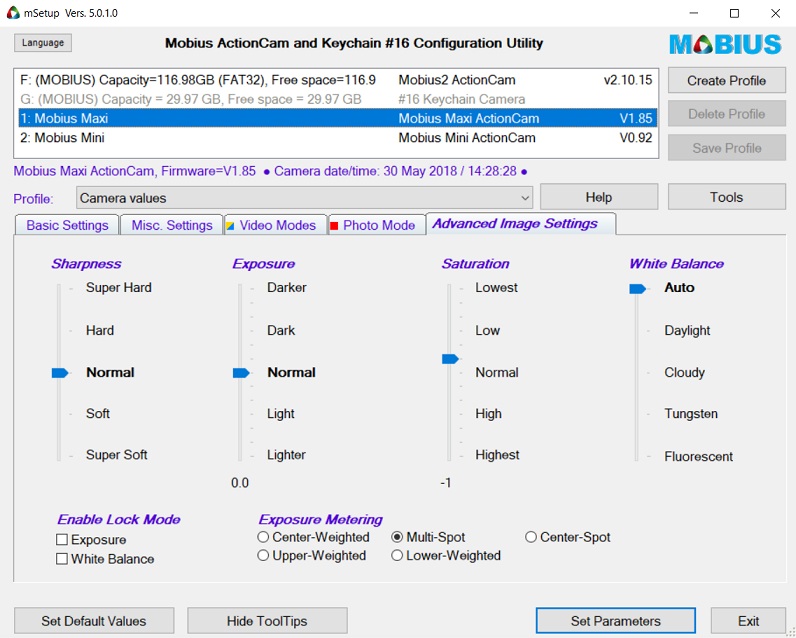 ... there's always an online user guide (manual) at your fingertips 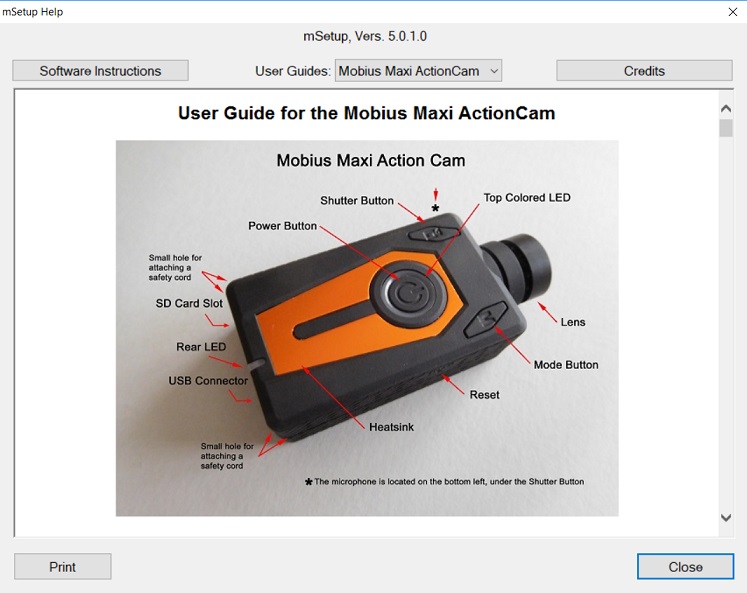 ... you can set your own parameters and download new versions 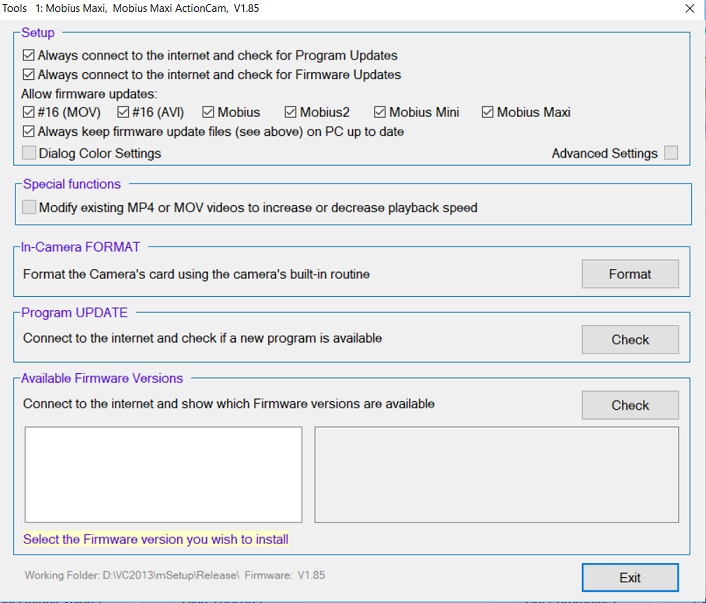 ...and of course you can set your own colors for the program 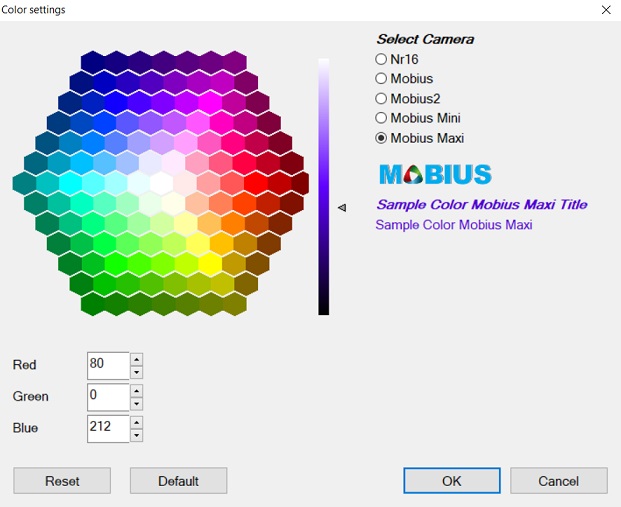 ... There's also a function where you can increase or decrease the playback speed of any .mov or .mp4 media files 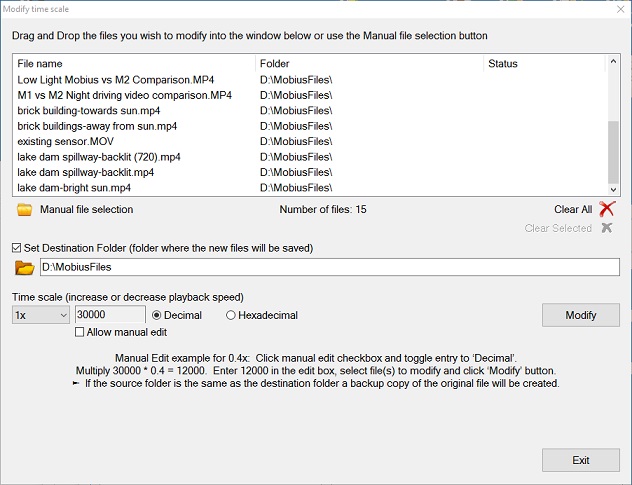 ...and lots of useful information too 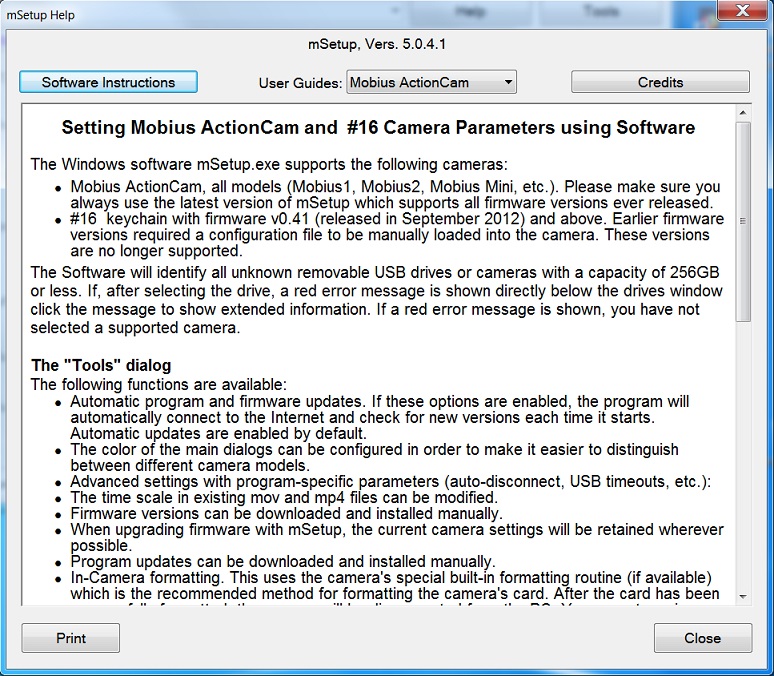 To date, mSetup has been translated into 13 different languages: Traditional Chinese, Czech, Dutch, French, German, Hindi, Hungarian, Japanese, Polish, Portuguese, Russian, Spanish and Turkish. Many, many thanks to all translators for your hard work! Here's an example: 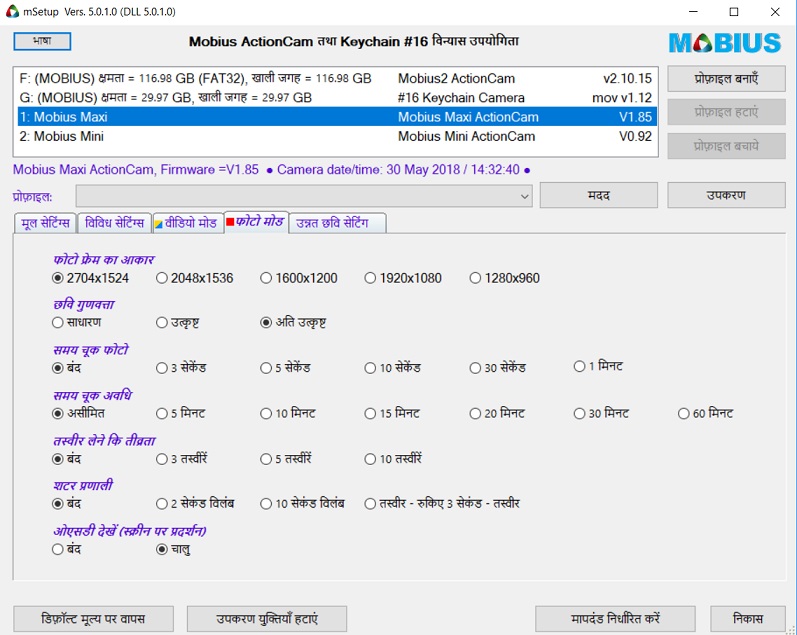 mSetup is guaranteed 100% Clean, which means it does not contain any form of malware, including but not limited to: spyware, viruses, trojans and backdoors. Click the image below for more information. 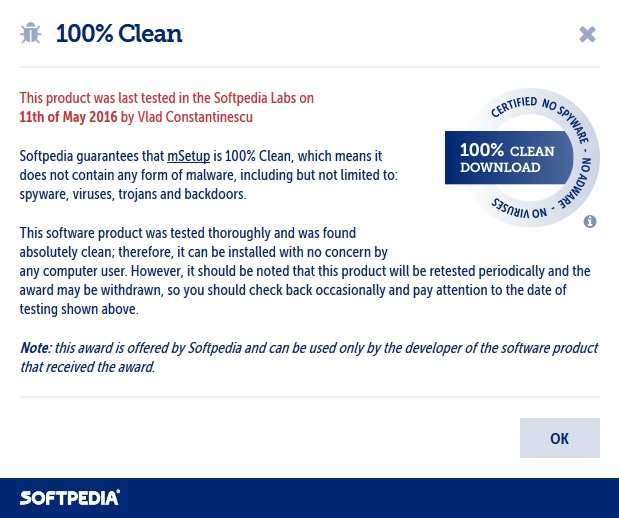
|
|
|
Last edited by Isoprop; Mar 18, 2019 at 09:20 AM.
|
|
|
|
|
|
Cables and more
USB Cable
The Mobius Maxi uses the same cable as the Mobius Mini. It is similar to the Mobius2 (M2), except for the external Microphone. 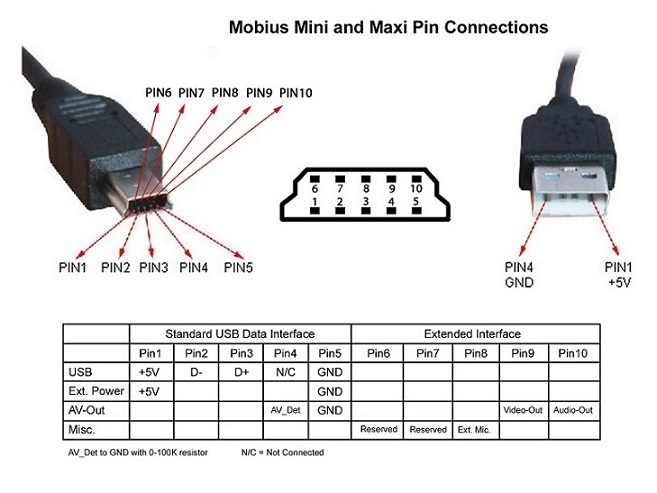 External Microphone (Pin #8) nianeko1, from RC Groups, has created a DIY video showing how to use an external microphone with the Mobius Mini and Maxi. He uses a different pin numbering scheme to the one shown above, so beware! Battery Plug The Mobius Maxi uses a Micro JST SH 1.0mm 2-Pin plug for the battery. It is the same as the plug used for the Mobius Mini. Lens Extension The Mobius Maxi uses the same Lens Extension lead as the #16. The maximum length sould not exceed 20cm (8"). |
|
|
Last edited by Isoprop; Apr 10, 2019 at 09:17 AM.
Reason: Added external Mic.
|
|
|
|
|
|
Dashcam users are welcome to discuss the Mobius Maxi at DashCamTalk
|
|
|
Last edited by TonyM1; May 22, 2018 at 11:24 AM.
Reason: Changed URL
|
|
|
|
|
|
USA vendors of the maxi please
|
|
|
|
|
|
|
|
|
Interesting, wonder what the intended market for this is? The Mini runs very nicely on external 5V power, which you can add to any model for a gram or so and minimal cost.
|
|
Latest blog entry: Eachine QX65 FPV quad review
|
|
|
|
|
|
Thread OP
|
It's mainly targeted for car driving recording use since it runs cooler (for continuous loop recording) and has some better low light tuning (including faster lens). But you might like it for other uses if you prefer the Mini CMOS capability and just need longer battery life, a G-sensor for auto image flipping, a 2.7k video resolution option, and can tolerate the extra weight.
|
|
|
Last edited by Tom Frank; May 22, 2018 at 11:53 PM.
Reason: added a coupld extras
|
|
|
|
|
|
Thanks Tom.
|
|
Latest blog entry: Eachine QX65 FPV quad review
|
|
|
|
|
|
|
Actually glad to see them going back to the low profile type mounting base on this. Skipped the M2 just because of the tripod mount. Would you know if the Maxi will fit on the M1 mount base? They don't look much different, but can't tell if they would be interchangeable. M1 dimension are 61mmx35mmx18mm,,, Maxi is 71mmx35mmx18mm... is that extra 10mm just the lens protrusion?
|
|
|
|
«
Previous Thread
|
Next Thread
»
| Thread Tools | |


| Similar Threads | |||||
| Category | Thread | Thread Starter | Forum | Replies | Last Post |
| Mini-Review | Hubsan H109S X4 PRO Unboxing, GPS Hold Test, FPV Test, RTH Test, Gimbal Test & Review | maninblack | Multirotor Drone Talk | 2 | Mar 12, 2017 10:11 AM |
| Gallery | test test test | vonpierre27 | Test Forum | 0 | Jan 11, 2016 12:44 PM |
| Mini-Review | 2W 2.4G wifi booster RANGE TESTS! (Sunhans VS Wii-link tested at ground level) | nonoze | FPV Equipment | 22 | Nov 25, 2015 04:39 PM |