|
|
|
|
Thread OP
|
Discussion
DIY reflow soldering ceramic plate
I'm very happy with mine prototype of Reflow soldering ceramic plate.
The ceramic plate is small - 4x4cm. With this plate and solder paste soldering is very easy.
If you see that components are moved from their places, then use tooth-stick to align them while solder is wet. If you see that on some places you have not enough solder, you can add a bit with tooth-stick while heater is hot. And I tried to make double sided boards with this. it works too.  This is prototype, Now I'm working on better and simplier version. Here is the new PCB (just sent it to OSHPark).  This board is featuring:
XD-JR80 Ceramic palte from Banggood:  Temperature sensor is 100K NTC 3950 (from 3D printers). Sensor can be better, but it is what I have at hands. This heater don't need very precise temperature control, so such a sensor is enough for measuring the temperature. OLED:  Information on OLED will be something like this:  Heater Project at Github... |
|
|
Last edited by nppc; Dec 04, 2017 at 10:53 AM.
|

|
|
|
|
|||
|
Thread OP
|
Final version
uReflow Station. Heating plate size is 4x4cm.
Only 13cm long.  Powering with single 12V DC adapter. USB connector for firmware updates.  Connection for Heating plate and thermistor. 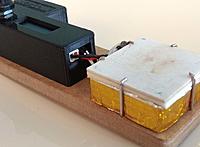 Control board. 
|
||
|
|
Last edited by nppc; Feb 18, 2018 at 07:43 AM.
|
||
|
|
|
|
|
This is nice, thanks for sharing! Which one of the ceramic plates did you use? 12V or 24V, 24W or 48W?
Unfortunately Banggood is restocking the XD-JR80 right now... Do you know if there are bigger ceramic heaters that could be used? 3.5x3.5cm work area is a bit limited |
|
|
|
|
|
|
|
Thread OP
|
Firmware is 99% complete. Now need to put everything together and to do final tests...
|
|
|
|


|
|
|||
|
Thread OP
|
No, you can power everything from one 12V PSU. I'm using 3A 12V PSU.
Heating speed is quite good.
USB connector was connected only for debugging purposes. |
||
|
|
|||
|
|
|
|
Thread OP
|
And here is a bit more photos and explanations.
Case is printed with black PLA. Inside the case is 3in1 PCB (Arduino, Reflow PCB and OLED) and connector for 12V PSU. The heating plate is sitting on a cotton insulation from 3D printer extruder. And some carton in folio and Kapton tape for protecting base from the heat, I placed the thermistor (also from 3D printer extruder) between heating plate and cotton. This combination gave the best reaction for PID loop To finish the project I only need to cut new base from MDF 
|
|
|
|


|
|
|
|
|
do you have video solder pcb by this device ?
|
|
|
|
«
Previous Thread
|
Next Thread
»
| Thread Tools | |


| Similar Threads | |||||
| Category | Thread | Thread Starter | Forum | Replies | Last Post |
| New Product | H3.6 Flight Controller Set with Base Plate for DIY | Reyan Sid | Vendor Talk | 2 | Nov 02, 2016 12:24 PM |
| Help! | how to clean reflow solder paste from needle tip? | protocol | DIY Electronics | 3 | Jun 09, 2015 10:46 AM |
| Discussion | Can I silver solder brass to something nickel plated? | CyberJay | The Builders Workshop | 1 | Feb 03, 2011 12:18 PM |
| Mini-HowTo | DIY - Diamond plate decking | ken_nj | Dock Talk | 7 | Jan 01, 2011 01:26 PM |
| Help in Soldering Gold Plated Connectors | m4tm | Electric Power Systems | 3 | Jan 04, 2004 08:09 PM | |