|
|
|
|
Thread OP
|
Help!
Battery Hatches-Show Me Yours!
I've done two glow to electric conversions, a .40 size Big Stik, and a .60 size Goldberg Tiger (both as kits not ARFs). I like to build kits, and would like to do more electric conversions. Next up is a Sig Kobra (.25 size).
The Stik and Tiger both have flat front fuselage sections, so the battery hatch for each was simple, just a tongue and pivot strap hold each in place with no problem. But The Kobra, and anything else I want to build/convert won't be that simple. What I'm really struggling with is how to hold the hatch in place for anything that isn't just a flat rectangular piece of plywood. So I'm asking anyone out there to show me pics of how your hatches are being held in place, if you use a system other than a tongue at one end and a pivot strap at the other. I'd especially like to see any hidden or camouflaged methods. Anything and everything helps. 
|
|
|
|
|
|
|
|
|
|
|
 My two cents about if may help....rare earth magnets, wooden tangs and carbon pin rods....to hold them down...just be sure not to do a overpressure air into de fuse...for good airflow and keep all electronics and propulsion cool fresh air need enter and go out too... My two cents about if may help....rare earth magnets, wooden tangs and carbon pin rods....to hold them down...just be sure not to do a overpressure air into de fuse...for good airflow and keep all electronics and propulsion cool fresh air need enter and go out too...
|
|
|
|
|
|
|
|
|
Battery hatch
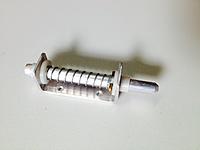
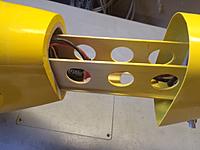
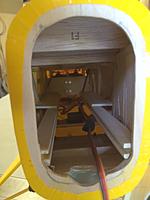
On several of my planes, I made the cowl, firewall, and battery box slide out from the fuse on rails. The whole assemble locks into place with a spring loaded pull pin. It's proven to be a good solution for planes that are difficult to find hatch space.
Rick |
|
|
|
|
|
|
|
|
Great idea! I've been trying to figure out a good solution to access the batteries in a 1/6 scale clipped wing Cub I'm now building. You just gave me the answer, Thanks!
|
|
|
|
|
|
|
|
|
On my 1/6 scale Sig J-3 Cub, I have a functional side door/window. The door now has rare earth magnets imbedded in the edge which contact steel strips imbedded in the door frame. A lip on the top edge of the door traps the window and holds it shut. I have two 2200mah 3S lipos that fit onto a ply rack ,on the floor, with Velcro on lipo packs and the rack plus a Velcro strap that also holds the batteries to the rack. The batteries sit side by side fore and aft with the front ends in line with the instrument panel. This gives proper CG with the Cobra .40 equivalent brushless motor and speed control in place. Motor is Cobra 3515/14 brushless and 50 amp switch-mode BEC speed control, 11x7 APC Thin E Prop. Motor/prop/speed control are rated for 3S ( 12.6 volts hot off the charger) . It is somewhat fiddly installing and connecting batteries to the Y cable and securing the hold down strap. It is much better than having a battery hatch in the bottom of the fuselage and having to invert the model to install/change/remove battery packs. The battery rack is a rectangular piece of 1/8 ply with a central ply separator, with a Velcro strap in that goes around the middle and velro on bottom and sides of battery packs. Rack assembly mounts to the landing gear mounts with short wood screws and is removable. Sorry, no pics.
It would be somewhat less fiddly if I used a single 4400mah 3S lipo pack but I buy 2200mah packs on sale . I get around 9 minutes of cruising flight, somewhat less with some full throttle Cub style aerobatics. My overly long Cub build thread is on the Scale Electric Kit and Plan forum, Currently I have a pilot figure with his legs cut off at the knee to fit with battery rack, deleted the passenger. etc. The old build thread may have some helpful info: https://www.rcgroups.com/forums/show...wer-Conversion |
|
|
Last edited by E-Challenged; May 29, 2017 at 12:23 PM.
|
|
|
|
|
|
Thanks Russmall. The last plane I built was the Sig Cub in 1/6th scale. I did the sliding battery cowl thing on it and it works great. It is, however, a pain to set up in the fuselage. I thought about the hinged door thing that E-challenged did, but it just looked like a struggle on the battery change out. I opted for the more complicated battery hatch setup with the easier battery change out. Many ways to skin this cat!
Rick |
|
|
|
|
|
|
|
|
yel914, Do you happen to have any pictures of the sliding cowl setup on that Cub? That's exactly what I'm building and getting ready to start the fuselage. I'll design the sliding tray right into the build. I thought about the side door access and the bottom hatch method but I like your idea much better. Thanks again!
|
|
|
|
|
|
|
|
|
Battery hatch
Russmall, I just looked and it seems that I didn't take any pix of the Cub setup. In the meantime, here's a teaser.
Rick |
|
|
|
|
|
|
|
|
Battery access
OK, here's a few extra pics that may be useful. hope all this helps.
Rick ImagesView all Images in thread
|
|
|
|
|
|
|
|
|
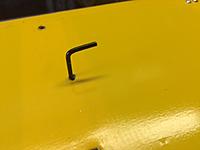
Thanks for the pics, they are very helpful. I agree that this set up needs an arming plug and that's a clever way to conceal it. One last question, how is the cowl attached to the firewall? I don't see any screws holding it, on this plane or the red & white plane in post #3. Thanks again!
|
|
|
|
|
|
|
|
|
Here's an old article for making a slide-out power module in a Cub:
https://www.rcgroups.com/forums/show...berg-Piper-Cub I am doing something very similar for my Stearman: https://www.rcgroups.com/forums/show...-project/page5 
|
|
|
|
|
|
|
|
|
Love how you disguised the arming plug, Rick. For my Stearman, I am using the carb-intake snorkel as the handle for my lock-pin. But I might emulate your arming plug and disguise it as the exhaust pipe or oil cap... very clever.
BTW, does it matter which wire (black or red) that gets spliced for the arming plug? |
|
|
|
|
|
|
|
|
Thanks all, for the compliments. I don't think it matters which wire as long as the plug completes the circuit. As good as this system is, I'd also like to see other methods for hatches as the OP asked. Us modelers are a pretty creative lot when pressed. One idea can inspire another idea, so share away.
Rick |
|
|
|
|
|
|
|
|
Just made this hatch. Very strong bond hard to pry off. I'll add front dowel later. Sig wonder.
|
|
|
|
«
Previous Thread
|
Next Thread
»
| Thread Tools | |
| Similar Threads | |||||
| Category | Thread | Thread Starter | Forum | Replies | Last Post |
| Contest | Show me your mullet mods! | Tokidoki | Micro Multirotor Drones | 8 | Mar 12, 2017 10:33 PM |
| Discussion | Show me your nanos?😞Got parts list? | rixstaa | Micro Multirotor Drones | 3 | Oct 17, 2016 04:17 PM |
| Discussion | Show me your motor balancing setup | BaronPork | Multirotor Drone Talk | 1 | Sep 14, 2016 12:14 PM |
| FAQ | Show me your battery attachment method! | Dancy | Multirotor Drone Talk | 7 | Sep 07, 2016 03:34 PM |


