|
|
|
|
Thread OP
|
Build Log
Falcon 56 mkII arf
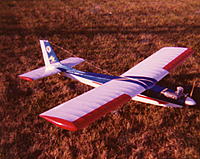
Greetings. I'm just learning to fly. I had the pleasure of buddy boxing on a glow powered early generation Falcon 56 several weeks ago. I ended up buying a new in box mkII ARF kit shortly after. My intention is to build it as an electric.
My first step was to use motorcalc to assist in confirming that the motor I wanted to use would work. I chose the 670kv Turnigy G46, a 55amp ESC and a 11x8 prop. I've been pondering on how to mount the motor before beginning with the rest of the short construction process. The motor is wider than the 10mm square wood rails meant to hold a glow motor carrier in the stock configuration. I will need to remove about 3mm per side from those wood rails to allow the motor to sit inside the fuselage. I spent about an hour measuring and CADing up a set of spacers that will glue solidly into the rear of the engine bay and stabilize the X-style mount that comes with the motor. These spacers are made of a nylon material. They can be mildly flexed by hand but should be quite solid once glued into the model. The pair weighs 14 grams. As currently built this will allow the bell of the motor to sit just outside the front of the plane and with the collet/prop adapter the prop should sit about where a glow engine would have it located. The plan is to add a small plywood reinforcement to the upper area of the firewall that is thinner than the lower area and then run 4 40mm long bolts, nuts, washers through the firewall, spacers and Turnigy mount. I haven't cut anything yet. Opinions and wisdom welcomed.    
|
|
|
Last edited by aalbinger; Mar 25, 2017 at 02:18 AM.
Reason: changing from discussion to build log
|
|
|
|
|
|
|
|
Love Falcons & Skylarks!
I've done a few conversions using various mounting techniques; here are a few threads that might give you some more ideas/info: https://www.rcgroups.com/forums/show...-Power-Systems https://www.rcgroups.com/forums/show...ic#post2513234 https://www.rcgroups.com/forums/show...ng-Aveox-Power https://www.rcgroups.com/forums/show...4&postcount=16 BOL! Jim |
|
|
|
|
|
|
|
|
First put on the the prop driver, to see where the prop actually sits. You may only need a few blocks of wood as spacers. I would be concerned the plastic will squish down causing vibration & misalignment.
I learned on a Falcon 56, Glow motor and fixed gear as in NO nose gear steering. We used to run them down a sloped driveway and adjust by bending the gear wires till it ran straight. Once speed got up the rudder worked. |
|
|
|
|
|
|
|
Thread OP
|
Some progress has been made. I used a variety of saws, files and sanding blocks to remove the forward portion of the factory engine bearers. Here are some photos of the initial fitment of the spacers and the chosen motor.
I'm happy with the few degrees of down and right thrust. So far it matches what my cad model intended. I will use some spacing washers if the angle is too drastic during flight testing. I still have some material to remove for proper clearance on the right hand side of the motor bay.   
|
|
|
|
|
|
|
|
|
Looking good!
Did you notice this thread at the bottom of the page: https://www.rcgroups.com/forums/showthread.php?803598 ? If you're an Intermediate (or beyond) Flyer you want to consider reducing the amount of dihedral from stock. |
|
|
|
|
|
||
|
Thread OP
|
Quote:
|
|
|
|
||
|
|
|
|
|
I built the 56 mkII in '77, this model did have ailerons. Don't change the dihedral it is fine.
I'll be interested in the turnigy G46 performance. Jim |
|
Latest blog entry: MAAC Wings
|
|
|
|
|
|
Thread OP
|
  I've moved on to gluing up the wing and tail, installing the 3 servos, control surface linkages, landing gear, and the RX. Next up will be epoxying in the motor mounts, bolting in the motor, installing the ESC and figuring out CG to make a battery tray. |
|
|
|
|
|
|||
|
Thread OP
|
Planned steps left: build a battery tray, nail down the CG paint the inside of the motor bay double check all the nuts/bolts |
||
|
|
|||
|
|
|
|
|
Wow I have to admit, I was incorrect. There is a lot of dihedral on the ARF. This is the amount on my Falcon 56 MkII build from 1977.
Jim |
|
Latest blog entry: MAAC Wings
|
|
|
|
|||
|
Thread OP
|
Here is the maiden flight. I didn't do the piloting as I'm still a complete noob and the wind was gusting to 20+MPH. My friend Denny who sold me the ARF kit did the flying.
Turnigy G46 670KV motor. 11x8 prop. Venom 2200 4S battery. Turnigy Trust 55a ESC. Seems to fly great!
|
||
|
|
Last edited by aalbinger; Apr 24, 2017 at 01:17 AM.
Reason: added prop info
|
||


