|
|
|
|
|
Keeping with the theme of "using a laser cutter to make a boat" it would seem that maybe "roofmate" is thin enough and sutable for cutting to make a "lost wax" mold following post 4?
https://www.rcgroups.com/forums/show...2&postcount=53 There is another post about using layers of 1mm lead flashing to build up a keel. That would need to be either shaped or filled with lead infused epoxy though. Thanks for investigating and reporting back! There is a market for keels. The Victoria was lead and then went to steel and I think aftermarket lead is now class legal. |
|
|
|
|
|
|
Thread OP
|
I was recently pointed to an article about sand casting a lead bulb using refractory (foundary) sand. It is posted at the San Francisco Model Yacht Club website.
I think I might try to find either some of that sand, or a local place also sells tubs of premixed refractory motor which can stand temps up to 2700 degrees. Sounds much safer, and frankly easier, than plaster of paris. Home Depot sells a tub of refractory cement here. Anyone know if this stuff would work? I don't see why not. The label says it will handle up to 2000 degrees. I'd have to figure out if that would be enough to make an open, half-bulb. I'm planning on molding, or having molded for me, two half bulbs instead of one solid bulb. |
|
|
Last edited by SeattleRCSailor; Feb 25, 2017 at 03:21 PM.
|
|
|
|
|
Thread OP
|
Sun Wind II Servo Tray
I spent some time working on my Sun Wind II servo tray. It's much more compact than my original design, but at the same time has more clearance for the arms and a small amount of flexibility in battery placement.

|
|
|
|
|
|
|
|
|
This is going to be a long one...
So the sheet travel at the fairlead as a function of servo arm travel can be made more linear or less by all sorts of tricks. You can "stall" the jib for example if you run a "bent" arm that gets the jib to 180* faster than the main. For the vistoria 15 degrees is the recommended so that you can go sails in (i.e. The jib) and then have a tiny range of trim on the main. You can also make an arm that stalls the main first and trim the jib. In your system the arms are already unequal length. I wonder if you could laser cut something with indexed holes so that a pin or bolt could be used (you would want to also have a screw into the servo as a pivot) so that you can set the degrees. I am thinking five holes in a line on the top arm and then five holes along a curve so that the middle hole would be 0 and then lower would adjust by -5* and higher would be +5*. So you get 10,5,0,-5,-10 degrees. You need to adjust the length on the boom for close haul and then adjust the diameter on the arm for all the way out. This is not a really high resolution "dial" that needs frequent adjustment but it does demand some skill in drafting and precision in fabrication. It would be too heavy for a race boat but would match the asthetic you have show so far. |
|
|
|
|
Thread OP
|
Swing arms
Yes, the arm is unequal. Right now I'm using the measurments given to me by Mike at Midlife Models, who makes a gorgeous Riptide. Since the Sun Wind and Riptide are quite similar in many ways, I'm using his measurements as a starting point, but will adjust where the rig, spars, fairleads, etc... all go as needed once the first full boat is built.
Based on Mike's swing arm, I've come up with two versions... a wooden laser cut version and an aluminum version. Your idea of adding further index holes is a fine one, and I may end up doing that. 
|
|
|
|
|
|
|
|
Thread OP
|
Updated Sun Wind II lines
Well, I'm now on revision 4, but I think I'm actually 99% finished with the Sun Wind II lines!
Here are the original 1949 lines:  And here are my updated Sun Wind II lines: 
|
|
|
|
|
|
||
|
|
Quote:
Does the Al one have the resolution to print the servo spline? If so you are a few washers away from not needing the arm from the servo kit. |
|
|
|
|
|
Thread OP
|
No, I can't laser cut aluminum. And even if I could, I'm not sure that I could model it accurately enough so that it would fit. Much easier to simply drill holes and mount it to one of the arms that comes with the servo.
|
|
|
|
|
|
|
|
Thread OP
|
Test hull almost finished
The planking was finished this morning, and by this afternoon I was able to sand it and add some fiberglass. I didn't fair it too much and you can still see areas where I should have worked on it further. But it served its purpose and I found that the frames are pretty fair. I tinkered with one of the front frames, but otherwise I'm pretty happy.
This is a mock-up, half-built hull to check for fit and fairness. I purposely didn't fiberglass the entire half hull so that it could serve as a demonstration for my school. Should be fun to look at! Will trim the excess glass this evening, and then tomorrow will cut it off of the base and take it to school.  
|
|
|
|
|
|
|
|
Thread OP
|
Sun Wind II Test Hull Completed!
Today I finished the Sun Wind II test hull to the point that I wanted to, and cut it from its supports. Looks pretty good to me!
 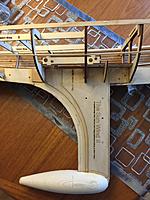             Now to start over again, this time with my "revision 4" lines on the laser cutter, and build the entire boat! Still working on a mold for the lead bulb. I tried to turn a bulb today, and it was going well, but will need to try it again. I think I can do it. Other unknowns... I've always bought aluminum masts, but this time I think I may try to make a laminated one. Hopefully sailing by this summer! :-) |
|
|
|
|
|
|
|
|
Thats really cool.
|
|
|
|
|
|
|
|
|
AS a kid 60 years ago that built Guillow's stick built, rubber powered airplanes. I would loved to have a teacher that had one of those to inspire us!
Today, with some technical schools having Laser cutters, 3D printers and other modern tools, it would be great fun to design & build challenging projects |
|
|
|
|
|
|
|
|
I am not up to date with the Marblehead regulations but nothing looks as technical as a tapered wrapped carbon mast. Is carbon allowed?
I ask for selfish reasons because I was thinking about ways to keel step my boats vs deck step and how I would add adjustable blocks to kick the mast a little. |
|
|
||
|
|
Quote:
Cheers, Earl |
|
|
|
||
|
|
|
|
Thread OP
|
Second round of laser cut frames
Started to cut the second round of laser cut frames for the Sun Wind II RC sailboat. This time, I intend to build the entire boat.
Got through two sheets today, and then the laser cutter started acting funny. Got some kinks to work out. But I'll try again tomorrow. Here's the first sheet that was cut today right after cutting. It's still on the bed...  It may have been that I used 3-ply plywood for the first two sheets, and then switched to 6-ply. The 6-ply wasn't cutting as well, and was causing a huge flame! Hmmm... maybe that's it...? |
|
|
|

