|
|
|
|
|
Build Log
Supra X build for ALES/F5J
I have received so much assistance in this hobby/sport from others who have posted their experiences on RCGroups that I wanted to add to the pool of knowledge and share my experiences building a SupraX for ALES/F5J. I wanted to start with a short background on me and then why I choose this sailplane. I have always loved flight, especially watching hawks and buzzards rise in thermals. I have been flying RC sailplanes since the early 80S when I was in high school. My neighbor across the street was just getting started in RC at that time and we learned together. We built Wanderer 99, Olys and Gentle Lady’s and enjoyed building, flying, crashing, rebuilding and flying again. I took a break in college due to no time or money available. I resumed my building and flying in the early 90s with a Ruby 2M, some handlaunch gliders and a couple electrics. My time was limited due to working hard on my career at Caterpillar designing large diesel engines and my wife and I raising 4 children. Now that 2 of the children are post high school, I have some additional time to resume my love of soaring. I am a recent member of the Cloud Jockeys RC club in Lafayette, Indiana, which is a great club with a bunch of great folks who love to fly all varieties of RC craft. For several years, I flew an electric Bird of Time that I had built from the Mark’s Model kit and an Easy Star just for fun in the soccer field across the street from my home. My introduction to the next level of soaring was when I visited the ALES NATS in the summer of 2015 as a spectator and was quickly greeted by Gordy Stahl, who let me join him while he timed a flight, introduced me to several folks and made me feel welcome to the community. I attended my first contest in late 2015, the SOAR contest in Chicago, which was a mixed launch event, which allowed me to fly my e BOT. I was again welcomed by the pilots there, Jerry Shape, Karl Miller, Rich Burnoski and others. I learned a ton from them as they timed for me with my BOT, I got to time for them and as I watched them fly their full house sailplanes. I decided I wanted to move to a full house, over 3 meter sailplane. I started looking at the classifieds on RC Groups, did a bunch of research and consulted Gordy often on potential sailplanes. I ended up with a beautiful used Aspire from Craig Greening that he had used for F3J. I spent the winter modifying it for ALES based on the great articles from Larry Jolly and many others. I flew it in several local and regional contests in Ohio with the MOSS club this past summer. I am halfway thru my eSAP for LSF Level II, working on landings and needing a few more contests.
So, after that bit of background, I will come to why I selected the SupraX to build this winter. As I was enjoying flying in the contests, it became apparent to me that having another sailplane would be a good idea in case the primary has a failure due to pilot error (read poor downwind landing that cracked the fuselage) or mechanical difficulty. I was wanting to get another full house, around 4 meter glider, but wasn’t wanting to spend the money to buy a new one. I really enjoy building so I started looking at potential sailplanes to build. I first came across an article by Rex Grace in the Northwest Soaring Society Newsletter about building a Super Supra. This was very encouraging. I then was reading some old issues of RCSD and was fascinated by the article about the Supryssa build by Alyssa Wulick and her Grandfather (RCSD 2009-01). I had never built a bagged wing before, but my friend at work, Darwin Garrison, of Pushy Cat fame, encouraged me and offered his support and guidance. After doing more searching and reading great discussions by Curtis Suter and Will Lipscomb (Heliwill10), I decided that a SupraX seemed like a great first build for a bagged wing 4 meter sailplane. I contacted Will to see if was willing to cut some cores for an ALES version of the SupraX. He was interested so the journey began. I started gathering materials in September and have made some good progress so far. I will be documenting the progress in posts that follow as I have some free time between Christmas and New Year’s. I hope you enjoy the journey with me. I am very open to suggestions, advice or experiences that you have had that can help me or others who might want to try building composite sailplanes. Ron Smith |
|
|
|
|
|
|
|
|
|
|
Gathering materials and sailplane specs
The SupraX is a 4 meter wingspan version of the Drela Supra. I am hoping that the finished weight will be around 70 oz.
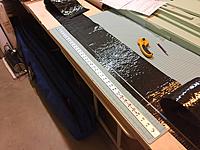
To start, I worked with Will Lipscomb to determine the layup for the ALES version of the SupraX. He recommended that I build the spar from 9 oz T700 Uni Carbon with multiple laminations for the top and bottom spar and a foam shear web. The laminations were 2x full span, 52”, 44”, 24”, 14”, 8”, 4” and 2”. I determined I needed a 6 ft section of a 12” width carbon. This turned out to be enough to build 2 wings, which will be handy in the future. He also recommended to use 4.1 oz T700 Uni Carbon as darts for the tail and the wing tips. I purchased a 10 ft by 12” section of this material. The wing and tail skin is going to be 1.7 oz Kevlar on a 45 degree bias with a 0.7 oz woven fiberglass top layer. I purchased 5 yards of Kevlar and fiberglass. I am running a little short on the fiberglass due to some mistakes and redos. I purchased the fuselage from CLM Pro, Fuselage set #132. It appears to be a sturdy fuselage for a pretty good price. Will provided the cores, joiners, plywood end caps and wedges for the layup. They look great! I borrowed a vacuum pump from Gordy, who was not currently using it for any projects. I am going to use a Turnigy Aerodrive SK3 2836 2500kv motor with a Maxx Products ACC4034 gearbox driving a 15x13 prop. I will be using a Mantis 65 Amp ESC run by an 850 mah Turnigy A-spec battery. This is the power set up I have on my Aspire and it works very well. I am currently flying with a Taranis radio setup that with some assistance from Gordy is working great. I plan to use KST DS115MG servos in the wing and KST X08 V3 servos mounted in the tail for the elevator and rudder. I will also be using an Ultra guard 430 battery back up to protect my investment. |
|
|
|
|
|
|
|
|
Building the tail surfaces
I started with the tail surfaces. For the rudder, I sanded and trimmed the foam to the desired shape. I then cut the first set of mylars based on research I had done on RC Groups. I used them as a pattern to cut the fiberglass, 4.1 oz carbon and Kevlar. When I showed them to Darwin, we discovered I had not made them precisely enough, so I started again. To prepare for the bagging, I used the technique of putting a narrow strip of Kevlar on the leading edge with Scotch 924 adhesive transfer tape. I put 3 coats of Specialty Product Honey Wax on the mylars. This worked very well. I used EZ Lam with a 30 minute working time. This worked very well, with very little odor and good consistency. I did not paint the mylars, but did use the layup of the 0.7 oz glass and then the 1.7 oz Kevlar. For a first attempt at bagging, they seemed to turn out pretty well.
|
|
|
|
|
|
|
|
|
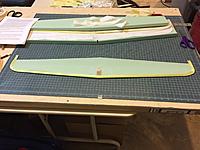
Here is the horizontal stab after trimming the trailing edge and lightly sanding the leading edge. It weighs about 2 oz.
|
|
|
|
|
|
|
|
|
Ron,
Fantastic! That's what I like to see is folks building! You can also be quite competitive with your workmanship too! So why the .7oz fiberglass underneath? IMHO it's just extra weight of epoxy and epoxy is heavy. Perhaps on the outside if concerned about finish but also even with painted mylars it's not necessary. Plus it's hard to work with unless you hairspray it lightly first to make it a little stiffer. So I'm subscribed and can't wait to see the final product. Oh, I'm always interested in weights too.  PM Sent. Curtis Montana |
|
|
|
|
|
Curtis,
Sorry for the confusion, the 0.7 glass is the outer layer after built, but the first layer on the mylar. I agree that it is difficult to work with and was not sure I needed it. I have already completed the tails, center section and one tip with it, so I will use it on the other tip, but will likely not use it when I build another one. Thanks for your interest in the build log and for all of your great posts that were part of my inspiration to try this. |
|
|
|
|
|
|
|
|
Preparing the center wing panel
The main wing panel was more complex than I anticipated, but it went together pretty well. In order to build the spar in the groove that was cut into the wing halves, a set of wedges was needed to support the top beds. Will cut them for me and I used foam safe CA to glue them to the bottom of the beds. This worked pretty well, expect my foam safe CA was eating into the foam a bit.
My next step was to sand the dihedral into the cores and glue the end caps that Will had provided onto the center and ends of the cores. Since my CA was giving me concern, I used a light film of epoxy to glue them on. This worked well. I then did some general sanding and trimmed off about 1/8” from the trailing edge to get a good straight edge. |
|
|
|
|
|
|
|
|
Center wing panel spar
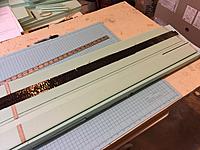
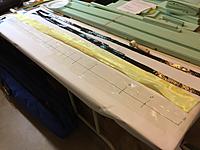
The spar is a lamination of 9 oz T700 Uni Carbon cut into 1” widths and 9 lengths per spar. The shear web is cut from the same foam as the core. The spar is built in the channel following the method that Will used on the SynerJ wing that he has posted. I used the 1.7 oz Kevlar on the bias as a wrap for the spar.
I dry fit the spars in the wing to make sure they would fit well. I then rolled epoxy on the spar laminations, starting with the longest lamination. I had the Kevlar wrap under the top spar when I was applying epoxy. It was quite a challenge to pick up the 66” long epoxy soaked Kevlar wrap and carbon spar to put it into the channel. It would have been easier to have someone else helping me with that. I then put the shear web in the channel and added the bottom spar. I put the core in the bag and let it cure for 24 hours. After the spar cured, I used lightweight spackle to fill in the gap. I put a couple of strips of narrow masking tape along the sides of the channel to keep the foam clean during application and sanding. ImagesView all Images in thread
|
|
|
|
|
|
|
|
|
Bagging the center panel
I decided to paint the center panel white. This is my first time to paint the mylars. Word to the wise, even though it is cold outside, don’t paint in the basement with no ventilation, do it in the garage ….. The family was not pleased with me. Anyway, I got the mylars waxed and painted and then aired out the house. I used a matte white krylon paint. I think I will use a glossier version next time, as the finish is pretty dull. The mylar that I am using was provided by my friend Darwin. It 3 mil thick inkjet mylar. It seems pretty thin, but appears to work well.
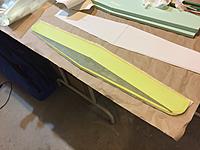
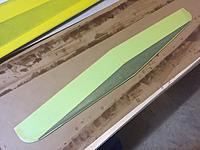
I had to move to the ping pong table to do the layup, as my workshop table was not nearly big enough for the 3 large mylar pieces, 2 for the top and 1 for the bottom. For the center section, since there is a spar, I used the 0.7 fiberglass as the outside and then the 1.7 oz Kevlar on the bias next. I laid the fiberglass on the mylars, wetted them with epoxy with a roller, then laid the Kevlar on top of that, using the roller to push them into the wetted mylar. After they were wetted, I put 2 layers of paper towel on top of each, stacked them together and put the assembly into the bag to debulk. While this was debulking, similar to the tail sections, I applied a ¾” strip of Kevlar with tape on the leading edge and then used a 2 oz fiberglass strip over that which was applied with the epoxy. Handling the large mylars and the dihedral presented a bit of a challenge, but I was able to get it all put together and into the bag. After 24 hours, I pulled it out and it looked pretty good. There was a section on the trailing edge where the paint did not stick to the wing well as well as a section in the middle of the top that was not painted. I am thinking that my wax was not done well on the trailing edge. Once the end cap supports were trimmed off, the trailing edge was trimmed and the leading edge sanded, the panel weighed about 20 oz. I discovered later that I probably should have faced the flap hinge surfaces to reduce delaminations. If anyone has any good ideas of how to do that after bagging, I would love to know. Thanks ImagesView all Images in thread
|
|
|
|
|
|
|
|
|
Re facing flap hinge after bagging:
1. Cut flap hingeline. 2. Cut out some of the foam ahead of and behind the hingeline. Start with a "V" 3. Enlarge "V" into a radius, exposing top and bottom skins. This will be your bonding surface. 4. Layup 3 oz glass in the radius. It will help to use 77 to make a thin strip of bias 3oz to some lighter straight cut glass. This will allow you to pull on the strip without it coming apart. 5. Support the hingeline area in the foam shucks or use Al extrusions clamped to the outside. 6. Treat flap similarly. 7. Hinge with 3m 5400 polyurethane or sikflex along one edge of the radius. This makes a very flexible hinge. A wiper can be built up on the flap if room is provided in the radius on the wing. See Joe Manor's posts for a similiar treatment |
|
|
Last edited by rrcdoug; Dec 29, 2016 at 08:06 PM.
Reason: oops hit the post button while typing
|
|
|
|
|
|
|
|
|
|
|
|
|
|
|
I have never faced flaps or ailerons. I cut them completely off the wing and reattach using a silicone hinge. Prior to doing this I take some epoxy and apply to the foam and ensure that it touches both the top and bottom Skins.
I have yet to have a problem even using top drive. Curtis |
