E-flite/Horizon Carbon-Z P2 Prometheus - RCGroups Review
E-flite/Horizon Carbon-Z P2 Prometheus - RCGroups Review

Now you can be Skip Stewart for Halloween! Or at least fly like him!
| Product: | E-flite Carbon-Z P2 Prometheus |
| Wingspan: | 48 in. |
| Wing Area: | 840 sq. in. |
| Wing Loading: | 19.2 oz/sq ft. |
| Weight: | 7 lb |
| Length: | 49.3 in. |
| Motor: | BL50, 525Kv |
| ESC: | 70-Amp |
| Servos: | 4x 25-gram mini metal gear |
| Battery: | 6s 4400mAh |
| Price: | $449.99 |
| Available from: | HorizonHobby.com |
| PDF Manual: | Click Here |
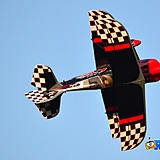
Anyone who has been to a full-scale airshow lately will certainly know the name Skip Stewart. His aerobatic show is nothing short of amazing, and his highly modified Pitts S-2S is hard to ignore! Stewart holds the distinction of being the first pilot to fly under a jumping motorcycle at an airshow. He also does some amazing high-alpha ultra-low knife-edge passes, and races cars and rocket trucks for one heck of a high-energy airshow.
Horizon recently worked with the Skip Stewart Airshows team to replicate his awesome full-scale plane into an awesome R/C scale foam & carbon fiber model. Introducing the Carbon-Z P2 Prometheus from E-flite! The third model in the large-scale foam Carbon-Z series, the Prometheus is the first in this line capable of some serious aerobatics both in precision and 3D. The Carbon-Z models are made of durable Z-Foam�, with carbon fiber inside to provide a light weight but very strong airframe.
| E-flite Carbon-Z P2 Prometheus - RCGroups Review (5 min 45 sec) |
Enough chatter, lets get this pretty thing together and in the air!
KEY FEATURES:
- Easy to complete final assembly
- Skip Stewart Airshows officially licensed adaptation
- Highly-tuned airframe for extreme aerobatics by Mike McConville
- Rigid Carbon-Z� construction delivers a strong yet lightweight airframe
- Powerful 50-size brushless motor
- High-voltage 70A brushless speed control
- Durable Spektrum metal-gear mini servos
- Accepts a 4400mAh 6S 22.2V Li-Po battery (sold separately)
- High-strength aluminum landing gear with matching finish
- Large control surfaces with double-beveled hinge lines
- Tool-free I-strut installation for fast field assembly
Needed to Complete:
- Full-range 6+ channel Spektrum� DSM2/DSMX transmitter
- Flight battery � E-Flite 4400mAh 6S 30C 22.2V Li-Po (EFLB44006S30) recommended
- Suitable charger
In The Box
So what comes in the box? Everything! Ok, almost...you need a Spektrum compatible transmitter and a flight battery. Everything in the box is wrapped, well packed and secured. Once you take the pieces from their wrapping, you'll immediately notice the great paint-job and tons of decals pre-applied. The foam is very nicely molded, including the wing rib impressions. The canopy is lightly tinted which encases a nicely detailed pilot and instrument panel.


Assembly
With a low part count, there really isn't a whole lot to do get this baby airborne, so lets take a look at the basic steps and some notes I took along the way that will hopefully make things even easier for you.
Before starting assembly, I took an extra step to keep this great looking paint job & decals looking that way. I noted several people in the RCG thread that had used clear spray to give an extra layer of protection for the paint using Minwax Polycrylic. The store I visited didn't have it, so I grabbed what I thought was a similar product. To my dismay, the spray dried with a white cloudy finish. I don't know if it was caused by the hot & humid weather that day or what, but my fault for not trying a sample spot first! Then I find a post by t33jetman, recommending Pledge Floor Care. This was easy to apply with a foam brush, immediately cleared up the cloudy spray and gave it a nice shine. I gave each surface two nice coats, 8 hours apart. Save yourself the risk of a clear-coat spray and get a bottle of the Pledge. Thanks for the tip t33jetman!


Alright, on to assembly. First, getting the bird on it's wheels! This step was painless as expected, however the foam block on my gear was a little off-angle from the fuselage. I masked this issue by painting the edge of the gear block and the hole in the fuse with some cheap acrylic black paint. A black Sharpie will also do just fine here. I also took the wheels off and added a few washers between the wheel and pant to eliminate play.


Next, the tail surfaces. A couple drops of CA (note: foam-safe CA not necessary!) on the rudder hinges and screws into the plate to hold the tailwheel finished the vertical stab. I had a little trouble figuring out which screws to use from the pack, as they didn't note which size or have a key of the screws & bolts. I finally decided that it was the only 2 actual screws (not bolts) in the pack. The horizontal stab slid through the fuse and was secured with 2 small bolts. The holes in the tailwheel plate had to be opened a touch, but nothing a hobby blade can't handle.

The lower wing was the main pain-point of getting this plane together. I knew from pre-skimming the RCGroups thread that this was an issue, so I took a deep breath and grabbed the wing.
First, make sure you grab the shorter wing tube (my first mistake).
Second, do yourself a favor and enlarge the tunnel that the aileron servo leads come up in the middle of the fuselage. I heated a piece of music wire/control rod and stuck it in each side at an angle to enlarge the foam tunnel. I also used a hobby knife to enlarge the rectangular hole that the servo wires pass through on each side. Although I didnt, you may also want to dremel/sand/cut the plywood inside the fuselage to enlarge the width of that opening as well.
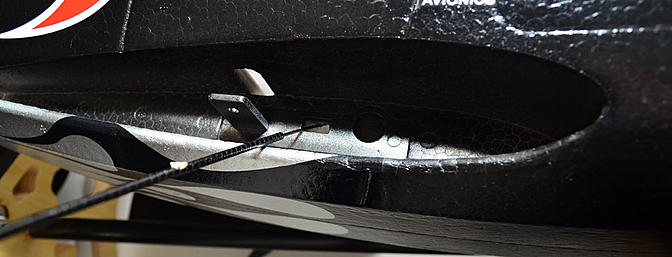
Make sure to secure the servo lead extensions with floss or heat-shrink. I don't know why this step wasn't mentioned in the manual, but will certainly be needed as you pull & yank on the lead to pull it up & through. For help pulling the end through the hole, I found a spare control rod with a z-bend end that was more helpful than those spring-loaded grabbers or needle nose pliers.
Use a small flat-head screwdriver and make sure the top of the plastic plate inside the wing halves is up into the foam. If it's dropped down, it may catch on the locking plate extending from the fuselage. Use the screwdriver to pry it up into the wing just before you slide it in.
-
 Always secure servo extensions
-
 The arrow points to plastic inside that needs to be spread apart for easier assembly
Finally, once you get one wing half in all the way (it may take some careful force and piece jiggling), secure it with the provided bolt before inserting the other half. This will save you from accidentally pushing the other half out. Also note that the bolts to secure the wing halves gave me very little resistance. Make sure you use the correct size bolts as noted in the instructions.
With the bottom wing finally secured, the top wing only took a minute by sliding in the wing tube and securing each half to the center cabane with two bolts. I did note the foam on the root of the right half didn't fit flush to the middle, but its a minor cosmetic flaw. The outer wing halves are supported with foam & carbon fiber wing struts with metal locking pins. The posts in the wings fit into slots on the struts, and then the locking pin slides into holes through both pieces for a very secure fit. If you have any problems sliding the pin through all of the holes, you could use a Dremel to round the end. A magnet in the foam of the cabane will hold the pin in the locked position.
-
 The top wing tab ready for the wing half
-
 Right wing half doesn't quite match at front & back
-
 The cabane locking pin
-
 A magnet holds the pin locked
No we're lookin' like a kick-butt biplane! After binding the AR626A to my Dx18 to ensure centered servos, I adjusted the control rods and snapped the ends to the ball on the control horns. Finally I put the prop and spinner on my balancer before securing them to the motor (only the spinner was slightly out of balance). Take note that on my 2nd flight, the prop adapter flew off during a spin. I highly suggest either using a prop adapter that has a grub screw, or getting some bearing retainer compound to put on the shaft before securing the provided adapter!
Finally before getting the P2 into the sun, invest in one of the smaller plane shade wrappers. There are some nice inexpensive ones available from RedWingRC andBanggood. With the whole plane being black, it will absorb the suns heat like crazy and end up 'popcorning', or bubbling/expanding , the foam and that pretty finish won't ever look the same!


LETS GO FLY!!


Flying
Takeoff & Landing
The 50-size motor has plenty of power, so roll-out is a snap. If you choose a more scale takeoff with gradual power, you'll probably need to stay on the rudder as it'll wander a bit. Going vertical after the wheels left the runway was not a problem with this motor.
Landing the P2 also wasn't difficult. Keep a little power on and the nose not above level through final until just before you're ready to touch down. Also note that the landing gear are quite springy, so be prepared for a bounce if you let go of the flair too soon. If it does bounce, add a click or two of throttle to fly through the bounce, instead of letting it fall.


Basic flight
Even though this biplane was designed for serious aerobatics, flying the circuit slow and fast is still a good time. Low rates gives you a nice stable & predictable flight. And if you start to yawn, just floor the throttle and hang on! The P2 has a great flight envelope and a nice top-end speed. I did end up changing the prop to a Xoar 15x6 wood prop to improve the throttle response and efficiency.


Aerobatics...Aww yeah!
This is what the P2 Prometheus was made for! Mid-rates start to liven things up as you take it through snaps, rolls and spins. The surface authority is great and doesn't leave you wishing you'd turned up the rates. Snaps are a little heavy and trickier to stop precisely, but that's typical for a biplane. Inverted flight needed just a steady slight touch of down elevator and felt quite solid. Knife-edge passes held decently, but had a touch of coupling (which can sometimes be fixed by shifting the CG). Spins were executed with ease, but benefited by flipping to high-rates to flatten out the spin.
Speaking of high-rates...! Flip that switch and huck this baby all you want. Rolling harriers are just what you'd expect, and high-alpha knife-edge passes down the field are a hoot. High-alpha harriers did have some wing rock (as seen in video), and hovers were good. I'm confident that once we get the gains tuned in, 3Ding the P2 will be that even better. I'm definitely looking forward to wringing this out and seeing how much the perfect AS3X settings lock in the flight characteristics of the Prometheus.


Summary
Pluses
- Great looking & detailed foam molds
- Very nicely painted & decaled
- Strong & light Carbon-Z foam technology
- Great flyer for fun sport & 3D aerobatics
- Great power, speed & response
- Good authority on all surfaces at all speeds
- Great use for those 6s 5000mAh packs many of us have
- FUN!
Minuses
- The lower wing can be difficult to get on, which could make it harder to assemble at the field
- Red paint on wheelpants don't match decals
- Bolts to secure lower wing halves seem to be too short
- Battery compartment could be a little tight for larger hands
- Stock prop adapter can slip off in flight if bearing retaining compound isn't used
- Wing rock in high-alpha without AS3X on
The Carbon-Z P2 Prometheus is a kick-butt biplane in both styling and flying fun. It's wide speed envelope and surface responsiveness makes it attractive for both the sport pilot and 3D aerobat. What's better is, from opening the box to ready-to-fly can be done in one evening! Everything is pre-painted, pre-installed and assembles quickly (except sometimes the bottom wing). Other than that wing preventing easy field assembly, my other minuses listed are quite minor. The Carbon-Z foam construction is durable, which I later proved with a transmitter programming error! If you're looking for a great looking foam biplane capable of anything you want to do, add this one to your hangar!
*Thanks to Horizon for supplying this review, and to pilot Alex Fredrickson for helping put this bird through its' paces!
Last edited by RCG_Jason; Dec 15, 2022 at 10:50 AM..| Thread Tools |
|
|
|
|
|
Prop and Spinner
I noticed you are using a Xoar propeller and possibly a different spinner. Does the stock Prop and spinner have any known issues?
I balanced the prop and it was almost perfect straight out of the box. Is this to alleviate the vibration/spinner wobble at high throttle and are you using the stock collett with the Xoar Prop? |
|
|
|
|
|
|
|
Thread OP
|
I am using Xoar, but it is the stock spinner. I added a couple drops of CA to balance my spinner, but it wasn't far off out of the box. The stock prop is ok, but heavy and less efficient than a Xoar or similar. If you check out the main P2 thread, you'll see several others have done the same.
I haven't noticed any excessive vibration or noise from the spinner yet at high throttle. I am using the stock collett, but as I mentioned in the article...make sure to use bearing retaining compound if you do. The collett is a touch too big to lock onto the shaft good enough for any hard flying. |
|
Latest blog entry: 93" AJ Laser 230z
|
|
|
|
|
|
Thread OP
|
You can use thin CA and kicker to help add weight to the light side of prop, spinners, etc. Some put fuzzy velcro on first and add the CA into the velcro.
FWIW, my replacement P2 spinner wasn't balancing very good at all, until I removed the factory installed blue putty...then it was perfect...lol |
|
Latest blog entry: 93" AJ Laser 230z
|
|
|
|
||
|
|
Quote:
The DuBro prop balancer is a really great tool for balancing both props and spinners. |
|
|
|
||

|
|
|
|
|
I like my P2. But out of the box it flew in loops. I looked at it and the motor appeared to have up thrust. So I added a few washers to the top motor mounts and it flew great after that. I wondered if mine had a bad fuselage? Then I crashed it and broke everything but the stab and electronics. So I bought more foam parts. I reasembled it and with the new fueslage the motor still appeared to have up thrust. So I added shims again and my P2 flies great. I've been following the forum on this plane and never heard of another person having the same issue with the up thrust.
The stock spinner is crap, I use a Dubro prop nut. |
|
|
|
|
|
|
|
|
Bad Top Wing Fit
Hi All I should start a New Thread. I find it impossible to get the top wing together. I think the wing spar boxes are out of alignment and therefore stopping the bolts from being inserted . also had to cut off 3/32 of the spar to help buy not completely. here are the pictures of misalignment. Talked to Horizon tech and they want to see the pictures before they send a new wing .
|
|
|
|


|
|
|
|
Thread OP
|
|
|
Latest blog entry: 93" AJ Laser 230z
|
|
|
|
|
|
|
Horrible spinner vibration out of idea's
ANY help???? i am just out of ideas. wicked vibration using any one of FOUR spinners, U can see the tip of spinner rotate in a circle instead of a point. I have balanced all 4 spinners tried an apc 12x6, all is fine with no spinner and all is ok with just a back plate. I have tried to mix and match back plate to diff spinners. ANY help??? I love the plane flys great and it does not need the spinner but it's just not right

|
|
|
|
|
|
||
|
|
Spinner issues
Hi,
I've had the same issue with the spinner. I used a prop nut for a while. Then I bought a third spinner to try it again. It was horrible, however I decided to try and make it work. I roted the spinner and found what side was 'high'. I noted that there are four tabs on the front part which contact the baseplate. I trimmed the high one so the spinner ran true. It also helps to tighten the screws a little at a time, alternating between the two so that the spinner cone comes down on the baseplate equally. It is a poor spinner design and not easily replaced because of extended flanges on the baseplate. Keep fiddling with it and you'll get it true. Quote:
|
|
|
|
||
|
|
|
|
|
Same here regarding spinner absolute garbage, complained to the vendor who i bought it of and he said it could have been a bad batch out of the mould and kindly sent me another. Guess what exactly the same so i sent an email to E-Flite but they did not have the decency to reply. I now fly it with out the spinner and though it flys well i will certainly think twice before buying from E-flite. I could understand if it was a cheap model but it is not.
|
|
|
|

