|
|
|
|
Thread OP
|
Discussion
Banggood Multiprotocol module (Flysky Frsky Devo DSM2)
This thread is intended as a quick start for the users who are trying to get their Banggood multiprotocol TX module working.
The item is located here: http://bit.lc/4Y16 The thread that started it all off is here: https://www.rcgroups.com/forums/show....php?t=2165676 The Github repository is here: https://github.com/pascallanger/DIY-...ocol-TX-Module |
|
|
Last edited by nebbian; Jul 27, 2016 at 03:21 AM.
|

|
|
|
|
|
|
Thread OP
|
Quick start:
* Turn the switch to the 0 position * Solder the two jumpers marked "Tx" and "Rx" * Insert into your Taranis, ensuring that you have the antenna lead and antenna rubber ducky part connected * Update firmware in Taranis to this version: http://plaisthos.de/opentx/ * Turn on your Taranis, and make a new model. In the menu turn the internal RF module off, and set the external module to be "Mult". Then you can select which protocol to use. * Set your receiver to bind mode * In the Taranis menu, press the "Bind" option. You should now be bound. |
|
|
Last edited by nebbian; Jul 26, 2016 at 10:46 PM.
|


|
|
|||
|
Thread OP
|
Banggood Multiprotocol module (Flysky Frsky Devo DSM2)
3D Printed Case:
Attached are some details of a case that I've modelled up. It seems to work well. You shouldn't need support to print this, both parts should print as-is. I used black ABS, which matches the case of the Taranis. When assembling, you need to insert the module PCB at an angle. Angle the right hand edge of the PCB into the case, and when it's at the bottom, rotate the left hand edge down into the case as well. It shouldn't need forcing. You can download the files from here: www.thingiverse.com/thing:1691786 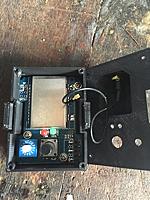 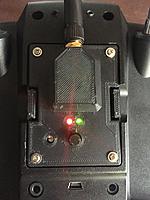 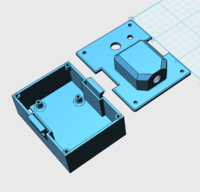 Updating the module firmware: Here is a video showing the entire process (thanks k3nv!)
Important: Do not power your module with 5V! Doing so will damage your module! Do not use a 5V programmer, even if powering the module from another source. Your programmer must be capable of toggling the signal lines with 3.3V. Firstly, make sure your programmer is not blasting 5V into the module. On my UsbTinyISP this meant removing a jumper. 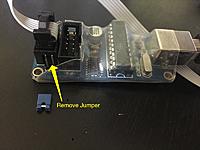 Then, solder in a 6 pin header into your module board. 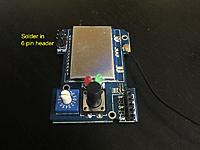 Now, whenever you want to power up the module, you do so with it inside your radio and your radio having a model selected that uses the 'external' module. The ISP programmer will then be connected to your computer and the board, with the programmer powered by your USB connection, and the board powered by your radio. 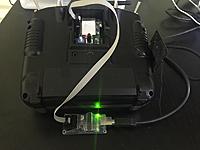 Once you have this connection, it's a good idea to download the existing firmware and eeprom so you can go back to a known good state if things stop working. Code:
# download your existing firmware: avrdude -c usbtiny -p m328p -U flash:r:"orig_flash.hex":i # download eeprom: avrdude -c usbtiny -p m328p -U eeprom:r:"orig_eeprom.hex":i Firstly, locate your boards.txt file, and append this to the end of it: Code:
##############################################################
## Multi 4-in-1 (3.3V, 16 MHz) w/ ATmega328
## --------------------------------------------------
multi.name=Multi 4-in-1

multi.upload.tool=avrdude
multi.upload.protocol=arduino

multi.bootloader.tool=avrdude
multi.bootloader.unlock_bits=0x3F
multi.bootloader.lock_bits=0x0F

multi.build.board=AVR_PRO
multi.build.core=arduino
multi.build.variant=eightanaloginputs

multi.menu.cpu.16MHzatmega328=ATmega328 (3.3V, 16 MHz)

multi.menu.cpu.16MHzatmega328.upload.maximum_size=32768
multi.menu.cpu.16MHzatmega328.upload.maximum_data_size=2048
multi.menu.cpu.16MHzatmega328.upload.speed=57600

multi.menu.cpu.16MHzatmega328.bootloader.low_fuses=0xFF
multi.menu.cpu.16MHzatmega328.bootloader.high_fuses=0xD3
multi.menu.cpu.16MHzatmega328.bootloader.extended_fuses=0xFD

multi.menu.cpu.16MHzatmega328.build.mcu=atmega328p
multi.menu.cpu.16MHzatmega328.build.f_cpu=16000000L
##############################################################
Then, in the Arduino IDE, do the following once:
If step 3 produces an error saying that 0x05 doesn't match 0xfd, then this is due to the varying ways of reporting fuse bits that don't exist. Change the extended fuse line in boards.txt to this: multi.menu.cpu.16MHzatmega328.bootloader.extended_ fuses=0x05 Then retry step 3. Now, download the latest code from https://github.com/pascallanger/DIY-...ocol-TX-Module and open this up in Arduino. You will need to modify _config.h, because there is more code in this repo than will fit on the module. You need to comment out a couple of protocols that you're not using. This is how I modified my config.h: Code:
//There are 4 RF components supported. If one of them is not installed you must comment it using "//". //This is also a quick way to reduce the number of protocols and save Flash space. #define A7105_INSTALLED #define CYRF6936_INSTALLED #define CC2500_INSTALLED #define NFR24L01_INSTALLED //Bellow is the list of all available protocols. Comment the protocols you are not using with "//" to save Flash space. #ifdefA7105_INSTALLED #defineFLYSKY_A7105_INO #defineHUBSAN_A7105_INO #endif #ifdefCYRF6936_INSTALLED //#defineDEVO_CYRF6936_INO //#defineDSM_CYRF6936_INO //#define J6PRO_CYRF6936_INO #endif #ifdefCC2500_INSTALLED #defineFRSKYD_CC2500_INO #defineFRSKYV_CC2500_INO #defineFRSKYX_CC2500_INO #define SFHSS_CC2500_INO #endif #ifdefNFR24L01_INSTALLED #defineBAYANG_NRF24L01_INO #defineCG023_NRF24L01_INO #defineCX10_NRF24L01_INO #defineESKY_NRF24L01_INO #defineHISKY_NRF24L01_INO //#defineKN_NRF24L01_INO #defineSLT_NRF24L01_INO Code:
//Uncomment to invert the polarity of the telemetry serial signal. //For ER9X and ERSKY9X it must be commented. For OpenTX it must be uncommented. #define INVERT_TELEMETRY1 |
||
|
|
Last edited by nebbian; Jan 13, 2017 at 03:15 AM.
|
||
|
|
|
|
Thread OP
|
Technical info
Known to work without modification:
Known to not work with:
OpenTX status OpenTX 2.1 - Unofficial version - Source available under https://github.com/opentx/opentx/tre...multi_module21 - Binaries available under http://plai.de/opentx - Telemetry is now working - Companion 2.1.8 will overwrite multi settings. 2.19 Companion (and current nightlies) will not overwrite setting but also do not show the settings OpenTX 2.2 - current development version of OpenTX, not for normal users - Multi serial support in official OpenTX repository - Telemetry working and Spektrum (DSM2/DSMX) telemetry implemented - Works on Horus and Taranis ER9X status - Supports this module ERSky9X status - Supports this module PPM Mode (not serial) PPM Mode can be selected by turning the dial to one of the following options. Note that you also need to select a matching protocol inside your model selection in your transmitter (ie don't use the "Mult" option, select the protocol that matches the dial position). |
|
|
Last edited by nebbian; Sep 11, 2016 at 08:17 PM.
|

|
|
|
|
Thread OP
|
Review:
I was excited to receive this board. I'd been following the parent thread off and on for a few months, and jumped at the chance to try this board out. Initially I was a bit frustrated at the lack of documentation. The relevant parts of information needed are scattered throughout many pages of the parent thread, and I found it difficult to find what I needed to get this up and running. This caused me to create this thread  Once I had it figured out though, the setup was quite straightforward. I had it bound to a receiver within minutes of plugging it into my Taranis. This was in the simple mode of just moving the dial to the right position for my receiver. After doing this I found out how to use the serial mode, and so updated my Taranis to a version of OpenTX that supported the module. Now that it's all set up I'm going to use the Taranis as my main radio, and retire my ageing Turnigy 9x. That 9x doesn't owe me a thing, I've had many years of fun with that radio... but this module enables me to fly all my models without having to change modules. I'm yet to try some range tests, but I'm sure that it will be fine for my use. I hope this thread helps others who are in the same situation as I was in, a week or two ago. |
|
|
Last edited by nebbian; Jul 30, 2016 at 09:20 AM.
|
|
|
|
|
Thread OP
|
I believe it is fully supported:
https://github.com/pascallanger/DIY-...-serial-output |
|
|
|
|
|
|
|
|
Yes, and a 'bit bashed' serial receive driver is included to handle the non-inverted telemetry on the SKY board, AR9X board, Taranis and 9Xtreme. The 9XR-PRO has a programmable inverter so also handles non-inverted serial input anyway.
Mike. |
|
|
|
|
|
|
|
|
Are the resistors no longer needed? I thought I read that in the other thread.
|
|
|
Last edited by westphill24; Jul 27, 2016 at 05:04 AM.
|
|
|
||
|
Thread OP
|
Quote:
I think that the resistors are already present on the latest banggood board. You can see them in my picture on post 2. I only bridged the two pads with solder and the system is working fine. |
|
|
|
||

