HobbyKing Night Walrus - RCGroups Review
The HobbyKing Walrus has been around for 4 years, and in that time it has become a favorite for many.

Introduction

|
|
| Wingspan: | 1400mm (55 inches) |
| Flying Weight: | 890 grams (31 ounces) |
| Length: | 1036mm (41 inches) |
| Transmitter: | Minimum of 6 channels |
| Receiver: | Minimum of 6 channels |
| Battery: | 3s 2200 25-40c |
| Power system : | 2212-1350KV motor, included |
| ESC: | 30amp, Included |
| Typical Flight Duration: | Depends on available lift, but I easily got 15 minutes |
| Available From: | HobbyKing |
| Price: | $107.07 at the time of this review |
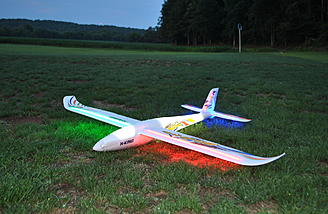
The HobbyKing Walrus has been around for 4 years, and in that time it has become a favorite for many. With good flight characteristics, and a full house set up (yep..it has flaps!) in a 55 inch wingspan, the Walrus seems like the perfect plane. However, as with most things, there was room for improvement. You see, the problem with the Walrus was when the sun set, the fun was over. Not anymore! HobbyKing has added LED's as well as a few structural updates so you can continue flying well after dark.
Flight Video
| Hobbyking Night Walrus - RCGroups Flight Review (6 min 7 sec) |
Kit Contents
- (6) 9 gram Servos (installed)
- LED's (Installed)
- Motor and ESC (installed)
- Hardware to assemble the glider
-
 The aren't a lot of parts to put together..this means a fast build!
-
 The checkerboard on the bottom is a nice touch
In addition, HobbyKing also supplied a FrSky X6R receiver
Additional parts I supplied to complete the build:
Assembly
Not much to say here..a Phillips head screwdriver, a pair of needle nose pliers, and glue (I prefer Foam-Tac) are all you need.
In order to complete the build, you simply install the control horns and clevises, glue the empennage in place, and finally, slide the wings into place and secure them with the included screws.
The motor and the ESC are pre-installed, so the only wiring you need to do consists of plugging in the LED connections to the surfaces, and of course hooking up servo's to your RX as you assemble the Night Walrus.
-
 The lighting uses micro connectors like we have seen on single cell quadcopters
-
 All the connections are made, except for the canopy LED's
The Night Walrus features plastic "skid plates" pre-installed on the fuselage where it will come in contact with the ground during landing. This is a nice touch and is direct response to feedback received from the original Walrus.
The LED's are embedded in the plane, resulting in a nice glow that isn't going to blind you if you are flying "slow and low." Personally, I appreciate this approach, as it saves the pilot's eyes, as well as the eyes of those who may be flying with you

Flying
Launches are easy, just throttle up and give it a toss. The climb-out is solid, and half throttle is all you need for a successful launch. Before takeoff, I had added a bit of up trim to insure a good launch. As it turns out, this wasn't needed. I did have to add a little right aileron trim, it ended up being 3 click's worth. Flaps, rudder, and elevator needed nothing. Controls throws felt great on the recommended high rates, though I do want a bit more aileron.
I did some basic aerobatics, and the Night Walrus took them all in stride, and looked good at the same time. One thing that surprised me was how quick the Night Walrus is. Most of my flying was at or below half throttle, but I did open it up a few times and I was pleasantly surprised at how quick it is. My camera person, on the other hand, wasn't as impressed, since fast flight made it hard to keep up with!
Landings are simple, with or without flaps. The plane carries speed well, and floats like you would expect from a sporty glider. Flaps are effective, and though you don't need to use them, they sure do add to the fun of short field night time approaches!


Pluses and Minuses
Pluses
- Very fast build
- Pre-installed LED's extend your flying time
- Pre-applied graphics
- I didn't need any weight to hit the CG
Minuses
- It can be tricky to get all the connections from the wing into the fuselage
- I wasn't able to use Velcro to secure my RX in place
Conclusion
I like this plane a lot. Good looks, a great lighting scheme, and rock solid flight performance make the Night Walrus a plane that will get a lot of flight time. The build is fast, from the box to flight ready took me an hour. The colorful graphics are complimented by the internal LED's and make for a very easy plane to see at night. The wide speed range make it great for lazy flying as well as spirited passes down on the deck. Add to that the easy launch and landing characteristics, as well as "full house" controls, and you have a winner. The Night Walrus will be in the truck every time I head out!
I would like to thank Stuart at HobbyKing for providing the Night Walrus for review, my wife for photos and video, and Jim T. and Matt Gunn for their assistance as well.
Last edited by RCG_Jason; Dec 06, 2022 at 03:19 PM..| Thread Tools |
|
|
|
|
|
Nice plane, curse you and HK for putting this in front of me not long after several planes left and made room for it.
Couple questions: 1- How convenient is this to transport? Does it break down quickly and easily or even go back in it's original box? 2- How is the hardware quality, I ended up sourcing replacement screws for a number of the Tundra parts, wondering how this is. 3- How easy is it to tell up from down in full darkness conditions? A lot of my planes that glow internally and are fairly symmetric it can be difficult to orient when rolling. This one has a lit vertical stab that appears to be the only visual clue when night flying. 4- How feasible is this to dive down to a very small field in a residential subdivision at night? It will glide forever but bringing it down safely in tight quarters may allow me to fly it more frequently. |
|
Latest blog entry: Ultra configurable plane storage rack
|
|
|
|
|
|
Thread OP
|
1: Since the tail surfaces are glued on, it won't go back in the box. The wings come off with the removal of 2 screws, and disconnecting the servo and LED connections. The only difficult part is threading the wires back into the fuselage, but that could be made easier with longer "Y" connections.
2: The only hardware you have to remove and install when breaking down are the wing screws. Those are machine threaded, and of good quality. I'll get a measurement this evening, and let you know the diameter, and the thread pitch if I can find my pitch gauge 3: Pretty easy..the vertical is lit, and the cockpit has white LED's in it, shining up through a frosted canopy. Also, the wings are lit Red and Green, red on the left and green on the right..that alone makes it easy to tell if you are upside down or not. 4: With full flap, you could get it in a pretty small area with some practice. I would recommend trying some approaches at your regular flying field during the day to get a feel for it. One thing to keep in mind is since you have flaps and ailerons, you can set up a "Crow" mix and really slow things WAY while keeping a steep descent angle. That will help with short field landings as well |
|
Latest blog entry: Intro..a few years to late!
|
|
|
|
|
|
Thread OP
|
The wing bolts are 3mm x 50mm , machine thread, like I mentioned earlier. I just ran mine in and out several times a few minutes ago without a problem..
|
|
Latest blog entry: Intro..a few years to late!
|
|
|
|
|
|
|
Are the lights always on? Or can you disconnect them during daylight flying so as not to have an unnecessary drain on the battery?
|
|
Latest blog entry: Ultra configurable plane storage rack
|
|
|
|
|
|
|
The lights can be disconnected easily.
|
|
Latest blog entry: 93" AJ Laser 230z
|
|
|
|
|
|
|
What are the rules in the US for night flight?
|
|
|
|
|
|
|
|
|
Night Walrus power setup question
I received the new Night Walrus I ordered last week from HK. I have been doing my usual detailing/ reworking prep for assembly.
I noticed the outrunner brushless motor installed in mine has a label on the motor bell that says 2215-1100KV. Everywhere I look it says that the old Walrus and the new Night Walrus comes with a 2212-1350KV motor. Mine has an AeroStar 30 ESC and the 9x? folding prop. On a bench run, I'm getting 200 watts at 17.6 amps and 11.4 volts on a 3s 2200mah LiPo. That is a respectable 110 watts/lb which seems about right for a powered sailplane. However, if they did intend to have a 1350KV motor powering this plane, the extra 2000-3000 RPM it would be twisting the prop certainly stands to produce a bunch more watts unless there was a prop change made too. Anyone out there have any vintage Walrus where they can see what motor it has? |
|
|
|
|
|
|
|
|
This is from the AMA safety code under B. Radio Control(RC)
8. RC night flying requires a lighting system providing the pilot with a clear view of the model’s attitude and orientation at all times. Hand-held illumination systems are inadequate for night flying operations. |
|
|
|
|
|
|
|
|
|
|
|
|
|
|
|
|
|
I received mine today, I must say I'm not impressed by the packing job. It came in a large shipping box that was pretty much crunched due to being twice the size needed...but it was full of those airbags as well as the plane. Inside the shipping box was a 2nd box that survived the trip well, and inside that one was a 3rd box that was also undamaged. Unfortunately, the parts were in plastic bags and rattling around loose inside. My wingtips got some minor damage where they curl up at the end, but I'm not terribly worried about it as it's not gonna affect flight and straightened out by hand easily enough. Just seems silly to waste 3 boxes and not even tape the parts together to prevent damage during shipping like others do.
The first thing I did was plug everything up and check that all the LEDs worked prior to gluing anything together. My GT Power meter showed 0.95A for just the LEDs on a 3S lipo at storage charge. Not too bad, I was afraid it would be much higher, such as the roughly 3A current reported by Flybeam owners. The LEDs are connected via micro Losi connectors, these have proven secure in my experience, so I'm not worried about them coming loose in the future...but I'll still tape or glue them once installed. The LED leads are pretty short, anybody that needs to take this apart for transport or storage will likely want to extend them some. Even then it'll be a tight fit and frustrating I suspect. The foam hinges on all pieces are nicely done, none so thin that they're nearly (or already) torn from the factory. A little flexing by hand and all move nicely so they should last a while with decent care. The various stickers seem placed and glued well enough, I'm glad to see there's something on the bottoms to help maintain orientation during the day, this is a nice touch that many planes don't have despite all the cool graphics they may have on the top. There is no battery tray, strap, or other retention method, and the only place to put the battery as delivered is on top of the ESC. This is right in front of the tail servos, so if you don't make some form of battery retention, it can slide back and jam them both. With a 3S 2200 pushed against the firewall, the other end is uncomfortably close to the servo arms. The receiver will have to somehow be connected up in the cockpit then shoved back behind the servos, and it's gonna be difficult at best to get the Rx secured as there's no hand room to do so. If this was plain foam I'd just cut a one-time hatch to make the connections then glue it shut, but in this case that would also require cutting up the clear skid that's installed. Once the Rx is connected and secured by whatever means, there will be no easy way to get to the wing servo wires; which will make removing wings even more challenging. The four-way LED harness must also be connected and stashed someplace here, making a large bundle of wires on top of the servo arm location. They can likely be pushed back, but again there's no way to secure them from shifting and jamming up the servos. Here's some pix to show what I mean about the battery compartment...first one shows how little space there is and also the servo locations.  Here's a pretty standard sized 3S 2200 pushed all the way forward.  One partial solution is to move the ESC to the side and tape it in place, this gets the rear part of the battery below the servo arms by about 1/4" and should allow a little play in battery location for CoG if required.  All that's left is to determine a way to keep the battery secure and out of the way of the servos. Speaking of servos, one of mine is loose in it's little foam pocket...so check yours closely to ensure they are snug. Will just take a dab of glue to fix. More once I get her built and flying, with so many issues to deal with, that won't be tonight unfortunately. |
|
|
|
|
|
|
|
|
Rebuilding the Night Walrus
Fyathyrio, I guess you aren't the only "A/C" out there because you zeroed in on many of the shortcomings I noticed as I planned how to put this together.
The triple boxing is amusing but I read how many of the early Walrus' suffered from shipping box damage. Mine came without even a nick on the outer box. The parts seemed restrained in the box well enough but only the fuselage was immobilized, everything else "floats" around in their plastic bags. At least the wing servo horns were turned in so they didn't poke anything else. In no way would this plane be one you'd want to have to tear down to transport. Toss that idea from the get-go and try to work on some of the more critical shortcomings. The battery mounting is very untidy. You have recognized that the ESC is going to have to stand along one side of the cockpit. I think most people are standing the battery on edge between the tail servos. For the sake of good fit this probably still calls for some guide rails, Velcro and tie strap to fashion an appropriate battery tray arrangement. A fair amount of wiring will have to go behind the battery pack, so I'd cringe to think of stuffing a receiver back in there as well. I my case, I'm intending to use an OrangeRx 6-Ch Rx with builtin 3-axis stabilization so I need a solid deck to mount and orient the Rx. Also need to be able to reach and adjust the gain pots. You are right that this plane cries out for an access hatch. My choice is going to be in the belly behind the plastic skid pan back to the rear exit vent hole. My wing tips were curled up as well. They are pretty thin and weak for the last inch or two. I embedded a length of CF rod in the edge to toughen them up. They also did a sloppy job cutting the decal stickers on the wing over the flap and aileron hinges. Apparently a wavy cut is as good as a straight one for this. I was disappointed to see how they addressed the covering of the servo pockets in the wings. The tape job was pretty lame considering they went to the trouble of having a recess molded around the pockets to inlay a more substantial cover. However, they glued the servos into the pockets with a big gob of glue so they didn't lay down flush with the surrounding recess. I yanked out all the servos and re-glued them with something that wasn't so gloppy. I then cut some covers out of 0.5 mm plastic sheet and glued them into the recesses over the servos. As a finishing touch (which I do on most all my foam planes) I put a 3/4" wide strip of clear tape over the leading edge after sanding away any mold flash off the radius of the leading edge. I think you can see this isn't a simple "tonight" project for me either. I'm sure I'll develop some more tweaks as the project progresses. |
|
|
|


|
|
|
|
|
Life got in the way yesterday and I didn't get much accomplished, but managed to do a few things so far today with "Wally". The manual states that when installing the elevator & rudder, that you should pull the wires from inside the fuse to take up slack. This is not possible to do one at a time, it must be accomplished together when the rudder is installed. This is due to the fact that the tail power wires use the tail end of the LED PCB and are actually very short. Not a big issue as the horiz stab can be installed first and there's still plenty of room to connect the wires for the rudder, apply glue, and get it set in place correctly.
 One minor issue I had with this step was the fact that my fuse LED strip was stuck. This could have been due to a bit of glue from when the fuse halves were put together, or even as simple as the sharp corners of the LEDs themselves getting caught on the foam inside. Either way, work it gently back and forth until it's freed up in order to make installing the tail bits easier. You definitely don't want to yank it too hard and pull the wires & connectors through the other end! The glue slots do include small grooves to allow the tail LED wires to tuck in, but the rudder slot has a 90* bend that the wire would likely never follow. This could potentially prevent the rudder from seating all the way down. My fix was simple, I cut a small groove with my Exacto and tucked the wires in, then stuck them in place with a bit of Goop glue to keep them there once I started to install and tug on wires. The last issue I ran into, and this one could be bad, was that one of the clevises provided had too large of a hole to properly screw onto the control rod. Luckily I had a bag of much nicer ones from Freewing that I can use as a replacement. The Freewing ones also include a length of fuel hose so you can cut some clevis retainers that HK chose to omit. The Freewing part # is on the bag in the photo below if you choose to order some.  I've also noticed that the elevator control horn hits the fuse pretty early in it's travel, this will likely require some modifications to give it proper clearance. Not a big deal other than this spot is also covered by the hard plastic clear skid installed. |
|
|
|
|
|
|
|
|
Doublecheck your Servos!!!
Had a frontal dive down crash on first flight.
 After inspection of the wreck, the elevator-servo became lose. It was fixed only with some sort of thin doublesided tape. So reglue them in or better directly replace them! Other things: The rudder servo didn't center well, left turn is ok but right always offcenter. My motor is labeled Aerostar 1100KV not 1350 (see upper post). My Walrus had more power on the sticks. I extended the LED-wire for the canopy . The plastic nuts for the wings screws in the fuselage can be pressed down or one was completely missing (can't find the nut for the rear screw). The ESC is getting warm, when checking on the bench, without motor running. I won't remove the wings for transport. The wires are very short. Just my two cents Chris |
|
|
|

