|
|
|
|
Thread OP
|
Mini-Review
Electric Combat HogWild
https://www.rcgroups.com/forums/show....php?t=1501246 Link to first build version .
Here it is folks, the last combat plane you will ever need. Not only is this little plane great for combat, but can and has been used as a trainer. This is the Hogwild V2 from Electric Combat out of Piggott , Ar. www.electric-combat.com This has been a on going design to produce a near perfect combat plane. Designed and produced by Bobby Baker , a lifetime of designing model and full scale aircraft. Bobby is one of the best. Their moto is " Go ahead and crash it" . I've seen these go full throttle into the ground and be picked up and go right back into the air. You can get a Hog as a kit , or arf. from basic airframe to rx ready. Prepainted or unpainted and includes professional quality vinyl decals , or you can paint and decorate to you own design. A basic yet fully informative instruction manual with pics is included along with all hardware , glue , motor and esc and prop. So lets get started. Made od coroplast , CF rods and ABS plastic , they have been flown with no c/g changing issues with 1800 mah thru 2200 3 cells. |
|
|
Last edited by 62pilot; Apr 30, 2016 at 06:27 AM.
|
|
|
|
|
|
|
Thread OP
|
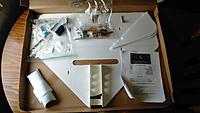
The box arrives with several warnings stamped on it about wild hogs. Cute. Other than some basic info on the label , you will notice there is some rectangles drawn on the box top. I'll explain what these are for later.
When you open the box , you will see it is fairly well packed with plenty of packing material to protect things enroute. Also you will see several plastic baggies containing all the numerous bits and parts. Some of the plastic airframe parts are taped to the box bottom , but are easily removed. When removing the canopy , be sure to look inside it, as the attachment hardware is taped to it inside. I removed all contents and made sure everything was included and should always read the instructions before starting any build. Laying out the parts help in following the few short steps. You will also notice there are not many parts to begin with. . |
|
|
|
|
|
|
|
Thread OP
|
First off you will see the control horns and the electronics / battery compartment have already been installed along with the CF rods in the wing , the tray being preinstalled ensures the motor mount will be in the proper location.
Before we actually start the construction, I just want to give a quick guide to applying the vinyl decals. These are pressure sensitive decals , not waterslide. Remember if you plan on painting your hog, do that before applying any decals. First lay out the decal in the final position and get an idea of where you will place it . Next, peel off the wax paper backing with the transfer tape , you can apply these dry if you're carefull, or if you feel you need to, some dish soap mixed with water as a lubricant will help in getting them placed correctly. Once in position rub them down with a credit card or soft towel , if using a application fluid, allow to dry before attempting to remove the tape. In removing the transfer tape , start at one corner and peel it back over the decal, as opposed to straight up. This greatly helps in separation and avoiding peeling the decal back off. Once on and dried , they are on for good. |
|
|
Last edited by 62pilot; Apr 28, 2016 at 10:59 PM.
|


