| Thread Tools |
| This thread is privately moderated by wazoo22, who may elect to delete unwanted replies. |
|
|
|
|
|
Build Log
Captivated! Kidnapped! The X8 has me!
I don't do foam. I'm a crotchety old man, and my art is building, so to have someone squirt plastic in a mold and pop off a few thousand planes and sell one to me--- well, just not my thing. And after more than 50 years of building things, in about every material possible, I've earned my chops.
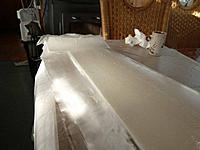
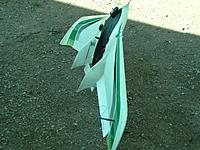
BUT---- The X8 is a lovely shape that caught my imagination from the first moment I saw it. So life is balance, and I compromise. .I ordered it from HK, and waited. And waited. Forever. It did arrive, or I'd not be writing this. Congratulations to the designer for a lovely creation, and less kudos to the guys who did the rather imperfect tooling, and sympathy for the fact that the shape would be a real female dog to tool. The design cried out to me-- several things. Things about payload, long range, and gracefulness, and these things: 1.) Help! Somebody do something! Anyone can see my wings will twist! 2.) What can I be when I grow up? A foam overcast? 3.) Please! Aagh! Somebody get this gruesome thing off my chin! Leading edge damage is the nemesis of foamies. Torsional wing distortion was a virtual certainty as well- by hand, the wing twisted far too easily, the tip foils had a center of effort well above the wing axis, and lift is never free. My suspicions were confirmed. I had to glass it. But first, I needed to remove the warts. Injection moulding leaves sprue bumps where the chemical goes in, and they serve no useful purpose. Wart Removal Get a razor plane, and some old-style Gillette razor blades. Set the blade for a very, very shallow cut. To get this setting, I set my plane on a formica surface, wiggle it a bit to let the blade settle, tighten the blade retainer wing nut and try it on a piece of foam. You want no cut. That's right, no cut. But almost a cut. A setting that takes off only the bumps. Adjustment and technique are crucial. When you think the cut is as close to exactly on the surface as you can get it,, try it like this:Hold the plane at an angle of 30-40 degrees to the wart, and smoothly swing it in an arc about six inches long, with light pressure, over the wart (s). No cut means a little more pressure. If still no cut, you may need to set the blade a hair deeper. You only want to cut the wart! If all this is obvious, ---well, it's a short read, and someone else might find it useful. Once you get it right, most of those pesky warts will peel away and turn to dust before your eyes. NOTE: |You won't get it all. The base will remain, but it will be far better than before. But you must remove most of the bumps, or the laminate will not go down evenly. And--who wants warts, anyway? Miller's Free School for Wing Laminators Laminate spec. for wings:-- 1 layer 46 gram/m standard bidirectional e-glass, in aircraft grade epoxy, full span, done in two halves, top and bottom. The laminates will overlap the leading edge by 10 cm. giving a double layer on the fragile leading edge. Use aircraft grade laminating epoxy with a pot life of around 40 minutes. -- 1 additional layer, same procedure, min. overlap on leading edge, 1/3 span. -- 1 50 mm tape at wing root, 105 gm/m, all round, to overlap root rib 1 cm. min. -- 1 layer 105 gram twill or satin weave on lifting body, same two-step procedure, to overlap on nose, by 10 cm on top and 20 cm on bottom. (Satin weave will conform to compound curves, with patience.) -- 3 additional local reinforcements at point where wing attach bolts go through, and around servo cutouts to replace lost strength, Q.S. (Quant. Sufficient). This is not easy to do right. 50 years of fiberglass construction has taught me a few things. Forgive me if I gift you with some of the experience that will die with me otherwise. Ignore it all if you are better at this than I am, or if you don't give a rat's tush.. To achieve lightness but some impact resistance, you do NOT want a dry laminate. Do not squeegee. It's too thin a lam to squeegee, anyhow. Use a medium foam roller, (10 cm) which allows you to evenly coat by looking at the reflected surface appearance for wet or dry spots. Do not precoat the surface before laying the glass. It will stick and it will still be very difficult to move to relieve wrinkles. Weird but true. Cut the ailerons loose and laminate them separately, or replace with balsa ones. Cut the two glass panel, lay the glass and begin to wet out from the dimensional center of the panel. Work outward like covering film on a solid surface. Wet out that first anchoring spot with slow roller till attached, then roll patiently outward, radially, with wet roller. Press roller with medium pressure and roll patiently till it's adhered, then move on. remember the laminating resin will easily be pressed through glass this thin, provided you maintain enough roller pressure. When the panel is completely adhered it should be wrinkle free but will be unevenly wet. If you have some wrinkles trace the threadline to the panel edge and gently pull on those threads, and the wrinkle will come out. Now go back to the center and evenly roll, in long easy strokes, the whole wing panel, till the reflected appearance shows an evenly wet (and fully wet through) laminate. If you keep adding resin, you can oversaturate till the glass fiber floats. If you are too stingy with the juice, you will lose adhesion and impact strength. You don't want it flooded, you just want it evenly wet through, no holidays, no lakes. This final, rolling will allow the foam to steal resin from the wet spots and deposit it in the dry ones. Err on the side of wet. Great tool, those foam rollers. Do not use a hard roller! Lam is too thin. If all goes well, your wing will come out needing only a little finish sanding. Things I wish I'd done. I'd shim the wing panels for 1 degree of washout before I laminated. Anti-death roll insurance. ImagesView all Images in thread
|
|
|
Last edited by wazoo22; Sep 07, 2016 at 11:10 PM.
|
|
|
|
|
|
|
|
Looks good! Have you flown it yet??? Mine is almost finished, hope to fly it somewere in the coming two weeks.
|
|
|
|
|
|
|
|
|
James :
I am with you in that THE BUILD is the thing most loved about this hobby . For me , I always prefer to use balsa as it was the material to use 40 years ago when I started out . Nowadays , balsa is extremely hard to come by . I would always prefer to hand select my stock at the local hobby shop but now there are none to be had . My nearest hobby shop is some 300Km away . I decided to try out the foam this year and must say that I like working with it . Being able to build CHEAP (under $25) models that actually fly is key for me as I am on a pension . What I find interesting is the fact that the 40 years of building experience is transferring well into this newer material use . I am into my bag of tricks all the time . For my fiberglass work , I per-fab most of my wing sheeting sheets on a large plate of glass . I use a thinned epoxy resin on the 1/2 ounce cloth as the binder . Once cured , peel of a 'glass smooth' sheet for covering . That's all there is to it . Love your work : RickC |
|
Latest blog entry: Fellas Fellas Fellas !
|
|
|
|
||
|
|
Quote:
For the record, the total weight penalty for glassing the X8 wing was 60 grams per wing. Cheap insurance! I also just tried the foam. In fact, the X8 is number two. How do you use those pre-fab sheets? As a replacement for --- what? Over foam? If so, do you bag it onto the surface? Or is it a free-standing skin? I'm really interested, Rick. Jim P.S. I am fortunate to have a supplier that has a good stock of balsa--TopModel-- who also ships. The 8 euro shipping fee hurts, so I combine all my purchases- I keep a notebook by the work area to list stuff. When I can no longer wait, I order. |
|
|
|
||
|
|
|
|
|
Old, old post but I just had to comment. Lol
I have 2 x X8s and my buddy has one. We have had them for several years and they are all in good condition still. They are great wings. I converted one to have retractable u/c that works quite well. Lately we have been flying a FX 61 Phantom and a FX 79 Buffalo but we still drag out the X8s. I wonder if yours are still flying? |
|
|
|
|
|
||
|
|
Quote:
Yes, my X-8 is still in flying condition, but right now is hanging from the ceiling in the salon (we live on a 65 foot steel Dutch barge, 1924 vintage). I have a list of aircraft that I want to fly again, but right now I've got to get good with the pixhawk/arduplane system, since they all need an upgrade from Eagle tree. That will be about four systems- a lot of money- so I'm starting small, with a Falcon with pixhawk/arduplane/MP/qgroundcontrol. You could say I'm back in school. ImagesView all Images in thread
|
|
|
|
||


