|
|
|
|
|
|
|
Here is a link to the concept that seems to have the best chance of moving forward:
http://web.mit.edu/2n/events/DsgnSym...esentation.pdf Looks like a commercial-based design again, which really comes as no surprise. This one is a variant of the UT-722L tug, which appears to have been designed by Rolls Royce Marine. Special features would include ice strengthening, diving support capabilities, and substantial towing/salvage capability (200 tons of bollard pull!). These are obviously preliminary sketches, but I don't think the MIT guys have a complete grasp on towing ops. Take for instance the generator exhaust located on the fantail. Wouldn't take long for a towline to take that out. The location of the winches also looks odd to me, and I'm not sure that both a 35-foot workboat and a RHIB would be needed. It's a start anyway, and a whole lot more practical than the "bag of ass" trimaran concept if you ask me. |
|
|
|
|
|
|
|
|
Back at it again after a week off in Florida....
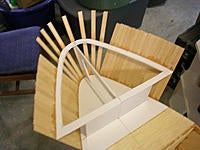
I have been constructing the forward bulwark and shelter deck enclosure, which is a little tricky as you can see. I started with a styrene "skeleton", the top of which will support the actual shelter deck later. The skeleton then served as a guide to install the wood strips, and around they went. The tapered curve of the bow required lots of specially-cut planks, but it turned out well. Once the bow was enclosed, the styrene supports were removed with the exception of the shelter deck perimeter. After the bulwark ribs were installed, the bulwarks were planked and faired into the bow enclosure. The hole for the large bow anchor will be cut later. Now comes resin and glass; and lots of tedious sanding! |
|
|
|
|
|
|
|
|
Well, the hull has been fiberglassed and thoroughly sanded. I haven't posted an update in awhile because frankly, this is an uneventful and tedious stage. She looks a little splotchy from the different layers of filler, but trust me, she is baby-smooth.
The very conspicuous hull rubbing strakes are up next, and once that is finished it will be time for a coat of primer to help spot any imperfections I've missed. It's just about time for shaft installation too. |
|
|
|
|
|
|
|
|
Thanks everyone.
I'm waiting for 3/16" half-round stock for the rubbing strakes to arrive, so I thought I might as well get the shafts and motors in. I added two alignment blocks to ensure good shaft location, but the shafts will be glassed-in to really fix them in place. I have located the shafts in their scale locations, but because they are so low in the hull (and parallel to the keel) I was forced to mount the motors upside-down. The motors don't seem to mind. I made a base out of 1/4" ply, reinforced with basswood strips to prevent any sagging over time. The nice thing about these MFA motors is that they come with high-quality detachable mounts, which were lined up and secured to the base while on the bench. After the motors were bolted-on, the whole assembly was flipped over and installed on pre-aligned bracing that had been glued to the inside of the hull. Once the alignment was verified, the base was fixed in place and two support posts added along the centerline to anchor the assembly to the keel. |
|
|
|
|
|
|
|
|
And on to the bow thruster....
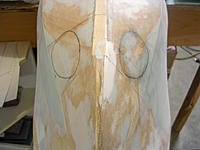
This tug has a complex fairing that must be tapered from the hull shell to the thruster outlets. Since the whole setup is on a compound curve and on the angled portion of the hull, the outline for the thruster opening cannot be transferred onto the model direct from the 2-dimensional profile drawing. Even though I have a handful of sectional drawings from Marinette Marine to aid in the process, there is still a lot of "eye-work" to make sure the opening is located and sized correctly. Once I was satisfied with the shape of the opening sketched onto the hull, I transferred it to a piece of paper and reversed it for the opposite side. Then it was just a matter of cutting it out with the trusty Dremel and a tile-cutting bit. I set the thruster in the hull just to make sure everything looked right, but the actual fairings will have to go in first. |
|
|
|
|
|
|
|
|
mariner02 very nice work on the atf very clean and organized just totally outstanding
Jerry |
|
|
|
|
|
|
|
|
She's progressing nicely, I'll be keeping an eye on this thread!
I was lucky enough to get a bit of stick time on one of the ScaleShips 1/48 T-ATF's a while back, they are very impressive on the water but keep an eye on the weight of materials and fittings above the main deck, it won't be hard at all to wind up with a boat that is top-heavy and tender. |
|
|
|
|
|
||
|
|
Quote:
The real ships don't ride that great either; they have a tendency to lurch rather than roll. We were in a good storm off Los Angeles once, and couldn't do more than 8 knots since we had a tow. The thing was jerking side to side so violently that I was thrown against the corridor bulkheads more than once. I woke up the next morning with bruised shoulders. And everyone was sick- even the "I don't get seasick" types. You know the guy; he'll be sitting at the lunch table with everyone saying "yeah it's a good storm, but I'm used to this sort of thing". Then you see him an hour later leaning over the bulwark where he thinks no one can see him, feeding the fishes. 
|
|
|
|
||
|
|
|
|
|
Copy that...
The ScaleShips 1/48 T-ATF came with a 7 piece fiberglass superstructure set and a whole gob of heavy polymer fittings such as the entire visor around the pilothouse roof. I think you should have no trouble making the major pieces out of a lighter material to leave yourself a little room for the weight of the other detailing that you want to do. |
|
|
|
«
Previous Thread
|
Next Thread
»
| Thread Tools | |
| Similar Threads | |||||
| Category | Thread | Thread Starter | Forum | Replies | Last Post |
| For Sale | Built 1/48 Scale ATF Fleet Tug | Sweeper Nut | Boats (FS/W) | 3 | Jan 27, 2014 10:30 AM |
| Discussion | Where to find 1/48 Modern USN Fittings | nismoron | Scale Boats | 6 | Aug 14, 2009 11:06 AM |
| Sold | 1/48 ATF Fleet Tug Hull | Sweeper Nut | Boats (FS/W) | 9 | Jun 07, 2009 10:04 AM |
| For Sale | Built ATF Fleet Tug 1/48 Scale | Sweeper Nut | Boats (FS/W) | 3 | May 09, 2009 12:42 PM |
| For Sale | 1/48 ATF Fleet Tug Hull | Sweeper Nut | Boats (FS/W) | 2 | Jan 13, 2009 10:44 PM |


