|
|
|
|
|
Building a Few Small Sub-Assemblies
While the mud on the hull was drying I skipped ahead a little and started building some of the smaller sub-assemblies. The parts were built up per the instructions, sealed with thin Cya and sanded in preperation for painting when the time comes.
|
|
|
|
|
|
|
|
|
|
|
Fiberglassing the Hull & Turtle Deck
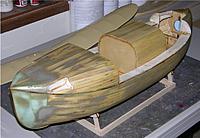
After the drywall mud was sanded and contoured, the hull and turtle deck were fiberglassed using 2 oz. cloth and West Systems Resin. The cloth was cut into sections. Then starting at the front and rear decks the cloth was applied, followed by the bottom sections. Because of the extreme curves on the full, several slits had to be made in the cloth to prevent it from creasing and bubbling as things progressed.
Then once the hull was done, the turtle deck was glassed using .6 oz. cloth. Since the fit into the hull was a little on the snug side, the lighter cloth was used to prevent the need for sanding the sheers to get it to fit once it was finished. |
|
|
|
|
|
|
|
|
Trimming the Cloth
After an overnight cure, the cloth was trimmed around the edges. The resin was still a bit "green" this morning, so trimming the edges was easy, but it's not quite ready for sanding yet, so that'll have to wait till tomorrow.....
At this point, we're about ready to start the finishing process, so we'll keep our fingers crossed for a decent painting day to get the primer on once the sanding and filling is done. Stay tuned, lots more coming real soon. PAT |
|
|
|
|
|
|
|
|
Setting Up the Falsa Keel
The front and rear false keel sections are done with 4 laminations of bass wood. The recomended proceedure is to wet the sticks, then tape them in place in their respective locations using white glue to form the bows. Then when dry, remove them, trim to length, and glue in place on the hull.
Since I use Cya, I glued the center keel stick in place first, then glued the bow section in place one layer at a time, butted up against the center stic. Then when dry, the top was trimmed flush with the deck. The aft section was done the same way, then trimmed top and bottom using a razor saw. |
|
|
|
|
|
|
|
|
Installing the Rub Rails.
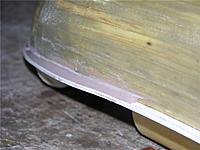
The rub rails are made from ABS plastic, so they conform easily to the hull shape. Cya was used to glue them in place.
|
|
|
|
|
|
|
|
|
Contouring the Rub Rail
The bottom side of the rub rail is molded into the hull with Bondo. A shaping tool is provided for dragging the Bondo along the hull that worked well, but needed to be just a touch larger to prevent the bondo from building up and getting all over my hands, so I made a larger one from styrene scrap.
Before you start this part, get out of that good shirt!  I ran out of snappy answers years ago for how I goobered up my best shirt with bondo and other messy stuff. I ran out of snappy answers years ago for how I goobered up my best shirt with bondo and other messy stuff.  So now, for the messier opperations like this one, I change first.... So now, for the messier opperations like this one, I change first....  Making the Bondo fillet was much easier then I had anticipated it might be. The secret is to mix the Bondo a little light with part B to extend the cure time. You'll need to work swiftly and in small section. I did about 1/3 the length of the hull at a time, applying the Bondo into the affected area with a squeegee, then dragging the shaping tool along. One pass with the scraper is all you need once you get the hang of it. Then mix a new batch of Bondo and repeat as many times as is needed to make your way all the way around. The main thing with forming the fillet into shape is to keep the scraper tool clean. You'll no doubt wind up with Bondo all over your hands as the residue comes off onto the tool, so keep a rag handy to wipe up the mess as you go. And don't try to do too much at once. When the Bondo kicks, it goes quick, and once it starts to go, your done! I also applied a little Bondo along the edge of the false keel bows where needed to fill the larger gaps. |
|
|
|
|
|
|
|
|
Prepping the Surface for Primer
After the bondo had cured I smeared red Spot Glazing putty around all the perimeter areas on the hull. Then a thin coat of putty was squeegeed over the entire hull to fill the grain from the cloth and level up the low spots.
I might add, before the putty was applied, the entire hull was wet sanded with 220 grit paper. This does 2 things: first, the water removes the wax coating from the resin that will affect the adhesion of anything that's applied over the un cleaned surface, and second, it breaks the slick glaze on the surface of the resin and allows for a good solid mechanical bond to the putty appled over the resin. |
|
|
Last edited by P. Tritle; Jan 02, 2013 at 12:52 PM.
|
|
|
|
|
|
Doing the Final Detail Sanding Before the Primer Goes On
Once the putty had dried, the entire hull was wet sanded with 220 grit paper. Now with that done, the hull is ready for priming. So once again, we wait. Woke up to 10 degrees this morning and am lookin at a high of 33, so it's going to have to warm up some before I can get back outside to paint.
But till then, I'll sneak a little ahead and work on some of the smaller sub-assemblies so that when it does come time to paint, I'll be able to do all, or at least most of it all at the same time. PAT |
|
|
|
|
|
|
|
|
Pat, instead of spot putty, I brush on a coat of Evercoat acrylic lacquer primer straight from the can. Once it dries, it sands fairly easily, fills the pinholes, etc.
|
|
|
|
«
Previous Thread
|
Next Thread
»
| Thread Tools | |
| Similar Threads | |||||
| Category | Thread | Thread Starter | Forum | Replies | Last Post |
| Build Log | Building the Dumas U.S. Coast Guard 44' Lifeboat | P. Tritle | Scale Boats | 92 | Apr 06, 2024 08:26 PM |
| Question | Dumas U.S. Coast Guard 44' Lifeboat #1212 | dash8man | Scale Boats | 12 | Jul 30, 2021 11:38 PM |
| Discussion | Dumas Coast Guard Lifeboat kit 33" | clemkathy | Scale Boats | 5 | Oct 05, 2008 05:26 PM |
| Help! | Dumas Coast Guard 44' lifeboat | Wolfmann | Scale Boats | 0 | Aug 28, 2008 01:03 PM |


