|
|
||||||||||||||||||||||||||||||||||||||||||||||||||||||||||||||
|
Thread OP
|
Great Planes Proud Bird EF1 Racer/Sport Plane ARF ReviewIntroduction
The Proud Bird is designed to be set up as either a competitive EF1 racer or as an aerobatic sport plane for slightly slower, more relaxed sport flying. Mine is set up as a EF1 competition racer with the O.S. OMA-3820-1200 brushless motor, a 60 Amp electronic speed controller and an 8 x 8 E thin APC electric propeller. The plane is an ARF with an all wood built up fuselage and wing that comes all white. This is intended to be a blank canvas for the pilot to make their own customized color scheme. For that part of this review I got professional help. No, not medical help but that might have been a good thing as well. I got professional graphic help from fellow E Zoner, FASTALJR, who has a professional graphic and sign shop. Among other things, he makes custom vinyl designs for our hobby. I really admire Great Plane's commitment to making the Proud Bird an all white plane for pilots to make their own. No pilot wants to race their plane with multiple planes that all look like theirs. With the all white plane the pilot can easily customize the plane to make it recognizable as their plane out of a pack of planes.
Kit Contents
Kit Contents
Items Used to Complete the Plane Supplied by Hobbico
Items supplied by author
Graphics supplied by FASTALJR
As mentioned above, the plane comes in an all white color scheme. They had one on display with Great Plane decals decorating it and one in the scheme featured on the box cover at the AMA show. It clearly brought home what a wonderful platform this plane can be for creating a custom finished plane. Here are the Proud Birds as seen at the AMA Expo on January 11th of this year.
My friend Dan Landis recommended that I contact Alan M. Mostek who was making custom decals for Dan's plane. I contacted Al and learned he was E Zone member FASTALJR and that he was making decals for his own Proud Bird. I shared some ideas I had, and he made up some vinyl decals for my Proud Bird and helped make her a thing of beauty. I cover the decals in a separate review. I join Dan in recommending Al's work. Here are ways to contact him to have custom decals or signs of any type made for your projects. His Website is: alanmmostekdesigns.weebly.com His e-mail is: Preventerwind@msn.com and his phone number is (518) 488-7006. I did use three decals that came with the plane and some that came with the OS motor as well. The Great Planes decals on the tail and a Proud Bird on the bottom of the fuselage came with the kit.
Adhesives, Building Supplies and Tools
Adhesives and Building Supplies
Optional Supplies and Tools
Replacement Parts List
Proud Bird Replacement Parts
Features promoted by Great Planes
Promoted Features
Assembly
The first thing I did was take out my Monokote iron and tighten up the Monokote anywhere it needed it. There were only a couple spots at that time. There were a few more in Arizona with all the moisture in the air from the rain but they tightened up very nicely.
Wing
The wing comes in two halves that are permanently joined into one wing. I followed the instructions and installed the hinges into the ailerons and secured the ailerons into the wing halves. I glued the wing rod and guide pin into one wing half and when dry, I glued the wing rod, the guide pin and the wing halves together at the root rib with 30 minute epoxy. When it was dry, I removed the covering to mount the servo mount and the wing bolt plate. I sawed part way through the wing bolt plate to flex it to match the wing dihedral. The servo mount and the wing bolt plate were glued in place per the instructions. When they were dry, I mounted the Futaba aileron servo, and per the instructions, I secured the control rods between the servo arms and the aileron torque rods. The control rods get a 90 degree bend to fit into the servo arms and clevises to fit into plastic mounts installed on the aileron torque rods.
The last two steps for the wing are covered later in the instruction manual but let's cover them here. The landing gear is assembled, and each is attached to the wing with two bolts. I used some locking compound per the instructions. Be sure to oil the axles before installing the wheels. Finally, I trimmed the belly pan very carefully so that it didn't cover the landing gear at all. Ream out the holes for the mounting bolts so that the bolt and the washer fit through to secure the wing. They are not to pull down on the belly pan. the belly pan was glued onto the wing with CA on the front and the edges of both sides. My wing was now assembled and set aside while the fuselage was assembled.
Fuselage/Tail
The fuselage was mostly assembled as sold. I followed the instructions to install the horizontal stabilizer by fitting it in place with the wing on the fuselage and trimming away the covering that was inside the fuselage to allow the glue to make a tight and proper bond. I then installed the hinges in the elevators and the elevators into the stabilizer. The vertical stabilizer also involved trial fitting and removal of covering. I simply followed the instructions, which were well written. Installing the tail wheel into the rudder and vertical stabilizer required me to drill a hole into the back of the stabilizer for a hinge that is part of the tail wheel assembly. With hinges on the rudder I was careful to trial fit the rudder with wheel in place and determined where I would add glue and where there should be no glue on the tail mechanism, and glued the rudder in place.
Next I installed the rudder and elevator servos into the fuselage and the control horns onto the elevator and rudder surfaces. As with the ailerons the control rods were bent 90 degrees to fit into the servo control arms which were drilled out to fit the control rods. Clevises were installed to connect with the control horns on the control surfaces.
Motor and Speed Controller Installation
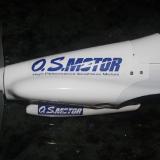
The motor came ready to install with three connectors to be soldered onto the speed controller. I soldered the connectors onto the three motor wires and soldered a Deans connector onto the wires for the power. The OS racing motor required the use of only three of the supplied motor mount pieces per the instructions. I carefully drilled out the motor mounting holes where indicated starting with a 1/16" drill and expanding the holes making sure they remained centered to 5/32". The 3mm blind nuts were drawn into place by using a screw and a washer and tightening them to draw the mount into the hole. I started all four motor mounting bolts and tightened them and secured them in place with some locking compound. I connected the ESC to the motor through the firewall and using two plastic straps that I supplied I secured the ESC in the compartment behind the firewall. The plans called for using supplied hook and loop material but I found using the plastic straps easier.
PBC 015.jpg:The motor and ESC installed.
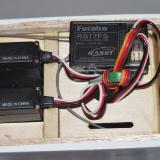
Radio Installation
Per the instructions the receiver is secured to the fuselage just in front of the servos for the rudder and elevator. I added a 12" servo extension wire to the aileron channel and plugged in the throttle control, elevator and rudder servos. The ESC also has its own on/off switch that I ran up to the battery compartment in front of the receiver. I bound the receiver to my transmitter and then trimmed the supplied plastic cover that goes over the receiver. I secured it in place with small pieces of white plastic tape so that I can easily access the receiver in the future if needed. I trimmed another small plastic cover that fits in front of the receiver cover and tucks under it. That and the canopy cover over it hold this second cover in place. I glued some hook and loop material onto the battery tray to help secure the battery in flight. I glued the opposite hook and loop material onto the bottom of the battery.
Securing the Fiberglass Cowl
A molded fiberglass cowl that has a special shape comes in the kit and it fits over the motor and onto the fuselage. Using the back plate of the spinner and the propeller I trial fitted the cowl until I was certain it was properly positioned on the fuselage. I followed the instruction manual and cut up a 3 x 5 card and secured it to the fuselage and marked on it where the holes for the cowl mounting screws should be drilled. I drilled the holes per the instructions starting with guide holes that were expanded to fit the screws. The cowl was successful secured in place.
Completion
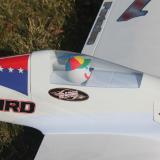
The canopy tucks into the cowl in front and is secured with magnets in the back. Two magnets come already mounted into the fuselage. Two magnets and wooden mounting rings come as parts. The magnets were placed in the wooden rings and then onto the magnets in the fuselage. I trail fitted the canopy in place and it fit properly. I placed a small drop of thick CA on the magnets and fit the canopy in place over them and held the canopy tight against the magnets for about a minute. I then let is sit for a few more minutes. The canopy came off the fuselage, and there were magnets attached inside on each side to hold the canopy in place.
I trimmed the supplied plastic molded wing fairings and trial fitted them in place. I secured them one at a time with drops of CA around the outside edges that were in contact with the fuselage. With one side secured I repeated the process on the other side.
I secured the spinner and propeller in place. I had earlier made sure the motor was turning in the proper direction before I had secured the ESC in place. The recommended Center of Gravity (C/G) for the plane was given at 3 7/8 inches back from the leading edge of the wing. That is exactly where mine balanced with the battery in the battery compartment. The control throws were given as charted below.
Control Throws Low Rates
Control Throws High Rates
Trust those recommendations! When the plane is going 100 miles per hour you do not want too much elevator throw. I programmed the recommended throws into my computer transmitter starting with the throws mechanically set at neutral for all surfaces. I am glad I did.
Flying
Basics
On paper the Proud Bird is a simple four channel plane with one aileron servo, one rudder servo, one elevator servo and throttle. The recommended set up has limited throw movement for the controls in low rate and not particularly large movement in high rate. Sounds simple. But then add in her speed potential and Great Plane's pilot limiting recommendation and you'll get a bit of a pucker factor for the the first flight. But Jim Allen did a very nice job with this design, and she flew great with a low rate takeoff and the first several passes around the field. I was as concerned about flying her too slowly as I was flying her full throttle but found I was very happy with her flying about 60 miles per hour, which is top speed for a number of my planes. I could fly her slower but I surprised myself and found I was very happy at about 60 mph and even went to high rates and made a few full throttle passes on the first flight. (Do not advance the throttle too fast or the prop might spin freely. If that happens just reduce the throttle to get it back under control and advance the throttle a little more slowly.) She really does fly like a sport plane with high rates. That is how she will be flown by me most of the time. My nerves of jello firmed up considerably during the first flight.
Taking Off and Landing
As seen in my video below the plane can take off in very little space. All takeoffs should be into any wind. If there is some cross breeze the rudder can be used to keep the Proud Bird straight on the runway. This plane should be flown with the motor on all the way to the landing with decreasing throttle. They recommend oiling the axles during the assembly. I did but then wiped it all off and thus the noise heard on the video during the landing. I have since lubricated the axles again. Landing into the wind the plane was not hard to land. Because of the skill level recommended to this plane I don't expect any pilots to have trouble landing the Proud Bird in normal flying conditions.
Aerobatics/Special Flight Performance
The plane's first design function is to be a racer and that means to go fast. And go fast she does with just the four cell recommended battery. I was surprised after the first high speed flight that the battery was not not very warm. For racers it is "go fast turn left," and she will do 100 miles per hour plus. The good news for me is that she can be slowed down some and flown as a sport plane with loops, rolls, and more. I enjoy flying her about 60 miles per hour with a few high speed passes mixed in. Although I used to have several 100 mph plus planes I sold those a few years ago and it was a little concerning to be challenged to fly that fast again. I shouldn't have worried as the proud bird handles very well. I switched from low to high rates during my first flight but went back to low rates for takeoffs and landings. In Arizona she flew in gray skies and actually disappeared from the camera at times, but thanks to the colorful decals from Alan she never disappeared from our vision. But she does have a thin appearance coming at or flying away from me so I limit the view by flying her out in front of me and not directly at me.
Is This For a Beginner?
NO! Great Planes answered this question definitively with the following statement: "WARNING: The Proud Bird requires advanced flying skills and is not suitable for beginning or intermediate pilots. It reaches speeds over 100 mph (160 km/h) when equipped with the recommended racing power system, and should only be flown at an approved AMA flying site. Because it can quickly disappear from sight, pilots should remain focused on the plane at all times."
Flight Video/Photo Gallery
Proud Bird Rips Up the Sky on a cloudy day in Arizona at the 2013 Arizona Electric Festival
Downloads
Conclusion
I enjoyed the assembly of the Proud Bird and very much enjoyed installing the decals made by Alan M. Mostek for her. She definitely flies smoother with Dan on the transmitter, but she flies fine for me as well. She is more fun to fly than I was expecting. She really does fly like a sport plane and is large enough to be flown a fair distance away from me and yet still be comfortable for me to see and fly. Most owners will probably fly her consistently faster than I do, but I do enjoy the high speed pass down the runway and it seems even more impressive when mixed in with some slower flying. I have done a couple of vertical stall turns at altitude and they were only so-so but everything else I have tried has been very nice. Obviously she is designed to be a racer and that is where the majority of sales will come from but I was happy to find she can do a lot more. I really admire Great Planes for giving her the all white finish for pilots to be able to make her their own visually without having to first strip off the covering. no one wants to see five planes all the same color in a race. This basic white will make it easy for pilots to add their own design. To that end I recommend Alan M. Mostek. He will be happy to take your ideas and make up a scheme for your consideration. He will e-mail the proposed scheme to you to review and when you come to agreement he mails you the vinyl decals marked and ready to install. For me that was greatly appreciated and my plane looks great. Being from Great Planes I expected the kit and the instructions to be good and they were, very good in fact. I expected the plane to be fast and it certainly is. I wasn't sure about the sports plane claim and how much I might enjoy flying her but even there she impressed me. Certainly she is no lazy Sunday flyer nor a pattern plane but she fits my flying surprisingly well and has raw speed on top of that for my occasional high speed passes as well. Two throttles up for the Proud Bird.
Pluses
Minuses
ImagesView all Images in thread
|
|||||||||||||||||||||||||||||||||||||||||||||||||||||||||||||
|
|
Last edited by Angela H; Feb 01, 2013 at 01:21 PM.
|
|||||||||||||||||||||||||||||||||||||||||||||||||||||||||||||


|
|

|
|
|
|
|
It looks faster in the review video than GP's official video. Trying to figure out how fast my planes are in comparison. I don't think I have anything that breaks 60mph if that.
|
|
|
|
|
|
|
|
|
Is it possible to push this plane above 125mph, speed reached with a Sundowner 36?
|
|
|
|
|
|
|
|
|
Proud Bird
This is a verry clean line Midget Racer , low drag aicraft , allway love those type of racers , this one similar wing shape to compare the T-Tail Rivets, with same landing gear type plate ,. verry nice . Cheers
|
|
|
Last edited by Jeanskydive; Feb 07, 2013 at 02:34 AM.
|


|
|
|
|
|
Approved AMA site? Didn't know there was such a thing.
|
|
|
|

|
|
|
|
Thread OP
|
They recommend flying completely on low rates the first few flights. I found she handled fine on low rates. At speed and high rates she changes direction very quickly. I still use low rates and 30% expo for my landings and takeoffs and that has worked well for me. Mike Heer
|
|
|
|
|
|
|
|
|
Troy my friend, its all a matter of the glass being half empty or half full (and perhaps when you started flying ...)
I was scratching my head with the same discussion when assisting someone at the NEAT Fair. their way of thinking is High rates = higher reduction of deflection .. or maybe he did get it unintentionally wrong  PS - Props to the pilot. Smmmmmoooottthhhh like buttah |
|
|
|
|
|
||
|
|
Quote:
High rates when moving 200+ MPH would mean the airplane is uncontrollable. You want very small control surface throws when flying high speed. |
|
|
|
||
|
|
|
|
|
In a racing situation you would typically use low rates for flying and switch to high rates for landing for more response at low speed. The Proud Bird is also marketed as a sport plane, so high rates might be fun for doing sport aerobatics or when you're just poking holes in the sky.
Tim |
|
Latest blog entry: Latest blog entry
|
|
|
|
||
|
|
Quote:
|
|
|
|
||
|
|
|
|
|
What motor is being used for extreme speed? Imo, the recommended powerplant will not push the plane much above 110 mph on a good day. Looking for a minimum speed of 125.
|
|
|
|
| Thread Tools | |


| Similar Threads | |||||
| Category | Thread | Thread Starter | Forum | Replies | Last Post |
| Review | Thunder Tiger Naulantia 1 Meter Racing Yacht RTR Review | Michael Heer | Sailboats | 7 | May 25, 2023 02:23 PM |
| Discussion | Great Planes Proud Bird | dkane | High Performance | 557 | May 30, 2020 05:11 PM |
| Discussion | Proud Bird EF1 in stock | 3dcraz | High Performance | 1 | Dec 10, 2012 05:59 PM |
| Sold | Great Planes Rifle Sport/Racer EP ARF New in the Box | hobbyfun100 | Aircraft - Electric - Airplanes (FS/W) | 1 | Dec 09, 2012 11:09 AM |