|
|
|||||||||||||||||||||||||||||||
|
Thread OP
|
Great Planes Avistar Elite GP .46 ARFIntroduction
The Avistar Elite is a complete nitro-fueled RTF intermediate flyer package. From the reliable OS .46AX II engine to the Tactic TSX105 servos and the 2.4GHz Tactic TTX600 six channel transmitter with a TR624 six channel receiver operating in concert with Tactic�s Secure Link Technology, it's a truly complete kit. The Avistar Elite is also available as an ARF with a fuel .46 engine or as an electric (MSRP $139.98). This is the kit you have been waiting for, and the one that will get you into the air with very little build time or setup. It is also the plane that will really begin to let you, the pilot, take control and expand your abilities in the air, but still have the comfort of a plane that is docile, stable and obedient to your commands.
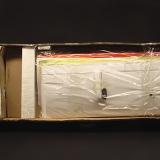
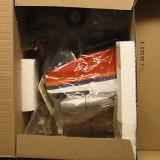
Kit Contents
Without giving up all the good stuff to follow, here are few pictures of the contents from shipping to sorting out the Avistar Elite components:
What�s Included
What�s Needed
Assembly
Great Planes assembly manuals are always complete and provide updates on the web if changes are needed. The instructions are fully photographed and few ambiguities exist when you follow their well written instructions. Be sure and read through the manual before beginning your assembly and take note of the safety tips and suggestions provided. Start by either ironing out or using a hot air gun to remove any wrinkles that may have occurred as the Avistar Elite was shipped. This took just a few minutes for me. Weather will cause these too, so if you move the plane into a cold atmosphere from a warm one, the skin may wrinkle very slightly. The hot sun will remove most wrinkles, but never leave your plane exposed to the sun for very long. Let�s start the build by getting the Avistar up on its own legs. The nose gear is installed and is connected to the rudder servo. Do not force the nose gear if it is misaligned. Notice as you slip the main gears into their respective slots the angled tip of the gear should face up as this must force the retainer up until it can click into place and lock the gear tightly. I really like this setup as the gear can easily be removed if you want to store the plane.
Wing
A major component to the Avistar Elite is the wing. This is the heart of this plane as it differs from the Hobbico Avistar .40 II being both semi-symmetrical and with less dihedral. Both the Avistar Elite and its predecessor the Avistar have cambered wing tips, but the Avistar has a flat bottom airfoil. As well, the Avistar Elite has a longer wing by 3.5 inches and with that comes about a 10% increase in the wing area, but a slight increase in the wing loading from 19 to 22oz/sq. ft. The Avistar Elite uses a carbon fiber wing joiner that runs straight through the wing. Flaps are also provided on the Avistar Elite and can be installed with the included control horns and linkages. Servos are required.
Assembly is easy, requiring only the installation of the joiner, and as you pull the wing halves together, mating the alignment pin to complete the wing. The wings will remain unified with the insertion of the forward alignment tabs and the wing bolts. The wing halves are not glued together.
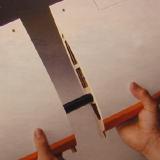
Tail
The tail feathers of the Avistar Elite are flat. Both the vertical and horizontal stabilizers lock together and are extremely secure with two fastening bolts. All linkages are pre-installed.
With the Avistar Elite standing on the tricycle gear, energize the receiver and transmitter to check the ground tracking with the wing removed. Center the trim on the transmitter and make sure the rudder is true with the vertical stabilizer. If that is case, take the plane and roll it across a smooth surface and check that it tracks straight. If not, adjust the nose wheel trim with the setscrew on the servo.
Fuselage
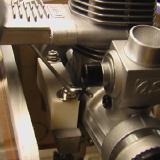
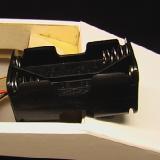
The fuselage is another area where the Avistar Elite RTF shines. There is so much here that is done to make the build simple. The OS .46AX II is installed using a solid aluminum motor mount and vibration dampers. Behind the firewall the fuel tank is installed with the fuel lines attached to the motor and muffler, plus a third overflow line running out the bottom of the motor compartment. Everything from the wing bulkhead forward is covered by a plastic magnetic hatch that allows plenty of access to just about everything under the wing. This is exceptional and allows you to see the fuel in the fuel tank, access the receiver and receiver battery.
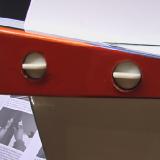
The motor mount is attached to the firewall with blind nuts and creates an intimate joining of the motor mount to the firewall. Behind the firewall the fuel tank is perfectly aligned.
A platform is available behind the fuel tank, but I would be careful adding anything into this space as the Avistar Elite as provided will need a few ounces of weight in the tail. The receiver and battery are mounted on the next platform back.
Other than installing the receiver batteries (included) you have little to do with regard to the fuselage. Basically the tricycle gear and tail are all that you install. Having the motor installed is a huge time saver, and it also provides use of manufacturer technology in setting the thrust line correctly and very little to go wrong.
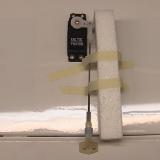
Radio Installation
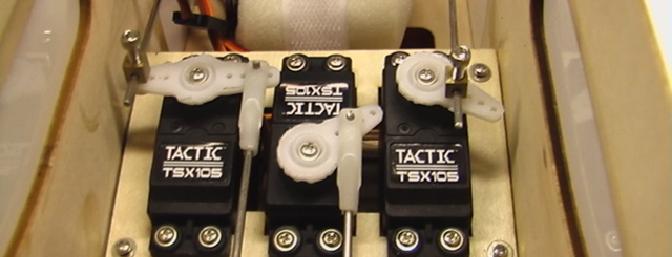
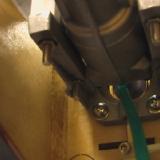
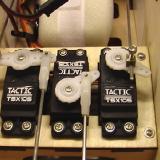
The Tactic radio is well proven and the FHSS spread spectrum 2.4GHz transmission across the Secure Link Technology platform is as good as it gets. The Avistar Elite comes with a six-channel transmitter and receiver. The transmitter includes dual rate and trainer switch, a flap channel dial, and a gear switch. Analog throttle trims and digital aileron, elevator and rudder trims, V-Tail and elevon mixing, wireless trainer system, ball-bearing gimbals, programmable failsafe and power LED and low-voltage alarm are included. The Tactic receiver as installed into the Avistar Elite includes a 4.8 volt battery carriage and an on/off switch pre-installed on the left side of the plane away from the exhaust. Labels for clearly identifying the switch position are provided.
My Avistar Elite was bound and ready to go. Velcro straps secure the foam wrapped battery and receiver to the mounting platform.
Completion
Setup is also a good checkpoint prior to flying. Install the decals, which are pre-cut and easy to install. If you spray the surface of the Monokote with a mix of dish soap and water (1:4) you will be able to push the water out from under the decal and have time to position or re-position the decal before the water dissipates.
Check your control movements. They should be:
Center of Gravity (CG): 3-5/16" (84mm) back from the leading edge of the wing at the fuselage
Next, check your fail-safe setting on the Tactic system. The fail-safe is easy to set by following the directions provided. I set my fail-safe to shut down the OS engine completely. The default is slightly open and allows the engine to remain running at idle. Take a minute to do the standard ground check, and if you have been powered on for long periods of time, check the condition of your receiver batteries. Your battery pack is designed for 4.8 volts, but should read slightly higher. If you have a way to load the battery do so to make sure you have battery power to fly. The standard 4.8v alkaline pack should last for an afternoon of flying. Balance the prop, and make sure the prop is true. You can add weight by spray painting the backside of the prop and adding layers of paint. Get it as close a possible to avoid in-flight vibration. Get your CG correct. The Avistar has lots of options for any innovative pilot, but use the configuration suggested. Use a CG stand and likely you will be nose heavy. I installed 42 grams of weight to the tail. Make sure to add this to the top of the tail so the fuel does not weaken the adhesive. The weight is important otherwise you will not get a good flight trim. The plane should be level on the stand.
OS Break-in
Your OS .46AX II is brand new so you will need to break it in before flying. Follow the directions and run perhaps two or three tanks of 0% to 15% fuel through the engine running it rich. The method suggested is to run the engine rich for 10 seconds then lean the motor into a two-stroke rhythm for 10 seconds and then back to rich. You will notice in the rich setting the smoke and an erratic rhythm. Continue this through one or two tanks to ensure a good break in and a long engine life. I have included a short video of proper throttle response from a very low and steady idle to full throttle.
The OS 46AX II is uses an advanced Bi-Metallic cylinder liner for durability, a better fit between the piston and the cylinder wall, better compression and longer over-all engine life. OS AX engines use the proprietary Power Box muffler, a rear-angled needle valve for safety and include a two-year warranty.
Downloads
OS .46AX II
Flying
Excuse me for writing this portion like a kid that just walked out of a candy store, but I am very excited about how well the Avistar Elite flies. I think what you get is a hybrid trainer that flies like a trainer when you need it to and a plane that is very much a sport flyer when want to wring out some aerobatics. I would also add that fuel power is not going to be replaced by electric power, as there are just too many advantages. First you can fly for a long time on 8 ounces of fuel and other than refueling there is no down time in charging batteries, second the price of a gallon of fuel is about the cost of one battery. While onboard power is required, you have options, but with 4.8 volt packs you can fly all afternoon. Switch to a BEC and LiPo or LiFe battery and you have literally days of flying power. You cannot replace the sound of a well-tuned OS two-stroke motor. They can power through just about anything and when properly tuned they create a symphony of sound, smoke and power.
Basics
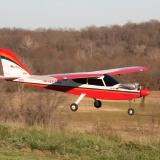
The Avistar flies beautifully across the flight envelop. Dual rates give you even more options. It climbs with plenty of power, tracks great, trims nicely and is responsive to your inputs. The Avistar Elite is also easy to see and big in the air. The covering stands out both on the ground and in the air. Any tricycle-geared plane should stand up steady and the Avistar does too. The mains are positioned with the nose wheel for perfect control and stability. The big 2.5-inch wheels will handle grass and even a rough surface easily. The nose gear is not going to cave under. Finally, I absolutely applaud the design of the huge access provided by the easy removal of the forward canopy. From here you can check the gas tank level, measure the power level of the receiver pack and do a general check of the security of the interior electronics.
Taking Off and Landing
This time of year I am always flying in a cross wind. The day of the video I was realizing 10mph gusts perpendicular to the runway. The Avistar Elite had no problem and because of the well designed landing gear the plane tracked straight. I also did not experience any tendency for a need to apply ailerons in the crosswind situation as the rudder has plenty of control. Take off roll on a rough surface is about 75 feet. Climb out is excellent with plenty of power. With the Avistar Elite you can throttle pack as soon as you gain altitude and fly at half throttle easily. It is nice to have power when you need or want power. Landings are very sport-like in that they carry some speed. A flap option is provided with the Avistar Elite and I will post back some experiences with that option later. I would guess it will be appreciated as getting the Avistar Elite to land takes a long final approach. That long approach is shallow and would steepen with flaps. I loved the ability to control the descent on approach. Quick throttle bumps and a rudder that works well are important to crosswind landings. You will see the plane in a crab as I land in the video. Approach controllability is a strong point of this plane.
Aerobatics/Special Flight Performance
The semi-symmetrical wing even though in a high-wing configuration certainly not a deterrent to doing aerobatics. Dual rates are not extreme, but do improve the aerobatic quickness. I noticed the exponential (not adjustable) is set at just about a perfect level because I had no problem landing with the dual rate on high or low. Rolls are tight and do not require huge amounts of elevator when inverted to keep the nose up. Inverted flight as well is easy to control and as it should b,e slight pressure on the elevator reminds one the plane is inverted. I say this because too much pressure indicates a poor CG and since the Avistar was balanced per the instructions, the outcome is a correctly trimmed plane in both the upright and inverted flight mode. The OS .46AX II is the perfect engine for aerobatics and will pull the plane from an inverted condition up and into an inside loop. This I believe is an absolute necessity for aerobatics, otherwise you have to roll out of inverted flight and lose some aerobatics character. The plane also has the wing strength to handle quick maneuvers and aerobatics.
Is This For a Beginner?
I would say if one wanted to get into RC flight and has some help in learning to fly, this is a good choice. If one has the experience behind the sticks on a trainer that has a flat bottom wing and they have experimented with aerobatics, then the Avistar Elite is the perfect plane. Much of the support for this being either an entry level or transition plane is the RTF concept with the engine installed. This fully realized concept will get you into the air fast and with some built-in beginner like components like the strong main and nose gear, a Tactic 2.4GHz radio system and that stalwart OS engine you have one of the best planes available in the marketplace today.
Flight Video/Photo Gallery
Downloads
Let�s go fly the Avistar Elite! 15.18 MB
Conclusion
I am so pleased I have had the opportunity to review this newest entry into the Great Planes hanger. I loved the simplicity of the build, the ease of breaking in and operating the OS engine, the high quality Tactic servos and 2.4 GHz radio system and quality of this aircraft. There are so many things the Avistar Elite does well so beginners, intermediate and expert flyers alike will enjoy flying this plane. It indeed has all the qualities you have come to expect from Great Planes and I am sure you will love flying the Avistar Elite.
Pluses:
Minuses:
ImagesView all Images in thread
|
||||||||||||||||||||||||||||||
|
Last edited by Angela H; Dec 05, 2012 at 03:13 PM.
|
|||||||||||||||||||||||||||||||


|
|
|
|
|
|
|
Wow! Very nice, I have the original Avistar and it is an excellent plane!

|
|
|
|
|
|
|
|
|
i have this plane and really like the way it flies. i have had a few of the tactic servo's fail on me after only having the plane for a month. that is my only complaint about the plane. it flies great, landings are a little fast without the flaps. the flaps make landing a lot easier for a beginner pilot such as myself. this is my first plane.
|
|
|
|
|
|
|||
|
|
Hello all,
I have this same model. Flys real well. Just recently installed flaps. Check out my video.
|
||
|
|
|||
|
|
|
|
|
I actually put my flaps on ch5. i didn't like trying to turn the knob to deploy the flaps, i flip the switch and they drop down. It makes a huge difference in how it flies. it seems like it will float forever.
|
|
|
|
|
|
|
|
|
wow,I just want to buy a .46 size energy these days
|
|
|
|
|
|
|
|
|
My compliments on an excellent review. I bought this plane for my first fuel powered plane after owning many electrics. Went with the RTF because of the price value. I am currently flying it with my DX6i but the transmitter/rx that came with the package seems to be more than sufficient. I really enjoy flying this plane and I think it is a well planned and thought out release for Great Planes.
|
|
|
|
|
|
|||||
|
|
Here's my first solo with this plane.
|
||||
|
|
|||||
|
|
|
|
|
Thats actually a good point becuase playing with that dail during mid flight and trying to keep orientation is hard since im a beginner.
|
|
|
|
|
|
|
|
Thread OP
|
I tend to use the dial because in full size planes the flaps are implemented in 15 degree increments. This way you can trim the nose down and not have to keep pushing the stick. In a switched condition the nose has to pitch up. With some TX you can mix the switch or dial to provide the trim necessary to keep the plane level
|
|
|
|
|
|
The dial is on the left side of the tx, how do you twist the dial and adjust the nose down at the same time? i just flick the switch and push up on the elevator stick at the same time. works better for me that way, but to each his own.
|
|
|
|
|
|
|
|
|
I just got the ARF as a replacement for out clubs Alpha 40 that crashed when the RX battery died in flight, and other than a few wrinkles it looks good. I'll be using my Airtronics SD-10G for a primary radio, and SD-6G for a buddy box. I'll set the flaps up on the slider on the side of the case by the throttle with servo delay, and probably mix in some elevator with it. Midpoint will be take-off, full rotation will be landing. Plus flight modes will allow the use of different mixes (crow, camber with ailerons, etc) for more fun.
If your radio supports it, set up a slight delay on the extension/retraction speed - it'll make the plane much easier to fly with the change in lift/pitch from the flap actuation up or down. The only drawbacks I see to the RTF are the use of the Tactic transmitter which limits the use of a buddy box to only a a Tactic radio (which I know of nobody who flies one), and they don't show the installation of a 4-stroke engine, only a 2-stroke. Hogflyer |
|
|
|
 Jan 04, 2013, 09:33 PM
|
|
| sdfkwhiuhsdfi | |
|
A moderator felt this post violated the following rule: Off Topic Advertisement.
|
|
| Thread Tools | |


| Similar Threads | |||||
| Category | Thread | Thread Starter | Forum | Replies | Last Post |
| Discussion | Great Planes Reactor GP/EP 3D ARF .46-.70 | BoneDoc | Sport Planes | 48 | Aug 09, 2013 05:10 PM |
| Sold | Great Planes U-Can-Do 3D ARF - 46 ARF, mint cond. | Turqui | Aircraft - Fuel - Airplanes (FS/W) | 2 | Aug 05, 2012 11:20 AM |
| Sold | Extra 300 sp - Great Planes 55" EP-GP .46-.81 | Firedawg | Aircraft - Fuel - Airplanes (FS/W) | 5 | Jun 20, 2012 05:14 PM |
| Review | Great Planes Shoestring .46-.81 GP/EP Sport ARF Review | EYEinSKY | Sport Planes | 181 | Apr 23, 2012 11:22 AM |
| Discussion | Great Planes Reactor GP/EP 3D ARF .46-51,58 | slagger | Fuel Plane Talk | 7 | Feb 26, 2009 08:18 AM |