|
|
|
|
|
|
|
It’s been awhile… this thread was off the grid.
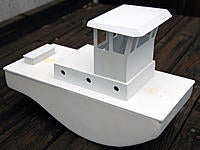
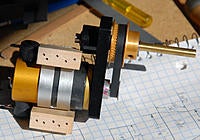
 I had some final shafts made for the Astro Flight belt drive. Basically, ¼” reduced to 3/16”. ¼” thru the plastic bearing block, then 3/16” for the uni. The brass tube between the belt drive and motor represents the uni for alignment purposes. It’s a tight fit but I think it will work OK. Need to make motor mounts now. I opened up the deck area where the motor cover goes for as much access as possible. I also cut a hole over the rudder-post for access once the deck is glued to the hull. Made a hinged toolbox that gets screwed to the deck to cover that hole. I made the roof to the pilothouse removable for now, to make it easier to paint and get the windows glued in later. |
|
|
|
|
|
|
|
|
Thanks boys.
I got the motor mount blocks made from a chunk of Ash. It was a little hairy inserting the brass inserts because my test piece wanted to split. I drilled oversize holes, just enough so the threads of the insert would still cut into the blocks. I put a nut & washer on the 4/40 hex screw so once the insert has seated, I could get the screw out without backing out the insert. ZAP them with some thin CA and they ain’t goin’ nowhere. The only fiddling left to do is shaping the foot of each mount to the hull. The plain clam shell mount is from MPI. Part # ACC315. |
|
|
|
|
|
|
|
|
Got a little more done over the weekend. Stuffing tube glued in place, motor mounts glued to the hull. I carved some of the skeg down for the rudder support. 2/56” brass inserts are used to screw the brass support to the hull. I discovered that the SS 1/8” rod going thru the rudder is removable. Not sure why, but at a loss on how to glue it back into the rudder. Surprised that no cross bar was put on the 1/8” rod prior to molding the part.
|
|
|
Last edited by woodybob; Oct 30, 2012 at 12:20 PM.
|
|
|
|
|
|
Sand the part of the rod that would be inside the rudder with some 100 grit or less sand paper. Use a small file for the shaft hole inside the rudder. You don't need to remove a lot of material just roughen up the surfaces.
Mix up a very small batch of 1 hour or longer epoxy. Put a little epoxy into one end of the rudder shaft hole, say the top. Wipe some on the rudder shaft, the part that will be inside the rudder. Slowly insert shaft into rudder, some epoxy should emerge from the bottom of the rudder when the shaft is pushed through. Clean up the bottom of the rudder and exposed parts of rudder shaft. (Q Tips?) Then put it aside and wait. 
|
|
|
|
|
|
|
|
|
Thanks Troy, I'll see if some epoxy will work.
I scuffed up the shaft with a file, scrapped out the hole a bit on the resin rudder, and filled it with epoxy. Hopefully that shaft will never rotate again inside the rudder. 
|
|
|
Last edited by woodybob; Oct 31, 2012 at 02:37 PM.
Reason: added comment
|
|
|
|
|
|
Humm…
I got the servo placed, need to make final adjustments once I dig up a receiver and check travel. Got the drive done, made a jam nut for the prop from a brass nut, using Octura steel & moly-nylon thrust washers to help it keep it spinning smoothly. Found an old AF 208D ESC in a drawer, which should work nicely. Going to swap out the Zero Loss with Sermos for continuity. Once I dig up that receiver and get a motor battery, I’ll be able make some final component placement decisions in the DTF. (kitchen sink) |
|
|
|
|
|
|
|
|
Clean, very clean!

|
|
|
|
«
Previous Thread
|
Next Thread
»
| Thread Tools | |
| Similar Threads | |||||
| Category | Thread | Thread Starter | Forum | Replies | Last Post |
| Build Log | 1/32 Truckable Tug | JOHN SCALE BOAT | Scale Boats | 39 | Oct 07, 2018 02:18 AM |
| New Product | 1/24 Truckable Towboat hull in fiberglass | CaptCB | Scale Boats | 489 | Jun 06, 2017 03:16 PM |
| Build Log | 1/24 scale Truckable Tow Boat | keith S | Scale Boats | 79 | Feb 05, 2016 02:14 PM |
| Discussion | 1/20 vs 1/24 fittings for 1/24 elco 80 PT boat? (mainly guns) | Reckless | Scale Boats | 15 | Apr 14, 2012 01:46 AM |
| Question | 1/24 Truckable Towboat hull in fiberglass | CaptCB | Micro and Sub-Micro Boats | 3 | Apr 01, 2012 12:11 AM |
 , now what do I do? Thanks for 'splainin' my faux pas.


