|
|
|
|
Thread OP
|
Build Log
#6 Model Airplane Building Clinic >> Mountain Models Lucky ACE <<
I am starting my build log for my Mountain Models Lucky Ace. I am participating in the Building Clinic started by Murocflyer (Frank) which can be found here.
I have started to build a couple planes when I was a kid (20 years ago), but never finished them, so consider myself a newbie at building. I will update this thread as often as I can, and try to take as many pictures as possible. Let's start with a clean workbench, a stack of balsa and some hardware! |
|
|
|
|
|
|
|
|
|
Thread OP
|
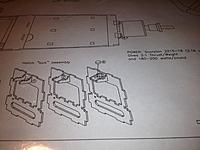
I completed steps 1-5 and on step 6 already ran into a question. The kit came with 1 magnet. Step 5 clearly states to glue it into the hole inside the hatch that I made in step 4. Step 6 states to follow the hatch lock assembly instructions located on the plans (see picture below). Step 4 of those instructions has me putting something into the space created which is what will interact with the magnet to keep the hatch shut. The issue is that I do not know what to put there. I have all the parts per the parts list, I went through everything first thing and checked off items. I was actually missing 2 of the 6 blind nuts (Mountain Models is taking care of me, good service). Do I put another magnet? A piece of metal? The only thing that it might be is that there is a #4 washer that came with the kit and was listed in the parts list. It seems a little too big to go there. I do not recall if I could find anywhere else in the instructions where it was used (I read through them twice but that was a few days ago). The washer would probably go in with just a little pressure (which may have been intended in order to keep it in along with some CA). The washer would also do the job, but I hate not knowing (by the instruction telling me exactly what goes there and not just a picture that does not look like a washer).
What goes there? |
|
|
Last edited by glazzies; Sep 02, 2012 at 03:15 AM.
|
|
|
|
|
|
That little #4 in the circle "should" correspond to whatever item is #4 on your inventory list. If not, I'm pretty sure a washed goes there. I just built a Switchback and it used the same hardware, magnet and washer, to hold the canopy on. The washer was glued to the structure and the magnets on the canopy.
And if you want to be certain, you can always wait and glue the washer on last. That way you will know for sure. Hope that helps, Frank |
|
|
|
|
|
||
|
Thread OP
|
Quote:
Thanks again! |
|
|
|
||
|
|
|
|
|
Glazzies, I just finished building my second ACE: https://www.rcgroups.com/forums/show...&postcount=591
I glued the magnet to the hatch, and the washer into the support glued to the firewall. As this build is a recent one, if you have any questions, don't hesitate to shoot me a PM. I'll try and follow this thread as well. Mark |
|
|
|
|
|
|
|
|
Thanks for helping out Mark. It's great to see folks stepping up to help.
Frank |
|
|
|
|
|
||
|
Thread OP
|
Quote:
Thanks, yours looks great! I am still trying to figure out what color and design I am going to do for covering. Thinking about a single color for covering with some trim tape for design and oreintation purposes. Thanks! |
|
|
|
||
|
|
|
|
Thread OP
|
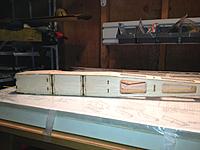
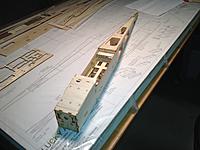
I am not sure exactly how long this took, but it felt like no time at all. It could have been more than 2 hours, but I would be surprised if it was. This is a very easy straightforward build so far (great for a newbie like me). The fuselage is done!
And as you can see I put the washer in and it works great. |
|
|
|
|
|
||
|
|
Quote:
 My first ACE was transparent yellow on the wings and tail, with a red fuselage. When I did the second one, I did not want to use transparent again. While it looked great, I did have issues with determining orientation. So the second one got the checkerboards on the top and the white stripes on the bottom. This one I can see clearly, even at a distance. It never hurts to have contrasting colors top and bottom, along with stripes, roundels, patterns, etc. on one side. I'm older, so having a clearly distinguishable top and bottom really helps with orientation. The ACE does all the acrobatics my thumbs can handle, with the exception of knife edge. I've done inside and outside loops, rolls, spins, vertical 8's, square loops, lots of inverted, immelman's, cuban 8's, stall turns, etc. with mine. So orientation is important to me.  Mark |
|
|
|
||
|
|
|
|
Thread OP
|
Your telling me... I stayed up a little later last night (this morning) and nearly finished the wing. I dry fitted most of it but decided to wait to glue today when I am more awake. I will post more pics later.
|
|
|
|
«
Previous Thread
|
Next Thread
»
| Thread Tools | |
| Similar Threads | |||||
| Category | Thread | Thread Starter | Forum | Replies | Last Post |
| Cool | Model Airplane Building Clinic ~ Building A Kit | Murocflyer | Parkflyers | 484 | Mar 14, 2013 02:37 PM |
| Cool | Balsa Model Airplane Building Clinic | Murocflyer | Beginner Training Area (Aircraft-Electric) | 12 | Sep 12, 2012 02:01 AM |


