Top Flite Mini Contender EP Review
Top Flite Mini Contender EP Review

Introduction
| <b>Top Flite Mini Contender</b> | |
|
|
| <b>Wingspan:</b> | 36 in |
| <b>Length:</b> | 34.5 in |
| <b>Wing Area:</b> | 329 sq in |
| <b>Weight:</b> | 30.0 oz |
| <b>Wing Loading:</b> | 13 oz/sq ft |
| <b>Servos:</b> | Futaba S3114 |
| <b>Receiver:</b> | Futaba R617FS |
| <b>Battery:</b> | FlightPower 3S 11.1V 1800mAh 30C Lipo |
| <b>Motor:</b> | RimFire .10 Brushless Outrunner |
| <b>ESC:</b> | ElectriFly SS-25 Brushless ESC |
| <b>Propeller:</b> | APC 9x6E |
| <b>Power WOT:</b> | 27 Amps - 303 Watts - 160+ Watts/lb |
| <b>Transmitter:</b> | Futaba 9CAP with FASST Module |
| <b>Manufacturer:</b> | <a href=http://www.top-flite.com/airplanes/topa1025.html>Top Flite Models</a> |
| <b>Available From:</b> | <br><a href=http://www.gpdealera.com/cgi-bin/wcA56910ap.pgm?V=HCA>Hobbico Dealers and fine Hobby Shops</a> |
| <b>List Price:</b> | $129.99 |
| <b>Street Price:</b> | $ 99.99 |
The original Top Flite Contender was a very unique plane when it was first introduced in the late 1960's. It looked like a military jet with a really thick wing. I think the plane got some of its good looks from the world famous <a href=http://www.top-flite.com/airplanes/topa1000.html>Flite Streak</a> control line model. The Contender's designer, Dave Platt, would later become known as one of the most gifted model aviation builders of all time. His design of the Contender exhibited such wonderful slow speed traits and such spirited high speed aerobatic abilities that the Contender would eventually endear itself to several generations of RC flyers. All through the 1970's and 1980's you could find a Contender at almost every flying site throughout the US. In the 1990's, the kits were getting harder to find and the prices were getting higher and higher. Finally, in 1999, Top Flite released a Gold Edition kit of the Contender to celebrate the 30th anniversary of the design. It was still a kit, but Top Flite had made a number of construction improvements so that you only needed about 10 to 16 hours to assemble the airframe and have it ready to cover. The design continues to prove itself a winner even in this age of ARFs as the <a href=http://www.top-flite.com/airplanes/topa0210.html>Gold Edition Contender</a> kit is still available today.

|

|
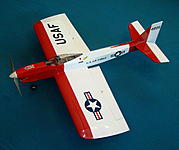
The new Top Flite <b>Mini Contender</b> accurately captures the distinctive lines of the original Contender right down to the colorful MonoKote trim scheme. With its 36" wingspan and its clean and quite electric power source, this newest Parkflyer version should continue the Contender legacy well into the future. Thankfully, Top Flite brought the Mini Contender to market as an ARF, so the total assembly time is now an easy 4 to 6 hours. I think it's about time I got started building my very own Mini Contender.

|

|
Kit Contents

Even though double boxed, the kit had a rough ride. |
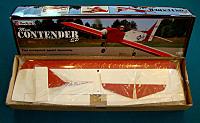
Components were well protected and undamaged! |

|
Kit Includes:
- Built-up Fuselage with pre-installed Pushrod Tubes
- 1-Piece Built-up Wing with pre-hinged Ailerons
- Built-up Rudder, Horizontal Stab, and Elevator
- ABS Plastic Cowl
- Generous Hardware Package
- Colorful Decal Sheet
- 16-Page Photo-Illustrated Instruction Manual
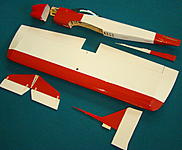
Major parts |

Unique Contender nose |

Generous hardware package |
Kit Requires:
- 300 Watt Brushless Motor
- 25 Amp Brushless ESCs
- 9x6 Electric Style Prop
- 1800 to 2200 mAh 3-cell Lipoly Battery
- Minimum 4-Channel Radio
- Four 21 oz-in Torque Servos
- 4-6" Servo Extensions
- 1-6" Servo Y-Connector
- Thin CA Glue
- 6-minute Epoxy Glue
- Thread Locking Compound
- Assorted Drills, Knife Blades, and Screwdrivers
Recommended by Great Planes and supplied by Hobbico for this review:
- RimFire .10 (35-30-1250) Brushless Motor
- Silver Series 25 Amp Brushless ESCs
- ElectriFly 1800 mAh 30C Lipoly Battery
- APC 9x6E Propeller
<div class = "leftside">

<b>Rimfire .10 (35-30-1250) Outrunner Motor<b> |
|
| Type: | Brushless Outrunner |
| Number of cells: | LiPoly 2s-3s |
| RPM/V: | 1250 |
| Weight: | 71g |
| Max Continuous Current | 30A |
| Max Surge Current: | 35A |
| Max Power(watts): | 330W |
| Shaft diameter: | 4mm |
| Male Motor Connector : | 3.5mm |
</div>
<div class = "rightside">

<b>ElectriFly 30C LiPoly Battery<b> |
|
| Type | Lithium Polymer |
| Number of cells | 3-cells |
| Capacity | 1800 mAh |
| Voltage | 11.1 Volts |
| Weight | 160 gm |
| Dimensions (L x W x D) | 86 x 35 x 25mm |
| Maximum continuous discharge | 30C |
| Maximum continuous current | 54 amps |
</div>
<div class = "center">

<b>ElectriFly Silver Series ESC<b> |
|
| Type | Brushless Speed Control |
| Number of cells | 2-4 Lipo cells |
| Max Continuous Current | 25 Amps |
| Max Current Surge | 28 Amps |
| BEC | 2.0 Amps |
| Operating Frequency | 8.5 kHz |
| Voltage Cutoff | 67% |
| Timing Angle | 12 Degrees |
| Brake | On or OFF |
| Dimensions (L x W x D) | 40mm x 26mm x 8mm |
| Weight | 26 grams |
</div>
.
- Futaba R617FS Receiver
- 4-Futaba S3114 Servos
<div class = "leftside">

<b>Futaba R617FS Receiver<b> |
|
| Frequency Band: | 2.4 GHz |
| Type: | FASST Frequency Hopping |
| Number of Channels: | Seven |
| Antenna: | Dual Antennas |
| Range Classification: | Full Range |
| Size | 1.6" x 1.1" x .35" |
| Weight with case: | 9.8g/0.34 oz. |
| Power: | 4.8V - 6V |
</div>
<div class = "center">

<b>Futaba S3114 Servos<b> |
|
| Type: | Analog |
| Size Factor: | Micro |
| Bearing: | Nylon |
| Operating Speed 60�: | 0.10 sec @4.8V |
| Torque: | 21 oz-in @ 4.8V |
| Weight: | 7.8g/0.28oz |
| Dimensions: | 0.9" x 0.4"x 0.18" |
| Gear Type: | All Nylon |
</div>
Assembly
The 16-page <a href=http://manuals.hobbico.com/top/topa1025-manual.pdf>Instruction Manual</a> includes numerous illustrations and pictures and helpful building tips. Experienced ARF builders should have no problems with this build. The parts count is low and the assembly is straight forward. If this is your first ARF build, you may need to check with an experienced modeler or <a href=http://www.top-flite.com/techsupport/index.html>Top Flite Technical Support</a> if you have questions during the build.

Detailed Instruction Manual and colorful decal sheet with Navy and USAF markings |
Before starting the assembly process, it would be a good idea to use your MonoKote iron and smooth out any wrinkles that may have appeared during the shipping of your kit. It is also a good idea to install your chosen decal scheme before you start the assembly process. Some of the decals will be more difficult to apply once the plane is finished.

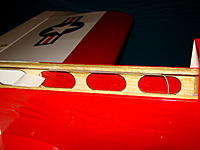
Decal overlaps servo opening |
Wing
Assembly begins with the one-piece wing. The first order of business was the installation of the aileron servos. The wing contained a string for pulling the servo leads through the wing ribs to the center section. The string was buried in the wing and I needed a pair of forceps to fish it out through the servo and wing center section openings. I found that the string was one continuous strand from one servo opening to the other. I needed to exercise care not to pull on the wrong half of the string and pull it out of the other servo opening.
The recommended Futaba S3114 servos were a perfect fit in the servo openings. After I finished the servo hookup, I noticed that if I had installed the Z-bend and aileron horn toward the wing center section instead of toward the wingtip (as shown in the manual), the control horn would have been better centered on the aileron reinforcement pad under the covering.

Perfect servo fit |

Note reinforcement pad in aileron |
The final order of business on the wing was the installation of the main landing gear. The flats on the gear legs should face the rear of the plane. I found the gear wires were a tight fit in the wing gear blocks so I used the end of the gear wire and scraped along each block to widen the groove. The screw holes in the blocks were so tight that the mounting screws would strip their heads when I tried to tighten down the gear. I found that drilling each hole out with a 5/64" drill bit opened them up just right.

|

Wheel collar screw heads face rear |
Fuselage
The fuselage assembly was next. I found that the elevator joiner wire would bind up when I installed the horizontal stab. I used my Dremel to open up the fuselage slot just slightly and that freed up the wire. I then needed to trim just a very little sliver off one side of the stab slot to allow the horizontal stab to line up with the wing.

|
When I installed the pushrods in the fuselage, they seemed to drag on the pushrod tubes. I removed the wires and thoroughly cleaned them with alcohol. Next I gave them a light coat of <a href=http://corrosionxproducts.com/corrosionxpage.htm>CorrosionX</a> and tried them again. This time the pushrods moved freely in the tubes.
When I started to mount the servos in the fuselage, I found that if I mounted them with their output shaft facing the tail per the manual, the short rod would hit the pushrod tube. Even after I turned the servos facing the nose, the rods could still hit the tubes. The plane shown in the assembly manual had much shorter tubes, so I cut the tubes as shown and left the servos facing forward.
Close clearance |

Much better |
The recommended RimFire .10 motor was a perfect fit on the firewall. The motor leads from the ESC should be routed around and through the motor mount to prevent them from contacting the rotating part of the motor.

Motor lead arrangement |
Radio Installation
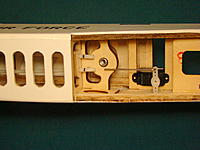
The manual states that the receiver and ESC should be installed in the small compartment in front of the wing. Unfortunately the manual does not show any typical receiver installations. Luckily the Contender has a hatch on the bottom of the fuselage that gives access to the small compartment.

Bottom hatch for access to front compartment |
The recommended Futaba R617FS Receiver is a snug fit in the compartment, but it is very workable. I used some short sections of outer pushrod tubing to help route the receiver antennas to opposite sides of the fuselage and keep them at the desired 90 degree orientation to each other.

Vertical behind firewall |
Horizontal under canopy edge |
Completion
The completed Contender weighed just 1pound and 14 ounces RTF. With a fully charged battery and the recommended APC 9x6E prop, the RimFire .10 motor spun up to 303 Watts of static power loading. That's just over 160 Watts per pound of power. This RimFire motor produced 1:1 thrust at just over half throttle.
I was surprised how far back I had to move the battery to achieve the recommended CG. The Contender was very nose heavy when I tried to install the battery up forward behind the firewall. I kept moving the battery back until it was within 3/4" of the servos before I got the plane to balance at the recommended 2-5/16" from the leading edge of the wing. The good news was that the battery ended up centered over the CG location so I could change battery sizes without changing the plane's CG.

Final battery placement |
For the first flight I set the control surface throws at the recommended amounts for low rates and at full servo travel for high rates. Since I prefer to fly with exponential, I then programmed in 25% exponential on low rates and 35% exponential on high rates. For later flights I set the low rates to the recommended high rate deflections.
Flying
Basics
The original Contender was one of the finest sport planes made for almost three decades. It was also one of the winningest fun fly airplanes of all time. The Mini Contender upholds both of those traditions. This Mini can putt around the pattern and shoot easy touch-and-goes all afternoon, or it can twist and spin and roll with the best sport planes at the flying field.
Taking Off and Landing
With its tricycle gear, the Mini Contender is very well mannered on taxi and takeoff. The takeoff roll can be gentle with a gradual climb out, or it can be short with a vertical climb out. It all depends on how far and how fast you push the throttle stick.
Landings are a thing of beauty with the Mini Contender. Just like the original, you can hold the nose high and leave a little power on and you can touch down light as a feather. After you touch down, you can hold the nose wheel off the runway for a very long time. That big thick wing works just as well on the Mini as it did on the original.

Nose high landings |

|
Normal Flight
Once airborne, the Contender flew great. The climb out was gentle and stable and I only used a little over 1/2 throttle for a brisk cruising speed. I found that the recommended low rates and CG location would be about right for a low-time intermediate flyer. The turns were gentle and the elevator was not overly sensitive. These setting would be very good for an introduction to sport flying.
Aerobatics
First, let me say that the RimFire .10 has gobs of power! At 160+ Watts/lb, this motor/battery combo just keeps going when you point the nose straight up. This Mini Contender has a better power to weight ratio than my original Contender with its .61 engine!
The recommended CG location and low rates were just too sedate for my liking. I set my low rates to the throws recommended in the manual for high rates and I set my high rates to 100% servo throw. I moved the battery back so that the CG was at 2-1/2" from the leading edge. These more aggressive settings had my Mini Contender flying more like the fun fly setup I had on my original Contender. The following maneuver descriptions are based on these more aggressive settings.
Snap rolls were crisp, and upright and inverted spins were tight and stopped as soon as the sticks were returned to neutral. Inverted flight needed only a small amount of down elevator to maintain level flight. Rolls were axial and loops were as big as I wanted to make them. Knife edge had considerable coupling and needed a lot of opposite aileron to stay on course. I'm not that good at 3D yet, but the Mini Contender will hover and high alpha nicely.
Is This For a Beginner?
No, not really. However, pilots with intermediate flying skills should have no problems. The Mini Contender should make an excellent first aerobatic airplane.
Flight Photo Gallery

|

|

|

|

|

|

|

|

|

|

|

|

|

|

|
Flight Video
<center> <br> <a href="http://www.youtube.com/embed//ImD19T1t_tE">Youtube Link</a><br> <iframe width="640" height="360" src="http:// www.youtube.com/embed//ImD19T1t_tE" frameborder="0" allowfullscreen></iframe> </center>
Downloads
Conclusion
Top Flite has done an excellent job of shrinking the original Contender down to Parkflyer size while increasing its performance and updating its power source. The wonderful flight characteristics of the original have been maintained in a new quick-building ARF package. Leave the control throws on low rates for an easy Sunday flyer, or hit the throttle and high rates for an exhilarating adrenalin rush. Either way, the Mini Contender will not disappoint. I'm predicting that this newest Top Flite Mini Contender EP will become as much of a flight line staple as the original 1970's Contender.
<div class = "rightside"><b>A WORD OF THANKS</B><br><br> Thanks to my Wife, Nancy, and to Wayne Meredith and Jesse Webb for all there help with the photos and video. Thanks to our Editor Angela for the grammar check, and thanks to <a href=http://www.hobbico.com/>Hobbico</a> for providing the Mini Contender EP for this review! </div>
Pluses:
- Iconic Contender Good Looks
- Correct MonoKote Trim Scheme
- USAF and NAVY Trim Included
- RimFire Power System has Plenty of Power
- Great Low-Speed Flying Traits
- Spirited High-Speed Aerobatics
Minuses:
- Wrinkled MonoKote on the fuselage
- Long pushrod tubes needed trimming
| Thread Tools |
|
|
|
|
Thread OP
|
This post reserved for future updates.
McD |
|
Latest blog entry: LEDs on my T-28
|
|
|
|
||
|
Thread OP
|
Quote:
Starcad, this Mini Contender is definitely a keeper! McD |
|
|
Latest blog entry: LEDs on my T-28
|
||
|
|
|
|
Thread OP
|
As much as I loved my glow powered Contenders, this Mini is my favorite. The 36" WS is just right for tossing in your car on a moments notice and heading for the nearest park. What a jewel!
McD |
|
Latest blog entry: LEDs on my T-28
|
|
|
|
|
|
|
Its too bad they didn't make a kit version as well. I wish there were more park-sized wood kits like these to build, rather than just foam or ARFs.
|
|
|
|

|
|
|
|
|
Nice flying and review Mike! Seeing the Contender in the air reminds me of our old flying buddy Dick Adams and the nitro-burner that he always flew. Drop a PM whenever you get the chance. Always enjoy your reviews!
Larry E. |
|
|
|
|
|
|
|
|
Awesome review for a plane that was brought back from the past!!
See ya at the field, health and weather permitting!!!! 
|
|
|
|
|
|
|
|
Thread OP
|
Larry that made me smile, I hadn't thought about Dick in a long time.
flmlm, I'm looking forward to seeing some pictures of your new Mini Contender in action. Nathan, hope to see you at the field soon. I'm out of town till Wednesday, but maybe later in the week. McD |
|
Latest blog entry: LEDs on my T-28
|
|
| Thread Tools | |


| Similar Threads | |||||
| Category | Thread | Thread Starter | Forum | Replies | Last Post |
| Discussion | TopFlite mini Contender EP ? | ltc | Sport Planes | 374 | May 30, 2016 07:47 AM |
| Question | Top Flite Contender conversion | ltc | Glow to Electric Conversions | 18 | Mar 20, 2013 11:43 AM |
| Discussion | New park sized Top Flite Contender | PRND21 | Classic Pattern Flying | 13 | Aug 26, 2012 11:13 AM |
| Found | Top Flite Contender Kit | KaP2011 | Aircraft - Fuel - Airplanes (FS/W) | 4 | Jul 10, 2012 08:25 AM |
| Discussion | Build - Top Flite Contender | safebet | The Builders Workshop | 34 | Jul 15, 2007 11:16 PM |