|
|
|
|
|
It's not the end of the world. It's the end of the Age. The 6,000 year cycle.
Not just the Mayans either. The Sumerians, the Egyptians, the Hopi Indians, The Jews in the Torah, the Muslims in the Koran,, the Christians in the Bible. They, and many other cultures, all speak of the end of the Age. We shall see what we shall see. The day ain't over yet.  Apart from all that, I did a bit of work on the drive line today. The motor mount that I ordered was too big to fit in the hull so i had to make one from some Aluminium angle. I bent the angle to to what was required & epoxied it into place & added some 1/8th ply braces at the sides. Solid. The whole drive line & motor is offset to the right 7mm to counteract the prop steer. These boats will still be running the clockwise oval course. The strut was fitted temporarily to allow the stuffing tube to be bent & cut to shape. I'm using a 1/4" flex & Speedmaster strut. I won't glue the tube into place yet as there is still plenty do do on the preparation of the hull & I don't really want the tube in the way. Here's a couple of pics. Cheers. Paul. ImagesView all Images in thread |
|
|
|
|
|
|
|
|
|
|
Had a tedious but productive morning.
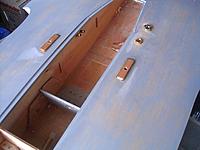
I finished trimming & fitting the cowls. Then added a 1/4" bulkhead into the rear cowl for strength & for the front cowl to glue to. After that was set I cut away the front of the air intakes creating a recess back to the bulkhead. The spray shields were then cut & epoxied into place. As these will have the hold down locks in them I made them as strong as I could by using the old tongue & slot system, both into the bulkhead & the side of the cowl, to firmly fit them into place. Now a bit of filling & sanding over the whole boat & she will be ready for paint. Here's some pics of this mornings fun. |
|
|
|
|
|
|
|
|
Well I hope you all had a Merry Christmas. Now it's just the New Years festivities to get through safely.
Last night I did what I'd been dreading every time I thought of it. I had to cut the nose & the tail off the cowling so they could be fixed to the hull. Surprisingly, all went well & the resulting joins look OK. So they were epoxied on to the hull & the underside nose piece was also installed. Then all the dings, scratches & chips were filled with Auto blade putty and sanded ready for sealing. Cheers. Paul. |
|
|
|
|
|
|
|
|
Had a pretty good Christmas here Paul. No gifts exchanged as I'm a hermit of sorts, but still recuperating from all the excess food I ate at friends houses. Managed to hit one on Christmas eve and another on Christmas day.
 I know exactly what you mean about cutting the glass parts. It's something I always dread as well. |
|
|
|
|
|
|
|
|
Just a quick catchup on the last few days. Not much really.
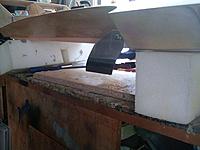
Firstly, I've given the whole boat a coat of Epoxy sealer. I've added some 1/32 ply stiffeners to the ends of the cowl sections. Then a tongue was added the front of the cowl to locate it to the fixed section. And then a tongue was added to the rear fixed section to support & locate the rear of the cowl. A fastener will be needed there, also either side of the air intakes. So I ordered some of these. Nice & streamline & won't spoil the scale look. http://www.dzusfasteners.net/product...h-springs.html Then I made up the tail fin brace from some 440 threaded rod, a couple of aircraft clevises and some aliminium tubing over the rod for the bling factor. The brace sits in a slot at the top of the centre fin & will be glued into place after the hull is painted. The clevises are fixed to the transom with screws. A couple of brackets were made to fix the ends of the wing to the side fins, & the wing is screwed down into the centre fin with 40mm screws. The wing is adjustable to both positive & negative by a few degrees each way. Old mate Trev at our club gave me a turn fin from a 36" Whiplash kit to try so I made up a bracket for that & temporarily fitted it. Looks about right to me. I'll have to pay him for it when he lets me know the cost. The only other thing I've done is set up & dry fit the rudder. Once I set up the servo bracket & servo I can strip it all down & glue in the strut & start painting. Oops. I just remembered, I'll have to drill the holes for the safety loop & the water outlets first. I hate drilling into a finished painted hull. So here's a few pics to make it all clear. Have a safe New Year. Paul. ImagesView all Images in thread
|
|
|
|
|
|
|
|
|
Bill.
I'm going to fashion some aluminium exhausts just like the real one. They will be blocked off just inside the cowl. That will look so much better than just painting the exhausts on to the cowl. |
|
|
|
|
|
|
|
|
Paul,
I have enjoyed reading your build thread. Very nice work. The fasteners you selected look very interesting, but I can't quite figure out how they work. I am about to launch into building a 1/10th scale T-Plus which will use a very similar approach to securing the cowling, so I am very interested finding a good fastener. |
|
|
|
|
|
|
|
|
Hey cyber.
Long time since our paths crossed. glad you like the build. The d Dzus fasteners are mainly used in model aircraft for cowling locks. This page shows the general fitting instructions. It should explain it better than I can. http://www.dzusfasteners.net/pages/D...ent-Guide.html Basically the spring is glued to a part of the fixed cowling & the button engages it with a 90 degree turn when the cowling is put in place. They also come in many other styles, with or without backing plates. Self ejecting or with tabs. Even countersunk heads. http://www.dzusfasteners.net/categor...us-Combo-Kits/ It's been a long time since I've built a plane with removable cowls & I'm glad to see that Dzus Fasteners are still around. I trust we will see your build of the T Plus. Is it a kit or scratch build? |
|
|
|
|
|
|
|
|
Thanks for the update Paul, I am going to have to get some of those fasteners and try them out. I am always looking to "borrow" ideas from your builds.
I will have a build log for the T-Plus coming to a thread near you, and hopefully not too far in the future. I am having the West Coast Custom Boats build a carbon fiber hull and then I will be doing the hardware and paint. |
|
|
|
|
|
|
|
|
It's been a while since posted anything but that's because I haven't done anything for a few weeks. I hate it when 'real life' gets in the way of building model boats.
Firstly, the Dzus fasteners arrived & they were much bigger than I remember them from years ago. Too big to look right. So I opted for some wooden blocks with a 3/16" nylock nut recessed into the underside & then the blocks recessed into the hull with the splash guards sitting flush. Then a mushroom head bolt was used to fasten the cowlng down. That was for the front. The rear was the same principal but the wooden block was glued to the underside of the rear fixed cowl. I've also added the 8mm safety loop connectors , as required for racing in Australia. I'm trying out a set of these. http://www.espritmodel.com/jeti-afc-...-8mm-300a.aspx The two water outlets have been added & they exit the hull behind the left sponson. The last thing I've done is to add some foam under the exhaust outlets & carved out the openings. I'll add some fiber glassin there & then carve most of the foam away. The holes will also be blocked off inside the cowl. The whole thing has also had a couple of coats of primer/filler & sanded back almost ready for paint. ImagesView all Images in thread
|
|
|
|
|
|
|
|
|
I was of the same mind too Bill.
But it is very dense Urethane foam & is a bit on the heavy side. But it's great for sanding & shaping things. So the idea is to get rid of most of it, & add some really light 'coolite' foam, you know, the white beady stuff. Not sure what you guys call it over there. I plan to add it to the whole cowl. Cheers. Paul. |
|
|
|
|
|
|
|
|
Look what a nice guy named Pete, over at the Hydroplane & Raceboat Museum forum, sent me. A pic of the dash.
What a guy. Now I've got some work to do. |
|
|
|
«
Previous Thread
|
Next Thread
»
| Thread Tools | |
| Similar Threads | |||||
| Category | Thread | Thread Starter | Forum | Replies | Last Post |
| Cool | Hobby king now offers a 1/8 Hydro and Tunnel............!! | scorpion1 | Racing Boats - Electric | 3 | May 24, 2012 07:29 AM |
| For Sale | trade or Sell- Miss bud 1/8 scale hydro.. | Jag72 | Boats (FS/W) | 9 | Nov 27, 2006 10:00 AM |
| Electric 1/8 Scale Hydros Video | JIM CALDWELL A | Racing Boats - Electric | 5 | Oct 08, 2005 09:52 AM | |
| Electric 1/8 scale hydro ? | cratfy1 | Racing Boats - Electric | 7 | Sep 03, 2005 12:20 PM | |


