Skyartec Wasp X3V Flybarless RTF Micro Helicopter Review
Not long ago, flybarless helicopter technology was an exotic, expensive technology. FBL technology is finally coming to affordable RTFs of all sizes and here's proof.

Introduction
I remember some of the first articles I read both online and in print about flybarless technology.
In less than two years, FBL and other three-axis gyroscopic stabilization systems have taken the hobby world by storm in what may be as important a breakthrough as 2.4GHz radios and lithium polymer batteries.
I'm pleased to report that all those technologies are wrapped up in an amazing little package.
The <b>Skyartec Wasp X3V</b> 250-class flybarless helicopter was recently introduced to me courtesy of Mr. Max Ettinger of Park RC Models, an RCGroups site sponsor based in Auburn Hills, Michigan and the North American distributor of Skyartec models. Max asked via a private message if I'd like to review the RTF version of this latest addition to the rapidly expanding Skyartec family of models; I quite naturally agreed to do so. When I checked out the model online, I was even more excited at the thought of flying this little eggbeater.
This machine, the latest in the Wasp lineup, is a no-nonsense, fully aerobatic flybarless helicopter built like a far larger model and designed for every level of helicopter pilot, including beginners. Each and every unit is test hovered for thirty seconds at Park RC Models and undergoes a fifty-step quality check before shipping; a QC checklist is shipped as well.
This promises to be a lot of fun, so grab a snack and let's get started.
| <center><b>Skyartec Wasp X3V</b> | |

|
|
| <b>Main Rotor Diameter:</b> | 18.7" (475mm) |
| <b>Tail Rotor Diameter:</b> | 5.1" (130mm) |
| <b>Flying Weight:</b> | 10 oz (293g) |
| <b>Length:</b> | 18" (455mm) |
| <b>Construction:</b> | Composite and fiberglass frame; alloy tail boom; carbon fiber tail support rods and tail slider pushrod; machined aluminum Bell-Hiller head and swashplate with composite links; machined aluminum and composite tail slider; polycarbonate canopy; ABS resin main blades with optional carbon fiber blades; composite tail blades; composite drive gears; plastic landing skids |
| <b>Options:</b> | Padded aluminum carrying case, training skids |
| <b>Cyclic Servos:</b> | Skyartec VTS-05B 9g analog |
| <b>Tail Servo:</b> | Skyartec SCM-9A 9g digital |
| <b>Transmitter:</b> | Skyartec 2.4GHz SKY-706 seven channel CCPM, programmable via a PC |
| <b>Receiver:</b> | Skyartec SKY-X302V three-axis, two-in-one gyro/receiver combination |
| <b>Range:</b> | 2500' (762m) |
| <b>Battery:</b> | Skyartec High-Power 900mAh 15C lithium-polymer with JST-XH balancing plug and JST CON-240 power plug |
| <b>Motor:</b> | Skyartec BL250 4500Kv brushless outrunner |
| <b>ESC:</b> | Skyartec BMC-15A 15-amp |
| <b>Typical Flight Duration:</b> | Five minutes |
| <b>Operator Age:</b> | 14+ |
| <b>Minimum Skill Level:</b> | Supervised beginner |
| <b>Manufacturer:</b> | <a href=http://www.skyartec.com/ProductShow.asp?ArticleID=1817>Skyartec R/C Model Fun Co., Ltd., Unit 420, 4th Floor, Nanyou Commercial Services Building, No. 21 Deng Liang Road, Nanshan District, Shenzhen, China</a> |
| <b>Available From:</b> | <a href=http://parkrcmodels.com/product_info.php?cPath=28&products_id=1306>Park RC Models, Auburn Hills, Michigan USA</a> |
| <b>Catalog Number:</b> | HWX3V-01 |
| <b>Retail/Selling Price (USD):</b> | $299.95/$259.95 |
Kit Contents
-
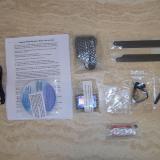 These are the extras packed with every X3V...
-
 ...and these are the extras Max was kind enough to forward.
-
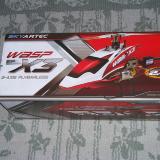 The display sleeve features bold, dramatic graphics.
There are a lot of goodies packed with the Wasp X3V:
- Seven-channel 2.4GHz CCPM transmitter
- 7.4V, 900mAh 15C li-po battery with JST CON-240 connector and JST-XH balancing plug
- Carbon fiber main blades with shims
- 2 -3 cell 0.8A DC li-po battery charger with AC adapter
- Spare hardware package including tie wraps, a motor pinion and 1.5mm allen wrench
- Two spare hook-and-loop battery retainer straps
- CD-ROM with ClearView SE and Flying Model Simulator flight sims, several hundred FMS model files and programming software for the transmitter
- DIN to USB cable to link the transmitter to a Windows computer in order to program it and to use the flight sim program
The only things needed are:
- Eight AA-cell alkaline batteries for the transmitter; Park RC Models recommends Duracell brand batteries
Recommended stuff:
- Align T-Rex 250 ball link removal tool (AGNH25036), available through Park RC Models
- Electronic caliper to accurately measure servo link lengths for repair and maintenance purposes
- Skyartec CON-240 battery connectors (FXQ-A009-1 SM 2P) and banana plugs to allow charging with a banana plug-equipped charger; connectors available through Park RC Models
- Skyartec 1.0mm hex driver for servicing the tail rotor
- Skyartec padded aluminum carrying case
Getting started
Park RC Models is serious about making sure the Wasp arrives at its destination in one piece. They ship all their models in custom made, 200# boxes. The box as shipped is surprisingly heavy at roughly 12 pounds, which represents a lot of protection.

Once I got past the reinforced strapping tape, I was looking at an exceptionally nice looking display sleeve, beautiful in its red and black color scheme.
One end of the box sported an inspection label; it was a verification of the test flight signed off by Max Ettinger himself.
Please go back and read that last sentence.
As I mentioned in the introduction, Max himself test flies and trims each model prior to shipment and he even shoots video of the individual test flights which are posted to YouTube and the links of which are e-mailed to the buyers.
Impressive? Oh, yes.
-
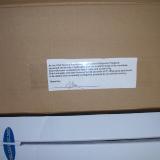
 This is the label I found taped to the end of the inner box. Labels like this abound, testifying to the in-depth pre-shipment checks of these models.
-
 Here's another example. The white box with the Skyartec labels holds the helicopter itself.
-
 And of course, the contents of that same box.
-
 This label is important; it explains the normal operation of the tail servo.
Once inside, there were three boxes for the helicopter, the transmitter and the accessories. Again, this is custom packaging we're talking about here with the helicopter nestled in a cut-to-fit foam tray. Other QC and warning labels abound throughout the package, including one on the transmitter instructing that the upper right toggle switch must never be used.
Actually, that's for beginners and it's good advice. The right switch is the for the flight modes. Flipping the switch downward engages the idle up, something a beginner is wise to avoid at first.
The other, marked "GEAR," is used as a throttle hold.
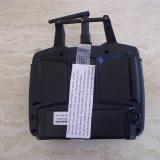
As for the transmitter itself, it's an inexpensive but surprisingly full-featured park flyer unit. It features seven-channel operation and full programmability via a PC and the enclosed CD-ROM software which, by the way, features a pleasant surprise which I'll divulge in a moment. The full-sized sticks feel terrific; they wouldn't be out of place on a more expensive radio. A series of three LEDs denotes battery level while sliders on either side of the main sticks can be used for elevon/flaperon mixing on an airplane.
Skyartec does in fact sell this transmitter with a number of different receivers; it's a nice option for someone wishing to upgrade a park flyer for comparatively little cash.
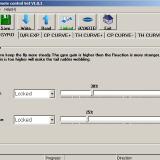
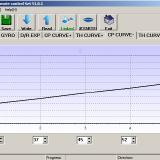
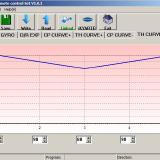
Screen caps of the transmitter setup progams show how easy it is to adjust the transmitter to one's liking:


Although there's a battery charging jack on the back panel, there is no Ni-Cd charging capability. It has, strangely enough, been disabled from the factory. The DIN plug is used for programming the transmitter via a Windows PC and for using it as a controller for the flight sim. There is an ingenious wireless buddy box system built into the transmitter, but it involves the use of a second Skyartec transmitter.
The eight-cell battery holder can be unplugged and replaced by a Ni-Cd or lithium polymer pack if one wishes, but such a pack would have to be charged after removal from the transmitter. Max does all of his flying with Duracell brand batteries and he says they're good for several weeks of really intense flying.
-
 Park RC Models places this foam block atop the transmitter's face to protect it in shipment.
-
 Here's the back as it comes out of the box with one of the ubiquitous (and useful) labels found throughout.
-
 The back of the transmitter shows the DIN plug and charging jack, but what appears to be a 2.4GHz module is in fact empty despite the manual's claims.
-
 Here it is in ready-to-use form. For such a relatively inexpensive unit, it has a good heft and overall feel.
Getting back to the labels: Another label warned against attempting to straighten the canopy mounts in case they were bent in transit. My example did in fact have slightly bent mounts but no other damage; this in turn has resulted in a new policy whereby the models will now be shipped with the mounts off of the model and in a small zip-lock bag taped to the airframe. It's important to screw in the mounts before flying since they help hold the main rotor shaft mounting block in place.
The third box sported some marvelous stuff including a bunch of extra-cost items. Max sent me two more batteries, another set of CF blades and a set of wooden blades. A CD-ROM with transmitter programming software and a USB cable with a DIN plug on one end which connects the transmitter to a Windows computer is a benefit with every Skyartec model.
As for that surprise I mentioned, it's in the form of Park RC Models' own CD-ROM with an exclusive version of the <b>ClearView SE</b> flight simulator.
That same box also held printed instructions for the software, a printed assembly manual for a kit version of the Wasp (which can serve as a marvelous repair guide despite some poor translations from Chinese to English) and some more support documentation, including a "getting started" guide sheet. The manual is usually available online; Max forwarded it as a courtesy. Links to all the documentation as well as instructional videos and the test flight video are e-mailed to all customers prior to shipping. The e-mails are a plethora of incredibly detailed, useful advice.
I wasn't sure what to expect in the way of customer service, but I certainly wasn't expecting this level.
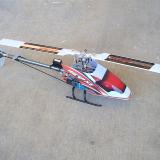
As for the real goods: The Wasp X3V looked good online, but even better in person.
The CNC-milled, flybarless Bell-Hiller head and swashplate are beautifully rendered. Compared to the rough machining evident in the HK450TT Pro review of 2011, the main rotor of the Wasp X3V is a work of art and can be retrofitted to earlier Wasp models with traditional flybars and gyros for around fifty dollars. Park RC Models can even do the job for you for a very reasonable fee. It's quite simply built like a much larger helicopter as I pointed out earlier, right down to the belt-driven tail. Many small helicopters feature direct drive main rotor gearing and a separate tail motor. Not so the Wasp with its autorotation drive gear system and the aforementioned belt-driven tail.
-
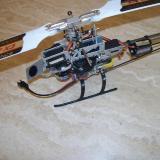
 If I didn't know better, I'd swear that I was looking at a 450.
-
 I'd still think so.
-
 Radio control meets radio broadcasting: Brad Mercer is a guitarist, singer, composer, full-scale pilot and the afternoon drive personality on classic rocker KMRJ-FM Palm Springs, aptly nicknamed "The Heat." I work in the next studio on contemporary country station KPLM-FM, or "The Big 106."
While the design is not totally new since the X3V shares a few parts with the flybar-equipped <b>Wasp X3</b>, nor is it simply a modified X3. The frame, rotor head and tail rotor assemblies are different between the two models; small items such as the drive gears, belt, landing skids and a few other minor parts are shared. I'm somewhat surprised that Skyartec didn't take the opportunity to give the X3V a torque tube-driven tail, but the belt drive is certainly a vast improvement over a motor-driven tail.
In addition, the model was fitted with tough ABS resin blades; their lightening holes covered with slightly tacky looking foil decals.
Tacky though they may be to the eye of the beholder, they serve an important purpose. The labels and the clear tape on the undersides of the blades serve to increase the lifting capability. Removing the labels will greatly reduce the lift potential.
A beautiful pair of carbon fiber blades come with the Wasp; beginners would do well to avoid their use at first since they are far more fragile and responsive than the tough, great-flying ABS blades. The servos, tail boom and assorted components and accessories had foil seals attached; these turned out to be quality control inspection markers applied at Park RC Models. All the parts looked to be of exceptionally high quality, but what really rang my bell was the hardware.
The entire airframe is assembled with 1.5mm socket head hardware. Phillips head hardware is used on the main rotor.
If there were any visual disappointments, they were found not only in the decals atop the main blades but the canopy as well.
It's a polycarbonite unit, far more robust than anything short of a fiberglass canopy and even more robust than those found on more familiar brand name models. An elastic band underneath the canopy hooks over the front of the frame and keeps it away from the motor; time will tell how well the band holds up under repeated installations and removals.
It also uses the exact same decals as the X3. For that matter, the canopy is nearly identical save for the aforementioned band. The X3V canopy has a cutout to clear the bottom-mounted motor, hence the band. The X3 has a top-mounted motor and therefore no cutout. Modifications or not, it seems strange to me that Skyartec wouldn't do something as simple and as inexpensive as doing up new graphics.
Make no mistake, this is a nice canopy, but the Wasp X3 decals on the sides and those representing a simulated windshield were applied in a slightly uneven fashion, with gaps between the three windshield decals and pinstriping along the nose which didn't quite line up. The odd red, orange and brown color scheme against the white canopy simply give the Wasp a toylike appearance.
I assure you, the X3V is no toy and the build quality appeared first rate as did the components; it's more fiberglass and alloy than plastic. An aftermarket canopy coupled with the carbon fiber blades would make it the talk of the field. There wasn't anything physically wrong with the canopy and it bore one of Park RC Model's QC seals as a result.
All Skyartec RTF models are identified by serial numbers both on the airframe and transmitter and what really caught my eye on my example was its own serial number: WHV00005.
-
 Detail of the left side of the frame along with the serial number. Note the foil quality control seals.
-
 Right side of the frame showing a level of sophistication not usually found in most models in this size class.
-
 You won't find a short-lived and twitchy motor back here.
I wondered if I really had what was only the fifth production unit and sure enough, Max Ettinger verified that the entire initial production run was shipped to Park RC Models and that my review sample is indeed Wasp X3V number five. He kept WHV00001 through WHV00004 for himself. In comparison, the Wasp X3 Max sent to me for its own review is WH314563.
I don't know if the X3V will ever become a collector's item, but the low serial number is kind of cool.
Oh, Susanna!
The rather unusual title of this section deals with the equally unusual alert tone that awaits when the battery is connected to the receiver. Yes, it plays the first eight bars of "Oh, Susanna."
I happen to have an ESC that plays that same alert as a countdown to the programming mode; the same thing applies here, but there is almost no chance of accidently reprogramming the ESC. Max's advice to me was to let the alert tone play out in order to assure proper initialization of the gyro and to eliminate the chance of accidental reprogramming via the transmitter. The gyro seems to initiate rather quickly, by the way. After a few quick flashes of the status LED on the gyro, it glows solid red and is ready to go. If reprogramming the ESC is desired, a Skyartec programming card is available. There really is no need for reprogramming since the system works so well.
Beginners who have never flown a heli or those with no experience beyond a coaxial may find the head speed of the X3V to be rather intimidating; this little machine means business. It is far greater than that of even the fastest coaxial I've flown, but rest assured, that extra speed is your friend as it actually adds necessary stability.
I'd never flown a flybarless helicopter prior to the first liftoff of the X3V. I knew it would be more stable than a traditional flybar-equipped machine in a hover (compared to the X3, it is), but I wasn't expecting just how stable it would be.
The ESC and the 4500Kv outrunner are a perfect match, ramping up to speed smoothly and with a high-quality, almost turbine-like sound. Once the X3V lifted off from the living room floor, anticipation turned into sheer amazement.
So stable was this model that it literally hovered hands off once it cleared the ground effects. If anything, it actually proved to be more stable in hover than a coaxial. If ever there were an argument for a serious beginner starting out on a CCPM helicopter and skipping over a coaxial, this was it hands down.
Max had the gyro gain set to perfection with no tail wag. A few flicks of the rudder stick showed no bounce, either.
The next step was to get it in the garage for more in-depth testing; outdoor flight wasn't going to happen due to high winds.
Once more, the X3V showed its pedigree by hovering practically hands off in my garage.
Impressive, indeed. Frankly, I couldn't wait for the winds to die down so that I could get this little jewel outside.
Flying, this time for real
The X3V's first outdoor test flight took place at a park not far from where I work and during a period of relative calm. Once it was in the air, it displayed the same incredibly stable hovering capabilities which proved to be a bit too stable.
With the gyro set in as-delivered condition, the X3V will hover, but not bank.
I found that out rather quickly as I applied some forward cyclic and tried to make a left turn a moment or two later. The model didn't turn so much as skid and it was something I was unprepared for. After a few harrowing moments spent coaxing the model closer to me, I tried the idle up. It made the transition fairly well with oodles of head speed and fairly good overall control, but the bank was only slightly improved.
E-mailing Max netted me the answer: The agility setting on the gyro was set to full stability. After reducing the stability, I brought the X3V back to the park the next day.
The incredibly stable hovering was still there. The lack of bank was not.
That simple screwdriver adjustment immediately transformed the Wasp into a wickedly fun little sport flyer. No helicopter this small should have flown as well as it did, but the proof was in front of me.
Overall control was laser sharp. Slow, lazy turns a few feet in front of me were just as easy as fast forward flight with high-G turns, steep climbs and chandalles. Simply incredible, fun performance and I hated to bring the Wasp in for a landing; I needed to save it for the video shoot.

High winds and triple-digit temperatures are a fact of life here in the desert during summer, so there was a delay in getting the X3V up in the air for its video shoot. When the time came for me to meet with my videographer, I was met with the usual high winds at the Coachella Valley Radio Control Club, my usual test area. My videographer had to cancel at the last moment, but I wasn't about to let a period of calm winds get me down. I wanted to fly this baby and I wasn't going to let the opportunity slip by.
The result was just as astonishing as the last test flight. Here was a model maybe 70 percent the size of a 450 banking and turning in the breeze like a far larger model even on standard rates. In fact, I felt as if I could desensitize the setting a bit more, but I was more than happy with the result. All that and hovering was still hands off!
-
 We're moments from takeoff.
-
 Airborne!
-
 The canopy actually presents very well in flight.
-
 The X3V is off for some fast forward fun. A bit of oscillation is noticeable in the vertical fin, but that's from the wash of the tail rotor. The model flies vibration free.
Remaining gone and forgotten was the tendency to skid; the X3V went right where I pointed it. Best of all, I was now flying relaxed. Flying a model which I don't feel I'm in full control of tends to give me a case of adrenaline shakes.
No more shakes, thank you very much. I felt as if I'd been flying this model for years.
There was one thing I'd anticipated and I'm glad I did: How would increasing the agility affect the idle up setting? As indicated, the factory had set the transmitter for more bank in the idle up mode and I thought that extra programmed bank might be an issue.
It was. The idle up setting prior to the agility adjustment was easy to handle. Not so anymore since the controls became extremely skittish, but I was ready. Even slight movement of the sticks sent the Wasp either rocketing skyward or blasting off toward the desert. Fun, but perhaps too much fun. Flicking the switch back to the regular linear response immediately restored the heli's amazing sport flying capability and control.
A review of the quick-start guide sheet explained the discrepency: The factory idle up configuration isn't fully calibrated and Park RC Models performs all of their testing and adjustments in the standard mode. So, new flyers will get a ready-to-fly model once the simulator is mastered and advanced flyers can set the idle up curves to their personal preference.
Again, I'm glad that I was ready for pretty much anything which prevented me from stuffing this great little model into the helicopter pad.
Further experimentation with the transmitter's idle up settings should tame the savage (but fun) little beast, but for now, I'm content to leave well enough alone and report back via the comments section.
It's a blast just the way it is.
Aerobatics/Special Flight Performance
While I'm more of a sport heli pilot than an all-out 3D devotee, the Wasp is more than capable of fantastic 3D flight as evidenced by Park RC Model's YouTube video. The stock model is shown doing inverted flight, barrel rolls, you name it. My assumption is that the model in the video is equipped with the supplied carbon fiber blades. I tried the CF's the next day and if the Wasp was responsive before, it was incredibly so now. Hovering was no longer hands off; the Wasp now acted more like most other helicopters, requiring constant stick input to maintain hover.
Continued windy and hot conditions prevented me from flying or hovering outside my garage, but I can tell you that the carbon fiber blades with their lower mass and thinner airfoil should prove to be a <i>lot</i> of fun with the increased cyclic response. They're also harder to see; the disk (the actual name of the rotating main blades for benefit of beginners) was nearly invisible, even in the sun.
Beginners, please take note.
Given the incredible stability offered by the flybarless system, I may well be dipping my toe in the 3D waters sooner than later.
Is This For a Beginner?
Absolutely! With a set of training skids and the supervision of an experienced pilot, this model can be successfully flown by a beginner. Skyartec's own claims back that up and the extra-stable nature of the FBL system is a tremendous help. As a new pilot progresses, crank up the agility and get ready for fun.

If a new pilot is really serious about learning to fly, I remain tempted to say that one can skip past a coaxial and jump in with an X3V as I pointed out before. The only real issues are those of repair and maintenance. This is a rugged yet very precise machine and here's where the electronic caliper comes in. Anyone who buys a Wasp would be well advised to accurately measure and write down the lengths of the cyclic linkages and the distance between the tail servo's forward mounting bracket and the rear of the frame. That Align 250 ball link removal tool I mentioned, available through Park RC Models, will prove to be a godsend in the removal of the delicate ball links. The tail servo is digital which, combined with the gyro, might not appear to be centered on powering up. Since every new Wasp is test flown, buyers may rest assured that their example will fly perfectly right out of the box.
Should a beginner have questions about repair and maintenance, I daresay that Max Ettinger knows more about this great little model than the engineers do.
Clearview SE flight simulator
One of the better value-added bonuses to come along in any RTF is the CD-ROM packed with the X3V. Not only does it have the software allowing a pilot to adjust the transmitter as necessary but it has a special edition of an excellent flight simulator as well.
A special version of <b>ClearView SE</b> and extra-cost models are available online, but Park RC Models has come through with an incredible bargain. Max worked out a deal with the creators allowing him to bundle the free version of ClearView SE (the full featured ClearView is sold on the ClearView's website for US$39.95) with three ClearView SE-only models valued at US$3.99 each. The models are of an E-flite Apprentice, a Twister Coast Guard coaxial helicopter and a Peugeot rally car, all of which are excellent tools for practicing the basics of radio control. Mastering more advanced concepts including 3D flying is as simple as purchasing a suitable model.


The only hitches are the system requirements if one is using an older machine and the fact that none of the programs will run on a Mac without first installing a Windows emulator. Older PCs will benefit from good old <b>Flying Model Simulator</b> which is a popular if older freeware system but with the benefit of a <i>lot</i> of supplied models.
ClearView SE is incredibly graphics intensive and my older 17" Gateway laptop with its Intel Centrino Duo processor, Windows XP, fully updated drivers and expanded RAM wasn't up to the task. What's more, my iMac doesn't have a Windows emulator.
Enter the folks at DA Computers in beautiful Palm Springs, California. The crew at DA had recently serviced the Gateway and I'd told them of the problems I was having with the simulator when I'd first dropped it off. Bring it in, they said and bring it I did.
They pored over the tech specs on the ClearView home page and went through the entire operating system. They verified that I did indeed have all the latest Intel drivers and the newest version of Java. Problem: The graphics card simply wasn't up to the task and since it's an integral part of the motherboard, it can't be replaced as a discrete unit.
Bummer.
I wanted to see it run (as did the techs) and so the program was uploaded into a business-class tower with a somewhat more powerful video card.
Ah, now we had something! The controller wasn't hooked up, but the photo-realistic meadow and 1/10-scale Peugeot which appeared when the program was started were utterly gorgeous in their high-definition depth and detail. From there, it was onto a flight demo featuring a beautifully rendered profile foamie flying a pattern inside a gym. The details rivaled any commercial simulator, but even that big tower had to struggle to keep up with the task of panning the background in sync with the airplane.
I honestly have to say that while Max was very enthusiastic about ClearView SE, I certainly wasn't expecting a free sim to rival a $200 commercial sim, but it did. Gamers with a heavily graphics-oriented machine should have no trouble gettng the sim up and running.
These are the minimum system requirements to get this great simulator roaring across your screen:
- Windows Vista, Windows XP or Windows 2000
- Intel Pentium 1.0 GHz or equivalent
- 3D video card with 128MB RAM and OpenGL 1.5 support
- Latest version of Java
- Latest Intel drivers if applicable
Enjoy some screen caps in the meantime:
Flight Video/Photo Gallery


<center><b>Prepare to be amazed by the 3D capability of the X3V!</b></center> <center><iframe width="480" height="360" src="http:// www.youtube.com/v/8BeFHwT9ZHA?version=3&hl=0&hd=1" frameborder="0" allowfullscreen></iframe></center>
Downloads
Conclusion
The Skyartec Wasp X3V was one of the most unexpected and pleasant hobby surprises I've had in awhile It has proven to be a fun, beautifully made helicopter the equal of anything on the market and, quite likely, better than many. An online search of discussion board archives spoke of poor quality components on older Skyartec products; poor quality simply doesn't apply here. Add to that full factory support and an almost unheard-of level of customer support from the distributor and it's worth as enthusiastic a two thumbs up as I can possibly muster. It literally leaves the distributor in better condition and in better packaging than what it arrived in. This model has quickly become a top-tier choice for trips to the park or the flying field and I honestly believe it will remain so for a long time to come. It flies like it's on rails and is as stable as a much larger machine.
It's also a bargain. I just got my first look at the new <b>Blade 130X</b> FBL CCPM micro. It's smaller, mostly plastic and the servos are of the proprietary linear type. No radio, either.
A set of unweighted plastic blades for improved fast forward flight is packed in the box.
Cost: 280 bucks.
The Wasp X3V is larger, is better made of better materials, is at least as capable in flight in the hands of a competent pilot, uses standard servos, comes with a seven-channel spread spectrum radio and programming software along with a flight sim and each unit is individually tested before shipping.
A set of high-performance carbon fiber blades is packed in the box.
Cost: 260 bucks.
Beginners, forget that plastic coaxial. Order a Wasp X3V with a set of training skids, practice on the ClearView SE simulator and get an experienced R/C helicopter pilot to place you on the path to success. Advanced users, prepare to go nuts. Start mild, go wild!
My deepest and sincerest thanks must begin with some for Max Ettinger. Not only am I flattered that he'd choose me for this review in the first place, he and I worked closely behind the scenes in order to bring you the reader as comprehensive a review as possible. The level of customer service he provides is simply beyond world-class. This veteran will work hard not to simply make you a buyer but rather to have you return as a repeat customer.
Equally sincere thanks are due to DA Computers of Palm Springs. They're as knowledgeable a bunch of computer-savvy techs as you'll find anywhere...and a couple of them are R/C enthusiasts! They did a superb job in getting my laptop back in proper order and later took time out of their busy day to assist me with the ClearView SE flight simulator.
My buddy Brad Mercer had a lot of fun hamming it up with the X3V in the broadcast booth at KMRJ-FM. Brad is a top-drawer musician and can be found at thebradmercerband.com as well as on and Twitter.
No review is complete without some thanks to administrator <i>par excellence</i> Angela Haglund for her tireless behind-the-scenes work.
Of course, informing our millions of readers worldwide is why we do what we do and all of us here at RCGroups thank you for your support. RCGroups.com is the premier internet site for all things radio controlled, so enjoy your stay, tell your friends and bring the family by for a visit.
See you at the field!
Pluses and minuses
Good things really do come in small packages if the Wasp X3V is any indication:
- Nearly unmatched customer service
- Park RC Model's unequalled fifty-point inspection process insures true box-to-air capability
- Excellent documentation and instructions provided by Park RC Models
- Outstanding component quality; machined parts are particularly noteworthy
- Inexpensive, readily available parts through Park RC Models
- Beautifully matched, smooth running motor/ESC combo
- Belt-driven tail; no tail motor to burn out and no tail blowouts during extreme maneuvers
- The FBL system is a major technological breakthrough and it shows on this model
- Custom-made, heavy-duty packaging assures the X3V will arrive undamaged and ready to fly
- Wide range of agility adjustment means the X3V can be locked down for a beginner and opened up for an experienced pilot
- Smooth, predictable flight in sport mode; all-out 3D monster in idle up and a change of main blades
- The stable, great flying resin main blades will literally pay for themselves after just one strike
- Transmitter is easily set via a PC
- The ClearView SE flight sim is a tremendous added value
There are a few minuses, but not too many:
- Poorly translated factory manual
- Some errors and omissions in the manual which are primarily centered around measurements; updates are frequently posted online
- Disabled transmitter charging jack means no ni-cad battery unless the user charges a battery outside of the transmitter
- Mac users won't be able to use the transmitter programming software or the flight sim without a Windows emulator; users of older PCs might not be able to access the flight sim at all
- Same basic canopy and decals as the less expensive Wasp X3; roughness from the vacuforming plug is visible on the finished product
- Decals on the canopy and blades might be considered a bit tacky, but the canopy looks better in the air than on the ground and it makes the model easy to track
- Difficult to restore the flight characteristics after repairs and/or maintenance without an electronic caliper and prior knowledge of certain specifications
| Thread Tools |
|
|
||
|
|
Quote:
We will announce availability soon Max www.parkrcmodels.com www.skyartec-usa.com |
|
|
|
||
|
|
||
|
|
Quote:
|
|
|
|
||
|
|
|
|
|
I did not know that it was for sale in the USA,I just received one from Asia,it was a big disappointment, first the heli came with a damaged servo, second, the reciever and the TX seem to have some issues, I tried to set up the tx from my pc, I think I followed the steps correctly, connect the transmitter to the PC, the tx was linked to the software successfully, I established the values for the throttle and pitch curves, dual rates values, mode 2, flybarless etc, save the data in the tx by clicking the icon write, but even so the heli does not work properly when I put throttle in the left stick rather than the motor spins, the swashplate moves forward, when I move the right stick horizontally (aileron) the swashplate moves properly in both directions, when I move the right stick vertically (elevator) nothing happens, and worst of all and most dangerous: the last time I was setting it up, after thirty seconds or so after having bound to the transmitter, the motor began to run at high speed without any input from the transmitter and uncontrolled, that scared me too much. I do not want to bother sending it back to Asia and pay expensive shipping, I'd rather sell it and recover some money back, or fix it if someone could help me. Anyway I will send an email to the seller and see what he can do for me. Right now I have it for sale on e-bay at a very low price. http://cgi.ebay.com/ws/eBayISAPI.dll...ht_2884wt_1396
I think this heli is for someone with more experience than me at 6 channel helis that have the skills to fix it. so far this heli has been a bad experience for me. If you could help me make it work properly I would be very grateful, thanks. |
|
|
|
|
|
||
|
|
Quote:
Did they send you a transmitter setup for Mode 2 ?? (with throttle stick setup on the left?) On the CD there is a folder called Mode2, under the default settings folder. Inside that folder is a config file for the X3v called WASP X3V.ini. Using the Transmitter software, use the open button to open to this file, once it is loaded into the software use the write button to make it permanent. When using software configuration make sure the left transmitter switch is in the down position. You shouldn't need to configure the individual settings on the Transmitter manually to get you setup and flying. You can tweak it later. Remember when flying the helicopter the RIGHT silver switch on the transmitter should be in the UP position for normal operation (down is for idle up / 3D aerobatics) Let us know if this helps Max www.parkrcmodels.com |
|
|
|
||
|
|
||
|
Thread OP
|
Quote:
I agree that the problem might be in the fact that the overseas shipper sent you a unit programmed for Mode 1, or with the throttle on the right stick. Don't give up on your X3V; you will LOVE it once it's programmed correctly. |
|
|
|
||
|
|
|
|
|
Is it possible to change the rx so I can use my own radio system, or is the fbl unit/rx combined?
|
|
|
|
|
|
||
|
|
Quote:
|
|
|
|
||
|
|
||
|
|
Quote:
Although you are in Mexico, you can contact our support directly at max@parkrcmodels.com to arrange to have just the transmitter or both the helicopter and transmitter shipped to us to be worked on in our USA Warehouse by our support staff. Max www.parkrcmodels.com www.skyartec-usa.com |
|
|
|
Last edited by Parkflying; Jul 29, 2012 at 12:31 AM.
|
|
|
|
||
|
|
Quote:
|
|
|
|
||
|
|
||
|
|
Quote:
Normally we expect the seller to provide these services to their customers but we might be able to make a one time exception to help you out in this rare and extraordinary situation. Maybe we can save the shipping costs. Contact us directly at max@parkrcmodels.com and we will work it out UPDATE: We discovered the version of the software that Evernin was using was incorrect. We provided the correct version and he has reported that his radio is now properly configured for his Skyartec FBL X3V Max www.parkrcmodels.com |
|
|
|
Last edited by Parkflying; Aug 03, 2012 at 03:31 PM.
|
|
|
|
|
|
|
A flybarless Bell-Hiller head is an oxymoron. Flybarless heads do not incorperate Bell-Hiller technology. Bell-Hiller refers to the combination of 1940's helicopter technology from Bell (Arthur Young's stabilizer bar) and Hiller (Stanley Hiller Jr's Rotor-Matic system with paddles). Its very cool stuff if you are interested in the history of where the conventional RC helicopter rotorhead with paddles came from, but it has nothing to do with a flybarless head that uses direct swashplate to blade grip linkages.
|
|
Latest blog entry: shifting gears, selling some of my...
|
|
| Thread Tools | |


| Similar Threads | |||||
| Category | Thread | Thread Starter | Forum | Replies | Last Post |
| Build Log | My First CP Heli: WASP V3 by Skyartec | bobepine | Micro Helis | 89 | Dec 12, 2013 12:24 PM |
| New Product | skyartec new flybarless video | skyartec | Micro Helis | 5 | Jul 20, 2012 12:52 AM |
| Discussion | Skyartec wasp v3 | MADLOO | Electric Heli Talk | 5 | Feb 01, 2012 06:55 AM |
| Discussion | Skyartec Wasp V4 Servo question | andione1983 | Electric Heli Talk | 1 | Nov 07, 2011 08:45 AM |
| FAQ | How about SKYARTEC WASP-V1? | ryu0215 | Micro Helis | 3 | Aug 13, 2006 09:03 AM |