|
|
|
|
|
Hi guys, get a video if you can
 Mopar your Me-309 looks pretty much ready to fly if you ask me (maybe w/o spinner  ). ).http://www.rc-network.de/forum/showt...er-etc./page12 English  : :http://translate.google.com/translat...-etc.%2Fpage12 |
|
|
Last edited by Herb; Apr 10, 2013 at 08:53 PM.
|
|
|
|
|
||
|
|
Quote:
 I have taxi it around and looks good  I ready like to read the German site, but can't 
|
|
|
Latest blog entry: Bajahobbyusa XXL Viper Jet is here
|
||
|
|
|||
|
|
This brand new F9F Cougar 90mm edf looks very much like another CMP /CMPro product:
https://www.hobbyking.com/hobbyking/s...00mm_ARF_.html .
|
||
|
|
Last edited by Herb; Apr 23, 2013 at 10:53 AM.
|
||
|
|
|
|
|
I still like the L 39 / L 59

|
|
Latest blog entry: Bajahobbyusa XXL Viper Jet is here
|
|
|
|
|
|
|
Herb If I would to buy another L39 or L59 which one should I get ?
I want to try one of those all alloy fan,very light on 6 or 8s. 
|
|
Latest blog entry: Bajahobbyusa XXL Viper Jet is here
|
|
|
|
|
|
|
Hi Herb, While you are here answering some questions can I also ask you what mod's you did to your intake ducting? I remember reading something you posted earlier about a duct mod you made after your maiden flight. I was a little unclear about what you did and why and was wondering if it is one of your recommended modifications. I finally got a hold of this kit and am enjoying the build. I am doing all the important changes I have seen here but am wondering why some guys are changing the splitter area. Some are adding cheater holes? I assume they are referring to an opening in the duct, not the fuse. In your experience do you think the intakes need any changes? And if so can you explain. Thanks for your help Herb. This thread has been of great assistance to me.
Dean |
|
|
|
|
|
|
|
|
Hi Dean,
The L-39 intakes are fine as they are ... I did not modify anything, you want to preserve that L-39 look  The major L-39 required modification is of course the mains retract mounts, and the flimsy wing structure around it ... They only minor intake mod was to sand the inner part of the intake lip to make it more rounded. This is done after the inatkes are glued in, with a generous amount of 30-min epoxy mixed with microballons (as a filler, to make the epoxy mixture lighter in weight and more sandable). You can see in the video below how well it flies with the stock intakes  If you open up a cheater hole  you will increase static thrust, but completely ruin the flying speed fan efficiency, since now you are feeding the fan highly turbulent dirty air. A bad idea. EDF's don't fly on static thrust, most will agree that good clean ducting to the fan is crucial at flying speed. you will increase static thrust, but completely ruin the flying speed fan efficiency, since now you are feeding the fan highly turbulent dirty air. A bad idea. EDF's don't fly on static thrust, most will agree that good clean ducting to the fan is crucial at flying speed.Here are a few pictures on my L-39 intakes, you will see that there is a bit of sanding and filling that needs to be done to get a smooth transition at the intake. You can see in the last picture that the inside of the intake has been dremeled out a bit, to widen the intake. . ImagesView all Images in thread |
|
|
Last edited by Herb; Apr 21, 2013 at 12:12 PM.
|
|
|
|||
|
|
L-39 with stock intakes ...
They seem to work ok in the L-39 because the L-39 is, on the whole, a lower drag (compared to say the Hawk / T-45) airframe. So, it seems to me, the slight inefficiencies of less than perfect (but near-scale) intakes is largely compensate by the relatively low airframe drag... .
|
||
|
|
Last edited by Herb; Apr 21, 2013 at 12:14 PM.
|
||
|
|
|
|
|
Thanks for that Herb. I see what you did now and agree there is no need to change the intakes. I am happily modeling away on this bird. I strengthened the main gear mounts. It was a shame cutting into that nice covering but it had to be done. I used the middle size of the PZ retracts here"
https://www.hobbyking.com/hobbycity/s...dProduct=28976 and along with the struts I used here: https://www.hobbyking.com/hobbycity/s...dProduct=25499 The nose units fit with slight trimming and the mains fit if you lengthen the wheel bays in the wing. I also changed the rudder and elevator linkages to internal and joined the elevator halves so as to now use one servo to drive the elevator. When I find the cable to upload pics from my phone I will post some of my changes here. Thanks, Dean |
|
|
|
|
|
|
|
|
Mine is now almost finished.
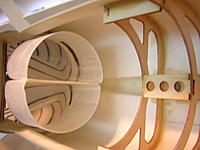
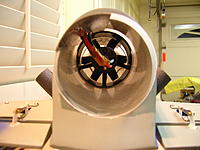
I was fiddling today to install the EDF, as we all know the original fanmount is too high, resulting in a wrong angle for the thrust-tube and additional problems. I decided to tackle the problem at the root and modify the mount. But because I am a lazy person, I am using the same part! With a cutting disc (dremel) I cut out the inner "mount" out of the original part as shown in picture 1. I then glued a piece of plywood under the middle part (where the 3 holes are) and this part will now by epoxied into the fuselage as shown in picture 2. The "open ends" you currently see will be extended back towards the remaining frame by using 4 pieces of 3mm plywood. The rest of the original frame will remain in the fuselage, keeping it rigid. I extended the original plate for the fan mount towards the nose by using a piece of plywood on each side. This makes the fan come forward by 3-4cm and 2 screws each side will hold it firmly in place. Picture 3 shows the whole construction. Inlets, EDF and thrust tube now fit with ease and are in a straight line ! There is even enough space now to the hatch to make the EDF-wires come out of the fan on the bottom. Time for the whole modification: 10 minutes. Tell me what you think. |
|
|
|
|
|
|
|
|
Hi,
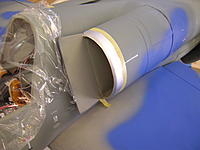
Yes I thought of initially of dremeling down the EDF fan mount a bit to get the thrust tube aligned, but eventually decided against it for three reasons: (1) There is not enough plywood material to remove, esp. given the fact that the edf mount is already hollowed out ; (2) a weakened thinner, less rigid fan mount will cause more noise and resonance problems in these kind of fiberglass (actually polyester here) fuselages ; (3) a thinner, weaker ply former could cause eventually the outer polyester gelcoat to crack. (4) The end piece can be adjusted several times to suit, by changing the angle. That is why I decided instead to use the simpler solution of just slightly bending and re-aligning the outlet, and thus leave that sturdy fan mount untouched. I have done this kind of mod a few times before, and it is simple yet effective. How does your fly ?  Pictures of my simple thrust tube re-alignment on the L-39: . |
|
|
Last edited by Herb; May 10, 2013 at 11:48 AM.
|
|
|
|
|
|
Hi Loopsy
Wait a sec, I thought you are suppose to lower the fan mount (towards the rudder side) to get the straight thrust line, not raising it (towards the belly side)? I redid the whole mount using 3mm plywood based on a pdf drawing somebody did, after a few flight tests, I now actually have about 1 degree down thrust, and it flys straight and true under full throttle. |
|
|
|
|
|
|
|
|
@Herb
All valid points, but when the EDF is connected to the ducts and the thrust tube using tape, the whole unit is usually quite stiff and I donīt expect the outer gelcoat to crack. If it does, well: There will be more minor damages anyway (I produce myself) when loading the plane into my car.... I expect to finish the plane tonight, tomorrow Iīll program the remote (throw etc) and maybe on Sunday I can try the maiden....  @nerv Yes, the mount will be lowered towards the rudder side. As I said, I am too lazy to cut new wood myself. I donīt own a CNC machine either. I admit itīs not too much work to produce a new mount but hey, itīs hidden in the fuselage anyway so why make it more difficult... 
|
|
|
|
| Thread Tools | |
| Similar Threads | |||||
| Category | Thread | Thread Starter | Forum | Replies | Last Post |
| Discussion | L-39 90mm EDF | rctoday | Electric Ducted Fan Jet Talk | 6 | Dec 09, 2011 06:25 PM |
| Wanted | WANTED A NICE 90MM EDF KIT like the red/wht HET L-39 I have a TJ100 PNP I'll trade. | mechengineer03 | Aircraft - Electric - Jets (FS/W) | 0 | Jul 23, 2011 06:44 PM |
| For Sale | K&A L-39 Albatros EDF kit | richardc951 | Aircraft - Electric - Jets (FS/W) | 0 | Jun 01, 2011 07:16 PM |
| Wanted | L-39 Savex Albatros 90mm EDF | EDF Guy | Aircraft - Electric - Jets (FS/W) | 1 | Oct 17, 2007 08:23 PM |


