|
|
|
|
|
DPS-600PB Builds - hints, tips and build plans
These 12V (up to 13.8V) 47A PSUs are quite popular, but there aren't many builds I could find apart from the staple series 24V 47A pair, and the singular 12V 47A 'build'.
Hopefully this thread will become a central source of info for those venturing into building your very own high-powered PSU for less than $200. Why I chose the DPS-600PB
Information is buried in several huge threads, and I spent some portion of life trawling through to get all the info I needed to build my own, so I thought I'd share this with people who have managed to get hold of this specific PSU (I have 7  ). ). The many folk who work in Operations in data centres know that these DL380 PSUs are rock-hard reliable, tightly regulated, run HOT 24x7x365 for many years, and almost never break down leaving lots of spares. If you research well, you can pick these up for between $20-$40 each, refurbished/new, but a far cry from the $600-$800 original price. Why did I not pick the way heavier but more powerful Dell DPS-1570AB 1570W 12V PSU?
I did think about it for a while though, even put up some offers to ebay sellers, who promptly rejected my insulting price. So that was that. Basically, 4 of these 'tiny' DPS-600PB PSUs are perfect for building 2400W power supplies in either 24V or 48V configurations, and still remain light enough to cart around. Current Sharing Also, for those who have seen the pinouts know that there is a 'current share pin' (CSP). For this, it's as simple as connecting all paralleled PSU's together on this pin. So if you run 2 of these in parallel, just connect each CSP to each other. If you have 4 of these and want to run each 24V series pair in parallel, then connect the CSP of the first (DC grounded) PSU of each pair together, and connect the CSP of the second (DC floated) PSU of each pair together. Tested build: 4xDPS-600PB - Each pair 24V (series), paralleled to each other I've tested the current sharing, and no matter how much I adjust the Voltage of each PSU randomly (eg. one might be 12.5V, the other 13.8V), each pair puts out exactly 50% of the current. I was testing a 22A draw at 26V, and each pair put out 11A. While running, I randomly spiked the voltages, and current spiked to about 11.5A, before promptly dropping back to 11A. I'll post some pics of my build soon. Each has been tested to 50+ amp continuous draws with no problems. At one stage I accidentally used a lower grade PC cable (used to power an old portable drive) which promptly melted and shorted causing some nice 240V-short fireworks - replaced with proper server PSU cables and now all is good. |
|
|
|
|
|
|
|
|
|
|
My build
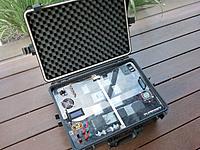
Ok, mine's a bigger than many would like... it's easy enough to carry to a field. At 26V 2600W max, it can run 2 PL8s if the socket allows it. Or, 3 Junsi 30** chargers charging 6S lipos at the full 30A each.
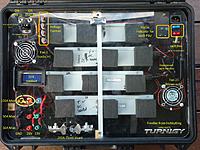
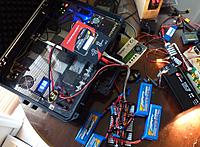
*** I'll post the PSU pinout and wiring later (not sure where I put it) The bling lights were just that... bling  . So I rewired them to good use - the far left is ON when any pair (or both) are out of standby to ON. The middle light is always ON. The far right lights up when the case fans are full throttle. . So I rewired them to good use - the far left is ON when any pair (or both) are out of standby to ON. The middle light is always ON. The far right lights up when the case fans are full throttle. Well, as fate would have it, after installing the LCD display and associated components, I accidentally rewired the 24V to 12V and 12V to 24V. I thought about it for a moment, but I couldn't think of any reason why it wouldn't be ok, forgetting that the fans and the lights are soldered to the 12V terminals. So LEDs are busted, but the main fans are ok since they're switched, and I didnt' switch them on during testing. It's fixed now. Completed build, in a Craftech case. Top view, with all the main parts labelled. 2 pairs each running about 26V, rigged for full burn test. 6S @ 40A charge on the PL8, and the Junsi putting out 350W running my discharger - I'll post up my build for this in another thread. All up around 1300W burn test. PSU putting out around 53A. ImagesView all Images in thread
|
|
|
|
|
|
|
|
|
Wiring diagram
Warning! Build at your own risk!
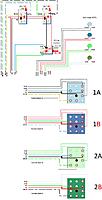
Alright, disclaimer aside, here's the wiring diagram for how I built mine. It's based on a pinout diagram in another thread, and this description of the pins which was also in that thread: PIN ------------ Ribbon Wire 1----------------- +5VSB, not on ribbon wire 2----------------- +5VSB, not on ribbon wire 3----------------- +5VSB, not on ribbon wire 4----------------- 3 (Controls fan speed) 5----------------- -12V, not on ribbon wire 6----------------- 5 (PsKill) 7----------------- 6 (not sure what this one does) 8----------------- Ground, not on ribbon wire 9----------------- 8 (Voltage Adjust) 10---------------- 4 (PsOn) 11---------------- 9 (Current Share) 12---------------- 7 (not sure what this one does) Shorting 6-8-10 turns the PS ON. I put a switch here. (Note: Tjinguy at his site shows that he shorts pins 6-9-10 instead to turn it on. I can confirm it works, but it limits your max output voltage to around 13.1V+/-, among other effects I didn't test. That's because you're shorting on the voltage control pin.) Shorting 4-8 slows fan speed to minimum. I put a switch here as well. Putting a variable resistor between 3-9 allows voltage adjustment up to 13.8V. Each switch is a twin 3-way switch, each on independent circuits. So I've used one switch to turn on a 24V pair (12V in series). The wiring is done so that DC-grounded PSU's can controlled by the same switch, same with the DC-floated PSU's. But not the grounded to the floated ones. |
|
|
Last edited by rchelijc; Jan 25, 2012 at 07:57 PM.
|
|
|
||
|
|
Quote:
By the way, if you intend to connect your supplies in series, then I assume you know to (and how to) float the DC-common/negative for one of the supplies? |
|
|
|
||
|
|
||
|
|
Quote:
Harry |
|
|
|
||
|
|
|
|
|
Thanks guys. Wasn't worth it time wise to build it to sell, so if you think you'd like to use any part of the design to make some cash, feel free! Just buy me a coffee if you visit
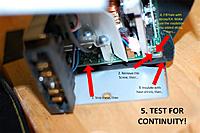
 Thanks to 007brendan on HF, I edited the photo from this thread.     Do this at your own risk Do this at your own risk     I'm assuming you already know how to test for (lack of) continuity between DC common and the case, and DC common with the Earth pin on the input AC socket. Also, test for continuity between the case and the AC Socket Earth pin - very important!! If not, you really shouldn't be building these. If you still have continuity, then the hunt is on. It could be anything - some have reported overzealous soldering that touches the case, etc, etc. |
|
|
|
|
|
|
|
|
How to connect to the 12 pins on the back plane
If you noticed, the 12 pins on the back of the DPS-600PB is laid out as follows:
o o o o o o o o o o o o Well, I started the arduous task of hand soldering wires to the pins I needed. Painful.. A much easier way: use servo connectors!! They're a perfect fit for each row of 3 pins! I used Futaba for the top, and normal JR ones for the 3 below, simply for orientation purposes. You could use any combination of the two. It was a late discovery, but when I did, I removed all the wires, removed as much solder as I humanly could, and redid it using 4 servo connectors CA'ed together to form a "socket" of sorts, for each PSU. Now, removing and replacing a dead PSU (if I need to) is a simple case of unplugging the socket, unplugging the bullet connectors, and swapping it with a newly prepared unit. Of course, those who have access to the original HP socket, or prefer to use the ribbon cable wires, you don't need to do this. |
|
|
|
|
|
||
|
|
Quote:
The only thing I'd change is shorting pins 6-8-10 instead of the 6-9-10 which he suggested. Reason is posted above... |
|
|
|
||
|
|
|
|
|
Converting these are very easy. I have decided to go with binding posts and have removed the hot swap. Just need to pick up some posts tomorrow and should be complete. Also need to find a case and think I will install a voltage meter as you did. Thanks for your help - what great timing!
 Harry |
|
|
|
«
Previous Thread
|
Next Thread
»
| Thread Tools | |
| Similar Threads | |||||
| Category | Thread | Thread Starter | Forum | Replies | Last Post |
| Discussion | Flydumini Frame Thread and Build Hints/Help | nasgul | Multirotor Drone Talk | 216 | Sep 28, 2013 04:58 PM |
| DPS-600PB Power Supply Shuts Down | wcsd106 | Batteries and Chargers | 3 | Jun 23, 2013 06:11 PM | |
| Mini-HowTo | Tips, Tricks, Hints, Secrets & How To's to help make a build/rebuild easier... | ABADGTP | The Builders Workshop | 37 | Dec 24, 2011 12:48 PM |
| Discussion | Sokol build tips and hints | Dan the man | High Performance | 9 | Aug 21, 2008 03:26 AM |
| Discussion | GWS Piper Cub Build Tips & Hints? | Royster | Australia | 111 | Feb 07, 2007 04:11 PM |

