|
|
|
|
Thread OP
|
Discussion
The ORIGINAL #16 HD keycam thread (read posts #1-#5 BEFORE posting questions)
Thread Usage Protocol
This thread is part of a radio controlled model web site in a Forum dedicated to Aerial Video. As such, the content of this thread is intended to focus on the operation and capabilities of the #16 HD keychain camera for aerial video purposes. I know there are many users of the camera for purposes other than this, and you are welcome here. In fact, many of the camera's functions have evolved from your input. But I ask that your posts do not divert the flow of the thread into off-topic areas. Video links should be for aerial videos, with a couple of exceptions... to demonstrate a specific problem/solution with the camera or to clarify some of the camera's abilities. These exceptions can help all users as well as give feedback to the camera developer, who monitors this thread closely. Also, this thread is a "self-help" thread! The four posts following this one contain much information that can answer many user questions. I try to keep these four posts updated with current information, frequently asked questions/answers, firmware updates, and useful utility links that everyone can make use of. It is my intent and expectation that thread posters user will "do their homework"  and access these four posts before posting new questions. If you still have questions, the advanced thread search feature should be used to help find posts that relate to your questions. This will not only help keep the thread from becoming bloated with redundant questions that have been asked and answered many times, it will also keep the thread leaner and more interesting to the target audience. and access these four posts before posting new questions. If you still have questions, the advanced thread search feature should be used to help find posts that relate to your questions. This will not only help keep the thread from becoming bloated with redundant questions that have been asked and answered many times, it will also keep the thread leaner and more interesting to the target audience.If this is your first time reading this thread, please read the next four posts now to familiarize yourself with this thread's structure and resources. Thanks in advance for your cooperation! p.s. The chucklohr.com web site will also have information about the #16 camera. |
|
|
Last edited by Tom Frank; Dec 31, 2013 at 04:00 PM.
Reason: Just looking :-)
|
|
|
|
|
|
|
Thread OP
|
#16 Camera Specs and Sources
This new #16HD is a completely redesigned version of it's predecessor, the #11HD keychain camera. Internal pictures are attached below, and the CMOS sensor data sheet is available here.
So far, the following web stores have been identified as selling the REAL #16 HD key cam. There has been no negative user feedback posted here on any of these stores, and positive feedback has been posted of receiving good service and vendors standing behind their product if any problems come up that are not caused by user abuse, crash damage, etc.: Developer's Direct Seller eletoponline365 (China) Re-Sellers digitalele889 (China); BangGood (China warehouse); novotm (U.S.-MA); MassiveRC (U.S.-FL); BangGood (U.S. Warehouse); Webbex (U.K.); JooVuu (UK); BangGood (UK warehouse); Mobiuscam (CZ) Prices can vary slightly from one vendor to the other and depends on what is included in different accessory packages. User replaceable parts, e.g. battery and CMOS/lens module, are available from the camera vendors for about $4US and $9US delivered, respectively. If parts are not listed on their sites, use the web site email contact link to request what you need. They will respond promptly with information of how to buy them. They all use direct PayPal payment. Class 4 memory cards provide the best compatibility with this camera and are strongly recommended. Class 6 and Class 10 cards, at best, do NOTHING to improve the camera's video and cost more, and at worst, they may not work at all! If you are uncertain about what kind of memory cards work with the camera (see the FAQ in post #3), look to order one from the camera vendor when you place your order and be done with it !Look for the frame size and frame rate to be 1280 x 720 @ 30 fps, the H.264 video codec, and the .MOV file format. The detailed specification that frequently accompany the add banner may also have these details. Sample pictures and a specs list from an eBay ad for this camera is attached below as a reference. <EDIT 01/27/13> A new case with a flat bottom, better CMOS module securement, stronger case securement tabs, and a higher capacity battery option have been announced. See details here. <EDIT 06/13/2013> The V2 #16 with video-out is now formally released, with three lenses... the normal 70 deg. one (Lens A), a slightly wider AOV "red" one (Lens B, with IR filter on the front) and a 120 deg. fisheye lens (Lens D). A side-by-side visual comparison of these lenses can be seen in this post link, and also this one. <EDIT 6/4/2013> New accessory cables for lens extension, right-angle USB video-out, and USB OTG (for Android devices) are now available. See here for details. <EDIT 12/31/2013> New version 3 (V3) circuit board camera released. See post #16522 for details. <EDIT 04/22/2014> New base plates have been released that will allow mounting the #16 camera to standard tri-pod screw mounts as well as their various articulating-ball mounts. <EDIT 04/28/2017> The V3 circuit board had some revisions back in 2015 (!) to the components that were done only to improve power consumption. The function of the board has not otherwise changed and both V3 boards run the same firmware identically. Details are in this post. |
|
|
Last edited by Tom Frank; Sep 24, 2020 at 02:27 PM.
Reason: Added BangGood to Verified vendor list
|


|
|
|
|
Thread OP
|
#16 Frequently Asked Questions (FAQs)
FAQs are kept updated as new frequent questions come up.
General Camera Questions
The #16 HD key cam outputs files with H.264 video codec, with two different firmware versions for the output container format. The standard firmware uses .MOV format, an Apple implementation, which unfortunately makes it more problematic for editing since some editors will not import this format. Also available is an .AVI firmware, but the implementation has editing issues of it's own due a non-standard .AVI format. But you can re-encode (with slight quality loss) the native non-standard AVI file to a standard AVI format with most any file converter program or editor such as the VirtualDUb or AviDemux editors. The AVI format does offer one advantage over the MOV version, and that is the continuous recorded clips have a one second overlap, so they can be stitched together with an editor to make one long continuous video. This does require overlapping each clip manually with the exact 1 second overlap, though, to eliminate duplicated or dropped frames. If you don't need that overlap, but do need AVI files for editing, the best solution is to shoot in MOV format and convert to AVI with no quality loss using the following conversion tool. MP4cam2AVI Conversion tool If you cannot import .MOV format files in your editor, the best way to convert the file is to use the MP4cam2AVI utility available here. It will do a direct stream copy (no recompression) of the source audio and video streams and simply repackage them in an .AVI container which most editors can load. The advantage of this is both speed and quality. Since it is just copying the video and audio streams verbatim without doing any re-encoding, it is very fast... approximately 1 second for each minute of video. And because it does not re-encode, you don't lose any quality. Some players/editors will not properly decode the direct copied audio, so I usually do re-encode it or turn it off. Selecting one of the .MP3 codecs will produce slightly smaller files. You'll still need to have the video codec (H.264) on the computer to decode the video, though. The ffdshow codec package mentioned below will provide the codecs if needed. Other tips for using this tool are in this post. This program can also do some limited re-encoding of the video using the less efficient X-vid video codec, join clips together into one, and trim unwanted beginning and ending sections from videos. Windows Movie Maker 2012 This latest update to the former Windows Live Movie Maker was released with Windows 8. One significant improvement is it can now output in MP4/h.264 format as well as it's own WMV format. Another significant upgrade is a built-in image stabilization function, however it only functions when running under Windows 8. Other than that one feature, it runs OK under Windows 7. WMM 2012 can be downloaded for free from Microsoft's web site. If you prefer the look/feel of the old XP WMM with the better capability of the Vista version (v6.0) of WMM, you can also download the latter. Details here. VideoPad This is a commercial product, but can be download a free version with most functions activated. It is an easy to use editor similar to the older Windows Movie Maker (before WLMM was released), but it can import/export most common file formats and has a few more bells and whistles, like more than one timeline for videos and overlays which not only work for text, sound tracks, and pictures, but also a second video (i.e. picture-in-picture capability). It will still import most video formats, but will only output in WMV and AVI formats. And you can't use add-ons, like Vdub filters. But for basic editing, it's a good alternative, even in the freeware version. It can be downloaded here. AviDemux A decent basic freeware editor that can import and edit the .MOV files directly is AviDemux. It is available in version for Windows, Linux, and Mac. It has similar functionality to VirtualDub, but Vdub can only directly import .AVI files and the H.264 video codec must be added separately. The latest version of AviDemux can be downloaded from the author's web site here. An AviDemux user guide is available here. While this editor does not have the fancy transitions and text tools of WLMM, it has some very powerful filters for visibly improving the color and clarity of the HD key cam video that WLMM cannot do. Tips and Tricks for editing HD key cam videos with AviDemux Freemaker Video Converter This tool can efficiently convert clips from the .MOV format to other formats with other codecs, but unlike the MP4cam2AVI tool, it will re-encode the video, which takes a lot more time and can add a tiny bit of quality loss. But, it adds the ability to also trim out un-wanted sections, rotate/resize videos, join video clips and pictures together. and add a sound track into one final video. While it lacks fancy transitions, video effects, and text titling tools, this may be all that's needed for many people. Buttons to click for direct uploads to YouTube and other hosting sites are also built in. Some tips for using this tool are listed in this post, and the program can be download from here. Video and Audio Codecs - ffdshow If your video editor/player does not support the codecs used in the camera's native .MOV file, you will need to add them to your system. The code pack I use and would recommend is ffdshow. This tool is regularly updated to keep it current and/or squash any bugs that might be found. The latest version of ffdshow can be downloaded here. Note: The latest revision of ffdshow no longer supports the H.264 video codec for encoding files, but does have the codec for decoding files. If you want to encode with the H.264 video codec, download and install the open source version, x.264vfw, for MS Windows from this source. This gives some info on using the x.264vfw codec with VirtualDub editor, and codec configuration settings that provide good results with #16 video. Many video players/editors do not support the Apple Quicktime .MOV file format that the HD key cam records. You will need to convert the file from .MOV to a format your software will load. Standard .AVI is usually a universal format for this. Editing Tips 1. If you are not doing any editing, it's always best to just upload the original from the camera. But if it's a long video (more than 2-3 minutes), it's always best for your viewers to at least trim out redundant or less interesting parts to keep the duration within that guideline. 2. If you are ONLY TRIMMING unwanted sections, you do NOT need to re-encode the video if you use the MOV firmware. You can use free utility software to do trimming with a "direct copy" mode for the video. The file output will go extremely fast since there's no re-encoding, but some formats do not like the native audio from the camera, so I always set audio to re-encode with .mp3 compression for compatibility reasons. The output speed is still much faster than when re-encoding the video. If you use the camera's .AVI firmware, you can NOT do direct copy video trimming because the camera uses a non-standard AVI format. You will always need to re-encode the video. If you use the MOV firmware, you can do direct copy video trimming using AviDemux editor, or you can "re-package" it first into a standard AVI format (with no quality loss!) using the MP4cam2AVI utility, and then use the Virtual Dub and AviDemux editors, or the Avi Trimmer utility (all are free downloads). 3. If you need to do anything other than trimming, such as adding titles, using special video effects, etc., you will have to re-encode the video. For best quality and smallest file size, keep the h.264 video codec (aka AVC, x.264) and set the data rate to be roughly the same as your original recording. You can easily determine what that was by looking at the file properties (with Windows, right click on the file icon, and select Properties/Details tab). Alternatively, if using Windows Movie Maker, outputting into .WMV format using the program's "best for this video" choice when selecting the profile to use for outputting the file will give virtually the same video quality (to my eye) with only slightly larger file size. In some case, the motion appears smoother to my eye as well. |
|
|
Last edited by Tom Frank; Oct 01, 2017 at 08:53 AM.
Reason: Deleted broken battery plug link
|
|
|
|
|
Thread OP
|
#16 Firmware, Configuration, and User Manual Information
If possible, firmware updating and changing of camera settings should always be done using the developer-supported Windows graphical user interface (GUI) software.
This page has an overview of the current configuration setting information and download links for the instruction manual (user guide) and Windows GUI software authored by Isoprop. This thread supports an Android App authored by "Thomas." (on RCG) for changing configuration settings in #16 (and Mobius) camera(s), Post #1 in that thread links to the App Download site. New firmware and user settings can be loaded into the camera manually as a last resort (see below), but it requires specific file editing and handling procedures as well as multiple button press sequences on the camera. It is easy for user errors to cause these updates to fail! Also, there are numerous camera settings, some of which conflict with each other if both are toggled on at the same time. The GUI programs will not permit these conflicting settings to be set. The GUI programs will eliminate all of these user error possibilities, so please do yourself a favor and use them. Alternative Manual User Configuration Setting Procedure If a GUI tool is not available or you would rather just edit the configuration text file manually, it's easy to do, just follow these steps exactly: 1. Download the camera's configuration file to the flash card in the camera (see procedure in the instruction manual referenced above). 2. Turn the camera on, connect it to your PC, and access the camera root directory when it goes into the "removable disk mode". 3. Open the config text file with a simple (ASCII) text editor (e.g. the familiar "Notepad" text editor for Windows users). The file will look similar to this: Note: Values used by the camera are highlighted in the square brackets. The text underlined in red is NOT part of the config file, but is included here to show question marks can be used for the date/time value to keep the camera's current date/time settings. Functions shown may vary with firmware updates, but manual editing is similar. Text in curly brackets at the bottom show the firmware and boot loader versions in the camera.4. Replace any number(s) in the square brackets with any valid alternate setting number, shown highlighted to the right of each function, with the exception of date and time. Don't delete the "-" or "/" marks or add any spaces or invalid numbers. note: Using invalid numbers or other characters in the square brackets has not shown to cause serious problems. The camera appears to ignore them or switch to default values.5. Save the revised file back to the flash card root directory, but do not change the file name. 6. Upload the revised configuration back into the camera. The same key-press sequence used to download the configuration from the camera will also upload it to the camera. 7. When the LED turns off, you're done! The new configuration will be in the camera and the config file will be automatically deleted from the flash card. You may check the flash card to confirm this if you wish. Firmware Firmware for the #16 camera does not need to be replaced with new firmware every time a user configuration change is desired. Those changes are best done using the GUI tool (see above). Also, the GUI will determine if your camera firmware is out of date, download the latest firmware if you agree, and install it for you, taking all the potential for user error out of it. You are strongly advise to ALWAYS use a GUI tool for all camera firmware changes. The firmware development and refinment is a continuing process, and the most recent OFFICIALLY RELEASED versions will be kept attached to this post as downloadable zip files. Any problems found with the Released Firmware should be reported to me via PM. Note: The different firmware will ALWAYS have the same name... FWMICDVR.BIN, which is necessary for the camera to identify it as firmware to be installed. When you un-zip the attached firmware archive file, the firmware FILE will be in a named FOLDER so you can tell at a glance which firmware file is in the folder. When preparing to install the firmware as detailed below, make sure to copy the firmware FILE (FWMICDVR.BIN) and NOT THE FOLDER itself to the memory card root directory. The camera will not find the firmware if it's in a folder. I keep old, obsolete firmware in case anyone needs a copy (PM me with your email address). NOTE: BETA TEST firmware is created as part of the on-going development and is sometimes released to selected users for testing only. It is NOT officially released firmware and it may contain bugs, so is NOT intended for general distribution. . There are two firmware types for the #16 camera:
The most up-to-date firmware is available for manual download at the bottom of this page. Optional Manual Firmware Update Procedure The following procedure is for manually updating your camera firmware. It is no longer necessary to do this if you use one of the latest GUI configuration programs. It will determine if your camera firmware is out of date, download the latest firmware if you agree, and install it for you, taking all the potential for user error out of it. You are strongly advise to ALWAYS use the GUI tools for all camera firmware changes. ALERT:
2. Disconnect the camera and turn it off. 3. Insert the flash card containing the new firmware file into the camera (if not already in the camera). 4. Press the Power button until the Yellow LED turns on and begins to flash. RELEASE THE POWER BUTTON AS SOON AS LED FLASHING BEGINS! If you keep pressing it longer, you may turn off the camera before the update process is done. 5. To confirm the firmware is being loaded into the camera, the Yellow LED will first blink. The blinking may continue until the LED finally turns off, or the LED may turn on solid for several seconds before turning off (depends on camera). In either case DO NOT PRESS ANY BUTTONS while the yellow LED is still on or blinking! If you do, the firmware may not fully install and the camera will not function properly. If you find this to be the case AFTER COMPLETING THE REST OF THESE STEPS, repeat the firmware installation and make sure you follow all the steps EXACTLY as stated. 6. When the firmware is fully installed, the Yellow LED will turn off and the camera will shut down. Note: v3 boot loader file should be installed to make the following Step 7 unnecessary once it is installed and running. It will automatically delete any new firmware (or boot loader) .BIN file from the camera memory card after it is installed and running. Installing it is optional, but recommended, and cameras are now shipping with this new boot loader installed.[/b] 7. Delete the firmware file from the flash card. DO NOT SKIP THIS STEP!
Firmware Download Site [B]FW v1.12 has been posted. This adds new Power On auto-recording, auto-connect to USB data ports, and USB charging ON/OFF toggle FOR V3 #16 CAMERAS ONLY! Requires GUI 2.0.2.2. or higher for PC configuration (see post #16522 for details). This FW can load and run in V1 and V2 cameras, BUT you will not get the added functionality with it. I have removed FW V67 for this reason (no need for a separate FW for earlier camera versions). ImagesView all Images in threadFilesView all Files in thread
|
|
|
Last edited by Tom Frank; Apr 04, 2017 at 05:13 PM.
Reason: Added Android App link I had accidentally omitted
|


|
|
|
|
Thread OP
|
Frankencams - Interesting mods, mounts, etc.
under construction
|
|
|
Last edited by Tom Frank; Apr 17, 2013 at 02:28 PM.
|
|
|
|
|
|
I am ready to order
With the free battery offer I sent the ebay seller a message to confirm how to secure the free battery.
|
|
Latest blog entry: Eagletree Guardian vs. Eagletree Vector
|
|
|
|
|
|
Thread OP
|
What's NOT Included In the Release Firmware
Since I listed all the features that were being worked on for the #16 back in the #11 thread, I thought I should mention a couple that have not met expectations yet.
|
|
|
Last edited by Tom Frank; Dec 03, 2012 at 11:20 AM.
Reason: deleted some .AVI comments and obsolete sample video link
|

|
|
|
|
|
In the beginning...
I would like to take this opportunity to specially thank Tom for all the hard work that he has done, and is continuing doing, for this camera.
He contacted me a few months ago and asked me if I would consider writing a configuration utility (GUI) for the upcoming #16 (#11 plus/ultra/ultimate/elite etc. at that time). I was absolutely delighted as this would be a change to my daily work programming gigantic, ultra complicated and messy applications. After a few months of silence, the developer was almost ready. OMG, I was taken almost by surprise  . From then on, things went very fast indeed. Luckily I could use the time-setting programs that I had previously written for the #11 as a base. . From then on, things went very fast indeed. Luckily I could use the time-setting programs that I had previously written for the #11 as a base.I went thru many beta versions, and Tom was more than helpful. Actually, most of the current layout is based on his ideas. We discussed a LOT of different options. The program's appearance may not be to everyone's likes - no skins and the like... But it's functional! We decided on a larger font for the sake of ease of reading, and we spent a long time on deciding on the colors. And there were those darn ToolTips, and the integrated Help, and, and, and. Of course it's possible to set the parameters using a text editor, like Tom initially did, but that method can be error prone. It also requires a bit of computer knowledge. At this point I must mention the developer and everyone (that's YOU and I) who participated in Tom's previous #11 thread. The developer listened to us all! He most probably read almost every post in Tom's #11 thread and realized what a great camera he had already produced. There was no stopping him incorporating the most requested features into his new, the #16, camera. So THANK YOU VERY MUCH. As a last note, which is just an assumption, I suspect that the resources (memory) must be pretty much depleted, so I doubt if it's possible to add any more code-intensive functionality to the camera. Of course, if more parameters can be added, I'll also modify the configuration utility. |
|
|
Last edited by Isoprop; Dec 16, 2011 at 05:16 AM.
|
|
|
|
|
|
Instruction Manual and Configuration Program
This is the original GUI which I created in co-operation with the developer and Tom. The first version was released on 16 December 2011 and has always been updated in synchronization with the latest firmware versions.
The program is a native Windows application specifically written for the Windows operating system (XP and above) and does not require any 3rd party runtime system to be installed. The simple and extremely user-friendly program is fully plug-and-play but also fully supports the older file-based configuration method. The program will also run on Linux and Mac systems running the Wine compatibility layer. A full feature list is shown after the introductory pictures below. The latest GUI software configuration tool together with the latest instruction manuals (User Guides) from both the manufacturer and the program may be downloaded by clicking here. I strongly recommend that you check the above site on a regular basis because I will be keeping the program instruction manual up-to-date, especially the "Trouble Shooting" at the end of the guide. Also, new firmware versions may incorporate new or modified parameters which will also only be available in the latest GUI version. You may also set the program to check for software and firmware updates automatically, each time you start the program. The above site does not contain any firmware files. All available firmware can be downloaded from here. Windows GUI software configuration tool (click on image below to download the program) 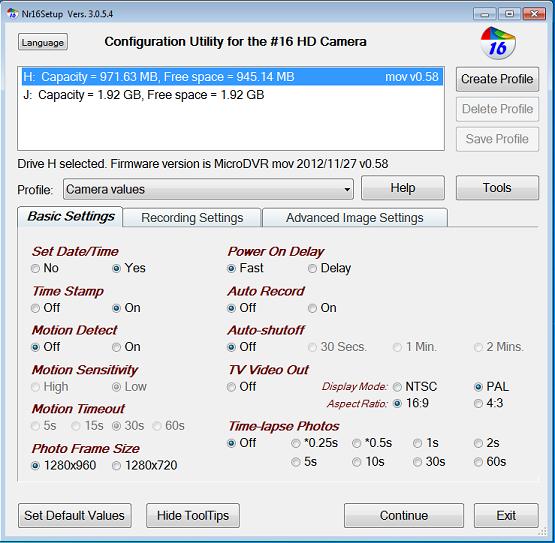 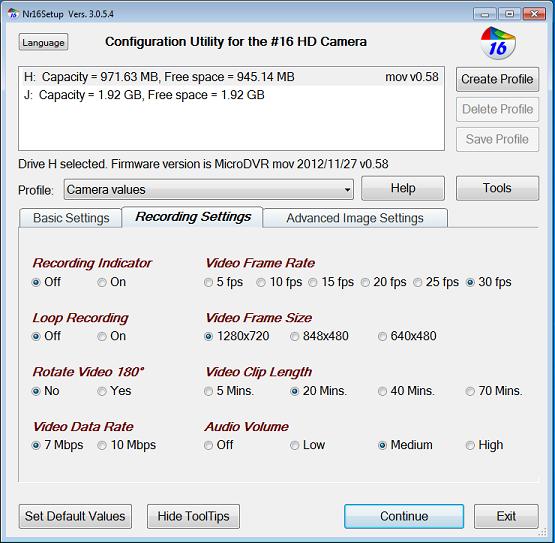 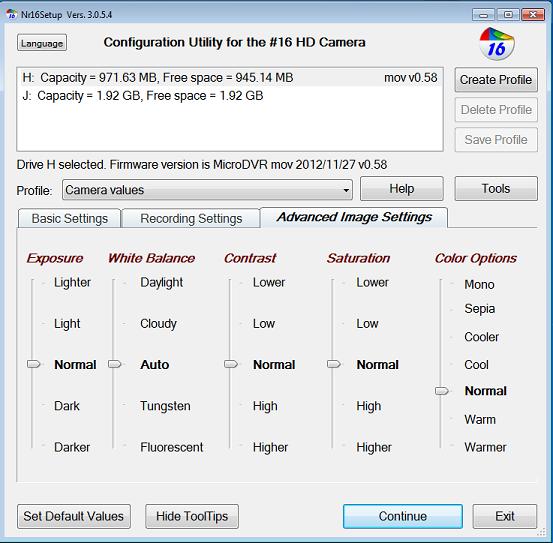 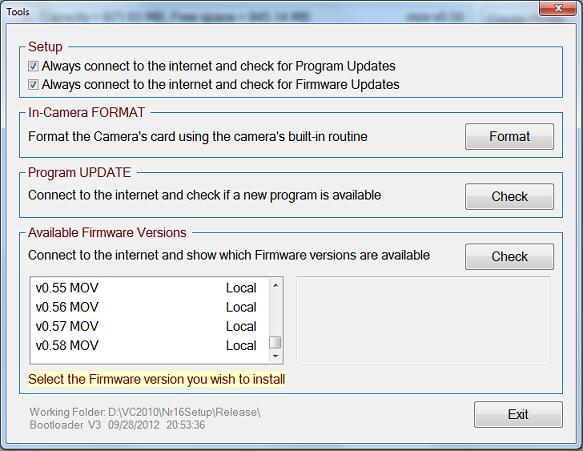 ...and the integrated "Help" (User Guide - click on image below to view/download)  The configuration tool needs no installation whatsoever. Just unzip it to your favorite location, even the camera's SD card if you feel so inclined. These are just a few of the software tool's highlights:
Note: As of version1.0.0.7 it is possible to create and keep the read-only attribute of the configuration file. This can be useful if you want to load different configurations from different cards. However, normal users do not need this special functionality. I have posted information about this new functionality here. Foreign language modules (DLL, Dynamic Link Libraries) must be copied to the same folder as the program. On execution, the program will show a language button if it finds one or more language DLLs. Once set, the program will always start in the language previously selected. |
|
|
Last edited by Isoprop; Apr 10, 2019 at 09:43 AM.
Reason: Page updated
|
|
|
|
|
|
Camera Ordered. Will update this post with my findings and thoughts when it arrives.
Many thanks to Tom and Isoprop for the work. -B! |
|
|
Last edited by Fugitive_Bill; Mar 02, 2012 at 06:07 AM.
|
")
")
|
|
|
|
|
Many thanks to Tom and Isoprop for all their work on this.
|
|
Latest blog entry: Eachine QX65 FPV quad review
|
|
|
|
|
|
|
I think I am correct when say the lens in now connected to the pcb by means of a plug, as I have indicated in the picture.
Is is possible to buy an extension cable with male/ female plugs on it to allow the lens to be moved further away from the pcb? I have a project where I would need this to happen. Thanks John. 
|
|
|
|
«
Previous Thread
|
Next Thread
»
| Thread Tools | |


| Similar Threads | |||||
| Category | Thread | Thread Starter | Forum | Replies | Last Post |
| Discussion | Looking to buy #11 HD Key Cam within US | Abolfazl | Aerial Photography | 4 | Mar 20, 2016 12:14 AM |
| Discussion | The REAL (#11) HD Key Cam Thread (PLEASE! READ POSTS #1-#3 BEFORE POSTING QUESTIONS!) | Tom Frank | Aerial Photography | 9936 | Feb 11, 2014 10:56 AM |
| Poll | Poll For Current and Future #11 HD Key Cam Users | Tom Frank | Aerial Photography | 0 | Sep 25, 2011 11:55 PM |
| Discussion | New HD Key Cam CHAMP? 1080x720p 3 HOUR RECORD TIME! | Jaybee | Aerial Photography | 4 | Jun 02, 2011 11:39 AM |