|
|
|
|
|
Build Log
Snort 1/350 Typhoon conversion
Hi lads,
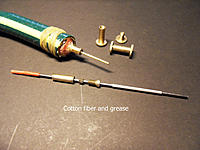
I have this Dragon/Italeri kit since the early 90' when attempted to motorize it  A month ago i thought that could be the right model to try dry hull technique. Thanks to cmpang and epg800 for providing inspiration and food for thought. Studying for boating licence beyond 12Nm gave me the impulse to try again to do a stuffing box for subs. I've bought some brass fasteners used to joint two glass panels and, with my trusty Hobbymat lathe, modified them into a working stuffing box. They were tested with a garden hose and they seem to work. Snort system will feature a very neat idea from the Wizard: magnetic coupled guillotine slide valve! |
|
|
|
|
|
|
|
|
|
|
Can you provide more info about those stuffing boxes you made?
|
|
|
|
|
|
|
|
|
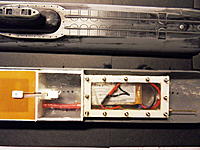
Watertight boxes are almost finished.
Front battery box will have removable transparent lid while the larger radio box will receive a fiberglass sheet lid siliconed over with a trasparent removable inspection window. |
|
|
Last edited by Cuddles; Dec 06, 2011 at 09:39 AM.
|
|
|
|
|
|
redboat219, what do you want to know?
They work just like the real ones: some oakum is compressed against the shaft. I just used cotton fiber instead of oakum. |
|
|
|
|
|
|
|
|
Thanks for the illustration. Now I understand what you did with the screw binder. You turned down that big flat head and bored a hole for the shaft to pass through.
Did you do it for both ends or just one? Interesting set-up with the snort pump. So you'll be using the middle section of the hull directly as the ballast tank. I assume the slide valve would be under the upper hull. Would you be extending the sides of the ballast tank down into the lower hull? With the longitudinal seam running down the length of the hull the air bubble your ballast tank would be confined just to the upper hull. Any more and it'll bubble out the seams. |
|
|
|
|
|
|
|
|
Exactly redboat219, I turned down the two flat heads and then slowly bored the jointed piece with a 1,2mm drill bit then reamed down to 1,5mm.
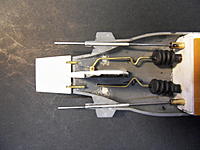
Then just slipped in the 1,5mm shaft, unscrew, pack with cotton fiber plus grease and closed everything. Yes, the midship section will be used as a ballast tank...well, an air tank because wil be filled with air just to take the sub from "half the sail dry" to the correct floating level. The slide valve will be over the ceiling of the tank, the picture should clear any doubt. In any case I'll steer you to the wizard's thread : http://forum.sub-driver.com/showthre...highlight=u214 Posts 69 & 70. I will extend the sides of the ballast tank down in the lower hull. Water will enter from some holes below (must look for underside view of the beast just to get some ideas) I've opened the holes for stuffing boxes and bellows, tacked the motors with some bluetack and runned them, they run fairly smooth 
|
|
|
|
|
|
|
|
|
When will be the shake down cruise? Can't wait to see those creation of yours working.
Btw, what electronics, motors and props are you using? |
|
|
Last edited by redboat219; Dec 07, 2011 at 06:33 AM.
|
|
|
|
|
|
After some well executed navigation and dead reckoning exercises I've decided to go ahead with Typhoon.
Decided to use UHU plus to secure those box interiors. While waiting UHU to catalyze, I've done dive plane (beaver tail) and rudder. Used 2mm plasticard and fiberglass sheet. Also, I've cut the top portion of the stern. About electronics, I'm going to use a shultze delta 540 receiver, three chopper servos, a micro modified sphygmomanometer pump, a microswitch, two in series diodes, two graupner speed 265 in parallel and a 10amp plane ESC. Props will be handmade, as usual, with copper sheet and brass round stock. In the meanwhile, I was thinking to try out a dry hull with bayonet lock ring for the next project. Well, I found in a russian forum, a dead simple method to make a bayonet lock ring. Please, leave an opinion. |
|
|
|
|
|
|
|
|
Cuddles,
Did you check out that link I showed cmpang about a similar Typhoon conversion? It just uses a simple plug in connection, no need for a twist locking mechanism. Hydrostatic pressure ensures the hull stays connected. BTW, Can you give the link to that Russian site? |
|
|
Last edited by redboat219; Dec 08, 2011 at 05:36 AM.
|
|
|
|
|
|
That german guy is really a genius...He and SilentHunter...Their micro piston tanks leave me speechless.
But I was looking for a simple locking design for a larger model and this russian one is perfect. Sorry but I didn't saved the position of that pic but the forum is this one: http://forums.airbase.ru/viewforum.php?id=91 I can remember that it was near the end of the pages...name of the thread contained the word "submarine". In the meanwhile I've managed to install servos and motors, figure out and build the ballast control system, rudder and dive planes and glue everything on the hull. Tonight I'm going to epoxy the seams and build some props 
|
|
|
|
|
|
|
|
|
Is this your first conversion project? Everything looks damn straight and clean.
|
|
|
|
|
|
|
|
|
Thank yoy redboat219,
this is my first conversion of this kind (i.e. dry hull) Have a WTC Kilo and Seawolf coversions under my belt. I had to correct some errors: _forgot to put a chunk of lead in the radio section.  _silicone couplers were struggling against torque, reinforced them with some heatshrink tube. Installed a tab and magnetic lock for the upper hull and a main switch in the battery section. I've also built the tank section with its guillotine valve. Tomorrow will do propellers and paint. Must look for suitable decals in the LHS. |
|
|
|
|
|
|
|
|
Cuddles,
I was looking over the pictures when I noticed that your snort pump is not like what David M. uses. It only has one nipple on top.Actually it looks a lot like the one I took out of an old mini digital sphygmomanometer (good for RCABS not SNORT). The air enters through holes on top next to the exhaust nipple. These holes are equipped with one way valves so air flows only in one direction. In yours I see that the induction tube goes into the side. Could you discuss how you modified it. I plan to modify mine too. Thank you. |
|
|
|
|
|
|
|
|
redboat219,
I was desperate too about the absence of the second nipple, but then i realized that somewhere there was obviously some kind of air intake. And indeed there it is,a small rectangle hole on one side! Then, it's a matter of disassemble and open up that small rectangle with your exacto just enough to cram in a short tube to make a nipple or a longer one if you need a snorkel. Take care not to pierce those little rubber cups and do not use glue, just rely on "vice effect". |
|
|
|
«
Previous Thread
|
Next Thread
»
| Thread Tools | |
| Similar Threads | |||||
| Category | Thread | Thread Starter | Forum | Replies | Last Post |
| Discussion | 1/350 Typhoon | cmpang | Submarines | 25 | Mar 21, 2014 01:59 PM |
| Gallery | Trumpeter 1/350 Hornet CV-8 R/C conversion | cmpang | Scale Boats | 19 | Nov 27, 2011 02:59 AM |
| Sold | 90mm Typhoon 600-33 and HET Fan Combo $350 OBO! | Rookie2008 | Aircraft - Electric - Power Systems (FS/W) | 2 | Jun 03, 2011 10:23 PM |
| Discussion | The Snort & The High Speed X-1 | PicooMan | Micro Helis | 2 | Jul 26, 2007 01:39 PM |
| 350/1 scale RC conversion Project | meatbomber | Submarines | 0 | Nov 02, 2004 06:00 PM | |


