|
|
|||||||||||||||||||||||||||||||||||||||||||||||||||||||||||||||||||||||||||||||||||||||||||||||||||||||||||||||||||||||||||||||||||||||||||||||||||||||||||||||||||||||||||||||||||||||||||||||
|
Thread OP
|
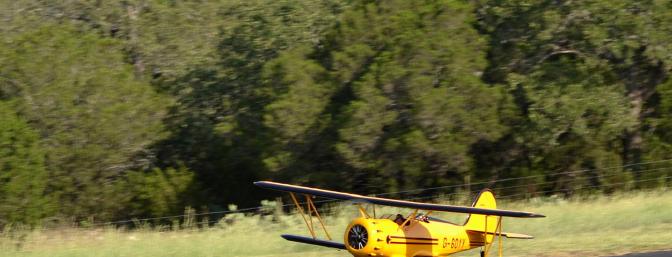
Great Planes Waco YMF-5D Biplane ARF 72" with OS 95AX 2-Stroke ReviewIntroduction
Waco. The name evokes images of the Golden Era of Aviation when real planes had two sets of wings and round engines. The Weaver Aircraft Company (WACO) was founded in 1920 by two businessmen, Elwood Junkin and Clayton Brukner, along with two famous barnstorming pilots Charley Meyers and George Weaver. The plane's barnstorming heritage was very evident in its beautiful lines and aerobatic abilities. The sturdy airframe soon earned the Wacos a reputation as rugged and reliable airplanes. Wacos were sought after by traveling businessmen, world explorers, and even the postal service. Unfortunately the company ceased operation in 1947 when the much anticipated post-war boom in civilian aviation failed to materialize. Pre-1947 Wacos remained very popular and were flown and collected by famous aviation enthusiasts worldwide. In 1983 the Classic Aircraft Corporation was founded in Battle Creek Michigan and began restoring, repairing, and upgrading classic Waco aircraft. In 1986 they founded the WACO Classic Aircraft Corporation and began producing brand new Waco YMF-5 biplanes using modern materials, construction techniques, and upgraded power plants. These modern planes looked just like their Golden Age predecessors but they were much safer and easier to obtain. Thanks to the skills and dedication of the Waco Classic Aircraft Corporation, magnificent Waco biplanes will grace the airways of the world for many years to come. They are currently producing about 6 new Wacos a year, and if you have a spare half million dollars laying around, you can place your order hereand own one of these modern timeless beauties. Play this video to get the feel of how the full size YMF-5 flies. As a more affordable alternative to a full scale Waco, you may want to consider the new Great Planes Waco YMF-5D from Hobbico. This beautiful scale model ARF captures all the classic lines of the modern YMF-5D Golden Age biplane in a much more affordable package. The GP Waco can be powered by a 30cc gas engine, a 120 4-stroke engine, or a .91 2-stroke engine. The new OS 95AX will be the powerplant of choice for this review.
Kit Contents
Kit Includes:
Kit Requires:
Recommended by Great Planes and supplied by Hobbico for this review:
Assembly
The 40-page product manual includes numerous illustrations and pictures and helpful building tips. Seasoned scale ARF builders should have no problems with this plane. However, newer modelers may need to get a little help from someone with more scale ARF building experience. The manual gives engine installation details for a 30cc gasoline engine and a 120 4-stroke glow engine, but does not include information for a 2-stroke glow engine. You can reference the Engine Installation Section of this review for most of those needed 2-stroke installation details. The various parts should be inspected as they are unpacked and the MonoKote covering tightened as needed before construction begins. The review model did not need ANY tightening. The covering was drum tight right out of the box! Considering all the climate and humidity changes from the factory to the dealer to my door, this was something of a miracle. Your experience may not be the same, but I was very impressed.
Wings
Wing assembly begins with the installation of servos and control horns. All the ailerons were already pre-hinged and aligned with their respective wing sections which was a great time saver. I cut up the paper liners that came in the servo boxes and used them for spacers during the servo installations. When the spacers were removed, the servos had the proper amount of vibration isolation from the servo mounts.
The six wing joiners that align the wing sections and set the dihedral angles each need to be laminated with 30-minute epoxy prior to joining the wing sections. I found that laminating all six joiners at one time was better than waiting for each assembly to harden during each wing segment assembly step. I also found it helpful to mark the center of each assembled joiner set and dry fit them into their wing segment prior to mixing up any more epoxy. I found that a few of the joiner pockets were about 1/4" deeper than the assigned joiner. Rather than chance the joiner slipping too far into one pocket and upsetting the dihedral angle, or risking a void in the epoxy, I pushed 1/4" pieces of sponge rubber into the deep pockets to take up the space. The resulting wing joints fit nice and tight. When I tried to fit the lower wing belly fairing in place, I found that the ends of the wing bolt backing plate were blocking the fairing from fitting all the way down on the wing. I also saw that the light wood color was going to show through the bolt hole openings when the fairing was in place. I used a black marker to darken the ends of the wing bolt backing plate and a sanding disk to cut away part of the bottom of the lower wing belly fairing to provide clearance for the ends of the plate and that allowed the fairing to fit flush with the bottom of the wing.
Fuselage
Fuselage assembly begins with the installation of the landing gear. The landing gear cover has two balsa spacer blocks that need to be removed prior to gluing them in place over the gear.
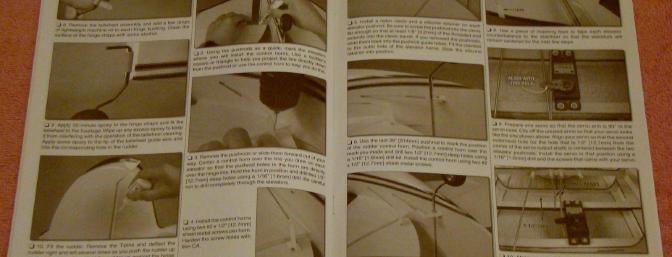
The stabilizer halves are next and require a little attention to detail to get them in place. I had some difficulty getting the parts to slip together when I tried to dry fit them in place. A call to Great Planes confirmed that the parts were intended to be a tight fit and that a slight flex in the aluminum tubes combined with the slickness of the epoxy would allow the parts to slide together as they were assembled. He was right. As I followed the assembly sequence outlined in the manual, I placed the tubes in the fuselage first and then slid each stabilizer half in place with a little flexing of the front tube and the parts fit flush with the fuselage sides.
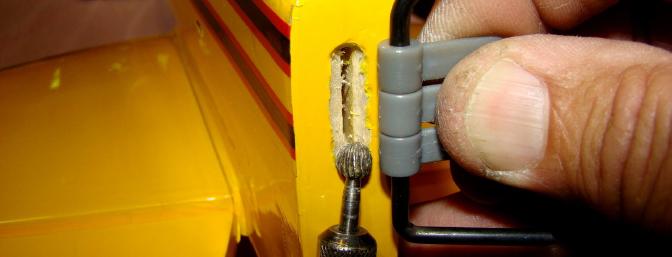
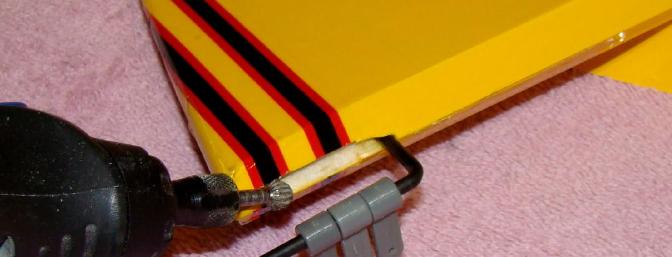
The tailwheel assembly and rudder are next. When I dry fit the tailwheel and rudder in place, the tailwheel bearing blocks caused a gap at the bottom of the rudder and a mismatch at the top of the vertical stab.
I cut a relief in both the rudder and the fuselage with a 1/4" rotary bit to close the bottom gap and restore the correct spacing at the top of the rudder.
Engine Cautions
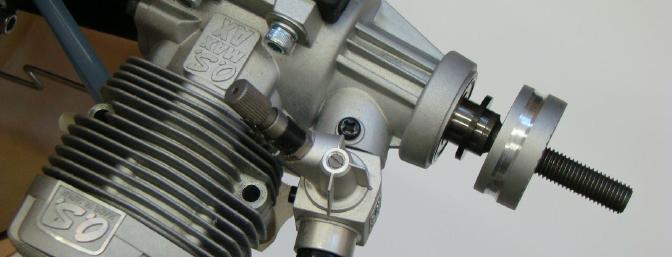
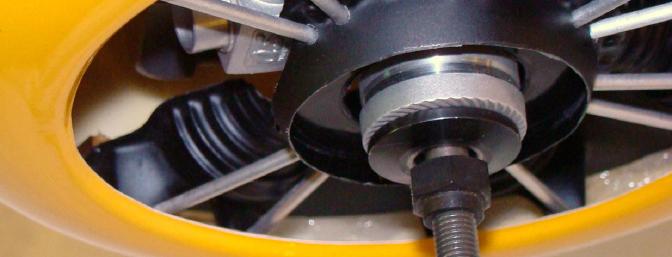
2-stroke engines require a break-in period before they are able to produce full power. I prefer to break-in a new engine on a test stand in the open air rather than on a plane with a cowled engine installation. The test stand method allows for easy access to throttle adjustments and plenty of cooling air flow during the critical first few minutes of run time. Note that the OS 95AX engine uses a thrust washer between the front crankcase bearing and the propeller drive hub. This washer is very important. It is also very easy to misplace. Whenever you remove the drive hub, this washer tends to stick to the back of the hub and then pop loose when you set the hub down or if you accidently drop the hub. Use extra care to be sure this washer is in position when you get ready to install the propeller. If the washer is missing, the drive hub will rub on the crankcase and the prop may not be able to turn. As you trim and drill the fiberglass and plywood on the cowl and firewall, be aware that the shavings and particles can find there way into the insides of your brand new engine. Take special care to tape off or plug the intake and exhaust of the engine before you begin any drilling or fiberglass work.
Engine Installation
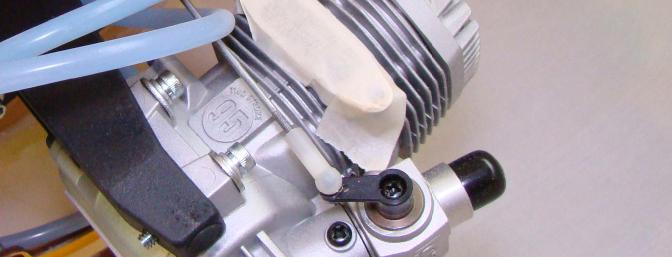
The OS 95AX 2-stroke engine used for the review model required several modifications to the model that were not covered in the product manual. Like the 4-stroke installation, the 95AX used the four inner mounting hole locations marked by "+" marks on the firewall. Due to its shorter overall length, the 95AX needed FOUR of the glow engine spacers. If I had chosen to purchase four 8-32 x 1-3/4" SHCS bolts, I could have used all six of the spacers and been able to set the engine farther back on the supplied engine mount. Because I chose to use the supplied 1-1/2" bolts, the engine needed to be mounted very close to the front of the supplied mount to achieve the required prop clearance from the cowl. The throttle control pushrod tube was mounted just outside the four spacers on the bottom side of the engine mount.
The throttle pushrod was bent as shown to mate up with the throttle control arm and allow clearance for the inside and rear of the Pitts style muffler. I used the supplied ball and socket links for the throttle arm to provide a smooth and non-binding pushrod connection.
Cowl Installation
The cowl ring and the mounting ring were very tight fits in the fiberglass cowl. After dressing the fiberglass seams inside the cowl and lightly sanding the cowl ring, the fit improved enough that I could insert the cowl ring in the cowl without flexing the wood too badly. However, the cowl installation called for placing a layer of plastic film between the cowl ring and the mounting ring and folding it back over the mounting ring before slipping the cowl over the assembly. That meant the mounting ring had to be thinner than the cowl ring by the thickness of the plastic film. Since the rings started out the same diameter, I had to use coarse sandpaper to reduce the outer diameter of the mounting ring enough to allow the cowl to fit over the plastic film covered mounting ring. Once the mounting ring was properly sized, the cowl fit properly over both rings and I was able to epoxy the cowl to the cowl ring.
The dummy radial engine had to be installed all the way forward in the cowl to clear the 2-stroke engine carb and the Pitts muffler. Because the radial was installed that far forward, the front of the dummy crankcase had to be cut off to provide sufficient prop clearance. I used the top off a spray paint can to fill in the front of the dummy crankcase and cover up the bottom ends of the dummy pushrod tubes.
On the bottom of the cowl, I had to cut out a 2-1/2" x1-1/2" segment to clear the Pitts muffler and allow for cooling air to exit the cowl. I also had to cut a 2-1/2" section out of the mounting ring and the cowl ring to improve the exit air flow through the cowl opening.
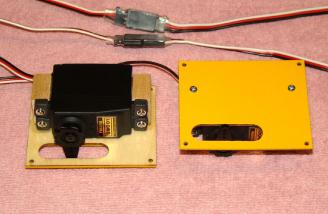
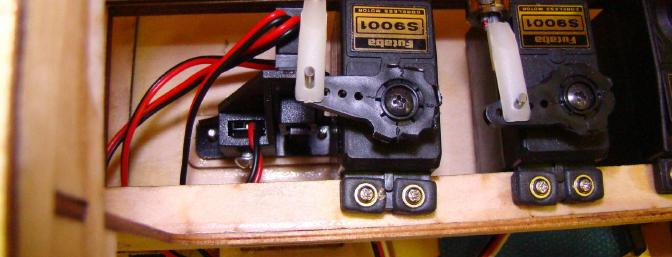
Radio Installation
The aft mounting rail for the fuselage mounted servos was located directly under the lower wing mounting bracket. This location made it difficult to drill the servo mounting holes and to install the servo mounting screws. The manual cautioned that you needed to be aware of the servo placements when you located the switch plate in the aft cockpit. Since I installed a scale pilots in the rear cockpit, I needed to mount the switch plate in a different location than the one shown in the manual. I was able to mount the assembly off to the side of the rudder servo. If I had mounted the rudder servo to the outside of the pushrod location, I may have had enough room to have put the switch assembly between the rudder and elevator servos and thus closer to the center of the cockpit opening.
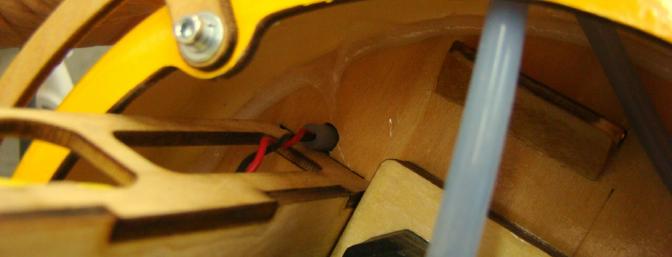
I mounted the FASST receiver and the Sanyo battery to the fuselage battery tray using hook and loop material rather than wrapping them in foam as shown in the manual. Due to the high summer temperatures here in Texas, I prefer the cooling provided by the hook and loop material. I did use the battery strap to provide an extra measure of security for the battery in case of high G-forces from snap maneuvers or maybe a hard landing. I used some of the left over throttle pushrod tubing to position the receiver antennas at the recommended 90 degree angle. I also installed my AMA number and contact information in the area behind the fuel tank.
Completion
The completed Waco weighed 13 pounds and 10 ounces. When I checked the center of gravity with the flight battery on the fuselage battery tray, the CG was 1" behind the recommended location. Rather than add lead to the firewall area, I chose to move the flight battery pack forward. To get the proper CG, I needed to move the battery pack all the way forward into the engine compartment. I used the gas engine ignition unit tray to position the flight battery above the OS 95AX. I needed to trim the tray slightly to allow the needle valve extension to clear the shelf and drill a hole in the firewall for the battery wires. I also needed to use a 12" servo extension to reach the new forward battery location. With the flight battery in this location, the plane balanced perfectly.
I set the control surface throws at the recommended amounts for low rates and for high rates. Since I prefer to fly with exponential, I programmed in 25% exponential on low rates and 35% exponential on high rates.
Flying
Basics
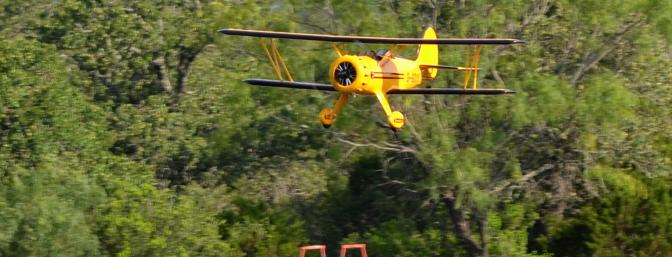
Everybody loves a biplane, but they can seem a little intimidating. I was concerned that the OS 95AX was pretty low on the power scale compared to the 30 DLE and the 120 OS 4-stroke. A 13+ pound plane seemed a little large for a 95 2-stroke. Boy was I ever wrong! The OS 95AX had plenty of power and the 16x6 prop was just right. I flew the greater part of every flight at 1/2 to 2/3 throttle. Full bore was fun, but it was way more than "scale" speed and I didn't use it very often. With the rates and throws set per the manual, the Waco turned out to be a pussycat to fly. It was well mannered and showed no nasty traits.
Taking Off and Landing
The full-scale Waco locks the tailwheel in neutral once you get lined up on the runway to keep from overcontrolling during the takeoff roll. For the Great Planes Waco I used low rate rudder for takeoffs because the rudder and tailwheel were very effective even at low speeds. I also found that slowly advancing the throttle allowed plenty of time to make minor rudder corrections during the takeoff roll. I found that the tail came up pretty early and the Waco got light on the mains before I'd get to half throttle during most takeoffs. Landings took a little practice. The Waco seemed to bounce a little if I landed too hard. I found that using high rate elevator allowed me to slow the Waco down a little more and settle into a nice 3-point stance for the landing. I believe that smoother wheel landings would be easier on a grass strip rather than on our hard surface runway.
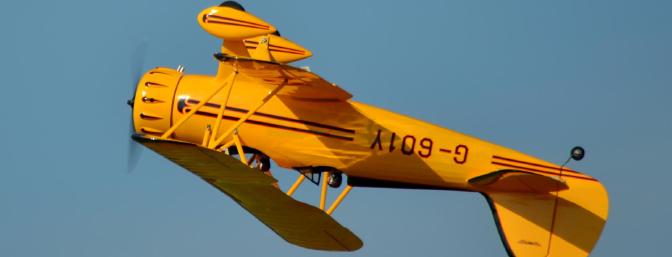
Scale Aerobatics
The Waco has the heart of a Barnstormer and it flies aerobatics like an airshow veteran. The OS 95AX has plenty of power for those long vertical lines or those hugh loops that look soooo good. High rates on rudder and elevator produce quick snap maneuvers and tight spins. Stall turns are a thing of beauty and inverted flight is rock solid even at low speeds. Knife edge takes full power and high rate rudder, but it looks marvelous!
Is This For a Beginner?No. Scale planes are not suitable for first-time pilots. Pilots with intermediate flying skills and a little taildragger experience should have no problems with the Waco. With it's 72" wingspan, the Waco qualifies for IMAA Big Bird Events and it would make an excellent first Big Bird model.
Flight Video/Photo Gallery
Downloads
Conclusion
The Great Planes Waco will undoubtedly be one of the best looking biplanes at any flying field in the country. The only thing that would make it look any better, would be if it belonged to you! This is your chance to own a piece of the Golden Age of Aviation -the Waco YMF-5D. This scale model Waco from Great Planes is absolutely stunning on the ground and in the air. Because it is an ARF, it builds quickly; because it is made by Great Planes, it flies easily. Whether you are at your home field, or at an IMAA Big Bird event, you can be sure your Waco will get a lot of attention and it's gentle flying characteristics will make you look gooood. The Waco is very versatile and it can be powered with a 30cc gas engine, a 120 4-stroke engine, or a .95 2-stroke engine. I'm here to tell you that the OS 95AX has plenty of power for this plane.
Pluses:
Minuses:
ImagesView all Images in thread
|
||||||||||||||||||||||||||||||||||||||||||||||||||||||||||||||||||||||||||||||||||||||||||||||||||||||||||||||||||||||||||||||||||||||||||||||||||||||||||||||||||||||||||||||||||||||||||||||
|
Last edited by Angela H; Jun 13, 2011 at 09:19 AM.
|
|||||||||||||||||||||||||||||||||||||||||||||||||||||||||||||||||||||||||||||||||||||||||||||||||||||||||||||||||||||||||||||||||||||||||||||||||||||||||||||||||||||||||||||||||||||||||||||||


|
|
|
|
|||||
|
Thread OP
|
Waco Review Updates
This post is a place holder for future updates to the Waco Review.
In June of 2011, Club members commented that the Pitts style muffler on the Waco was much quieter than they expected. I'm not sure if it was because I flew mostly at 1/2 throttle or because the 16x6 prop kept the RPM below 8200. In October 2012 I converted the Waco to 4-stroke power and flew it with a 100 Saito engine. It flew closer to scale and sounded more scale, but it didn't have near as much power as the 95AX so it got boring pretty quick. I wasn't flying my beautiful Waco very much anymore. In January 2013 I converted the Great Planes Waco to DLE20 power. Here is a video of the plane. I had only run about a gallon of gas through the engine and it was set slightly rich, but it had plenty of power! You may notice the engine seemed to have a slight miss every now and then during the flight. Read on for the solution.
I was worried about that annoying engine miss at most throttle settings, so I started troubleshooting to find the source. I finally replaced the ignition module and that solved the problem.
My favorite plane is now back and I'm loving it! I can now fly for 10 minutes on an 8 ounce fuel tank of $5/gal gasoline mix. McD |
||||
|
Last edited by kingsflyer; Feb 07, 2013 at 02:36 PM.
|
|||||
|
|
||
|
Thread OP
|
Quote:
http://www.highlandlakesflyers.org/ It's actually a reclaimed County Dump Site. We have a PetroMat runway and about 60 members. McD |
|
|
Latest blog entry: LEDs on my T-28
|
||
|
|
|
|
|
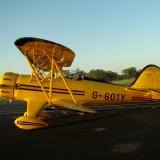
Beautiful looking Waco. The British registration should be all letters though.

|
|
|
|
|
|
|
|
|
Very nice review, and wonderful flying.
This is indeed a completely stunning model, I saw it on display at Toledo and it is gorgeous. And one of the most impressive items to me is the servos are INTERNAL!!! I absolutely hate exposed servos on a model, an approoach so prevalent in ARFs. It ruins the looks and is only done because it is so much cheaper and easier to build the model that way. My only gripe is there seems to be no way to take this model and lighten it for electric, without totally messsing it up. Those of you flying glow/gas, one of the few times I envy you... |
|
|
|
|
|
|
|
Thread OP
|
While Great Planes does not recommend an electric power option for the Waco, I was privileged to see and photograph an electric version that was specially set up for SEFF this year. At the time I didn't know GP did not have an electric option or I would have taken a lot of pictures of the battery hatch area and the motor install. The Waco was stock except for the motor and flight batteries and it had lots of power even at 13 pounds. Here are some shots of the E-Power version from SEFF 2011.
McD |
|
Last edited by kingsflyer; Jun 21, 2011 at 04:49 PM.
|
|


|
|
||
|
|
Quote:
I don't understand why so many ARF companies can't get registration numbers and letters correct. It really ruins this otherwise beautiful model... Also, isn't GP an American company? Why not use an N-number? One more reason to build it yourself, kids! Get it right. |
|
|
|
||
|
|
|
|
|
I just love this. It's my dream plane!! I had to order it from tower hobbies as here in Australia these planes are rare and hard to get. I should have it by september
 Great job on the building and flying mate!! Great job on the building and flying mate!!
|
|
|
|
|
|
|
|
Thread OP
|
Bob, though I put almost everything on floats at some point, I'm not sure I'll do that to my Waco. It's just too nice looking as it is. It has to be one of the best looking planes I've owned in a very long time. It looks great on the ground, always getting compliments everywhere I go, and it looks even better in the air!!
McD |
|
Last edited by kingsflyer; Jul 23, 2011 at 07:47 AM.
|
|
|
|
|
|
Thread OP
|
Robert, thanks for the kudos. Now that you have your Revolver up to "speed", have you slowed your Waco down just a little
and enjoyed some scale speed flying?McD |
|
Latest blog entry: LEDs on my T-28
|
|
| Thread Tools | |


| Similar Threads | |||||
| Category | Thread | Thread Starter | Forum | Replies | Last Post |
| Discussion | Great Planes Waco YMF-5D Biplane ARF .91-1.20 | jonnyspeed | Glow to Electric Conversions | 23 | Apr 30, 2012 05:51 PM |
| Sold | Great Planes Seawind ARF 60-91 NIB LPU San Diego 235.00 | boatdoc | Aircraft - Fuel - Airplanes (FS/W) | 0 | Mar 09, 2011 12:07 AM |
| Sold | Pica Waco YMF-3 Biplane 60" Wingspan. $75! | Johnny Angel | Aircraft - Fuel - Airplanes (FS/W) | 6 | Dec 27, 2010 04:50 PM |
| Sold | Great Planes P-6E Hawk biplane ARF | nutzaboutharleys | Aircraft - Fuel - Airplanes (FS/W) | 3 | Dec 17, 2010 09:01 PM |
| Sold | Pica Products 1/6 Scale YMF-3 Waco Biplane - Unassembled Kit in Box | szastoupil | Aircraft - Fuel - Airplanes (FS/W) | 2 | Jun 26, 2007 12:25 PM |