|
|
|
|
|
Cool
New HET L-39 90mm by EJF.com
HET has really been stepping their game up lately.
After our recent success and approval of the test-build/flight of their new 90mm F-16, I was very pleased to accept the challenge of doing another beta build for their latest model: the famous L-39 Albatross! Just like the last model I built, this one came out of the box largely prefabricated and with some verrry nice touches to it: - Full Epoxy/Glass composite Fuselage - Foam core, sheeted Wings with Flaps and Ailerons pre-cut and hinged - Gear mounts and Gear bays pre-molded/cut-out - NICE Metal, Trailing link suspension retracts - Fully Sealed ducting optimized for 90mm fans - Magnetic Framed Canopy and Access Hatches…. - Etc. She’s also a pretty big jet, and very nicely dressed up in one of the many schemes available; this one came in the High-Performance Jet Training scheme. After getting phenomenal results in the Falcon with HET’s new 9305 V2 and Typhoon 700 series motors, I’ve also decided to drop in an identical powerplant into this L-39. Plan is to run 8s for 2.5+Kw, with the option for 10s and 3.5kw… should have plenty of ‘motivation’ - Wingspan: 43-˝” - Length: 57” - Fan: HET 9305 V2 - Motor: HET Typhoon 700-1485kv - Battery: 8s or 10s 4200 Hyperion G3 packs Now without further adieu… the build of the new HET 90mm L-39 Albatross. 
|
|
|
|
|
|
|
|
|
|
|
First things first...
I decided to start the build with the Tail Feathers. First up was the Horizontal Stab.
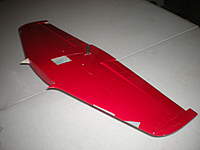
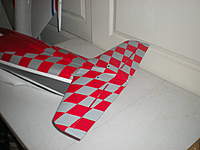
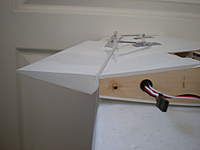
The entire Horizontal Stabilizer is foam core and Epoxy-Glass, the Elevators are pre-slotted for hinges and the joiner is already in place for you. All I had to do was dry fit my hinges, then glue the Elevator halves onto the Stab. The Elevators themselves are actuated via the joining rod and a big, fat, hidden metal control arm located on the bottom of the Stabilizer. Once the Stab is installed on the Fuselage, it will be completely hidden and out of the airstream...  Of course the next step was to secure a servo into the pre-molded bay in the Stab. I chose one of my favorite, proven methods: Wrap the servo firmly in painters tape, then epoxy the crap out of it into it's final location!  No worries... If you ever have to remove the servo, it comes completely clean off the tape, and it takes minimal effort to remove the excess glue from it's location. No worries... If you ever have to remove the servo, it comes completely clean off the tape, and it takes minimal effort to remove the excess glue from it's location.These Elevators are pretty big, and are going to be traveling pretty quickly, so I chose to use a Hyperion Digital DS-16FMD (Metal Gear) for the task. I created the link to the Elevator acuator with some rod and ball links. Simple, Secure with Loctite, and ZERO slop!  Once that's all done, you have two options: - You can either bolt on the Stab using the included blind nuts/bolts, or... - Do what I did and glue the Stab permanently on with Epoxy I figure that if I ever have to remove the Stab, I'll probably have some pretty big issues to work out... make sure you rough up the gluing surfaces with some coarse sandpaper and dry fit for proper alignment before mixing up the glue. Mine was perfectly aligned; no need for shimming anywhere! ImagesView all Images in thread
|
|
|
Last edited by AceMigKiller; Sep 06, 2010 at 10:59 PM.
|
|
|
|
|
|
Shark-like Fins
Up next: Vertical Stabilizer.
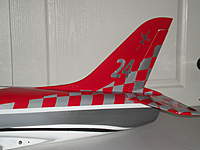
Before mounting the Fin to the Fuselage, we'll need to free the Rudder and hinge it to the Vertical Stab. The Rudder outline is molded in, so just cut it loose using a very sharp cutting tool; I used a razor saw. You'll need to add some wood to the trailing edge of the Stab and the leading edge of the Rudder in order to hinge it... I just used some hard balsa and cut/sanded it to shape on both sides. I dropped in 4 nylon-pinned hinges to secure the Rudder to the Stab. Make sure you get plenty of throw, but not so much that you leave an unsightly gap in your hinge line! It only makes sense that your next job is to drop a Rudder servo into place... I did in this model just like I did in the F-16. Mark out the area where you'll put your servo, cut out a nice clean area using a sharp razor saw, then save the piece for later. As you can see, I potted the Rudder servo into place as well. Now we must glue the Fin to the Fuselage. The only gripe I had so far was this: on all HET models, there is not nearly enough "meat" on the base of the Vertical Stab. to create a solid bond for the Fin! So once again, I epoxied on some wood to create a much larger and more solid base to support and grab on to the Fin. Don't forget to cut a hole in the Stab. base to drop your servo lead through, then glue the Fin onto the Fuselage. Take your time and make sure you've got it lined up right. ImagesView all Images in thread
|
|
|
Last edited by AceMigKiller; Sep 06, 2010 at 11:17 PM.
|
|
|
|
|
|
We're gonna need two of these!
Alright, time to get crackin' on the Wings.
HET designed these wings very well... a sign that they're learning from previous models (finally!) The Carbon Spar runs through the entire Fuselage, then to the outside edge of the Landing Gear mounts. Although that's only a few inches into the Wing itself, the Wing is reinforced from Root to the Ailerons by a secondary, very beefy hardwood Spar. My judgement tells me this should be more than sufficient, even for my style of flying...  Anyways, now we need to go ahead and prep the Wings before we glue them onto the Fuselage. Just like the Horizontal Stab, the flying surfaces (Ailerons and Flaps) come pre-cut, beveled, and pre-slotted for hinges. I put 3 hinges in the Ailerons, and 4 in the Flaps per side. Check for free movement of the surfaces, then drop a servo in the pre-cut slots for each surface. Hyperion servos are probably the best servos I've ever used in a Jet model. They're super strong, come in either Carbon or Metal (they don't even offer plastic gears), fast, and are very reasonably priced... much less than a comparable JR or Futaba. Another great advantage to Hyperion Digital servos is their wide range of programming options that you can modify right from your computer! Check out my flaps... No servo-slowers, just a regular Hyperion servo programmed to be slower.  *** SPACE SAVED FOR FLAP VIDEO*** ImagesView all Images in thread
|
|
|
Last edited by AceMigKiller; Sep 06, 2010 at 11:56 PM.
|
|
|
|
|
|
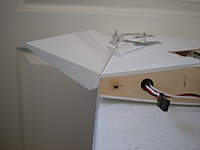
I've seen quite a few ARFs with the flaps done wrong like this. Sometimes they even hinge on top. It's a no brainer to hinge flaps on the bottom isn't it? In any case, it's not too difficult to fix this one by adding a bit of wood to the flap and re covering.
Nice plane otherwise. The inlets even look right...and I'm getting dizzy now - epoxy fuse!  I might have to consider one of these. I might have to consider one of these.  When are they available? Steve C |
|
|
|
|
|
|
|
|
also a tip whit sanding for your horizontal stab.
When sanding like on the copied picture. Then you better can't glue the stab on the plane. That safes weight. When you want to glue the stab on the fuse. You need to sand off the paint. Now you glued the stab to the paint, not a very well construction 
|
|
|
|
|
|
||||||
|
|
Hey guys, thanks for the responses!
I'll be sure to handle each situation... let me know if I miss your Q?  Quote:
But I agree, the Flaps on this bird should only be beveled on the bottom. I'm most likely going to fix this up before the first flight with some balsa triangles trimmed to shape, then re-covered.  Quote:
 You can see areas where I'm all the way down to plain old fiberglass. The rest is definitely sanded coarse enough to take epoxy. It's plenty strong... trust me! Quote:
 Quote:
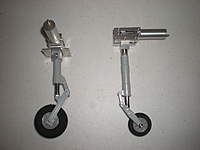
As you will see, the retracts and struts are verrrry nyyyyce!  ...and if the thing turns up missing I'll know where to look!    Quote:
 Cheers, Vic |
|||||
|
|
||||||
|
|
|
|
|
|
|
|
|
|
|
|
|
|
She's got hot legs!
Ask and you shall receive.
Here's some pictures of the Metal Suspension Air-Up/Air-Down retracts! As you can see... plenty of "beef" to go around.  They are full on trailing link on the nose and mains, pull-pull steering on the nose, and drop in perfectly into the pre-cut and molded gear bays. ImagesView all Images in thread
|
|
|
|
«
Previous Thread
|
Next Thread
»
| Thread Tools | |
| Similar Threads | |||||
| Category | Thread | Thread Starter | Forum | Replies | Last Post |
| Cool | HobbyTopGun L-39 by EJF.com | AceMigKiller | Foamy EDFs | 1363 | Nov 15, 2019 12:13 PM |
| Discussion | New 1:9 HET L-39 90mm | Robert Wagoner | Electric Ducted Fan Jet Talk | 60 | Sep 12, 2011 11:46 AM |
| Contest | EJF & HET Contest - Win a FREE 90mm HET F-16 | Robert Wagoner | Electric Ducted Fan Jet Talk | 29 | Sep 04, 2010 08:40 PM |
| New Product | Fly-Fly L-39 70MM Soon at EJF.COM | CRCJA | Foamy EDFs | 3 | Aug 10, 2010 05:53 PM |
| Video | Hobby Top Gun L-39 from EJF.COM | CRCJA | Electric Plane Talk | 0 | Jul 18, 2010 01:58 AM |


