| Thread Tools |
| This thread is privately moderated by kinderkram, who may elect to delete unwanted replies. |
|
|
|||||||||||||
|
Thread OP
|
Build Log
ArduPirates build
The original ArduCopter is a project of the DIY drones team.
 The original ArduCopter has gone commercially now...  Meanwhile a very international and very active community used this blog to fill the gaps in the "original" project. NOTE: The further development of the "official" Arducopter NG code was taken over by the Pirates! ArduPirates are now teaming up and joining forces with the Arducopter Team. Read DIYDrones founder Chris Anderson's blog announcement here: http://diydrones.ning.com/profiles/b...-taken-over-by Our Group is called ArduPirates  We started a Google Code project which can be found here: http://code.google.com/p/ardupirates/ Pirate Bastien recently updated the ArduPirates' Wiki You will find most informations to set up your ArduCopter there. Pirate Menno aka joebarteam offers a great tutorial on PID tuning Step-by-step instructions with videos! Not only applicable for MegaPirates but for every multirotor aircraft needing tuning of the PIDs. https://www.rcgroups.com/forums/show....php?t=1521520 What the Pirates have to offer: Working Sparkfun Magnetometer, GPS hold, altitude hold with Barometer and Sonar and also automatic camera leveling plus an automatic camera trigger! Even more: Hein's code applies to Hexa builds. Our Octocopters are using standard ESCs! Hein demonstrating waypoint Navigation using AC2.0.23 code:
Greg demonstrating different flight modes http://vimeo.com/27649497 New! Dani's Universal Ardu Online Configurator for NG code http://ardupirates.net/config/APNG_Config.php Ahoi, Pirates! I installed a new discussion Group on Google: http://groups.google.com/group/ardupirates The aim is to speed up the discussion and exchange of news, ideas and new developments faster than before. If you want to join the Pirates, send me a PM with your google mail address and I'll add you to both the wiki/trunk and the group. The ArduPirates' Group is open to everyone willing to share experiences on the ArduCopter/ArduPirates project. Non-members can read the posts but only members can post. Happy Pirating!  Hooray! Norbert (not me) aka Norf started a Facebook FanPage for the ArduPirates!  All aboard! We're sailing for new harbors! Norf also started a Build Log for Hexa copters
The unstoppable Norf also created a Vimeo Video Group for Arducopter Pilots: http://vimeo.com/groups/acp DIYdrones now supports full installations of the ArduCopter Configurator!  Download the complete installation file for the Configurator 1.22 here. Install it - all necessary NI runtimes and drivers for your Win OS will be included! IMPORTANT NOTE! If you're a non-English user you'll have to change the "regional settings" of your Windows to "English/US" or otherwise your settings will not be saved properly! HOW TO LOAD THE PIRATES' CODE - by CAPT
JANI'S MAGNETOMETER OFFSET CALIBRATION:
VERY IMPORTANT WARNING!!!  When you plug in the USB make sure you don't have your ESCs and motors connected. Otherwise you will blow your outputs! References: http://aeroquad.com/showthread.php?6...lot-and-Oilpan http://diydrones.com/forum/topics/did-i-blow-my-outputs There are two methods to prevent blowing your outputs: 1. Disconnect all power lines coming from the ESCs before you plug in the USB 2. Connect lipo first before you plug in the USB - and make sure to unplug the USB fisrt before you disconnect the lipo Atm. the official development is at public beta 2.0 stage. So please be careful as you might face unwanted and surprising impacts on your setup as the software might be very buggy at some stages! One of the first official releases will be The ArduCopter Quad. All available informations will be collected there: http://code.google.com/p/arducopter/...rduCopter_Quad Interesting Reads: Dedicated RCG thread for the ArduCopter development: https://www.rcgroups.com/forums/show....php?t=1255371 Another thread here at RCgroups dealing with different Ardu branches: https://www.rcgroups.com/forums/show....php?t=1066119 Jesolin's Mega Index (a must!): https://www.rcgroups.com/forums/show....php?t=1097355 Links: DIYdrones arducopter page: http://diydrones.com/profiles/blogs/...arducopter-the DIYdrones forum: http://diydrones.com/forum/categorie...istForCategory AeroQuad forum: http://aeroquad.com/showthread.php?4...AV-Multicopter! ArduCopter Wiki: http://code.google.com/p/arducopter/wiki/ArduCopter  Parts list: Ardu Pilot Mega (flight controller) ArduPilot Mega IMU Shield/OilPan (sensor board) Pin Headers (you need 2 or 1 x 16 rows) Con Headers (you need 2) Servo cable (4-8pcs. needed, recently 6 - to connect your rx) Magnetometer & Cable GPS & Cable You can purchase most parts from the AeroQuad store, Sparkfun in the USA, FahPah Shop in Asia, Coolcomponents in the UK or Lipoly and Watterott in Germany (if available).  Software/Firmware*: *You should give my new Arducopter Installer & Updater Software a try. See info below. Note: The public alpha sketches and libraries are available for download herehttp://code.google.com/p/arducopter/downloads/list Unfortunally the alpha 1.0 isn't represented in the trunk so it might get a bit confusing for beginners. Instructions for manual setup: Depending on your OS you may need some drivers for the USB-port of the shield. http://www.ftdichip.com/Drivers/VCP.htm Arduino Software needed to upload the firmware to the board: http://arduino.cc/en/Main/Software Arduino troubleshouting: http://arduino.cc/en/Guide/Troubleshooting ArduCopter Configurator: Sorry, this fine piece of software won't be further developed by Ted Carancho any longer (see message above) http://code.google.com/p/arducopter/...tor/Executable ArduCopter-Libraries: http://code.google.com/p/arducopter/...runk/libraries Installation instructions for the libraries: http://code.google.com/p/arducopter/...nk/Install.txt ArduCopter firmware: http://code.google.com/p/arducopter/...unk/Arducopter You need to download all files, put them into a folder i.e. named "ArduCopter" within the given path of the Arduino software. 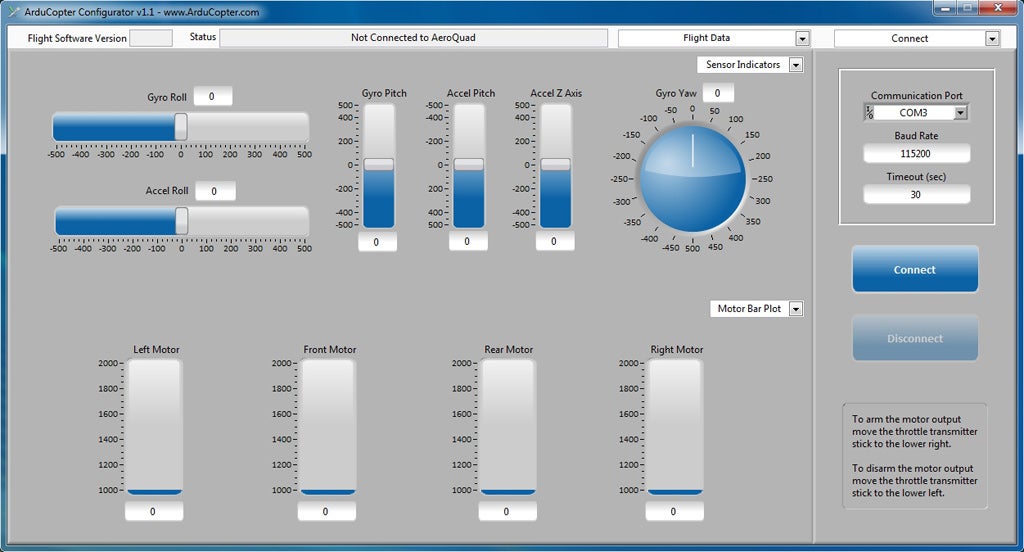 See more pics of the Arducopter Configurator in the attachements. The configurator is also a great resource when it comes to training your thumbs. You can see any reaction when moving the sticks and use it like some kind of "flight commands simulator". That's how I found out that my yaw-stick-thumb has to be trained a lot more ...  Always in mind to make the whole software stuff easier and faster, here comes the latest release of my ArduCopter Installer & Updater Software. I decided to split the installation and the update process. You'll need to download these 2 files: The Kinderkram Quad Installer: http://www.board-portal.de/ArduCopte...-Installer.exe Only needed if you DIDN'T already use my setup program.  New: The Arducopter Quad Updater http://www.board-portal.de/ArduCopte...er-Updater.exe Only 6,5MB file size. Will automatically load the Arducopter sketches. You only need to press the Upload button in Arduino.  The recent version 1.0 contains - Arducopter sketches & libraries from the public alpha 1.0 - Arduino 0021 - Configurator 1.1 (Important: Install it to C:\Arducopter\ArducopterConfigurator !)  After the installation in C:\Arducopter you can easily upgrade the Configurator to version 1.22 manually. Just press the "Update" button. If you bump into any problems, have a look into C:\Arducopter\sketches\Arducopter. If there's a Arducopter_alpha_RC1.pde - delete it! And please check if all settings apply to your setup, i.e. COM-Ports , Baudrates etc. Always download new updates from my server to C:\Arducopter\Updates You can download installation instructions as PDF here (65KB): http://www.board-portal.de/ArduCopte...structions.pdf  I also made a small tutorial for the use of SVN for easy semi-automatic updates of upcoming releases directly from the Arducopter trunk: https://www.rcgroups.com/forums/show....php?t=1317685 Here's a short How-To: After the installation of Tortoise SVN (http://tortoisesvn.net/downloads) 1. SKETCHES: right-click on the C:\Arducopter\sketches\Arducopter folder. As "URL of Repository" put in http://arducopter.googlecode.com/svn/trunk/Arducopter When you click "OK" all previous files will be overwritten. 2. LIBRARIES: right-click on the C:\Arducopter\arduino\libraries folder. As "URL of Repository" put in http://arducopter.googlecode.com/svn/trunk/libraries 3. CONFIGURATOR: right-click on the C:\Arducopter\ArducopterConfigurator folder. As "URL of Repository" put in http://arducopter.googlecode.com/svn...tor/Executable  Please report all bugs here and Have Fun! Software repository for ArduCopter: http://code.google.com/p/arducopter/...unk/Arducopter Build instructions (official ArduPilot Mega manual): http://code.google.com/p/ardupilot-mega/wiki/home?tm=6  The above image shows the abilities of the 2 boards connecting sensors. This sketch is ment for quadrocopters.  Setup for the X-mode (image of +-mode see attachments)  Jakub's Frame: http://www.kkmulticopter.com/index.p...rame-by-jakubj  Jakub is a nice guy from Krakow in Poland. He sells his standard quad frame for 59$ plus decent shipping fees worldwide. His brand new store offers a large amout of different frames (from Tris to Hexa) now: http://www.quadframe.com Some samples:       He's also very active in the RCG forums and you can read a thread about his new creations here: https://www.rcgroups.com/forums/show....php?t=1310314 Video of Jakub's frame assembly:
Motors: http://carancho.com/AeroQuad/store/i...products_id=50 Escs: http://carancho.com/AeroQuad/store/i...products_id=51 Of course you can use other frames, motors and escs. A great resource for informations on motors is Old Man Mike's regularly updated thread: https://www.rcgroups.com/forums/show....php?t=1006721  COSTS Motors 4 x 20$ = 80$ ESCs 4 x 20$ = 80$ Frame = 70$ - 150$ APM = 60$ IMU = 160$ CON/PIN HEADERS = 10$ CABLE = 10$ CONNECTORS = 10$ SUM = 480$ - 560$ COMPASS = 40$ GPS = 35$ CABLE = 5$ SUM = 80$ +SHIPPING ~ 10$ - 60$ COMPLETE ~ 570$ - 700$ Depending on what you want - you could build your own cheap frame, buy cheaper components - you can get away with less than 400$ for a standard version with triple axis gyros, accs and pressure sensor. Complete costs may vary if you add shipping, tax and customs. For European customers the overall costs will be around 600 - 700€ atm. I. SOLDERING If you don't have any experience in fine soldering and/or are not willing to learn - forget it! You better look for someone who does the soldering for you. You can ask tv or radio repair shops or any company dealing with reparation of electronic parts in your hometown. A skilled solderer should complete this within around 30mins or less. List of video tutorials for those who want to learn soldering: http://www.google.de/search?hl=de&cl...ed=0CHEQlAYwAA It's already been discussed to sell pre-soldered and pre-configured kits in the future. So keep an eye on the mentioned forums and threads. If you're willing to give it a try you should buy some low-cost tools. These are: - a fine soldering iron with 1mm tip - magnifying glasses with a stand - of course some 1mm soldering wire - a clean sponge for cleaning the tip  Assembly Tutorial for the APM/APM shield: http://code.google.com/p/arducopter/wiki/APM_IMU
II. HANDLING OF THE FIRM- & SOFTWARE* *You should give my new Arducopter Installer & Updater Software a try. See the info above. [IMG]IMG]http://arducopter.googlecode.com/svn/images/warning_rc_connection.png[/IMG][/IMG] Recommended read: The ArduCopter Wiki "Programming ArduPilot Mega"  1. Copy the arduino-0021 folder onto your harddisk. Follow the setup instructions from the Arduino-0021-README.txt Some of the necessary libraries are already included. In case of problems, consult the Arduino Trouble Shooting (http://arduino.cc/en/Guide/Troubleshooting) 2. Install the USB Serial Drivers if necessary. When you plug in the Megashield (oilpan), you might be asked for the drivers (not needed on Win7 and Mac OS 10.5x). Point the installer to the "USB Serial Drivers" folder. 3. Upload the ArduCopter firmware to the APM. - plug the board into the USB - start arduino.exe from the arduino-0021 folder - go to -> File -> Preferences and set the location for your sketches. Choose the folder that resides above the "ArduCopter-firmware" folder - go to -> Tools -> Board and choose the "Arduino Mega" as your board - go to -> Tools -> Serial Port and choose the port that was previously set up after you installed the USB Serial Driver (usually COM3) - go to -> Tools -> Serial Monitor and set the port speed to 115200 baud - go to -> File -> Sketchbook -> ArduCopter - click on the "Upload"-button. Then the arduino software compiles the firmware and uploads it afterwards. You should get the message "Done Uploading" 4. Install the Arducopter Configurator by starting the setup.exe After installation start the Arducopter Configurator software - choose COM3 als serial port (if it's the desired port - see above) - type 115200 baud for the "Baud Rate", set the timeout to 30 sec - click on Connect IMPORTANT NOTE! If you're a non-US user you'll have to change the "regional settings" of your Windows to "English/US" or otherwise your settings will not be saved properly! 5. Configure your copter - go to "Initial Setup" and click on "Initialize EEPROM" - in the status bar it should say "Initializing done" - Go to the "Calibration" screen and set the following values: You only need to adjust the PID values for the accels. Leave the others untouched for now. To set the values you'll have to choose "Calibration" from the upper right drop down menu. You can lower or higher the values on the right hand side and press "Update" each time. Lower Pitch = Lower Values Lower Roll = Higher Values Lower Z Axis = Higher Values Accel Roll & Pitch have to be near zero, while Accel Z should be near 408. Also check the artificial horizon. If the gyros are playing rollercoaster it's time for a rrreeesssettt. But disconnect from the Configurator first or it will hang. - Go to "Transmitter Adjustment" and check if your commands are displayed correctly  See more images for a step-by-step configuration in the attachements below.  A NOTE OF WARNING!!! The firm- and software is at alpha stage. That means there are still several bugs in the code that have to be ironed out! III. CALIBRATING ESCS and getting the MOTORS working Usually all calibration will be done through the configurator. For now you can only initialize the EEPROM and calibrate your tx/rx within the version 1.21.  So you'll have to do the calibration manually: Plug each ESC attached to the motors into the throttle channel of your rx. Switch on your tx and go to full throttle. Plug in the lipo for the motors. You'll here 2 series of beeps confirming the correct calibration. Then pull your throttle back to zero and wait for the beep code. When done unplug the lipo, switch the tx off, plug the lipos again and switch on the tx again. Do this for each ESC you want to calibrate. After the calibration is done you can plug all cables in place and try to arm the motors by pushing the throttle stick to the lower right position. To disarm the motors push it to the lower left.  ArduCopter Quad uses 4 motors in total and they are named as: + Configuration OUT0 = Right motor (CCW) OUT1 = Left motor (CCW) OUT2 = Front motor (CW) OUT3 = Rear motor (CW) X Configuration OUT0 = Front/Right motor (CCW) OUT1 = Back/Left motor (CCW) OUT2 = Front/Left motor (CW) OUT3 = Back/Right motor (CW) CCW = Counter Clock Wise rotation (eg backwards) CS = Clock Wise (eg forward like clock does) Aaron's Tutorial for the Ublox GPS  https://www.rcgroups.com/forums/show....php?t=1339624 Here's a description on how to set up the latitude: In the "Position Hold" settings of the configurator you need to change the value for the "Geo Correction Factor". Where GCF = cos(latitude). You can find the value of your current latitude via Google Maps or Google Earth and use a simple cosinus calculator like this: http://www.in-screen.de/swf/sinusrechner.html - Go to Google Maps - Search for your location - Click the right mouse button on the marker and choose "what is here" - Then it writes the values into the search field - The first value is your Latitude  Check "DEG." and put in the latitude value (in my case 51.2), then press "cos". In my case the resulting 0,626 is the value you need for the Geo Correction Factor. Press "Update" in the configurator afterwards. BUILD LOG IS NOT YET FINISHED! EXPECT MORE TO COME!!! Started by Norbert Machinek aka kinderkram D�sseldorf, Germany 08/04/2010
ImagesView all Images in thread
|
||||||||||||
|
|
Last edited by kinderkram; Oct 15, 2011 at 04:44 AM.
|
||||||||||||


|
|
|
|
|
|
|
Hi, kinderkram
I am very intersted in this project. I am one of a UAV fans in Japan. Now I own one 330X and one home-made octo with a brain of GU-344. I want to upgrade my Octo to a brain of Arducopter. Is it possible? If possible, at least What parts should I buy from the Ardu store? I want functions on my Octo at least the followings: 1. Position hold 2. RTH 3. Altitude hold Could you give me some infos? |
|
|
|
|
|
|
|
Thread OP
|
Hi Masao,
all the parts needed are listed above. The sensor shield comes with triple axis Invensense gyros, triple axis accelerometers and a Bosch absolute pressure and temperature sensor. For RTH/AH/PH and waypoint navigation you need the magnetometers/compass and the Mediatec 10Hz GPS which comes as a nice pluggable breakout board. Note that these functions are still in development and even the hardware could change in the next few months. But I'm quite sure that octos will be just a matter of programming. I've already seen a flyable hexacopter in another branch of the Ardu development scene. Dunno if octos with 8 independently controlled motors is as easy to set up. |
|
|
|
|
|
||
|
Thread OP
|
Quote:
I'll bundle a nice package for starters. Promised. But that'll take some time. I'll try not to stress your patience... 
|
|
|
|
||
|
|
|
|
|
Thanks, kindeKram
I read some Wiki pages and thought this Arducopter can be applicable to my case. I ordered the parts you kindly listed. But some of parts are out of order now, for example, MediaTek MT3329, 3x8 Right Angle Pin Headers. I hope those will soon be available. One question: It is uncertain on the chart you listed avobe that which numbers (from 0 to 7) I should use when connect 4 ESCs of quadcopter to the ArduPilot Mega board. |
|
|
|
|
|
|
|
|
Kinderkram I believe I can attempt this now that you have so graciously set up the steps and what is needed.
I ordered the frame from Jakub and will order the brain and oilpan next. I have a DX6 and hope it will work OK with this brain. I went to purchase the oil pan and it says it now comes with pin headers. Does that mean I can skip ordering the pin headers and con headers? Do I need to order a cable to let the brains talk with my computer? I ordered a USB cable too. All ordered now but I had to go to diffrerent places to get all the stuff. Is this a popular design and are there a lot of them flying? Thank you. John |
|
|
Last edited by john339; Aug 04, 2010 at 12:45 PM.
Reason: more questions
|
|
|
|
|
|
|
|
Latest blog entry: Eachine QX65 FPV quad review
|
|
|
|
|
|
|
Nice
Hey there nice job hard to keep up with you keep the good work up
|
|
|
Last edited by tom6696950; Aug 04, 2010 at 05:28 PM.
|
|
|
|
|
|
going to be fun will start ordering more Thursday need to spend some time with the boss (ak Wife) will check back later kinderkrams look what you have started
|
|
|
Last edited by tom6696950; Aug 16, 2010 at 10:12 AM.
Reason: spell
|
|
|
|||
|
Thread OP
|
Yes, a 6ch. TX/RX is minimum for the ArduCopter at this stage (4 channels for flying and 2 AUX to switch the modes). In future you'll need 8 channels to conduct all the features that come along with this aircraft.
Quote:
Quote:
This project is still in development. That's why you can't go into a shop and buy the whole stuff at once.
|
||
|
|
Last edited by kinderkram; Aug 05, 2010 at 06:20 AM.
|
||
| Thread Tools | |


| Similar Threads | |||||
| Category | Thread | Thread Starter | Forum | Replies | Last Post |
| Build Log | What to Build??? O What to Build????? | helidude2 | Micro EDF Jets and Power Systems | 10 | Jul 10, 2014 10:14 AM |
| Discussion | ArduCopter Project Update | km28104 | Multirotor Drone Talk | 176 | Apr 18, 2011 11:56 AM |
| Poll | Tamiya Wild One- To build or not to build? | peacekeeper94 | Off-Road Vehicles | 11 | May 29, 2010 05:05 AM |
| Discussion | Build Log: Monogram "build'n fly" DHC-2 Beaver | lw_hughes | Scratchbuilt Indoor and Micro Models | 9 | Nov 17, 2009 09:01 PM |
| Question | AMD Phoenix (Wingeron) Build Questions, Build, and Pics | Greygoosegregg | Slope Soaring | 82 | Sep 11, 2009 04:40 PM |