Great Planes Revolver Sport 70" Review
The Great Planes Revolver was introduced in 2007 as a sleek aerobatic design in a mid sized model.
Introduction

|
|
| <b>Wingspan:</b> | 70 in. |
| <b>Wing Area:</b> | 832 in2 |
| <b>Weight:</b> | 142 oz. 8.8 lbs. |
| <b>Length:</b> | 58.5 in. |
| <b>Wing Loading:</b> | 24.6 oz/sq. ft. as flown |
| <b>Speed Range:</b> | Slow to Moderately Fast |
| <b>Servos:</b> | Futaba S9001 BB Coreless |
| <b>Transmitter:</b> | Futaba Fasst 7C on 2.4 GHz |
| <b>Receiver:</b> | R617FS 7 Channel Fasst on 2.4GHz |
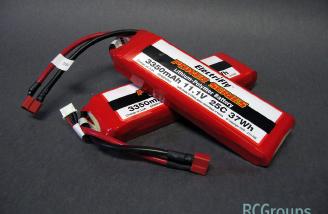
| <b>Battery:</b> | 2 x 3350 mAh 3S Electrifly 25C Lipo |
| <b>Motor:</b> | Rimfire 50-55-500 (.80) Outrunner |
| <b>ESC:</b> | Electrifly Silver Series 60A HV Opto |
| <b>Power Loading:</b> | 46A / 985W / 111 W/lb. |
| <b>Typical Flight Duration:</b> | 7 - 8.5 min. mixed flying |
| <b>Manufacturer:</b> | <a href=http://www.greatplanes.com/>Great Planes</a> |
| <b>Available From:</b> | Your Local Hobby Shop and <a href=http://www.greatplanes.com/>Great Planes</a> |
| <b>Price:</b> | $219 |
<center> <table> <tr> <td>

</td> <td>

</td> <td>
</table> </center>
The Great Planes Revolver was introduced in 2007 as a sleek aerobatic design in a mid sized model. It features an all built up airframe with extensive prefabrication and assembles into a fast, groovy airplane capable of all standard aerobatics. See the full review of the .46 sized Revolver on RC Groups <a href=https://www.rcgroups.com/forums/showthread.php?t=725108&highlight=revolver>HERE</a>.
Following on the success of their .46 sized GP / EP Revolver, Great Planes has introduced the bigger .60 GP / EP Revolver Sport. Recommended power options include .61 - .75 2C glow, .81 - .91 4C glow and .80 Outrunner Brushless. Bigger does fly better, and with the same moment arms in an expanded size, the Revolver Sport is smoother and easier to see while retaining the full aerobatic capabilities of the original.
Kit Includes: <li> Full built-up fuselage </li> <li> Fiberglass cowl </li> <li> Canopy with included pilot figure </li> <li> Wing halves with installed ailerons </li> <li> Carbon Fiber wing tube</li> <li> Fiberglass landing gear </li> <li> Wheels and fiberglass wheel pants </li> <li> Built-up tail surfaces </li> <li> Glow engine mount and fuel tank </li> <li> Throttle servo mount and linkage </li> <li> Lipo battery tray with hook and loop fasteners </li> <li> All Aluminum Spinner </li> <li> All necessary linkages and hardware </li>
Kit Requires: <li> 50-55-500 (.80) Rimfire outrunner motor or .61 - .75 2C , or .81 to .91 4C glow engine </li> <li> Brushless Motor Mount </li> <li> 2 x 3350 mAh 3S Electrifly lipos </li> <li> Series Connector to create 6S lipo</li> <li> Radio System, Servos and switch harness</li> <li> Receiver battery or BEC </li> <li> Servo �Y� Harness and 2-12� servo extensions </li> <li> 15 x 6 to 8 APCe Propeller </li> <li> Thin CA </li> <li> 30 min. Epoxy </li> <li> Hobby tools </li>
Items Included for Review: <li> Rimfire 50-55-500 (.80) Outrunner motor </li> <li> APCe 15 x 7 propeller </li> <li> 2 Electrifly 3S - 3350 mAh Silver Series 25C Lipo batteries </li> <li> 1 Battery Series Connector </li> <li> Electrifly Silver Series HV 60 Amp Opto ESC </li> <li> 4 Futaba S9001BB Coreless Ball Bearing Servos </li> <li> Futaba 7C Transmitter on 2.4 GHz </li> <li> Futaba 7 Channel R617FS Fasst Receiver on 2.4 GHz </li> <li> 1000 mAh NiCd Receiver battery </li> <li> Radio Switch Harness </li> <li> Aileron �Y� Cable </li> <li> 12� Hobbico Futaba servo extension </li> <li> Ernst Charge Jack for Futaba </li>
Kit Contents


The kit was double boxed and arrived in perfect shape. The top layer contains decals and instruction manual, followed by wing halves and tail parts all inside plastic bags and restrained nicely with clear tape. Below that was the fuselage, captured nicely and floating above the bottom of the box. At one end were the cowl and a box containing all the parts necessary to assemble the plane. Extra parts provide everything needed to install a glow engine and throttle servo (not included), as well as the option of an electric powered version with parts for the battery tray. On the bottom of the box are the pushrods and carbon fiber wing tube taped securely in place. It�s a very carefully packaged kit.
The parts inside the plastic bags were very high quality. Wing halves and tail surfaces were nicely covered and smooth. The built up fuselage was nicely done and quite light in weight. The canopy is already installed on the large, removable hatch with a nicely painted pilot figure ready to install. The fiberglass cowl, wheel pants and landing gear were nicely painted and matched the covering perfectly. I was looking forward to assembling this high quality airplane.
Assembly


See the Instruction Manual <a href=http://manuals.hobbico.com/gpm/gpma1019-manual.pdf>HERE</a>. The Great Planes instruction manuals are very good, and I recommend that you spend the time to give it a good read before you start assembly. I have found their assembly sequence to be logical and efficient, and the extra care they have you give to fasteners and linkages is well worth the effort. I was especially pleased with the recommendations for drill bit sizes for installing control horns, clevises, push rods and servo arms. The final control surface installation was very smooth moving and free from play.
I gave the instruction manual a careful read, noting only 2 places where I had questions about the assembly sequence and marked those places for careful study before I got to drilling holes and assembling parts. Please note that the photos and description below are just to give you an idea of the build. The manual provides all the detail you need to build carefully.
Since the recommended parts for an electric powered Revolver Sport were included for review, I found the assembly to be a real treat. All the parts fit together perfectly with pre-installed motor mount blind nuts, landing gear attachments and wheel pant assemblies. No modification of screw or bolt holes was needed making it easy to create a solid plane.
I started by removing all the tape pieces that secured the control surfaces, and removed any sticky residue with alcohol. This pulled the covering up in some spots, so I ran my sealing iron and soft glove over the Monokote covered surfaces to stick it to the wood really well. The covering was very well done with the usual wrinkle or two from shipping and storage.
Wing
| <b> Recommended Servo:</b> | Futaba S9001 BB, Coreless |

|
|
| <b> Size:</b> | 1.6 x 0.8 x 1.4" (40 x 20 x 36mm) |
| <b> Transit Time: </b> | .22 sec / 60 deg @ 4.8 V / .18 sec / 60 deg. @ 6 V |
| <b> Torque:</b> | 54 oz-in ( g / cm) @ 4.8 V / 72 oz-in @ 6V |
| <b> Gears:</b> | Nylon |
| <b> Accessories:</b> | Extra arms, wheels and mounting hardware |
| <b> Weight</b> | 1.7 oz / 48 g |
| <b> Manufacturer:</b> | <a href=http://www.futaba.com/products/hrc/overview/index.asp>Futaba Radio Control</a> |
| <b>Available From:</b> | Online and in Fine Hobby Shops |
| <b>Price:</b> | $34.99 |
-
 Servo Blocks glued with epoxy
-
 An additional screw secures the servo blocks
-
 Aileron servos installed onto hatches
-
 Hatch installed in wing
The wing halves come with the ailerons already hinged. Follow instructions, and use thin CA to glue in the hinges. The aileron servos install on the underside of the hatch covers. I first used a servo to verify the mounting block locations, then used epoxy to set them in place. These blocks are reinforced by external screws. <b>Whenever wood screws are used, the manual recommends that you put in the screw, take it back out, wick some thin CA into the screw hole to toughen it, then reset the screw when the CA has set to prevent loosening from vibration. </b> I recommend taking the extra time to install your screws this way. It creates a much more reliable airplane for the long haul. Finally, I installed the servos to the hatch covers.
I plugged together the servo extensions and secured the plugs with large heat shrink tubing. I used the strings to guide the servo wires down the tubes to the wing roots and then installed the hatches with attached servos.

Next, I installed the aileron control horns, noting that the screws <b>DON'T</b> go all the way through the aileron! I drilled the pilot holes carefully into the hardwood blocks. I fit the clevis to the pushrod, made a 90 degree bend at the servo location and installed a Faslink to attach the servo end. I slipped a silicone clevis retainer over the clevis to keep it closed.
Tail
-
 Glue the horizontal stab level and square.
-
 All elevator hinges glued in place
-
 Tail wheel wire epoxied into rudder
-
 Tail Linkages
I put the carbon fiber wing rod through the fuselage, then attached the wings with their hold down thumbscrews. I fit the horizontal stab dry, lining it up by measuring carefully side to side, and from each wingtip. I used 30 min. epoxy to set the stab accurately in place. It sat level with the wing without any sanding needed. I dry set all the elevator CA hinges, then followed the gluing instructions carefully to secure them.
For me, the rudder has always been challenging to do well, and I substituted epoxy to set the tail wheel wire in the hole to give me more time to clean up any stray glue. I was also careful to oil the wire where it sits in the tab. The manual recommends you use CA to set the tail wheel wire into the rudder, then more CA (or epoxy) to set the nylon tab into the fuselage along with the other CA hinges. I�ve ended up gluing the wire to the tab and the tab to the rudder with CA in other planes, (which paralyzes all rudder motion) so I would recommend careful use of <b>epoxy</b> for both the tail wheel wire end and the nylon tab end. This gives plenty of time to apply glue carefully, and it doesn�t tend to run onto other parts. I set in the other CA hinges before attaching the rudder. I used epoxy on the nylon tail wheel tab, and thin CA on the CA hinges.
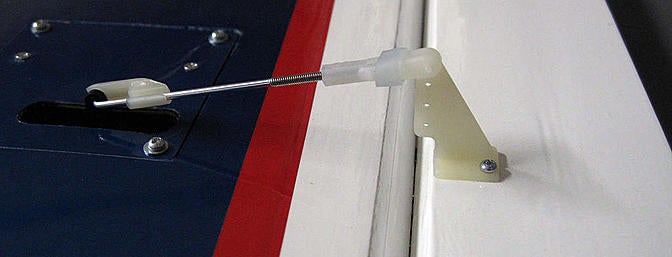
I inserted the push rods, attached the clevises and used the pushrods to help locate the control horn position. <b>Do not</b> drill all the way thorough the elevators or rudder. There are hardwood blocks in which to set the attachment screws. Finish by sliding silicone retainers over the clevises to keep them closed.
Fuselage
-
 First elevator push rod servo location. Use the push rods to locate the best position for the servos.
-
 Wheel collars tie together elevator push rods.
-
 Push rods + Faslinks complete to tail surfaces
With the tail surfaces complete, I placed the rudder and elevator servos in the fuselage, using the natural push rod locations to find the best spots to secure the servos and hardening the screw holes with thin CA. The elevator halves are driven by a single servo with 2 push rods. One elevator half is centered, the push rod cut to length, then bent at 90 degrees to go through the servo arm. Once that is attached, the other elevator half is centered and the push rod trimmed down. The 2 wire push rods are joined with 2 wheel collars set with a thread locking compound. When the wheel collars are tightened well this arrangement locks the push rods together. Make any adjustments to keep the elevator halves parallel to each other. I finished with securing the push rod to the elevator servo with a Faslink.
Radio Installation

Complete radio set with digital servos |
|
| <b>Channels:</b> | 7 |
| <b>Frequency:</b> | 2.4 GHz Fasst System |
| <b>Receiver:</b> | RS617FS Full range 12grams |
| <b>Servo Type:</b> | Futaba 3152 Digital with Radio System |
| <b>Type:</b> | Ball bearing, Digital, Size 1.6 x 0.8 x 1.5" (40 x 20 x 36mm) |
| <b>Transit Time: </b> | .22 sec / 60 deg @ 4.8 V / .18 sec / 60 deg. @ 6 V |
| <b>Torque:</b> | 70 oz-in ( g / cm) @ 4.8 V / 87 oz-in @ 6V |
| <b>Gears:</b> | Nylon |
| <b>Accessories:</b> | Extra arms, wheels and mounting hardware |
| <b>Weight</b> | 1.5 oz / 41 g |
| <b>Manufacturer:</b> | Futaba Corp. |
| <b>Available From:</b> | Online or your Local Hobby Shop |
| <b>Price:</b> | $349 |
The Futaba 7C Faast radio system on 2.4 GHz was used to guide the Revolver Sport. This radio uses continuous frequency hopping to avoid interference and includes a full range receiver. The transmitter has adjustable gimbals for spring tension, and the sticks are adjustable for length. It has a 10 model memory and full feature sets for airplanes, helicopters and gliders. Switches can be assigned to any function, and several mixes are available. A speedy rotary input dial makes programming and model naming go quickly. The EEPROM memory does not need power to retain your settings, so the transmitter battery can be safely removed for service or cycling. Dual and even triple rates can be set to one switch, as well as a low / high rate function that can be applied to the position of the control stick. The radio guided the Revolver precisely with no noticeable lag in response. It gave a very �connected� feel to the flights. See a complete review of this radio system on RC Groups <a href=https://www.rcgroups.com/forums/showthread.php?t=709587&highlight=futaba+7c+radio/>HERE</a> .
-
 Radio installation
-
 Receiver switch and Ernst charge jack
-
 Heat shrink locks plugs together on extensions
I installed the receiver using a foam backer and a hook and a loop strip wrapped around the case. There are available slots and holes for securing everything. I routed servo leads from the rudder, elevator, and aileron 'Y' harness as well as the ESC radio lead. It required 2 - 12" extensions to bring the receiver battery lead and ESC signal leads back to the receiver. I used cable ties to finish the installation. Since this is an Opto speed control, I added a receiver battery in the nose to power the radio which also required me to install a receiver switch and Ernst Charge Jack on the fuselage side. You could save a few ounces by using a quality BEC with plenty of amps to power your on board radio instead of a receiver battery.
Completion
<center> <table> <tr> <td>

</td> <td>
</td> <td>

</td> </td> </table> </center>
Landing Gear
I attached the axles first and cut them to length according to instructions. Next I installed the wheels after grinding a little flat spot on each axle where the wheel collar screw hits (use thread locker on the set screws). The wheel pants bolt to each half of the landing gear. I recommend you run the screws into each blind nut to make sure they thread in easily before assembly. There was a little "fuzz" in some of the holes. Follow the steps in the manual to attach and align the wheel pants.
Power System
<center> <table> <tr> <td>

</td> <td>

</td> <td>

</td> </td> </table> </center>
<div class = "rightside">

Silver Series 60A HV Opto ESC |
|
| Type: | Brushless HV Speed Control |
| Number of cells: | Li-Po 4 - 12 |
| Weight: | 102g |
| Input Volts: | 50V max |
| Current Capacity: | 60A Continuous/ 72A Surge |
| Max Power(watts): | 3000W |
| Weight: | 102g |
| Opto | No BEC |
| Brake Function: | On / Off |
</div>
<div class = "leftside">

Rimfire 50-55-500 (.80 Equivalent) |
|
| Type: | Brushless Outrunner |
| Number of cells: | Li-Po 5 � 6 cells |
| RPM/V: | 500 |
| Weight: | 268g |
| Shaft Diameter: | 8 mm |
| Power Ratings: | Continuous Amps 52, Surge Amps 65 |
| Max Power(watts): | 1154W Continuous, 2200W Burst |
| Recommended Props: | 15 x 6 to 15 x 8 |
</div>
The motor installation comes next, and there are instructions for glow or electric. I�m building an electric version, so I got out the motor, motor mount and screws. I attached the prop adapter using the included socket head screws and thread locker, then bolted the motor to the front of the mount carefully and removed an extra mounting bracket that would not be needed in this installation.


I installed the ESC to the underside of the the plywood motor mount box with 3 wood screws. I cut off the extra length on 2 screws because they stuck up into the battery tray area.


No extra cooling holes in the firewall are needed, so I proceeded to the motor mount installation. I simply attached the mount with the proper bolts and thread locker. At this time you may want do a preliminary Center of Gravity check, to determine if the receiver battery needs to go up front, or somewhere near the receiver. Mark the proper CG on the wing as described in the manual, assemble the plane, tape on the cowl and loosely installe the prop and spinner. Rest the 2 batteries in the tray, put the hatch on loosely and picked up the plane at the CG. If the tail hits the bench quickly, it needs the receiver battery in the nose. If the nose drops with authority, the receiver battery will have to go further back, perhaps next to the receiver where space is already provided. My installation needed the receiver battery in the nose, so I put it on the motor mount. This did require me to put the flight batteries at the back of the battery tray to balance. I secured the receiver battery with cable ties.

The battery leads will <b>just</b> be long enough when the �Series� adapter is plugged onto the ESC leads. I used a cable tie to secure the ESC power leads to the Series adapter since it is hard to reach if it came unplugged. In the future, I may get a longer series adapter, or add 2" of wire to the ESC battery leads for easier flight battery attachment.
Cowl
<center> <table> <tr> <td>

</td> <td>
</td> <td>

</td> <td> </table> </center>
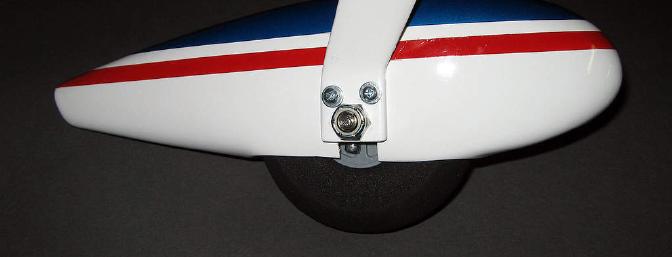
I followed instructions carefully to measure the location of the cowl screw holes so they hit the center of the mounting blocks. I installed one screw at a time and adjusted the cowl to stay perfectly centered on the spinner. Remember to harden the screw holes with CA. After the cowl was installed, I reamed, balanced and installed the prop and spinner.
Pilot Figure
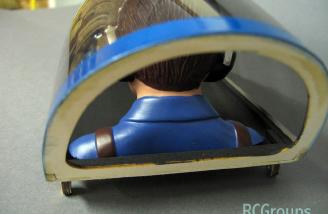

A nicely painted pilot figure is included. I decided to fit a custom shaped plywood plate in the bottom of the figure for more gluing area and attached it with RC 56 glue. Since the back of the canopy is open, I carefully coated the underside of the pilot with glue, then eased him into position near the back of the canopy.
Battery Installation

I slid my batteries onto the battery tray, and noted the position. I attached the canopy, and then performed the final CG check. Since I had installed the receiver battery in the nose, this required a rearward mounting of the flight batteries. To reach the marked CG position, I found that the batteries had to come all the way back to the spar. I installed hook and loop fastener on the battery plate and batteries, then routed the long hook and loop strap around the batteries through the provided slots.
Decals
<center> <table> <tr> <td>

</td> <td>

</td> <td>

</td> <td> </table> </center>
Even though these are not water slide decals, Great Planes recommends using a soap and water mix to allow you to position the decals more easily. I used the photos on the box to help orient and locate the decals properly.
Set directions and throws
The radio and servo installation yielded very smooth moving control surfaces with no play. I took the time to carefully set the recommended throws for low and high rates on all control surfaces. I also added 30% exponential for each high rate control. Be sure to do a range check with an assistant so you can run the motor to check for interference problems. The Revolver and Futaba systems worked perfectly.
Flying
<center> <table> <tr> <td>

</td> <td>

</td> <td>
</td> </td> </table> </center>
Basics
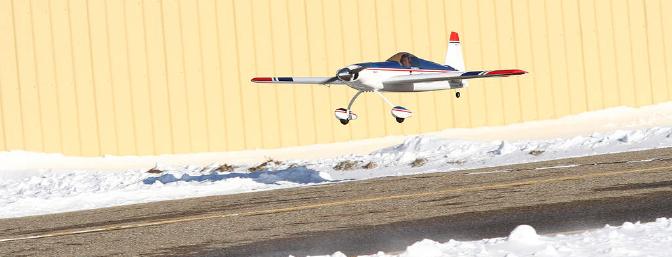
Our flights were done in the dead of winter. The first day the breeze was mild, so the Revolver tracked smoothly along the pavement with little rudder correction. Rolling on the power gave very quick acceleration to flight speed, and low rates yielded a smooth takeoff. About 3 clicks of elevator and 2 of aileron got it flying straight and level. Even on more windy days the Revolver tracked along nicely.
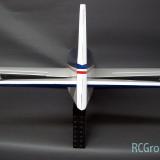
The .60 Revolver has a 70" wingspan and the trim markings make it very easy to see in the air. On low rates it is quite docile and requires full use of elevator to change pitch quickly. In fact, low rates are very low, and I preferred going to high rates for most maneuvers. I think I will settle on slightly more throw for low rates and slightly less for high rates.
Taking Off and Landing
The Revolver tracks smoothly along pavement on low rates and accelerates quickly. To lift off, I applied a little up elevator, and it climed out nicely. Landing requires some planning, as the plane is very clean aerodynamically and wanted to keep flying. I found that leaving the prop brake OFF helps the plane slow down nicely for a landing. Leave on a tad of power until you turn onto your base leg, then throttle back and let the prop windmill. The plane still comes in with a fair amount of speed and a good glide. Settle in just above the ground and slowly feed in elevator until the Revolver settles onto the main gear. Another technique that works well is to have the prop brake ON, but apply a couple clicks of throttle trim until the prop turns over slowly at low throttle. This allows the prop to windmill at low throttle, yet the motor will respond instantly to throttle if you need it.
Aerobatics/Special Flight Performance
This is a very smooth aerobatic plane on low rates. With 111 W/lb. available, loops are as big as you want with excellent vertical power. It retains energy well through maneuvers, not slowing at all on the downside of loops.
After some flight experience, I added another 10% of throw to both directions on the elevator. This gave it a much quicker response on High rates that matched the rates on the ailerons and rudder well.
Rolls are pretty quick and close to axial. Slower rolls need timed elevator to stay on line, and really slow rolls need rudder as well.
Spins require high rates and can be done at moderate altitude. The spin stops soon after you release the sticks, but requires some timing to stop in a precise spot as inertia carries it around a bit further.
Stalls are hard to induce with low rates. High rate elevator usually causes the nose to drop straight ahead, where a burst of power will get it flying again.
Knife Edge is very easy at high speed. It pulls a tiny bit to the gear with the right wing down, hardly enough to mix out. Knife edge with left wing down is just about perfect with no noticeable coupling.
Inverted flight is very easy with about � inch of forward stick required to keep it level.
Stall turns are a piece of cake with the very effective rudder.
This plane and motor are not really intended for hovering. It will hang on the prop but there is not enough power to pull it upward. Recovery to forward flight in any direction is easy though.
The Revolver snaps nicely both inside and outside on high rates. A bit of practice lets you stop where you want.
A nice feature of this Electrifly ESC is that when low voltage cutoff is reached, it pulses the throttle and you can hear it clearly. This is a very quiet power setup, so the changing pitch of the prop helps you quickly recognize ESC cutoff. The plane doesn�t really change speed as this happens, so you can fly normally as you back off throttle and set up your landing approach.
The speed envelope is fairly wide, with moderatly high speeds down to slow, controllable flight. It handles wind gusts well, so the day doesn�t have to be perfect to perform nice aerobatics.
The power system is nicely matched to the .60 Revolver for aerobatic flying. It has good speed and plenty of vertical power. It is also very quiet and smooth, with surprisingly good flight duration with the 3350 mAh batteries used. The batteries are light in weight and deliver full power right to low voltage cutoff. We flew in 35 degree weather so the motor was cool to the touch, and the batteries were just barely warm.
Is This For a Beginner?
This is a big, nice aerobatic airplane that requires you to put it where it needs to go. Consider this plane after you are comfortable with a low wing, aerobatic trainer.
Flight Video/Photo Gallery
<center> <table> <tr> <td>

</td> <td>

</td> <td>

</td> </td> </table> </center>
<center> <table> <tr> <td>

</td> <td>

</td> <td>

</td> </td> </table> </center>
<center> <table> <tr> <td>

</td> <td>

</td> <td>
</td> </td> </table> </center>
It was the dead of winter for our test flights, so we got permission to use a local airport taxiway. My video pilot is an accomplished RC as well as full scale pilot, and he kept the Revolver safely out in front of the hangars.
Downloads
Conclusion
This is a really nice airplane! It is very attractive and well built, and the recommended electric power package is matched very well with the flying characteristics of the plane. I feel good flying the Revolver. It handles smoothly in the air, yet is quite agile for aerobatics. I had no hesitation doing full throttle snaps and felt in control all the time. Takeoffs and landings are smooth and stately, although the gear is a bit stiff and will bounce if you set it too firmly on pavement. Everything about the plane is high quality. For those people that prefer glow power, no changes are needed to the firewall or airframe, and the motor mount and tank are included. You may want to fuel proof the engine area though. I look forward to many seasons of practicing and enjoying my aerobatic flying with the Revolver.
A special <b>Thank You</b> to my friends who helped with this article. Gary Deem; guest pilot for video. Dave Pearcy; all in-flight photos.
Pluses
<li> Beautiful fit and finish </li> <li> Robust landing gear and wheel pants </li> <li> Very smooth flying characteristics </li> <li> Versatile power options without modification</li> <li> Motor, ESC, batteries barely warm after full power runs </li> <li> Recommended parts create a great combination of power, flight capability and duration </li>
Minuses
<li>Tape on control surfaces pulls the covering up </li> <li>Stiff landing gear </li>
Last edited by RCG_Jason; Dec 06, 2022 at 12:13 PM..| Thread Tools |
|
|
|
|
|
Great review!
Nice airplane too. Pleasant video. |
|
|
Last edited by Michael in Toronto; Jan 24, 2010 at 02:10 PM.
|
|
|
|
|
|
Nice looking plane, but way too heavy. Great Planes sure overdesigns many of their planes.
My Reactor biplane (also a Great Planes glow/electric design), with the same motor and battery, with 100A ESC weights 7.25 lbs, with lots more wing area. Where does all the extra weight go? |
|
|
|
|
|
||
|
Thread OP
|
Quote:
|
|
|
|
||
|
|
||
|
|
Quote:
Your biplane is designed for sport 3d, so its built lighter. the revolver lines were always designed for Sport aerobatics, but not 3D. They are made to go fast(ish) and are thusly built very strong. I have the Revolver 46 sized with the Electrifly 42-60-800 motor. With a burst watts of 1850 and a 6s3300mAh lipo, it goes fast! I'd pylon race my Revolver, but not a Reactor Biplane. I'd attempt 3d with the Reactor line, but my Revolver .46 isn't going to hang on its prop. Not with the recommended 11x6.5 prop. Two different planes designed to do two different things. |
|
|
|
||
|
|
||
|
|
Quote:
Perhaps this was the maiden video, and not the, "ok I'm comfortable with the plane, time to turn up the power" video. To be honest, this video was not the best as it really gives the impression that the plane is a Sunday afternoon slow flyer, when its capable of far more speed. |
|
|
|
||
|
|
|
|
|
I think this video was just fine. Most RC pilots fly at totally unrealistic airspeeds. They even streak around in their World War I biplanes. I'm all for scale like speeds and precision in maneuvers which is just what this pilot displayed. I think we RC pilots should attend at least one full scale airshow a year and closely observe the flights.
|
|
|
|
|
|
||
|
Thread OP
|
Quote:
Also, the original Revlover / Rimfire 800 KV combo is flat out FAST! I ran that motor in the new Shoestring and got 82 MPH on the level. |
|
|
|
Last edited by EYEinSKY; Jan 25, 2010 at 05:10 PM.
|
|
|
|
|
|
|
I didnt mean to imply it was a slow machine.but it does fly much more aggressively than the first video showed.I am a typical flyer and planes of that sort move thru the air much faster usually. ..and everybody likes a different flying style and I respect thatI really do but for me I like faster speed.I was looking at a few motors from scorpion and hyperion that would really make it go.but thats just me andmy style of flying..I really love the look of that plane gas or electric..
|
|
|
|
|
|
||
|
Thread OP
|
Quote:
Tom |
|
|
|
||
|
|
||
|
|
Quote:
I've been eying this plane since it's release, at $219 it's quite a relief from Hanger 9 sticker shock! Personally, I feel a strong .60 to.75 two stroke would kick performance up a notch and do it justice 
|
|
|
|
||
|
|
|
|
|
|
|
|
|
| Thread Tools | |


| Similar Threads | |||||
| Category | Thread | Thread Starter | Forum | Replies | Last Post |
| Review | Great Planes Revolver GP/EP Sport Aerobatic ARF Review | kevin | Sport Planes | 848 | Dec 14, 2023 11:08 AM |
| For Sale | (slightly used...) Great Planes Revolver and Freestyle Rush. | cargomaster | Aircraft - Fuel - Airplanes (FS/W) | 19 | Oct 02, 2010 04:16 PM |
| For Sale | Great Planes Revolver .46-.70 NIB - $140. | ptuxbury | Aircraft - Fuel - Airplanes (FS/W) | 1 | Dec 09, 2009 07:15 PM |
| Sold | NIB Great Planes 70" Revolver ARF | RCForever | Aircraft - Fuel - Airplanes (FS/W) | 1 | Dec 09, 2009 04:35 PM |
| Sold | Great Planes Revolver | Fidelity101 | Aircraft - Electric - Airplanes (FS/W) | 3 | Sep 13, 2009 07:05 PM |