| Thread Tools |
| This thread is privately moderated by Jack Crossfire, who may elect to delete unwanted replies. |
|
|
|
|
|
Discussion
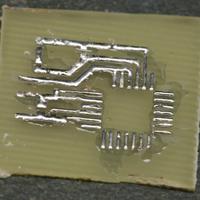
Photolithography worked. Yay!
Exposed it using the 2 transparencies, 26W fluorescent light, distance of 18" for 5 minutes.
Dunked it in the most diluted draino possible. Had just enough draino to wet the bottom of the container & the rest was water. Fluid flow affects the developing rate. Wherever U grab on the board is where the fluid is most turbulent & that develops the fastest. As it developed unevenly, dunked just the parts which needed more developing. Eventually should use q tips. Slowly dunked & rinsed to remove the tiniest amounts. Photoresist stood up better against ferric chloride than it looked. Even though it was faded, got solid traces. Concentrated, 80F ferric chloride was good enough to etch. Dunk it in a container of water to stop etching. It avoids splashing pure ferric chloride around the sink. After etching, dunk it back in the draino to remove the last photoresist. The Nate Siedle technique of running a solder ball over it sort of works. U need to constantly melt fresh solder, let it bridge, then suck the excess. Apply the solder with pulling movements, like a felt pen. Expect to destroy most of the boards in the draino. This is really a matter of luck. |
|
|
Last edited by Jack Crossfire; May 16, 2009 at 11:39 PM.
|
|
|
|
|
|
|
|
I'm sorry Jack but it your process that needs changed not LUCK.
Here is how I make PC boards with 95% of the time a good board. 1. Sand the copper on the PC board with 120 grid sand paper. Then use steel wool on the copper until it is very shinny. Note . Don't leave any finger prints on the board after this step. Use a old clean rag to wipe off the residue of copper. 2. Put the runs on the copper any way that works for you. I use a paint pin form SK Merchandising Corp. It has a .070 tip. 3. I use two 250watt heat lamps. One I put above the PC board, with the art work up and the heat lamp around 3" above it. It takes about two/three minutes to heat the board so if you pick up the board it would be very worm around 130 Deg. F 4. At the same time I would put about half inch of Ferric Chloride in a heavy plastic bowl. Put the second heat lamp over it about 3". By the time the PC board gets hot the Ferric Chloride should be hot. 5. Put the PC board into the Ferric Chloride bowl and use a small plastic tool to move the board around . Keep up the movement until the board is etched . I use forsepts to lift the board out of the Ferric Chloride bowl. I use a old plastic Coffee container to hold water for safety and when the etched board is complete as a stop etch by washing it in water. 6. I dry off the board and then sand and polish with steel wool. I use soldering paste all over the runs before we tint the board. The process all ways work for me. and we always use double sided boards. Keep up the good work CharlesB |
|
|
|


