Posted by mikejr83 |
Sep 27, 2023 @ 09:33 AM | 7,080 Views
For the last 10 months I've been laser focused on F3J. I was asked to be part of what I consider a dream team, Jeff Duval, Dillon Graves, and Gordon Buckland. These are all pilots I've looked up to and admired. I put in as much time as I could practicing while also trying to be supportive of my wife's triathlon hobby, taking care of my two young girls (10 and 8), and doing the normal work thing.
I won't cover my contest report here. It's posted in the TS thread: https://www.rcgroups.com/forums/show...3&postcount=42
In short, I flew good, but not good enough. I had a lot invested in the contest, emotionally speaking. It was hard leaving with the 6th place finish. I know I have a lot to be proud of and I've received great feedback and lots of encouragement. Honestly, I appreciate it all.
The nagging suspicion that I have is this will probably be the last F3J worlds. The participation in winch launched thermal duration contests is falling off drastically. I could be wrong. There's talk of allowing non-national team members to participate in the contest. That may renew interest, well at least at the world level. We only had 18 senior pilots at the TS event. In two years will we have that many again? I was impressed that we had 5 junior pilots flying. This is Charleston's last time as a junior. In two years will he be back as a senior. The pessimist in me looks at all of this and the rumors I've heard that it's hard to get a country to sponsor the world's event and comes...Continue Reading
Comments (2)
Add Comment
Posted by mikejr83 |
Dec 28, 2020 @ 10:08 PM | 12,755 Views
Well... I destroyed my last Xplorer F3J model. Earlier in the day I sold my backup 3.8. I'm selling the parts that I have and will be taking a step back from winch launch for a while. Unfortunately I can't budget a new model each year. I was anticipating buying a Q for F5J but the wifey kind of gave me a sour face when I mentioned that. Now that I just busted my winch launch model I don't think I can bring myself to tell her that I'm spending money on another model after I bought one last year. Oh well!
Posted by mikejr83 |
Aug 08, 2019 @ 08:55 PM | 10,588 Views
This is probably the hardest step. It's not technically difficult, but cutting holes in you brand new center panel can give you a bit of the hand shakes.
As with any task a little prep before can make the task much easier. Going back to the tools that I listed out in the earlier posts you'll want to have that diamond tipped cutting bit and a conical stone sanding bit along with your Dremel. You'll also need scissors, a felt-tip pen, a hobby knife, some scrap balsa sheeting, the top of a servo case (clear plastic will work), and one of your clevises.
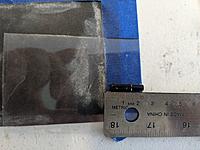
Cut the top off a case containing a servo. Most servo cases are clear so this generally is a good place to go to get a piece of plastic. Get a ruler and measure 2cm from the edge of the plastic. Place a dot there. Now take the ruler away and place your clevis so that its tip is on the dot. If the other end goes off the plastic that's ok. Make sure the clevis is sitting so that the pin would be parallel to the surface of the plastic, basically in the same position it would be as it was exiting the wing. You'll now take the felt-tip pen and draw a line around the clevis. The outer edge of the line should extend at least 2m, the width of the tip of the pen, from the clevis. Next remove the clevis and color in that whole area.

You can now position this on your upper wing skin to see how the hole will look in the skin. Don't be too concerned. You haven't cut anything yet.
Now time to cut! The plastic! Cut out the...Continue Reading
As with any task a little prep before can make the task much easier. Going back to the tools that I listed out in the earlier posts you'll want to have that diamond tipped cutting bit and a conical stone sanding bit along with your Dremel. You'll also need scissors, a felt-tip pen, a hobby knife, some scrap balsa sheeting, the top of a servo case (clear plastic will work), and one of your clevises.
Cut the top off a case containing a servo. Most servo cases are clear so this generally is a good place to go to get a piece of plastic. Get a ruler and measure 2cm from the edge of the plastic. Place a dot there. Now take the ruler away and place your clevis so that its tip is on the dot. If the other end goes off the plastic that's ok. Make sure the clevis is sitting so that the pin would be parallel to the surface of the plastic, basically in the same position it would be as it was exiting the wing. You'll now take the felt-tip pen and draw a line around the clevis. The outer edge of the line should extend at least 2m, the width of the tip of the pen, from the clevis. Next remove the clevis and color in that whole area.
You can now position this on your upper wing skin to see how the hole will look in the skin. Don't be too concerned. You haven't cut anything yet.
Now time to cut! The plastic! Cut out the...Continue Reading
Posted by mikejr83 |
Jul 20, 2019 @ 09:17 PM | 14,114 Views
In this post I'll be discussing getting the wing prepped for servo installation.
The Wing - Prep
I start working on the wing first. I like to get this out of the way first. The wing is the most complex part of the build. Spending time getting everything right here will ensure that your model launches true, holds trim and flies right, and lasts for many years. The key to achieving this is having good tight, zero-slop control surfaces along with correctly aligned push-rods. The following steps will help you prep the wing for the servo install.
I use lots of blue painters tape to write mark spots on the wing as well as to protect the surface. You may find that your tape doesn't stick well. This is because there may still be some mold release on the surface. As a general first step I wipe down the wing surface with isopropl alcohol. This also gives you a good opportunity to caress and love your model .
.
The next step you take is to stabilize the control surfaces. Most likely when you got the model out of the box NAN had the edges taped so that the ailerons and flaps wouldn't move around during shipment. It's best to go ahead and reinforce this a bit. I put about 15 cm (6") of tape on either side of top of the wing along the skin so that the tape overlaps the aileron or flap and the wing. Make sure to do the control surface is in a "neutral" flight position, like cruise. It isn't important to be exact you just want the aileron or flap to be in a...Continue Reading
The Wing - Prep
I start working on the wing first. I like to get this out of the way first. The wing is the most complex part of the build. Spending time getting everything right here will ensure that your model launches true, holds trim and flies right, and lasts for many years. The key to achieving this is having good tight, zero-slop control surfaces along with correctly aligned push-rods. The following steps will help you prep the wing for the servo install.
I use lots of blue painters tape to write mark spots on the wing as well as to protect the surface. You may find that your tape doesn't stick well. This is because there may still be some mold release on the surface. As a general first step I wipe down the wing surface with isopropl alcohol. This also gives you a good opportunity to caress and love your model
. The next step you take is to stabilize the control surfaces. Most likely when you got the model out of the box NAN had the edges taped so that the ailerons and flaps wouldn't move around during shipment. It's best to go ahead and reinforce this a bit. I put about 15 cm (6") of tape on either side of top of the wing along the skin so that the tape overlaps the aileron or flap and the wing. Make sure to do the control surface is in a "neutral" flight position, like cruise. It isn't important to be exact you just want the aileron or flap to be in a...Continue Reading
Posted by mikejr83 |
Jul 20, 2019 @ 08:35 PM | 14,078 Views
I decided to track my Xplorer X3, 2019 edition, build here instead in a public thread. In a number of posts I'm going to try to cover in-depth the manner in how I approach building this model. The first time I tackled this it was very intimidating. Luckily I have access to some top notch pilots and builders, Jody Miller and Jeff Duval. Both of these guys have build tons of Xplorers and know how to get them built and setup to win contests. Hopefully I'll try to best pass along tips and tricks that I've learned so that anyone reading should be able to build one of these models with confidence. This first post will cover getting things ready.
Getting Your Model
First things, first. Inspect everything you have. Do this before you sign for your model from the shipping company. In the USA our NAN dealer is Soaring USA. They pack their models for shipping in probably the best possible manner. Everything is bagged, wrapped in bubble wrap, covered in foam, and taped down. The box even has a 2x2 running down its back so it can't get compressed. Even still, shipping companies, I'm looking at you FedEx, can still come up with some creative ways to damage items.

The box on the left was delivered to my residence in December of 2018 and the box on the right is the latest in July of 2019. You can see how FedEx has some piece of machinery that has placed creases and holes in the same spots. The more heavily damaged box on the left contained my extremely fragile NAN Explorer Big...Continue Reading
Getting Your Model
First things, first. Inspect everything you have. Do this before you sign for your model from the shipping company. In the USA our NAN dealer is Soaring USA. They pack their models for shipping in probably the best possible manner. Everything is bagged, wrapped in bubble wrap, covered in foam, and taped down. The box even has a 2x2 running down its back so it can't get compressed. Even still, shipping companies, I'm looking at you FedEx, can still come up with some creative ways to damage items.
The box on the left was delivered to my residence in December of 2018 and the box on the right is the latest in July of 2019. You can see how FedEx has some piece of machinery that has placed creases and holes in the same spots. The more heavily damaged box on the left contained my extremely fragile NAN Explorer Big...Continue Reading
Posted by mikejr83 |
May 28, 2019 @ 09:15 PM | 9,103 Views
This past weekend I competed in a F5J event as the warm-up to the TD contest at the Mid-South Soaring Championships.
My goal was to launch to 100m for each round.
Flight #1
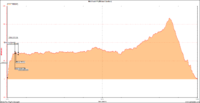
Flight #2
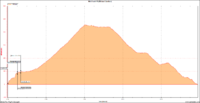
Flight #3
...Continue Reading
My goal was to launch to 100m for each round.
Flight #1
Flight #2
Flight #3
...Continue Reading
Posted by mikejr83 |
Jan 04, 2016 @ 09:37 PM | 23,441 Views
I finished my Sbach 342! Read all about it!
- User Lists

