droydx's blog View Details
Posted by droydx | Oct 07, 2019 @ 07:53 PM | 6,324 Views
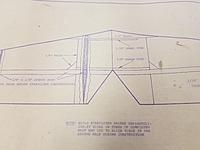
Got a request for some info on this old bird...so I pulled out the kit a picked up some years back. The cg starting point is at 13.5 inches aft of the nose. Some pictures from the plans here.
Posted by droydx | Mar 09, 2018 @ 06:27 PM | 21,341 Views
Now I have three sets of cores....time to start building some of these fun little slopers!! I have one fiberglass fuselage, one wood one that will be easy to duplicate in an OG early 1990's kit.
Posted by droydx | Feb 09, 2018 @ 12:43 PM | 23,326 Views
While waiting for my P51D Fakefest short kit, I banged out another PSS to "season" my new work area... I have a whole 2 car garage now, set up to work in, now that I have moved up the coast to Nipomo. I started out with a 1980's vintage Cliffhanger brand AT6 kit. The fuselage was the only thing I used. I had to reinforce it heavily, as it was the typical 2 piece heavily pinholed polyester resin lay up affair. I cut a new full span "amigo" style set of cores using the time tested RG14 7.5 airfoil. The wing uses 1/32 sheeting with glass covering, while the tail is hard balsa sandwiched on 1/64" ply, also glassed via vac bag. Servos are standard size Tactic brand using 4/40 control with 1/8" music wire torque rods.

I modeled the AT 6 "War Dog" that is frequently scene at airshows around the U. S. A. and used some of Callie Graphics vinyl to finish it out. Paint is Rustoleum with a spritz of clear to finish it off. It came out to AUW of about 70oz, so it will take a slope with solid lift to make it go. ...Continue Reading
Posted by droydx | Jan 15, 2018 @ 12:20 PM | 22,635 Views
Some pictures of a Hawk that I built. I cut a new wing core of S6060 profile, and it flies very well, and is a real survivor amongst my PSS fleet. ...Continue Reading
Posted by droydx | Nov 11, 2016 @ 07:30 PM | 24,047 Views
I took a break from finishing up my Fiat PSS project and built an EPP travel glider that I've had in the back of my mine for some time.

I was inspired by Adam's Wyoming Wind Works Slope Monkey and Aarons Super Scooter...both super fun ships. I wanted a slightly heavier version of the Scooter, and one that I could take apart to pack while traveling. I really liked the way the Slope monkey banged turns too, so I cut a set of DS19 cores with a straight leading edge.

I wasn't shooting for anything fancy, but I did want a super rugged model that would take some abuse, hence the extreme packing tape and goop fuselage, and 5 mil laminate wings.


The fuselage uses a central core carbon golf club, that the wing and tail surfaces are mounted on. The rudder is full flying and removable too, so it will break down fairly small. AUW is about 45 oz and Hitec 5065mgs are used along with a 2400 mah 4.8 volt battery. The radio is just forward of the wing in a small cavity and is removable.

Hope to get to fly this soon, I've been so busy lately, that it will be fun to get outside and enjoy the air again.


Andy
Posted by droydx | Sep 07, 2016 @ 04:36 PM | 26,791 Views
Fiat G.55
From Wikipedia, the free encyclopedia
G.55 Centauro


Role Fighter
National origin Italy
Manufacturer Fiat
Designer Giuseppe Gabrielli
First flight 30 April 1942
Introduction 1943
Status Retired
Primary users Regia Aeronautica
Repubblica Sociale Italiana
Argentine Air Force
Royal Egyptian Air Force
Produced 274 (wartime), 75 (postwar)[1]
Unit cost
L. 535.000 (L. 1.284.000 for planned 2.400 aircraft)[2]
The Fiat G.55 Centauro (Italian: "Centaur") was a single-engine single-seat World War II fighter aircraft used by the Regia Aeronautica and the A.N.R. (Aeronautica Nazionale Repubblicana) in 1943-1945. It was designed and built in Turin by Fiat. The Fiat G.55 was probably the best type produced in Italy during World War II,[3] (a subjective claim also frequently made for the Macchi C.205 Veltro as well as for the Reggiane Re.2005 "Sagittario") but it did not enter production until 1943.[4] when, after comparative tests against the Messerschmitt Bf 109G and the Focke-Wulf 190, the Luftwaffe itself regarded the Fiat G.55 as "the best Axis fighter".[5]

During its short operational service, mostly under the Repubblica Sociale Italiana insignia, after the 8 September 1943 armistice, this powerful, robust and fast aircraft proved itself to be an excellent interceptor at high altitude. In 1944, over Northern Italy, the Centauro clashed with British Supermarine Spitfire, P-51 Mustang, P-47 Thunderbolt and P-38 Lightning,...Continue Reading
Posted by droydx | Jan 17, 2015 @ 08:33 PM | 28,041 Views
Continuing to build up some of my backlog of 1980's era slopers, I came across this kit on RC Groups and pounced on it. I've always liked the looks of these, but never saw one fly well, until I saw one fly at Hughes Hill in the late 1980's. It was pretty impressive way back in the day and left a lasting impression on me. OK a million years later, I'm building one. The kit came in fair order, some parts missing but nothing that big. The instructions were not there....oh well, I guess I'll just build from the plans and update or modify what I feel like.

The first thing I did was to reinforce the ancient fiberglass fuselage with stringers of uni carbon fiber from nose to the tail on both sides. This should help stop the cracking that a lot of these fuses got, just aft of the wing saddle in a less than perfect landing. The other thing I did with the fuselage was to put a direct drive servo for the full flying stab in the tail. The original has a long cable drive, and I didn't want the slop that those inherently have, at the expense of needing a little more nose weight.

I built the E374 profile balsa covered foam core wing, as per plans, except for a couple things. I substituted basswood for the balsa leading edge. I used two Hitec 5085 servos to drive the ailerons via torque rods, instead of one. This allows me to have spoilers and camber control. I also ran the ailerons all the way out to the wing tips, instead of keeping them inside of the wing tip...Continue Reading
Posted by droydx | Jan 02, 2014 @ 03:43 PM | 26,802 Views
I posted this one on the slope site. I see these old kits pop up every once in a while. Not many get built though.....

That's too bad, they are fun fliers and an easy build.

https://www.rcgroups.com/forums/show....php?t=2065798
Posted by droydx | Mar 19, 2013 @ 09:40 AM | 27,662 Views
I had a hankerin' to build an old school balsa/foam wing ship, so I drug this one off the shelf. It was a fast build....simple box construction using the unique 1/2 side build at a time and then join, to make the fuse straight.

It flies very well, and is relatively quick, could use some ballast to speed it up. I kept it really simple with only 2 servos total...so no wing mixing, but that's the way we flew them. Looks great in the air with the swept wings and high all flying horizontal stab.

The wing cores with the kit were trash (see pics), so I cut my own out of blue foam. S 6062 at the root transitioning to to 6060 at the tip.

I'm a big fan of Jack Caldwells designs. He was active in the 1980's and came up with the Swift, the AR-1 (kitted by Craftaire, then Dynaflight, as the Freedom, the X-Cell and then this one the Mini Xcell. This kit was produced by Swenson Specialties from Pinole, CA. in the early 1990's..I haven't seen many on the market so it is relatively obscure.

Andy
Posted by droydx | May 05, 2012 @ 11:12 AM | 27,342 Views
I cranked out an Evo Alula for the WF 2012 this year..Michael has put so much thought into these kits that they just about put themselves together! I used one of his 300mah battery packs and a set of Futaba 3114 servos, along with a FAST Futaba 2.4 receiver. I could've pulled the case to save a couple grams, but left it on, thinking it would add some strength to the nose area in case of a punt. AUW is at 6.5 oz and it flies great, as all the Dreamflight products have.


Next up is the Prodij HM. I got this one through Tom Copp at F3x. A definite upgrade from the earlier versions..this one is sweet, for those who enjoy something different in the 60" class. I posted my build in: https://www.rcgroups.com/forums/show....php?t=1614447

First flights were extremely promising...at 26 oz it even thermaled very well, and has room for 14 oz of ballast, so it should move out when the lift builds. The airfoil is super thin at 7.5% and the moving wing surfaces are huge at around 30% of wing chord, so active camber changing is just about mandatory. I'll still need to do a lot of fine tuning on the set up, but I think that it's a winner and if it holds up as well as the earlier versions then it deserves some recognition, despite it's higher entry cost.
Posted by droydx | Jan 16, 2012 @ 11:23 PM | 28,123 Views
I bought this one off of agarchitect. Adam trucked it down to me, the one piece 110 " wing on top of his car, like a surfboard! Well, it took some work but is now complete and ready to fly. It came in at 84 oz, dry. I used a pallet to mount the V tail servos, like a Legerton kit for an Opus, because there is no nose cone, it is solid up front. There is room to hold about another pound of lead, using the Opus sheet lead plates if needed.

I had to redo the wing mount, area so it would slide off instead of ripping the fuselage in case of a bad landing, this amounted to making small fairings on the wing, counter sinking the wing bolts, upgrading the front bolt to a 1/4-20 I enlarged the rear control surfaces a bit, to just look a little more normal to my way of thinking. Made a wing harness, and got it all wired up. I layed up some servo covers and thats about it. The wing is huge, has a lot of surface area, so it should hold the weight really well. I had to surface the wings and do a lot of sanding because the vac bag job done by the original builder (Tom Roberts?) had a lot of waves, probably due to uneven vacuum along the pull. Anyway, it is still pretty badass looking, and should be a blast for hauling around the upper ruins, not a lot of $ for a lot of sailplane!

Thanks Adam!
Posted by droydx | Sep 18, 2011 @ 12:20 PM | 28,705 Views
This was one of my slowest ever builds... I literally started it at the end of March and finally cleared it off my bench last week. Sometimes you just poop out on the build, and I did with this one, when I realized that I wasn't going to be able to go the the ISR PSS slopefest last May.

Anyway, a lot has been written about these, and the man himself has the best threads on building one of these:

https://www.rcgroups.com/forums/show...spitfire+cores

All I had to work with was a fuselage that I bought off RCGroups from BillL. This was a very lightweight fuselage, which attracted me, because I wanted to build one with a shorter wingspan and lighter AUW to hopefully be able to fly it at other places than Fermin!

I had to scratch all the other parts, cut the elliptical wings, etc. The fuselage was in one piece, but need to have the vert. stab joined. I was able to fit a nice tail stiffner, and have a nice 1/4" plywood nose tray that holds the servos. This is a simple two servo ship, with the elevator driven by carbon pushrod...standard PSS fare. I cut the wing as per Russ' description, so it starts as an RG14 at 7.5% in the wing and tip areas, but is actually fatter in the middle of the chord...that went well using Russ' tips. I went with balsa skins and a thick basswood LE, to get the right curves was a real bear, and took a lot of hard hand work...whew, many hours of carving and matching. The wing covering is silver solartex fabric.

After putting it all together, painted it all and it came in at 53 oz with a 48" wingspan...it looks more scale than usual...the lines on this Spitfire are very cool.

Thanks BillL, and SlopeIron
Posted by droydx | Mar 30, 2011 @ 02:33 PM | 28,925 Views
Update on my Mark Grand Shredder slope pitcheron:
Well she was fun while she lasted. Unfortunately, she didn't last long....

Pitcherons with wingspans longer than 60" are tough to land at my usual flying site. It's really tough to bleed off the energy needed to turn and land in the usual saddle area. I made things tougher by loading the ballast in and then having not flown in about 6 weeks....
The Shredder looked to be going slow enough, but when I went to turn her back to the wind, she no turned..... although going slow, she touched down a wingtip on the backside and promptly shredded... well maybe that's why it is so named...the entire tailboom. The break was clean, and very complete, just ahead of the TE of the wing. A bent wing rod, showed that the wing tip strike had imparted energy to the fuselage side, and the consequent rotation of the ship whipped the fuselage clean in half. A few more layers of glass, some kevlar, carbon wouldve been helpful, but hey....I knew the risk when I flew it. Anyway, the wings and tails are in super shape, I just may recycle them a little shorter on a new Samurai fuselage that I have!
Posted by droydx | Feb 15, 2011 @ 10:33 PM | 29,911 Views
I just picked up one of these off the RC Groups for sale board. What a great kit! This is a 60" V tail, with foam core pre sheeted wings with obechi and a carbon fiber leading edge...super clean work The wing plan form is pretty old school, single taper RG 15 and pretty chordy, lots of square inches. It should take ballast well. The fuselage is awesome, heavy epoxy layup, nicely reinforced, with a slip on nose cone all with flawless white gel coat. Mr Stevens knew what he was doing here.

I hear these turn well, and are relatively fast...now I just have to figure out how to finish up the wing..maybe light glass or low temp covering?

I think what I like about this ship so much is that it is so simple, and so easy to build because of the amount of prefabrication that it is in line with keeping the hobby fun...which is something that can be lost when you start working on $1000.00 molded ships.....

Will post some pictures soon.

Andy
Posted by droydx | Nov 10, 2010 @ 11:43 AM | 33,261 Views
I just finished up this wood kit...all CAD and an extremely cool design with a lot of thought. Anyone who likes to build should get one of these kits, they are so different in approach and require some careful assembly. Its a 4 servo wingeron, so wing panels move for aileron/roll control, and you have ruddervator V tail for pitch and yaw control.

If you go about the build carefully, and follow the very detailed instructions, you should get a great looking model. I still have to do the final CG and set up, but should be flying this weekend.

Good job Kevin, thanks for the fun build!


Andy
Posted by droydx | Jun 10, 2010 @ 10:14 PM | 31,281 Views
Well I got the plans about 2 -3 years ago from Reed. Ended up buying a Jart LT from him, flew it a couple times, then took a mold off the fuselage for my kit. I ended up giving the LT away to a local sloper who lost his planes in one of our recent wildfires. I layed up a pretty nice fuselage off that mold about a year ago, and now finally got around to cutting the foam cores for the wing and horizontal stab.

It took me a while to get the hang of the foam cutter I built, but now it is doing great. I built it up from some plans and a power supply I got from Ed Berris, the Ex Sky king guy. I use compufoil for my templates...have been using that a while now. I use old formica that I have scavanged for the template material. Airfoil is the stock S6062 and 8020 stab.

I'll build this one with a removeable wing, like the LT, My wingspan will be slightly longer, maybe around 58" Other than a ballast provision it will be stock to the plan set.
Thanks Reed for a great design and fun build to come!
Posted by droydx | May 10, 2010 @ 06:39 PM | 29,803 Views
I had a spare fuselage, and wing cores for a Zipper sitting around. My buddy Glenn always liked the way my old one flew, so I built it up and gave it to him. I layed in some extra carbon in the fuselage, did a bolt down wing with servos wing mount. Extra carbon in the top root area, 1/64 plywood on the stock EH 1.2 airfoil, white foam cores. I put a ballast mount at the CG point in the fuselage and it holds about a 6.5 oz weight for windier days.
Glenn painted it up and should have it flying soon...some pics from his bench:


Posted by droydx | Nov 29, 2009 @ 11:10 PM | 33,204 Views
OK, After the Mark Grand Mini SR, I figured I would build up the Shredder short kit, that I got through another RC Grouper. I'll post some pics, and do a log over the Xmas break but for now, I'm slowed down because I dumbo'd cutting the 1/64" sheeting for the wings. I cut not one, but two complete sheets into pieces that are too small to use ! So, had to buy some more sheeting from National Balsa, the cheapest source I could find. I actually paid $21.00 for one 12 X 4 foot sheet at a Hobby People....akk National has them for 13.75, so the shipping costs are still a deal. Lesson is take your time, think it through and measure twice cut once.

Right now, I have the cores prepped, tubes mounted, outboard panels ready to bag, and tail pieces cut and ready to assemble. My only changes from standard plans is making removeable V tails and having a pop up canopy for a drag brake system.

Lets get ready to shred....
Andy
Posted by droydx | Oct 31, 2009 @ 09:21 PM | 31,293 Views
I've had this kit for a few years, bought it from Ed "Sky KIng" some time ago when it was on sale. I tried to sell it twice, but nobody wanted to buy it at my cost, so I decided to build it. Needed to buy a bit of lumber to finish it. There was some strange bits and pieces that didn't quite match the thickness of the wing sub TE and LE, so I cut my own. The glass work on the fuselage was crude but nice and strong, so I dig that. Mark Grand kitted these originally, and Ed licensed the design, to sell, and I think he changed the airfoil to a RG14 or something close. These are cute little planes, take the SR7 and scale it down to a 44" wingspan.

I built it with balsa wing sheeting, didn't do the "horner" curved wing tips, and made my elevator full span on the horizontal stab. Covering is ultra coat, or what ever they call it lately. 2- HS 85 MGs and a square 1/2 AA 600 MAH battery bring the AUW to 28 oz. I was really happy with the fit of the canopy. These can be a royal pain in the A, and if you kook it, youre done. It's the clear plastic, I spray it with a mist of silver, then black RC car paint on the inside. Its held on with a front pin and rear magnet set up....teee-ight.

Could be a while before it gets flown, but should be a fun, great looking model for close in work and half pipe fun.

Andy