Tom Hunt's blog View Details
Posted by Tom Hunt | Dec 21, 2023 @ 09:37 AM | 5,225 Views
I purchased the "special addition" Freewing 80mm A-10 when it was released by Motion RC in November of 2023. I have the smaller Eflite twin 64mm and have modified it by adding FPV and station 5 and 7 bomb drop capability. Although a good flyer, the wing loading is a bit high and the small landing gear and wheels are beat-up on my less than ideal home flying site.

It seemed the larger Freewing or FMS would be suitable for the same treatment and would be better suited to my home field. I was not ready to dive into another model until I saw the special addition version released. We have 3 other standard versions in our club and I have seen them fly. Although retired from Northrop Grumman for a little more than 2 years now, I still consult on the A-10 aircraft for NGC DS.

The plan is:
add pan only head tracking FPV to the cockpit.
add droppable stores from Pylon Sta 4 and 8 (new pylons will need to be designed and fabricated to replace the stock ones)
add droppable stores from new pylon stations 5 and 7 (not on stock model)
New paint job (retro WW2 scheme worn by one A-10)

Droppable stores will include :
Sta 5,7: Mk84 gravity bomb, Mk82 Snakeye low altitude bomb (with expanding fins), Mk82 gravity bomb
Sta 4,8: BRU-42 (triple ejection rack) with 3 Mk81 gravity bombs.
Posted by Tom Hunt | Feb 18, 2023 @ 02:53 PM | 11,646 Views
Hi ladies and Gents.

I picked up a NIB 75.2" Phoenix Stuka at the 2021 NEAT fair for a very good price (thanks Tony S). The main thread for this model can be found here:
https://www.rcgroups.com/forums/show...enix-Stuka-120 so I am not going to bore you with a complete build. I will just describe the changes I made to the model to incorporate:
  • Wing and Centerline bomb drop (complete with working trapeze)
  • Wing dive brakes
  • New trailing link oleo Tail wheel
  • enhanced scale details (3d printed)
  • No external screw cowl mount
  • Digital FPV with head tracking for the pilot
  • Analog FPV for the gunner (separate transmitter/rx with pan/tilt TX stick movements), gun will move also.
  • and all that needs to happen to make these things happen.

Let's get started.

First, the biggest error (still found today, almost 7 years after release) is the quoted scale of the model. It is NOT 1/5.75 the scale is 1/7.23. Vietnamese math must be different over there!

Secondly, though a nice model and well built, the model is definitely "stand way off scale". The cowl deviates quite a bit from scale, the provided exhaust stacks are gaudy, the vertical tail is wrong (though close) and the paint scheme awful compared to the true RLM colors... but what the heck, I won't see much of the airplane flying from inside! The model is missing both the rear gun and the wing guns (though the fairing is there). and when the siren was not installed on the landing gear leg (generally only one was used). The other leg had a domed fairing over the unused one.
Posted by Tom Hunt | Apr 08, 2021 @ 12:31 PM | 14,965 Views
I have been involved with 3d printing in some form at my day job since the late 1980's (parts for wind tunnel models). I have been 3d printing parts for my flying models since 2004. I still resist printing whole models due to their weight and fragility. I know there are quite a few very good 3DP (3d print) whole models out there and I have seen a few very small ones fly, but I'm very happy at this point to use the printer as a tool to help me get something done or changed on an existing model.

As I approach my late years, the printer gets me back in the air faster than I could have by older traditional methods. I am also an experimenter. Not just with the printing, but with model aerodynamics. Printing allows me to quickly "tweak" many existing designs and experiment quickly with my own designs.

I decided I wanted to redesign the Tundra wing to include a more "full scale" type aileron hinge and a non-slotted "radius" flap (similar to the full scale P-51). I fully expected this wing to weigh more than the original foam wing, but that was not the purpose. It's really hard to beat the weight and strength of a well designed injected model foam wing.

The new design is a blended mix of 3DP, balsa wood and hardwoods. It is basically a traditional "built-up" wing construction covered in Monokote. Difficult to shape parts were printed (aileron cove, flap cove, servo pocket mounts ect) and the laborious parts like the wing ribs (I STILL don't have a laser cutter!) were 3DP. The wing spars are hardwood and just about all the other wood in the wing was balsa.

So let's show you how I did it.

Obviously it starts with a complete 3d model to extract the 3DP parts. Below is the finished 3d model and an exploded view.
Posted by Tom Hunt | Feb 05, 2021 @ 07:56 AM | 24,010 Views
Hello modelers

Two new "fun" contests for the 2021 NEAT Fair have been proposed by Lobstah Al (aramsdell) and Nick (needmoreglue). you can see more info at:
https://www.rcgroups.com/forums/show...NanoFO-contest

The purpose to this blog/build thread is to show you my offering to the "ultimate" segment of the two contests.
Rules right now are pretty simple.
  • Must look like a BLUFO at no larger than 14" span
  • Any power system.
Flying portion of the rules is yet TBD.

I decided to make my first prototype from a combination of 3mm Depron sheet and 1/8 x 1/4 balsa. The fuselage pod will be shaped Dow blue-foam.
The radio and power system is to be stolen from a really bashed and barely flyable UMX Beast Bipe (pre AS3X).

I have included below the PDF's of my preliminary drawing if anyone wants to get started right away. The plans will be updated as required.
A second all-balsa/doculam version is envisioned which may or may not have a cambered airfoil rather than flat plate.

Lets get to it.

I cut out all the foam parts first and that took a little less than 3/4 hour . The work you see below took less than 1/2 hour. Now it's time to leave the basement and design and print a new motor mount for the Brushless 180 motor that cam with the UMX Beast.
Posted by Tom Hunt | Apr 14, 2019 @ 08:37 AM | 43,725 Views
This is a placeholder for the upcoming modifications to the Hobby King Grumman Albatross seaplane to include retractable landing gear.

drawings and stl files will be posted on thingiverse when I have this finished.

HK items you can purchase (if they are in stock) are:
oleos: (all three are used) https://hobbyking.com/en_us/alloy-ol...pin-trike.html
retract: https://hobbyking.com/en_us/servoles...mount-2pc.html
180 deg retract servo (new) for pulling gear in (abandoned the magnet slider)

I will work on the nose gear files and drawings next.

Thx
Tom
Posted by Tom Hunt | Oct 26, 2018 @ 12:03 PM | 40,829 Views
How fast does a stock V900 really go?

When Stuart Warne was still leading the Durafly Ship at Hobby King, I did some work for him on the upgrade to the EFX to the EFXTRA. The basic difference was a larger motor and prop and clipped tips.

A "stock" EFX with the supplied black prop barely got over 90mph. Putting a "better" APC prop on it made it go 99MPH! Stuart wanted it to go faster.... how much I asked. Lots... he said... I told him, sorry, but to go LOTS faster requires more energy than you can fit in the fuselage. Since 4S was really the size limit (with any reasonable amount of capacity), with some motor changes and better props, I was able to get the EFXtra to 110mph level flight and close to 135mph in a terminal (straight down) dive.

A couple years later, in steps the V900 from Eflite with claims of 120+MPH. With all the work and inflight data I collected on the EFX and EXFtra, I had to see if there was some magic in the V900 that made it go 10MPH faster on basically the same 4s power system. It takes GOBS more power to go 10MPH faster (level flight) at 100+MPH!

Well ladies and gentlemen, it does go 120mph as advertised, but only in a steep dive! It does about 110MPH straight and level, and surprise surprise, it's just about the same power level as the EFXtra! it's just that and EFXtra does it with a 7 x 6.5 prop and a V900 with a 8x8 . Pretty much proving that if you make good decisions (motor/prop), POWER is king, not what is in...Continue Reading
Posted by Tom Hunt | Aug 10, 2018 @ 08:02 AM | 41,961 Views
Well gentlemen (and maybe ladies)

I took the "stock" Opterra out for it's first ride today. Stock PnP that is. I don't fly Spektrum, I'm a Taranis driver, so no "stability" system in this one. I used an old (in time, not cycles)Eflite 20C 3s-3000mah because I had two and they fit all the way fwd and make the model balance right between the marks on the bottom of the centerbody. I taped the wings on to avoid any complications with the plug-in circuits.

The day was low broken clouds with rain nearby, winds southerly (off the ocean) at 6-8 MPH steady with gusts to 10-12.
I was alone at the field so the only recording was thru my headset (actually the best place to see it!).

First flight (very short, <2min) was LOS just to trim her out. no surprises, hand launch was uneventful. landed and hooked up the camera and went off to FPV. Spent most of the next 6 minutes getting used to her. She's a good ship and I found no surprises flying her fast or on approach to land.

OPTERRA FIRST FPV FLIGHT (4 min 15 sec)


Now..... I have built and flown many a flying wings in my 46+ years of flying RC models. I have even scratch built/designed a few. I had a suspicion that the inboard vertical tails were just "decoration" and the second FPV flight showed me that this was true..... but... (and it's a big but), I found out on the third flight that the tails may be responsible for the death spins some have experienced. Read on (and watch the...Continue Reading
Posted by Tom Hunt | Apr 25, 2018 @ 02:22 PM | 41,639 Views
I was involved in the power selection for the HK Avios Grand Tundra when Stuart Warne was still at the helm. Now that Stephen Neill has taken over he graciously sent me one for my personal use after I beat up a prototype model Stuart sent me last year. The proto is still in good flying shape, but kinda dented and dinged. Originally just an "albino", Stephen sent me a set of decals for it. I also converted it to clear windows which I will show how that is done after the pre-orders have reached the modelers. but until then I would like to discuss the inflight data I will be collecting on the model.
Posted by Tom Hunt | Dec 12, 2017 @ 06:24 PM | 41,043 Views
OHello fellow modelers.

Though I have seen a few multi-engine foam models released recently with removable outer panels, I wished that had done it on the Flightline F7F. Despite the nice multi-connector provided to make it easier to assemble the model at the field, it is still a pain to snake the wires (servos and power) into the fuselage each time. I do not yet know of the reliability of mulit-con, but my philosophy is: "if it doesn't need to be done... don't do it!".

So, to that end I decided to cut the wings off at the scale fold-joint on the model and re-install the outer panels with two simple servo connectors for the ailerons and lights.

Lets get started.

First you must take off the nacelles and then remove the tape covering over the wire troughs. With the bare wing on your bench you can proceed with the surgery.

I am sorry i did not actually get any pictures of me sawing off the wing, but the process is simple. You should use a brand new long edge knife for the foam (like the kind where you break off the end piece to reveal an new sharp edge) and then use a new fine tooth exacto saw to cut thru the spar tube. DO NOT cut the servo and light wires at this time, just remove them from the mulit-con near the wing root for now and leave them attached to the OWP when cut off.
Posted by Tom Hunt | Nov 19, 2017 @ 10:49 AM | 45,299 Views
Ladies and Gentlemen.

How fast does your model really go? It is amazing that asking a wide variety of people at any one flying field how fast a model travels that you get such very wide spread of answers. Many of those answers that are very far off the true airspeed are from quite seasoned modelers! I am getting better at it, but depending on the size of the model and maybe the noise it is making, I still can guess quite far off!

Well, there is no need to guess anymore. if you have telemeter type RX/TX's, a way to record data (or just listen) and an airspeed sensor, none of which are that expensive anymore, you too can really find out how fast your model is going and how much power it takes to get there.

Many of you know that I am quite fond of propeller driven warbirds, and my favorite is still probably the Supermarine Spitfire. I have done some design work for Hobby King over the last 5years for their Durafly and Avios line. I have designed power systems and props for many of these models. For this dissertation I decided to use an Eflite MK14 1200mm Spitfire. Though a good looking and flying model, many here on RCgroups think it is a bit slow for a warbird in the stock 3S configuration. When I first saw one fly earlier this year, I too thought the same. Then I got to fly one and my impression did not change. It was time to own one myself and see where the problem is and how it can be fixed.

From my experience on the Durafly Mk24 spitfire (I designed...Continue Reading
Posted by Tom Hunt | Apr 04, 2017 @ 05:12 PM | 57,696 Views
Hi Gang

I know many of you have seen the Hobby King Produced videos of my B-17 camera ship, but on the following pages I am going to relate some of the details of how I accomplished this amazing aircraft.

Links to the vids are first in case you need the background:
Weekly Update Ep. 38 - HobbyKing Live (6 min 44 sec)

Unsolved History - FPV B-17 Teaser - HobbyKing Live! (2 min 3 sec)
...Continue Reading
Posted by Tom Hunt | Jan 06, 2017 @ 06:45 PM | 46,193 Views
NOTE: updated on 3-13-2024

A lot of modelers seem to pretty clueless as to how to determine the "scale" of a particular model.

It is not all that difficult. The model wingspan (in meters) divided by the full scale wingspan, in meters, (query Wiki if you want fast answers) is the scale.

If the full scale aircraft had a wing span of 11meters and the model is 1100mm (1.1 meters) then the the scale is 1.1/11 or 1/10th.

Here is a list of the some of the most popular past and present Warbirds offered.

Grouped in ever larger sizes and grouped by color, this will give one the idea of which models pair well with the other for realistic static photography.

Enjoy
Tom
updated on 3-25-2022 to include Parkzone Wildcat and H-King F6F (little nugget)
updated on 6-20-2022 to include Durafly (Hobby King) Gloster Gladiator Mk1
updated on 11-7-2022 to include Eflite D18 and P-47d (1.2m) no longer making jpgs of excel file, just the pdf.
updated on 6-28-23 to include Freewing F9F cougar, Flightline B-24 and Eflite A-10.
updated on 11-18-23 to include Freewing A-10, Flightline B-25
updated ib 3-13-24 to include both Freewing F-14 tomcats and both FMS and Freewing F-86
Posted by Tom Hunt | Mar 26, 2016 @ 05:45 PM | 54,929 Views
Hey guys and gals,

Decided to bash a Dynam Tempest into a bit of a better looking model.

Things that are wrong with the original
  • Color scheme
  • Nose too long
  • Aft fuselage too short
  • Landing gear does not have enough fwd rake for grass fields
  • canopy to far fwd
  • Exhaust stacks not very scale.
  • 3 blade prop not scale
  • decals
  • no radiator in cowl inlet
  • NO WW2 warbird had right thrust!
  • chin inlet wrong shape!

What I will fix:
  • Color scheme (will use proper Dark Green / Ocean Grey / Medium Sea Grey scheme of all post 1941 British Aircraft
  • Nose too long (Shorten 1")
  • Aft fuselage too short (move tail back 1.25")
  • Landing gear does not have enough fwd rake for grass fields
    (replace crummy retracts with FMS 1400mm versions and rake fwd a bit)
  • canopy to far fwd (move aft .5")
  • Exhaust stacks not very scale. (3d Print new exhausts)
  • replace prop with 3d printed near scale 15 x 10 CCW rotating (viewed from the cockpit) 4 blade prop and spinner
  • Decals (probably make my own or get Callie to do them)
  • no radiator in cowl inlet (3D print representative radiator)
  • NO WW2 warbird had right thrust! (remove right thrust (3deg) and mount motor straight ahead)
  • chin inlet wrong shape! (fix, of course!)

Let's get started.

Tom
Posted by Tom Hunt | Jan 30, 2016 @ 02:35 PM | 52,828 Views
Hi Guys and Gals

Presented below is a make-over of the very first DF Spitfire MK1a that came out of the mold that Stuart sent me for flight test evaluation. It came to me in bare white foam but in all other ways was representative of a production model in shape and function.

I decided to make this a "B" scheme (mirror image camo of the "A" scheme found on a stock DF spit) Mk1a flown by Robert Stanford-Tuck around May 1940 during the "phony war". GR-P N3249.

First I needed to resize the horizontal tail to match the full scale. It was decided to make the model with a 10% larger tail to make it easier for novice to intermediate fliers to fly. I printed out a scale size tail and cut the stock model one to size in planform first. The I marked the middle of the foam on the LE and TE to give myself something to sand to. I also marked the approximate "high point" of the airfoil on the top and bottom surface.

Sanding EPO is not pretty. You have to use some pretty coarse grit <100. After rough sanding, one can go over this with 180-200grit, but do not be too concerned if you don't get it too smooth....Continue Reading
Posted by Tom Hunt | Jan 20, 2016 @ 07:03 PM | 56,564 Views
Hey Guys

when doing my "full" mod of the Durafly 1100mm P-40N to accept the Turnigy Retracts

I realized that anyone that is willing to buy the full retracts (the struts at this length are NOT available separately) just for the struts, could modify the stock retracts/struts to except the oleos.

Here is how it goes.

First you need to take your dremel and a cut-off wheel and cut off the existing 3mm landing gear leg about 20mm from the trunnion.

then you need to file/grind a flat on the inboard side of the stub strut for the grub (set) screws on the new Oleo strut. NOTE the flat you file may not necessarily be exactly parallel to the fuselage centerline as the set screws put in the oleo leg are not put in the accurately. you may have to adjust the flat a couple of times, so do NOT grind/file too deep at first.

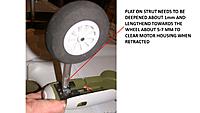
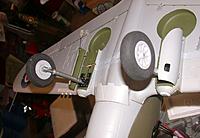
Next you need to grind or file the alum oleo strut so that it clears the motor housing of the retract. A flat is already provided, but it must be made slightly deeper and longer. You also need to open up the wheel axle hole to 3mm just as I did in the full retract mod.

slip the strut on and lock tight, test and go fly. very easy!

have fun
Tom
Posted by Tom Hunt | Jan 17, 2016 @ 02:46 PM | 56,599 Views
I have modified one of the earlier Durafly P-40N prototypes I had gotten from Stuart Warne at Hobby King to accept these Landing gear units. They offer the same 100deg forward rotation with the 90 twist to stow flat in the wing like the P-40 and F4U.

It is quite a bit of work as these are far from being drop in replacements for the stock solid strut units. But if you are interested in repeating this, keep reading.

You will need:
a dremel tool and a 1/8" router bit.
a disk or belt sander
3/16" (5mm) wood dowels
#2 sheet metal screws.

Let's get started.
Posted by Tom Hunt | Oct 25, 2013 @ 10:39 AM | 56,766 Views
HI Gang

I have decided to put this mod in my blog rather than clog up the thread in the electric warbirds section.

I recently acquired a "kit" version of the new Durafly BF-110 which includes no electronics, but I did acquire the retracts as these were specific enough to the aircraft for me not wanting to go at it alone. I also picked up a pair of mating prop adapaters to the props/spinners supplied.

With this said, I had to buy my own motors/esc's and servos. I also chose NOT to install the rudder servos, nor the tailwheel servo as I plan on using differential throttle to steer on the ground and in the air. I thought the weight savings would allow me to add functional bob drop instead.

let's get to it.

Motor choice and instalation:
I chose a pair of BP 2212-13 (1000kv). I did have to ream out the stock prop adpaters to 3.2mm (1/8) for these motors however. I have a small lathe in my shop, so this was no bother.

I had to add a bit of plywood in front of the supplied mounts in the nacelles to position the motors properly under the cowl.
Posted by Tom Hunt | Apr 22, 2013 @ 03:03 PM | 54,249 Views
I have decide to create a directory of my foam model bashes.

FMS 1450mm P-51D (V1) to B (way before FMS decided to make a "B") Status: sold
FMS 1400mm Bf-109(?) to BF-109E night fighter. Status: model scavenge for parts, may fly again.
FMS 1400mm MK9 Spitfire to MK5. Status: complete model still in good flying shape, unflown in some time, awaiting new Avios Mk5 that I worked on for Stuart at HK

FMS 1400mm MK9 Spitfire to MK12. Status: complete model still in good flying shape.

FMS 1400mm BF-109F bash and repaint Status: destroy in crash

Durafly 1100mm MK24 Spitfire to MK21. Status: completed. model still flying

Dynam 1200mm Tempest bash and repaint: Status: in process
Posted by Tom Hunt | Jan 28, 2012 @ 09:54 AM | 49,764 Views
Hi Guys

Here is two sneak peeks at a couple of projects I will be attacking this year.

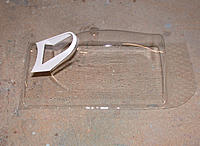
Probably first will be the bash of the new PZ Mk9 Spitfire into a BoB Mk1a. I began by creating a new canopy plug.

The white part is the external armour plating found on the early marks. (Mk9 had internal plating). It was made by the 3d printing process. The sliding part of the canopy is also "flat sided". It was much different looking than the "buldged" canopy of the later mks.
Posted by Tom Hunt | Apr 29, 2011 @ 03:34 PM | 59,916 Views
I spent the entire day putting the 11 servos in the wing for all the "stuff" that is hapenning out there.

centerline bomb drop
each wing:
1 aileron (eflite s-75)
2 flap (2 eflite s75s in LH wing, 2 HS-55's in RH wing beacuse the rotate opposite one another)
1 bomb rack bomb drop (FMA s-70)
1 dive brake (FMA s-20)

I also made new device hinges in my favorite machine as the stock ones rotate in the wrong place (the hinge line is inside the device, NOT on the bottom of the wing)...Continue Reading