Razors edge 29's blog View Details
Posted by Razors edge 29 | Nov 10, 2012 @ 07:49 PM | 24,906 Views
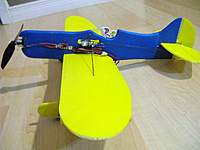
Today at the LHS, I bought a rubber band powered glider called the Estes Condor. I believe this is part of a new line up as it is foam, and not balsa. The wing, hstad and vstab seem to be made out of Depron, while the main fuse is conpressed EPP I think.

See link below
http://www.estesrockets.com/004014-r...nd-foam-glider

I bough this with the intention of making it a tractor set up, but then realized I dot have any small enough props to use with motors I had on hand.

So, I made it a top mount pusher.

It uses a Champ brick, mounted upside down under wing through fuselage, and a MCPX tail motor and rotor blade. I used a scrap piece of Depron to make top pusher mount. I ended up running the elevator linkage through the fuse. The brick is mounted off center to allow rudder/aileron servo to be outside fuse. I cut down the stock main landing gear and made it a lot closer to ground. I also fashioned up a tail wheel which is steerable via the rudder.

I went nuts with some sharpies and stock stickers. This conversion ended up with a weight w/o a lipo of just under 21 grams with landing gear.The main landing gear is removable and weights 1.3 gram.

I had it out earlier this evening and it did fly, but was quite pitch sensitive and thus I have since adjusted the motor angle to give down thrust.

She has lots of dihedrel, and under camber which provides great lift. I think it may even be able to rog in a gym for take off. The MCPX tail powers it nicely.

I will try and add videos if I can.

thanks for reading.
Posted by Razors edge 29 | Sep 04, 2011 @ 09:03 PM | 27,204 Views
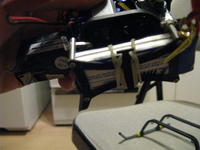
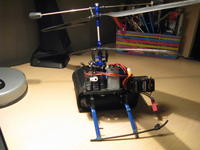
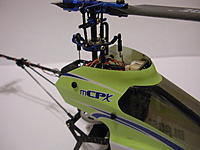
Here are some pics/info of the Xtreme upgrades that are now fitted to my Blade MCPX


Recently I received the new CF skids/boom support, and aluminum swash.

The stock skids weight .9 grams, and the CF skids weight 3 grams with boom support. This is 2 grams more than stock machine.

While the skids look very nice and are durable, they may not be a suited for pilots whom fly 3D on stock machines. They would be better suited for sport flying, and or those machines modded to brushless.


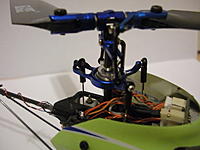
The swash is very nice, and is less than a tenth of a gram weight difference. My stock swash weighed in at 1.23 grams, whereas the new Xtreme swash is 1.32 grams. See pics below.

I also have the xtreme grips, and head which have been great so far. I have not flown yet with new swash and skids, but hope to tomorrow.

If you have any questions, please dont hesitate to ask....Continue Reading
Posted by Razors edge 29 | Jul 21, 2011 @ 10:17 PM | 26,848 Views
I was given a kit from Dynamic Foamie of there micro F22 Raptor

I finished building last night, and the AUW including lipo was 100 grams.

I used the following items outside of the kit

1. Specktrum AR6100E

2. GWS 4040 prop
https://www.hobbyking.com/hobbyking/s...dProduct=10041

3. 18-11 2000kv Micro Brushless Outrunner (10g)
https://www.hobbyking.com/hobbyking/s...idProduct=5358

4. Turnigy Plush 6 ESC
https://www.hobbyking.com/hobbyking/s...idProduct=4318

5. Nano Tech 2S 370 MAH 25C lipo
https://www.hobbyking.com/hobbyking/s...dProduct=11894

6. 2 x S0403 4.3g Servo
https://www.leaderhobby.com/product....=9394001020006


I used UHU POR glue for the majority of the construction, and used 15 min epoxy for the control horns and motor mount.


I had to change the motor mounting on the airframe, as the motor I use will not fit without a bit of foam cutting. Which, was no biggy.


This kit was very easy to put together, and looks awesome with the arctic camo paint scheme. The access hatch at the bottom is also a welcome feature and works great


I took it to the park tonight for maiden flight, and despite the higher than suggested winds (my gut told me to wait, but I did it anyways lol) if flew well.

I would describe this as more of a scale flyer, which is capable of high alpha. On 2S set up it is not that powerful, nor fast, but has adequate power to fly. Mind you, the winds were high tonight, and not ideal for flying this micro.

Rolls of...Continue Reading
Posted by Razors edge 29 | Mar 28, 2011 @ 11:56 AM | 26,803 Views
Finished building an small profile F22

below are some pics, and a link to the build log

https://www.rcgroups.com/forums/show...4#post17811112
Posted by Razors edge 29 | Mar 27, 2011 @ 02:07 PM | 27,009 Views
Here are some pics of my recently built, 21 inch wing span EPP Yak 55. Its total weigh is 55 grams with landing gear, minus lipo.

The airframe is built from 6mm EPP, and uses 1.5 MM and 1mm CF rod, so its built tough. I did not need to add X-bracing to tail as I ran a piece of 1.5MM Cf down the middle of the airframe and wing, so its very stiff and wag free.

Uses AP05 BL motor, 5030 prop, XP7A ESC, AR6400L (elevator and rudder servos), a hobbyking micro 3.7v servo for ailerons and landing gear from a 4-site. I am running small 7.4v lipos 20-25C range.

I have only flown briefly, outside in the wing mind you, but so far its great. Like a kit in the wind lol, but it can be flown. This thing on high rates rolls like a drill as per mega throw from aileron servo, so I toned that down a bit.

The AP05/5030 provides plenty of power to hover and throw it around.

Will try some more outdoor flights today, and indoor this week. I wanted something to hover in my house and now I have it


ps. last pic is this model with its bigger brother.
Posted by Razors edge 29 | Feb 15, 2011 @ 01:31 PM | 28,080 Views
I got this Foam Star Yak 55 kit from a club member whom bought it from a neighboring city. The kit comes with a 30 inch wing span, 3D profile foamie which is made from blue foam this kit includes all the CNC cut and milled parts which are tabbed and very easy to install. Also included is all the CF, motor mount, other linkages materials and landing gear.

This was very easy to install and came with good instructions. The CF is 1 and 1.5mm, and the foam is 1/4 blue foam which is ridged, flexible and has been milled for lightness. It is also fairy durable.

I used as little hot glue as possible, and mainly used UHU Por for construction to create flexible joints. I used Blenderm tape for the hinges. I'm not a very good artists but I tried to give it some color for orientation. This total unit minus lipo weights about 120 grams, which is light considering the motor should produce about 250 grams of thrust, so its over a 2:1 thrust to weight ratio.

I maidened outside today in my small flying area :and it handles well. LOADS of power , just the way i like it .

I may have to adjust the throttle curves on my ESC as it has most of its power about mid throttle, OR I'll just have to get used to it.

It hovers well and has more than enough pull out power.

Indoor this week is going to be fun

RX
Spektrum AR6100E

Motor
https://www.hobbyking.com/hobbyking/s...idProduct=6547

ESC
https://www.hobbyking.com/hobbyking/s...idProduct=4318

Servo (3)
https://www.hobbyking.com/hobbyking/s...?idProduct=663

Prop
https://www.hobbyking.com/hobbyking/s...dProduct=10048

Lipo
https://www.hobbyking.com/hobbyking/s...idProduct=9187
Posted by Razors edge 29 | Dec 14, 2010 @ 11:06 PM | 28,057 Views
Just posting some pics of my 3ch scratch build profile GeeBee using AR6400, hobbyking AP05 BL motor, 5043 prop with collet type adapter. It is currently set up as a 1S power system but that could quickly change as it is heavier than most ultra micro planks.

Frame is built using 3mm Cellfoam 88. The main body minus tail feathers are 3 pieces of 3mm laminated together with the middle piece being braced with a bamboo skewer for strength.

The wing is one piece of 3mm cellfoam88. I added under camber by tracing lines length wise underneath the wing and then scoring them with a thin piece of music wire. This allowed the foam to curve. I then added ribs underneath the wing. The wing also was cut, and then dihedral was added when mounted to frame.

I went with a cartoon'ish theme and used Krylon paint to cover, and added a Snoopy pilot and his yellow bird companion and a wind shield for fun.

I am a fairly new builder and not the best, but it have a great time doing it.

I have some 3mm EPP on its way with some UHU glue (hard to get for Canadians) and some other essential building tools which I desperately need.

Thanks
Posted by Razors edge 29 | Oct 17, 2010 @ 06:59 PM | 27,410 Views
Just some pics of my FP helis

Left to right

Xtreme Blade MSR

Stock Blade SR 120 (soon to be Xtremified)

Xtreme Nine Eagles Solo Pro
Posted by Razors edge 29 | Jun 20, 2010 @ 10:11 PM | 37,500 Views
Well today I decided to make a home made light kit for my hobby zone champ; it kind of messy but works till I get the tiny brite lights kit later this summer.

I used the EFlite Blade CX3 LED kit, took it apart and wired it up for 2 lights per wing, one blinking LED for bow and stern. This LED setup is using its own power source, via a parkzone Vapor 70 Mah battery.

I test flew tonight, and tried to dial in CG, but it was kind of windy but with a little trim worked well. The placement of the light kit battery made the plane glide very well by keeping some weight on the tail; it would glide pretty close to level without power, but corning was not as good due to excess weight and CG being off.

Still, it is fun for now


see attached for pics/vid on youtube


http://www.youtube.com/watch?v=PFavQCz_m5k
Posted by Razors edge 29 | Jun 20, 2010 @ 01:57 PM | 30,677 Views
I went to use the Celectra 4 port charger that came with my MSR a year ago, and the charger itself was not getting power unless I wiggled the wall adapter end of it, inside the female end of charger. So, figuring that a solder joint has gone cold or become loose, I took the charger apart. At first, it appeared that the one joint was just loose on the board. So, I reheated joint and let it sit. Plugged in the charger and still no power. Hmmm.....so I unsoldered the joints to the female connector inside the charger and upon inspection discovered that the tracks converging around the female connector tabs that go through board had somehow lifted on on two of the three connector posts from heat over time or something???

Because the tracks had lifted there would be no hope in hell of re-soldering the connector back to the board the way it had been. So, I took some thin gauge wire and resoldered the connector back to board further down the tracks. Luckily the posts off the connector, have a hole in the ends, to which I fed one end of the wire through, crimped over and soldered. I then soldered the other end of the wire to the end of the track where there was already a solder joint.

Plugged her back in and now she works.

I hope it stays that way and does not cause any damage anywhere else on board.

see pics
Posted by Razors edge 29 | Jan 17, 2010 @ 08:22 PM | 28,976 Views
One Modded CX2
One Modded CX3

2 MSR's with various detailing done

1 Stock MCX S300


The best part is - THEY'RE ALL RUNNING WELL NOW That feels good!
Posted by Razors edge 29 | Jan 01, 2010 @ 09:59 PM | 29,541 Views
Well got finished some painting tonight; turned out well, paint dried very fast surprisingly. The fuse will be drying over night and decals will be going on tomorrow. The only bad thing is the little Xtreme fuse which will go on MSR has a few cracks on it, not sure why, but i never noticed them before - they're not horrible so its good. Below are some pics, I couldn't really get a good pic to display the color (gun metal) of Xtreme fuse but its looks fantastic in light. I think i'll leave the view screen blank or paint it silver maybe. Also, the Xtreme tail I had for the MSR is currrently blue which I originally thought would look okay, but I think i'll paint it gun metal, or silver perhaps

Pics below
Posted by Razors edge 29 | Dec 20, 2009 @ 04:08 PM | 29,613 Views
Well, I had some after market Xtreme parts for my MCX which is now on the back burner, so I decided to use the Alyum swash, Fuse and Tail Fin on my MSR and do some more detailing. I have yet to pant the Fuse but I think I'll go with silver as it has blue decals. I will also do more detailing to the stock parts. Below are some rough pics!

I have also test flow it as is and it flew very nice - no high speed manuvers yet, just slow flights around kitchen - it piros better now I think - diff fin maybe? I need to find some paint and a decent place to do so as its cold here now


I just finished working off another idea I had. The MCX Xtreme tail fin is currently factory painted or inprinted blue. I painted gun metal over top of it, but as its factory painted and glossed not sure how it'll look, plus during trial flights a while back I broke the bottom piece of fin. Its been glued back on, but doesn;t look great. So..... I had a yellow MCX tail fin that I cut and shaped to look more like a MSR fin, roughed it up a little and it is being painted. The way they come, they just slip over the MCX tail shaft - I had to cut it so it will not just clip of the MSR shaft. I'll have to use a little bit of CA, but it shouldn't be visible! So, when both fin versions are painted and done; i 'll use the best one I supposed and keep the other as a spare.
Posted by Razors edge 29 | Dec 17, 2009 @ 09:43 PM | 29,782 Views
Here are some of my to be flown Parkzone Planes. I picked up the Vapor today in order to get the skills needed to fly my UM P51 Mustang.

I'll have the opportunity to learn indoors to fly these planes. I am hoping to be able to fly Mustang outside next summer at local park
Posted by Razors edge 29 | Aug 24, 2009 @ 07:06 PM | 29,494 Views
Here are some recent pics of my CX3 in mod process. Finally installed microheli CNC battery tray and Superskids 400 series landing gear with proper 14mm M2 screws. I would display pics of the painted fuselage but I am embarrassed at how bad it looks. Anyways, here are some pics.
Posted by Razors edge 29 | Aug 20, 2009 @ 11:15 PM | 29,694 Views
Had a couple good flights outside tonight, still no fuselage, but mounted on skids with quick ties, so not completly in the right place but it worked; screws come in monday for skid mounts. Surprising the heli handled okay outside cause the winds were a little gusty, not to say I was in total control, but I was surprised vs outdoor flight before mods. It was dark and dimly light so that didnt help either. I had a lower blade strike, either from flybar or something else. Thinking of getting extreme longer shafts and main gear to aid in no blade strikes. I also have a adjustable flybar on order which should help as well.
Posted by Razors edge 29 | Aug 20, 2009 @ 12:26 AM | 30,128 Views
Here are some pics of the microheli alum battery holder and the superskids 400 series CX3 adaption that is being outfitted to my heli. In the pics the skids are not attached yet, as I am waiting on longer screws. But it will look like this, the fuse is being repainted and not in pics. The skids are longer and wider yes, which is not scale, but good for a beginner like myself should be a lot more stable. Enjoy!
Posted by Razors edge 29 | Aug 18, 2009 @ 11:33 PM | 29,814 Views
Received CX3 upgrades today. Started assembling microheli CX3 aluminum battery tray, and superskids 400 series skids. I need to get some M2 philipps pan head screws about 14-16mm long to make it fit nice. I will post pics when done, it is going to be make the heli way better and durable. The only thing is, the skids won't look scale, but it will have added stability and as a beginner I need that. Plus it could become a good durable CX3 training tool perhaps. We all know how undurable this heli is, especially in blades, landing gear, battery holder, ow, and did I mention swash plate separation? Anyways, you get the point! Till tomorrow!
Posted by Razors edge 29 | Aug 11, 2009 @ 09:46 PM | 30,676 Views
I am a newby to the world of RC Helicopters and am having a great time. My first heli is a E-flite Blade CX3. I have had many crashes, replaced parts, added modifications and am still in the process of upgrading this heli. I have installed E flite aluminium swash, lower and upper head, bearing holder and replaced the inner and outer shaft. I have also had to replace bearings, main gear ect due to flying outside in winds; like I said, I am a beginner but enjoy this hobby, I have created this blog in hopes that others out there like me can provide me with tips to improve this heli. I have more parts arriving soon. I am upgrading to Superskids 400 with the Superskids 200 adapters and the microheli CNC aluminium battery tray. Basically, I am upgrading all the typical parts to break on this heli. I am also in the process of re-painting the fuselage, despite the fact that there are a few cracks in it, but it should look nice once done. If anyone can offer suggestions, it would be greatly appreciated,

Thanks