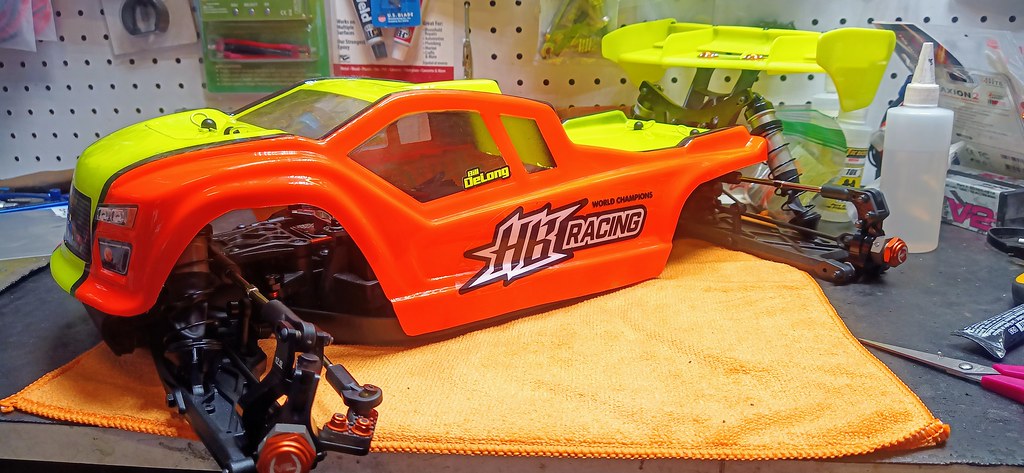
Posted by bill_delong |
Dec 12, 2023 @ 06:25 PM | 4,469 Views

This will be a live post that I will update regularly as new information becomes available. Although this thread will be targeted for club racing, I expect a lot of this information may be useful for bashers as well. I am a club racer who has been a basher since 1986 and got into club racing around 2010.
I have several years of experience racing the E819RS and this thread will carry forward many of the same tips as well as new things the team drivers have passed down in recent months with the WS.
- RC Tech Thread
- INSTRUCTION MANUAL
- Editable Setup Sheet
- Pro Driver Setups
- Bill DeLong Setup - Low Grip
- Bill DeLong Setup - High Grip
- Sacha Tauber Setup - Med Grip
- Gary Studt Setup - High Grip
Current Gear Used:
- ESC - HobbyWing XR8 Pro G3
- Motor - HobbyWing 4268-2200KV
- Servo - SRT 9032
- Battery - LCG Zeee 4S-120C-5.2Ah
- Radio - Fly Sky Noble NB4
- Body - 6MIK Optima
Recommended Upgrades:
- 6MIK Radio Box (also fits RC4 and mPTX transponders) - JT Box
- 6MIK Front Chassis Brace
- 6MIK Aluminum Servo Horn (also available in black)
- Emulsion O-Ring Set (low grip) or TLR Bladders (high grip)
- Servo Mount Options
- Exotek Aluminum Steering Brace Plate
- Exotek Aluminum Center Bulkhead
- Exotek - Akermann Bearings on Steering Cranks
- DE Racing Front Bump Skid
- DE Racing Rear Skid Plate
- Rear Carbon Brace *** Only use when traction rolling
- AVID Delrin Steering Bushings
- Flashpoint Magnetic captured wheel nuts
- Rear Shock Stand Off Mod
- M3x16 turnbuckle for steering link
Build Tips:
- Lucas White Lithium Grease (use on all rubber seals for shocks/diffs and ring/crown gears)
- Vibra-TITE 125 (gel threadlock, must apply on ALL metal to metal fasteners, including nylon lock nuts!)
- Phi Long - Use Camber Link Balls instead for center links:
Recommended spares to carry:
- Shock Shafts
- Ball ends
- Inner suspension pins will snap if threaded nut backs off
- M3x11.5 pins (I replace every 6-8 race days on center drive shafts) - Pin Replacement Tools
- M3x13.8 pins (for all other dog bones as needed, 12+ race days)
Check out more stuff on My Bookmarks page!
Comments (19)
Add Comment
Posted by bill_delong |
Mar 30, 2023 @ 08:30 PM | 11,910 Views
The following build was done APR-2023, keep this in mind as Caster is known to make running updates and improvements may be made to the kits for any build tips provided.

This will be a live post that I will update regularly as new information becomes available. Although this thread will be targeted for club racing, I expect a lot of this information may be useful for bashers as well. I am a club racer who has been a basher since 1986 and got into club racing around 2010.
Current Gear Used:
Key Stand Outs:
This will be a live post that I will update regularly as new information becomes available. Although this thread will be targeted for club racing, I expect a lot of this information may be useful for bashers as well. I am a club racer who has been a basher since 1986 and got into club racing around 2010.
- ETO821 Kit
- ETO821 RTR
- Caster Racing USA - Backstory
- Caster Racing Contingency Program
- RC Tech Thread
- USER MANUAL
- Editable Setup Sheet - ETO821
- Bill DeLong Setup - JUN 2023
- Carnage Report
- Final Thoughts
Current Gear Used:
- ESC - Team Trinity MX8 Pro + MX Program Box
- Motor - Team Trinity XF8 4268-2000KV
- Servo - Team Trinity HT-1990
- Battery - LCG Zeee 4S-120C-5.2Ah
- Radio - Fly Sky Noble NB4
- Body - 6MIK Optima -- Requires modification to fit, must use Caster body with stock body mounts!
- Wheels and Tires - Raw Speed
Key Stand Outs:
- Set of 4 yellow wheels and foam inserts included
- Clear lexan body with window masks included
- Tunable Pill inserts included, all 4 blocks (A-D) can fit the same inserts
- 10� and 15� Caster Blocks included in kit
- Short and Long Ackermann Bars included in kit
- Spare gasket spacers provided for diffs (if needed)
- 14T Pinion gear included
- Aluminum slide lock motor mount
- Spur Gear Dust cover
- 25T Aluminum Servo Horn included in kit
- 1 size bearing for entire drive train (18 total) -
Posted by bill_delong |
Mar 08, 2023 @ 01:26 PM | 6,526 Views
When I first started out as a basher in the 80's, I never did any maintenance. I simply waited for something to break or for the car to "act funny" before I addressed anything. While this minimized my wrench time, I would later discover that it increased my overall costs where if I had done regular preventative maintenance then I will have likely replaced worn parts before a trail of cascading repairs can erupt.
Fast forward to 2010 when I first got into club racing. I would soon discover the importance of tuning to compliment maintenance where performance would drastically degrade without doing both tuning and maintenance.
Over time, I would keep a race log, with a different worksheet for each chassis to include columns for: Date, Hot Lap, Hot Qual, Hot Main, Hot Consistency, Notes
In my notes I will record every rebuild where I like to go between 3-4 race days (roughly 2 hours of combined run time) between rebuilds, I also note when I replace tires, break a part, or any tuning changes that improve my lap times/consistency.
I color highlight my track records for a given layout, this allows me to "race myself" so if I don't make the podium but beat a personal record (PR), then it's still a rewarding experience. I will reset my PR's every time there is a new track layout. The goal is to always see forward progress to know that you're making improvements with your setup and/or driving skill.
A typical rebuild consists of the following:
- Remove
Posted by bill_delong |
Aug 22, 2022 @ 12:10 PM | 11,516 Views

This will be a live post that I will update regularly as new information becomes available. Although this thread will be targeted for club racing, I expect a lot of this information may be useful for bashers as well. I am a club racer who has been a basher since 1986 and got into club racing around 2010.
I already have about a year of experience racing this chassis and this thread will be focused on my second kit to include many tips I've learned along the way to make your build go smooth.
Current Gear Used:
- ESC - HobbyWing XR8 Plus GS2
- Motor - HobbyWing 4268-2200KV
- Servo - SRT 9032
- Battery - LCG Zeee 4S-120C-5.2Ah
- Radio - Fly Sky Noble NB4
- Body - 6MIK Optima
Recommended Upgrades:
- 6MIK Radio Box (also fits RC4 and mPTX transponders)
- 6MIK Aluminum Servo Horn (also available in black)
- Emulsion O-Ring Set
- Servo Mount Options
- Custom Captured Spring Perches ... OR... Exotek Clamping Spring Perches
- Exotek - Akermann Bearings on Steering Cranks
- DE Racing Bump Skid
- 6MIK Front Chassis Brace
- Rear Carbon Brace *** Only use when traction rolling
- AVID Delrin Steeering Bushings
Build Tips:
- Lucas White Lithium Grease (use on all rubber seals for shocks/diffs and ring/crown gears)
- Vibra-TITE 125 (gel threadlock, must apply on ALL metal to metal fasteners, including nylon lock nuts!)
- Phi Long - Use Camber Link Balls instead for center links:
Recommended spares to carry:
- Shock Shafts
- Ball ends
- M3x11.5 pins (I replace every 3 race days on center drive shafts) - Pin Replacement Tools
- M3x13.8 pins (for all other dog bones as needed, 12+ race days)
Check out more stuff on My Bookmarks page!
Posted by bill_delong |
May 11, 2022 @ 09:49 PM | 14,968 Views
This is not going to be an extensive "How To" thread but more of a proof of concept and the general path I chose to go when selecting and setting up my desktop CNC milling for creating custom RC parts.
I went through the process of selecting my CNC around late 2014 which would turn out being a Christmas gift to myself. I purchased an older version of this variant here which was limited to using a printer port and had to use Win7, but it looks like the newer versions can use Win10 with USB ports now:
https://www.ebay.com/itm/401755504617
Minimal assembly was required to install the stepper motors out of the box:

I use a dedicated PC that is not connected to the internet and the only programs running on it are those to operate the CNC:

The CNC came with a fully licensed copy of Mach3 which accepts G-Code from any CAM based product for the tooling:
https://www.machsupport.com/software/mach3
After trying several different CAD programs, I decided to go with CamBam which integrates the CAD drawings and generate tool paths for the G-Code in the same program making the best combination between low cost and ease of use that I found at the time. I continue to use the same product today!
http://www.cambam.info/
I've milled many parts over the years ranging from Kydex to Carbon Fiber as well as Aluminum!
...Continue Reading
I went through the process of selecting my CNC around late 2014 which would turn out being a Christmas gift to myself. I purchased an older version of this variant here which was limited to using a printer port and had to use Win7, but it looks like the newer versions can use Win10 with USB ports now:
https://www.ebay.com/itm/401755504617
Minimal assembly was required to install the stepper motors out of the box:
I use a dedicated PC that is not connected to the internet and the only programs running on it are those to operate the CNC:
The CNC came with a fully licensed copy of Mach3 which accepts G-Code from any CAM based product for the tooling:
https://www.machsupport.com/software/mach3
After trying several different CAD programs, I decided to go with CamBam which integrates the CAD drawings and generate tool paths for the G-Code in the same program making the best combination between low cost and ease of use that I found at the time. I continue to use the same product today!
http://www.cambam.info/
I've milled many parts over the years ranging from Kydex to Carbon Fiber as well as Aluminum!
...Continue Reading
Posted by bill_delong |
Mar 21, 2021 @ 06:07 PM | 30,332 Views
This will be a live post that I will update regularly as new information becomes available. Although this thread will be targeted for club racing, I expect a lot of this information may be useful for bashers as well. I am a club racer who has been a basher since 1986 and got into club racing around 2010.
- RC Tech Thread
- USER MANUAL
- Bill DeLong Setup JAN-2024 - Dry Grooved Medium Grip
- HobbyWing XR8 Plus - Bill's Setup Sheet for the ESC - marked in yellow
- Motor - HobbyWing 4274-2250KV
- Servo - NitroPro CT1 - Yes, I bought directly from the man himself!
- Battery - HobbyStar 4S-75C-6.5Ah ***2C Charge Rate, I charge at 20A = 3C
- Radio - HiTEC Lynx 4S - Modified tray to use 2S-20C-2Ah LiPo + Charger combo
- Body - VP-Pro CB-9001
- Yellow Wing - VP-Pro WN-008-Y
- 17mm Hex Caps - VP Pro RS-708
- M3 Flanged Lock Nut - Team Alien Orange
- Wing Washer - Team Alien Orange
Recommended Upgrades:
- HB204614 - 4� Steering Block
- HB204611 - 20� Caster Block
- HB204768 - Rear Carbon Chassis Brace
- 4mm Carbon Steering Plates
- 6MIK Radio Box (also fits RC4 and mPTX transponders)
- 6MIK Aluminum Servo Horn (also available in black)
- HB204570 - V2 Long Shock End ( for rear end only)
- Servo Mount Options
- Exotek - Akermann Bearings on Steering Cranks
Build Tips:
- Green Grease (use on all rubber seals for shocks/diffs)
- Team Thornhill Grease (use on diff crown gears)
- Vibra-TITE 125 (gel threadlock, must apply on ALL metal to metal fasteners, including nylon lock nuts!)
Recommended spares to carry:
- TBD - I just got the truck and will update this list as things break or if I see them break elsewhere
*** Build thread for the E819RS coming soon!

Check out more stuff on My Bookmarks page!
Posted by bill_delong |
Feb 03, 2021 @ 03:03 PM | 25,762 Views
Quick Notes:
I have not tested these but just want to write these down for future reference when racing at a big event with dry/grooved up conditions and these are recommendations from AKA Team drivers:
FDJ Clear - always use on new set of tires to get them to soak up sauce better
https://beachrc.com/traction-compound
Clay Compound: Liquid Wrench
SSLW to SLW:
FDJ Red for Pin tires
FDJ Green for bar tires
FDJ Gold for wet conditions
Sauce tires about 10 min before the race and bake on tire warmers, wipe tires dry
Posted by bill_delong |
Jan 25, 2021 @ 10:11 PM | 32,698 Views
Abridged Version:
AGFRC has been in business since 2009. I first learned of this brand with this thread over on RCTech: Digital Servos from China when someone linked to the thread on some other random post in late 2019.
The Good:
What drew me into the brand was low pricing to where I could get these servos for $45 each (+free shipping) after my frequent buyer discount from Banggood based out of China. Here was my first purchase on Jan 10, 2020:

I installed the following servos in each respective race class that I was running at the time:
A80BHM --> TEKNO SCT410
A62BLS --> PR Racing 401R ( 13.5T 4WD Buggy on Turf)
A62BLS --> PR Racing 401LW (13.5T 4WD Buggy on Dirt Oval Latemodel)
A62BLS --> PR Racing 401R-T (5.5T 4WD Mini Truggy on Turf/Dirt)
These servos were amazing at the...Continue Reading
- I bought an A80BHM servo which was rated for 1/8 off-road... servo failed after 10 race days in my TEKNO EB48 2.0 (internal electrical issue)
- I then bought a second servo which also failed after another 10 race days, same issue
- AGFRC was notified about durability concerns for A80 series of servos
- AGFRC simply removed the 1/8 spec from their product page and told me buy their A81 servo instead
- AGFRC did not offer to make things right, they simply cheated me with false advertising, then did a "bait/switch" after the sale
- Who offers a 500oz-in servo that is limited to 1/10 use only?
- This suggests that AGFRC is over stating their specs and can not be trusted
AGFRC has been in business since 2009. I first learned of this brand with this thread over on RCTech: Digital Servos from China when someone linked to the thread on some other random post in late 2019.
The Good:
What drew me into the brand was low pricing to where I could get these servos for $45 each (+free shipping) after my frequent buyer discount from Banggood based out of China. Here was my first purchase on Jan 10, 2020:
I installed the following servos in each respective race class that I was running at the time:
A80BHM --> TEKNO SCT410
A62BLS --> PR Racing 401R ( 13.5T 4WD Buggy on Turf)
A62BLS --> PR Racing 401LW (13.5T 4WD Buggy on Dirt Oval Latemodel)
A62BLS --> PR Racing 401R-T (5.5T 4WD Mini Truggy on Turf/Dirt)
These servos were amazing at the...Continue Reading
Posted by bill_delong |
Nov 01, 2020 @ 04:41 PM | 28,791 Views
AGF Programmable Servos
USER MANUAL
AGF SOFTWARE PROGRAM V1.2
Version 1.2 of the programmer can only be ran on a Windows based PC with the USB thumb drive provided by AGF. I tried using a couple other USB to servo adapters for programming ESC's and they were not compatible with the software. There is no installer, you simply run the executable stand alone, then connect the servo to the USB programmer and plug into your PC after the software is running, then click the "Read" button.
Here is a screen shot of the AGF-A80BHSW with the default settings:

Here is what the instructions say each option controls:

USER MANUAL
AGF SOFTWARE PROGRAM V1.2
Version 1.2 of the programmer can only be ran on a Windows based PC with the USB thumb drive provided by AGF. I tried using a couple other USB to servo adapters for programming ESC's and they were not compatible with the software. There is no installer, you simply run the executable stand alone, then connect the servo to the USB programmer and plug into your PC after the software is running, then click the "Read" button.
Here is a screen shot of the AGF-A80BHSW with the default settings:
Here is what the instructions say each option controls:
- Range for the Servo Angle can be adjusted from 1� to 255�
- Range for the Servo Neutral goes from -127 to 127
- Range for Damping Factor goes from 50 to 600
- Range for PWM Power goes from 39.2% to 100%
- 4 Sensitivity Options are Ultra High, High, Medium, Low
Posted by bill_delong |
Feb 21, 2020 @ 07:55 PM | 28,136 Views
Backstory:
I am creating this thread because I recently learned that URC has officially retired and all my "Build Project" threads on URC are long gone and will never come back
I will do my best recreate what I remember from my thread on URC and share this information here on RCG.
"PROJECT 21" was the very first 1/8 4WD SCT conversion made by Tim Martin and TheJANG at URC in late 2009, here are the original videos created:
...Continue Reading
I am creating this thread because I recently learned that URC has officially retired and all my "Build Project" threads on URC are long gone and will never come back
I will do my best recreate what I remember from my thread on URC and share this information here on RCG.
"PROJECT 21" was the very first 1/8 4WD SCT conversion made by Tim Martin and TheJANG at URC in late 2009, here are the original videos created:
| Project 21 - Original 1:8th 4WD brushless RC short course truck (2 min 41 sec) |
| Project 21 - 1/8th nitro buggy to electric short course conversion - Video 2 (1 min 21 sec) |
Posted by bill_delong |
Jan 03, 2020 @ 09:36 AM | 42,422 Views
Selecting a charger can be very difficult today with so many features out there, you should first decide what are your most important requirements?
I won't cover everything but I will highlight a few things to consider when making your selection.
I won't cover everything but I will highlight a few things to consider when making your selection.
- Internal Resistance (IR) Meter - this is probably the single most important feature to me, this gives you the ability to check the overall health of your packs(take the reading immediately after a full charge). For example, a brand new pack might measure both cells below 1 mΩ, and then as the pack ages/degrades you will slowly see the IR increase over time... anything below 3 mΩ is still considered "low IR" but I start to notice pack swelling and degradation of performance (fade, etc) as soon as any individual cell goes past 7 mΩ... it's a very subtle difference and is hard to tell if you use the same pack and that's where having an IR Meter helps you decide when to retire a pack. I might still keep an aged pack for practice up until any cell hits 15mΩ but at that point I typically toss them out or give them away. I have also found that when any cell is farther than 1-2 mΩ apart, then the pack tends to take longer to balance and that's when I may consider selling the pack provided the cells are still below 7mΩ... I make sure to post IR readings of any packs that I sell and I would refuse to buy any used pack without IR readings so you understand the current condition of the pack!
- Max
Posted by bill_delong |
Jan 01, 2020 @ 12:49 PM | 28,006 Views
Posted by bill_delong |
Dec 06, 2019 @ 03:29 PM | 30,358 Views
I saw someone recently ask the question, what parts are needed to convert an SCT410.3 into a MT410 and for how much?
Having an SCT410.1 myself, I have been tinkering with the idea of doing the conversion as well, so let's take a look and see what it will take. Note that I have not made the conversion myself, this is just a guess of what I think will be required based on cross referencing parts off the product pages:
$15 - TKR5424 – Turnbuckle (steering links, 2pcs, MT410)
$15 - TKR5194 – Spindle Carriers (trailing, 15 degree, L/R, EB/NB/ET/NT)
$14 - TKR5193 – Spindles (trailing, L/R, requires TKR5194, EB/NB/ET/NT48, EB/NB.3)
$12 - TKR5199 – Rear Hubs (L/R, CV or uni, EB/NB/ET/NT48, EB/NB.3)
$5 - TKR6145 – Shock Boots (for 137mm shocks, 2pcs)
$60 - 2 x TKR5472 – Driveshafts (front/rear, hardened steel, 2pcs, ET48, NT48)
$12 - TKR6061 – Shock Shafts (for 137mm shocks, steel, 2pcs)
$30 - 2 x TKR5451 – Turnbuckle (camber link, front, 2pcs, ET48, NT48)
$30 - TKR6060 – Shock Body (for 137mm shocks, aluminum, hard anodized, 2pcs)
$12 - TKR6081 – Shock Spring Set (rear, 1.6�10.0T, 90mm, green, 4.20 lb/in)
$18 - TKR5436 – Suspension Arms (front, 2pcs, ET48, NT48)
$18 - TKR5430 – Suspension Arms (rear, 2pcs, ET48, NT48)
$30 - TKR5071C – Wheel Hubs (17mm, lightened, aluminum, gun metal ano, 2mm offset, w/pins, 2pcs)
$15 - TKR5116 – Wheel Nuts (17mm, serrated, gun metal anodized, M12x1.0, 4pcs)
$40 - 2 x TKR5070 – Stub Axles (hardened steel, 2pcs)
$12 - TKR5055A – Arm Bushing (aluminum, hard anodized, 4pcs)
$12 - TKR5054A – Spindle Bushings (aluminum, hard anodized, 4pcs)
$35 - TKR5029 – Shock Tower (rear, 7075 CNC, gun metal anodized)
$35 - TKR5028 – Shock Tower (front, 7075 CNC, gun metal anodized)
$14 - TKR40007K – Battery Straps (black, 4-6 cell)
Total = $436
New MT410 Kit = $450
Here's an alternative:
| Tekno Custom SCT410.3 Mini MT410 Run VIdeo #3 (16 min 16 sec) |
Posted by bill_delong |
Nov 25, 2019 @ 11:01 AM | 33,748 Views
Short Answer: Not anytime soon
Long Answer: Graupner was founded in 1930 by Johannes Graupner in Stuttgart-Wangen. They would be taken over by his son Hans in 1953 and was sold to SJ Ltd (Korean based) in 2013. While the German plant had remained in operations since the buyout, it has been too expensive to keep that location open so the German location was shut down in 2019. Operations will remain the same for South Korean and US based distribution entities as the company is re-structured to reduce operating expenses.
Check out more stuff on My Bookmarks page!
Posted by bill_delong |
Nov 19, 2019 @ 12:16 AM | 32,093 Views
Here are the steps I used to convert an HP Power Supply, pretty sure most HP supplies use the same pin out so this should work for other models that may have slightly different output ratings, just make sure the exposed card slot looks similar to what is pictured below. I offer no warranty, only perform this conversion if you know what you are doing!
I bought the following HP Proliant 750W Power Supply HSTNS-PL12 for $15 shipped.
*** If you do not feel comfortable doing this conversion yourself, I am willing to work with you on a price (subject to current availability and shipping rates)
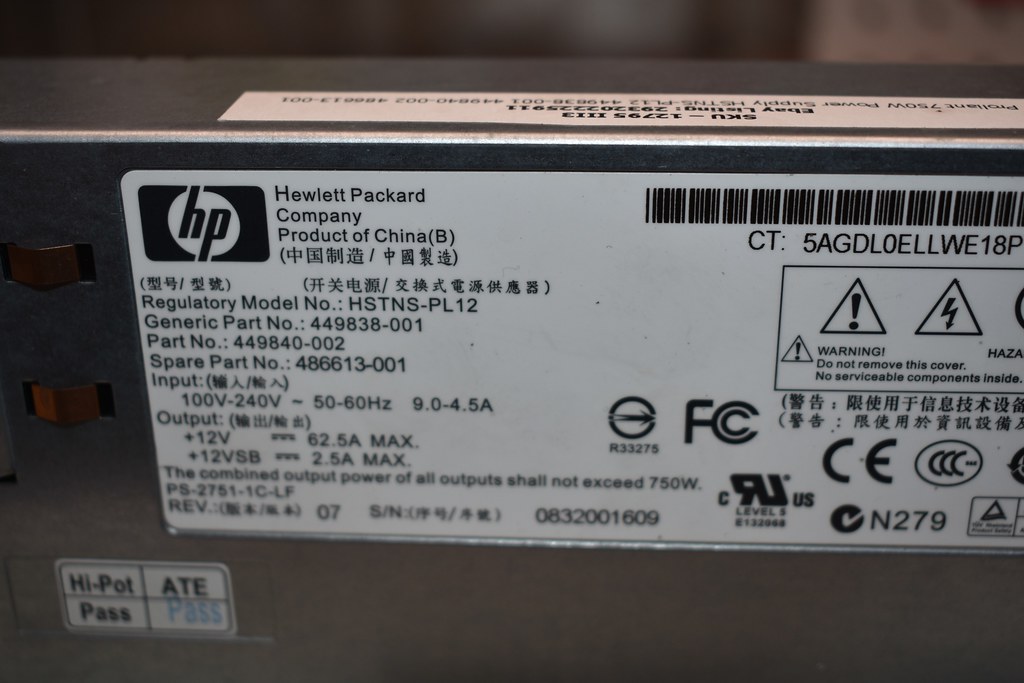
There are 6 short leads on the exposed card slot and 2 large leads for a total of 8 leads. I bridged the left farthest lead to the 4th lead to the right and then soldered up some 4mm and 5mm bullet connectors on the large leads where left side is negative and the right side is positive.

That's all there is to it!
You can put some colored shrink wrap on the bullets if you want, maybe cover the supply with some vinyl wrap if you want to make it fancy.
...Continue Reading
I bought the following HP Proliant 750W Power Supply HSTNS-PL12 for $15 shipped.
*** If you do not feel comfortable doing this conversion yourself, I am willing to work with you on a price (subject to current availability and shipping rates)
There are 6 short leads on the exposed card slot and 2 large leads for a total of 8 leads. I bridged the left farthest lead to the 4th lead to the right and then soldered up some 4mm and 5mm bullet connectors on the large leads where left side is negative and the right side is positive.
That's all there is to it!
You can put some colored shrink wrap on the bullets if you want, maybe cover the supply with some vinyl wrap if you want to make it fancy.
...Continue Reading
Posted by bill_delong |
Nov 08, 2019 @ 07:40 PM | 30,067 Views
So I recently found the need to break in some new tires. I plan to order the AKA Tire Break In Tool, but I just didn't have time to wait, I need to get these tires sanded down before tomorrow's race 
As luck will have it, I happened to have a spare front 2WD SCT axle from an old Kyosho Ultima SC5 in one of my parts bins, I used my dremel to grind off the bearing lip and it fit's perfectly into my cordless drill. Can't get any more simple than that!


...Continue Reading
As luck will have it, I happened to have a spare front 2WD SCT axle from an old Kyosho Ultima SC5 in one of my parts bins, I used my dremel to grind off the bearing lip and it fit's perfectly into my cordless drill. Can't get any more simple than that!
...Continue Reading
Posted by bill_delong |
Jun 22, 2019 @ 09:20 AM | 30,912 Views
TheJANG from UltimateRC did a battery review many years ago using a discharge graph comparing 30A discharge cycles between MaxAmps brand and a couple budget brand packs that were available at the time. TheJANG found that performance was nearly identical between the packs and could not recommend MaxAmps with the opinion that they were over stating their C ratings and the price they were charging were not justified. MaxAmps would retaliate and forced YouTube to remove any video that TheJANG had published with MaxAmps in his content over "Copyright Protection". TheJANG had to cross out MaxAmps in any reference to his review on his website. He even banned the word MaxAmps from being used on the URC forums... folks would quickly adopt the name MaxCramps which was very accurate.

*** UPDATE ***
TheJANG would ultimately shut down URC completely, though his YouTube page still remains, he is not publishing any new videos. At one point TheJANG mentioned that he would not make any more videos if he would not be allowed to voice his honest opinion and MaxAmps was the main reason why he was shutting down URC due to the legal nightmare they strung over him *** not a direct quote, I'm paraphrasing.
Check out my other threads here:
Bill's Bookmarks
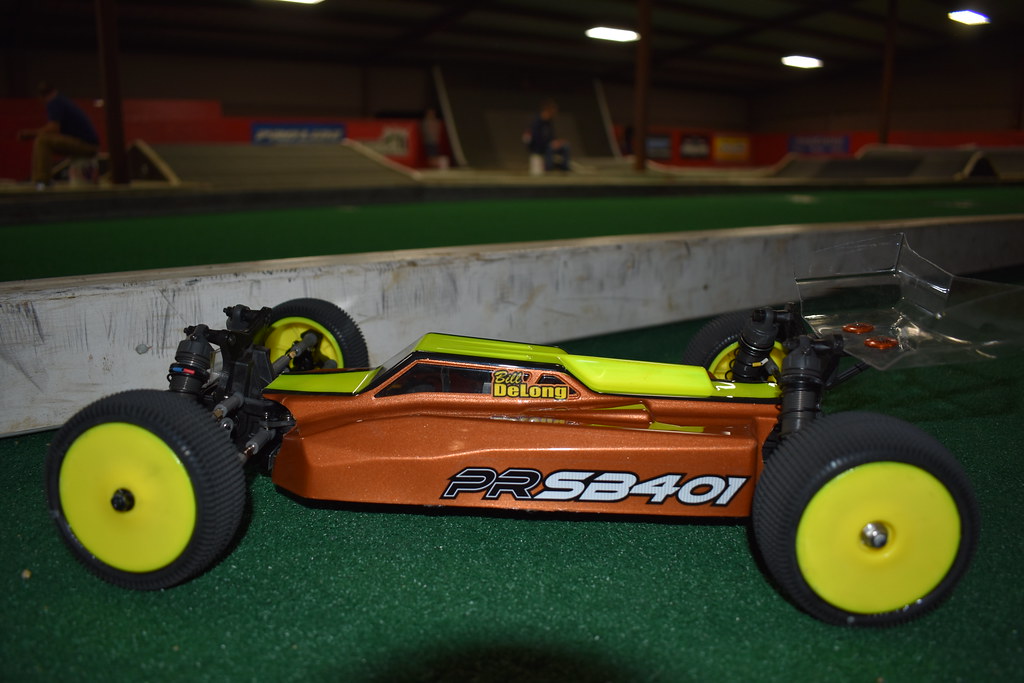
Posted by bill_delong |
May 21, 2019 @ 07:20 PM | 33,372 Views
This will be an evolving thread as I build and review a PR Racing SB401-T (1/10 Mini Truggy). Look for regular updates to this post as I plan to race this "Mini Truggy" in the 4WD Mod Truck class at Thornhill Racing Circuit (1/10 Dirt Track). Full disclosure, I recently picked up a sponsorship through PR Racing so be prepared to expect some bias, but I will do my best to identify potential areas to consider making upgrades to improve the quality of this kit where applicable.
A quick background on me: I started club racing around 2010 and have slowly improved my skills to where I'm one of the slowest of the fast guys at the club in my area, ha! I typically average between 96% -98% consistency and will occasionally pick up a win for club racing and often make the A Main for regional events. My first 1/10 Mini-Truggy was the HoBao Hyper10TT which I raced about 5-7 years ago until the class died. Then the class came back in 2018 when TEKNO released the ET410 which I have a full year of racing that truck on turf. I look forward to comparing the PR truck with it's predecessors!
Hits:
A quick background on me: I started club racing around 2010 and have slowly improved my skills to where I'm one of the slowest of the fast guys at the club in my area, ha! I typically average between 96% -98% consistency and will occasionally pick up a win for club racing and often make the A Main for regional events. My first 1/10 Mini-Truggy was the HoBao Hyper10TT which I raced about 5-7 years ago until the class died. Then the class came back in 2018 when TEKNO released the ET410 which I have a full year of racing that truck on turf. I look forward to comparing the PR truck with it's predecessors!
- Where to Buy?
- RCTech Thread
- Durability Testament
- Setup for low to medium traction dirt
- Feature Comparison Chart with TEKNO and XRay
- Setup for Low Grip Hard Pack Dirt
Hits:
- Loaded with upgrades in the kit for exceptional value!
- One of the lowest LCG designs I've seen on the market!
- Thin 2mm aluminum chassis with carbon reinforced spline offers one of the most flexible chassis'
Posted by bill_delong |
Mar 25, 2019 @ 07:27 PM | 39,723 Views
This will be an evolving thread as I build and review a PR Racing SB401-TypeR. Look for regular updates to this post as I plan to race this buggy in the 13.5T 4WD Buggy class at Thornhill Racing Circuit (Turf Track).
My first wheeler was an InTech ER-14 (clay), then I switched to a Schumacher CAT-K2 (clay+turf) and spent the last 16+ months running a TEKNO EB410 mostly on turf. I look forward to seeing what the 401R has to offer!
Hits:
My first wheeler was an InTech ER-14 (clay), then I switched to a Schumacher CAT-K2 (clay+turf) and spent the last 16+ months running a TEKNO EB410 mostly on turf. I look forward to seeing what the 401R has to offer!
- $470 - SB401-TypeR 1/10 Electric 4wd Off Road Buggy
- PetitRC Page - Links to manual, specs, build info and setup sheets
- PR Racing USA News
- RCTech Thread
- Adam Drake's Video Overview
- Billy Tylaska's video with test laps on 1/8 dirt track
- Bill DeLong's video with test laps on 1/10 turf track
- Bill DeLong's Setup for Turf
Hits:
- Loaded with upgrades in the kit for exceptional value!
- Global Team Driver Support with setups posted on FB and PetitRC
- One of the lowest LCG designs I've seen on the market!
- Thin 2mm aluminum chassis with carbon reinforced spline offers one of the most flexible chassis's I've seen to date!
- Aluminum: hangers, caster blocks, rear hubs, gear box support
- Carbon: towers, center brace, battery strap, ackermann, steering support
- Easy access diffs for super quick tuning changes between rounds
- Slide lock aluminum motor mount with Center slipper which is perfect for stock racing on medium to high traction surfaces
- Aluminum shafts and shock standoffs are available as upgrade options for stock racing
- Floating servo to
Posted by bill_delong |
Mar 09, 2019 @ 12:23 PM | 35,127 Views
This will be an evolving thread as I build and review a PR Racing SB401-LW. Look for regular updates to this post as I plan to race this buggy in the 13.5T Latemodel Oval class at Thornhill Racing Circuit.

Hits:
Misses:
- $311 - SB401-LW 1/10 Electric 4wd Off Road Buggy
- PetitRC Page - Links to manual, specs, build info and setup sheets
- PR Racing USA News
- RCTech Thread
Hits:
- Loaded with upgrades in the kit for exceptional value!
- Global Team Driver Support with setups posted on FB and PetitRC
- One of the lowest LCG designs I've seen on the market!
- Aluminum: hangers, motor mount, hexes
- Carbon: towers, battery strap, ackermann, steering support
- Easy access front/rear diffs for super quick tuning changes between rounds
- Slide lock aluminum motor mount with Center slipper which is perfect for stock racing on medium to high traction surfaces
- Aluminum shafts and shock standoffs are available as upgrade options for stock racing
- Wire management braces for super clean wiring jobs
- Aftermarket support from RideLow Racing (center gear cover) and Ardntcraft fan shroud
Misses:
- Currently only 2 distributors in the US, but there is promise of a large distributor picking up PR soon!
- Superseded by the 401R, very few Type-R parts are compatible
- Probably more cost effective to sell the 401LW and buy a 401R than to upgrade with Type-R parts
- Only 5 labeled bags A - E, will need to spend some extra time organizing parts during build
- E clips used in gear diffs, probably worth it because they don't leak
- User Lists


