Wormboy's blog View Details
Posted by Wormboy | Sep 02, 2016 @ 09:54 AM | 7,939 Views
This is a bit of a premature thread but there has been a bit of discussion in my previous build log about this one. I thought I may as well make a blog thread so that we can shift over any further conversation to it's own area.

I have decided to take on a second Peter Rake design after my reasonable result with the Besson MB411 prototype. This next build will be another design that has had a couple other builders start but none of which seem to finish (or at least they don't post up with their success or otherwise).

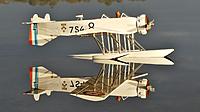
The Macchi M16 was an Italian biplane built and flown in circa 1920.
One of the later examples of this pudgy little bipe were evaluated by the US Navy in a communications role.

Originally designed for land-based operations, it was adapted to water-borne duties with the addition of dumpy little floats of similar character to the air frame itself. It is this US Navy float plane version that I plan to model.

It appears that the float design underwent some modifications between the original italian-fitted model, to the USN evaluation model. I suspect I will go with the later stepped floats as they are a bit more familiar to me, but I may experiment with the non-stepped ones, just for fun.

Peter's plans call for a 3 channel R/E/T arrangement as this is what the majority of full-sized versions had. However I will be adapting it to 4 channel A/E/T/R firstly because I like ailerons, and secondly this is sale for the USN version (clearly visible on the lower wing in the colour photo attached).

I'm still a while from starting, but as I said, this is more a place for continuing the pre-build conversation

-Mat-

Edit: just a couple of the previous builds so I can keep easy access to the links

Build1

Build 2


Posted by Wormboy | Sep 02, 2016 @ 09:28 AM | 7,492 Views
Now that I have completed and flown my Besson MB411 floatplane I thought I'd post it up in my blog so all of my builds are together in one place.

First up, here is a link to the original build log and initial flights.

40" Besson MB411 Peter Rake Prototype

As the title suggests, this was a beta prototype build for a Peter Rake design.
The original prototype had a few bugs that needed to be swatted . Once they were identified and fixed we now have a nice little float plane to add to the collection.

Plans are available through Peter Rake directly
and a laser cut kit can be found at Manzano Laser Works

Here is a video of the maiden flight: still a few tweaks to be made at this stage

Besson maiden flight (2 min 59 sec)


and here is a video after a couple of tuning flights

Besson post-maiden flying (2 min 16 sec)
...Continue Reading
Posted by Wormboy | Sep 13, 2015 @ 08:41 AM | 8,373 Views
I was working on my Besson today and felt that I was tired of looking for pilot bust for it. Of course if you want something done the way you like it... do it yourself.

Never having sculpted anything before other than Plasticine with my 2yo I didn't really know where to start. So where do we turn when we don't know something... where else but youtube! Several instructional videos later I was ready to rock.

Bear in mind that this is my first attempt so it is a bit rougher than I would like but you have to start somewhere. He stands a diminutive 32mm tall and 35mm across the shoulders. His head is about 20mm tall so it is about right for a 1:12, maybe a whisker too small. There is about 4hrs work in the original but I think with practice I'll get faster.

The original sculpt is in fimo polymer clay and is a bit heavy for direct use.
I have taken a Pinkysil mold and intend to do a slush cast to make a lighter resin duplicate to paint and mount.

For this, my first attempt, I didn't have a model or photo to base it on. I just kind of started pushing the material around and waited to see who came out of it. I think he looks like quite a distinguished little aviator.

I really enjoyed this change of medium and think I'll try and make it a regular part of my builds

-Mat-
Posted by Wormboy | Apr 24, 2015 @ 03:55 AM | 9,833 Views
Time for a new project!

After trying out Rhino on a few different models I have decided on one to carry through into production.

The model I've chosen is the Kawanishi H6K Mavis as I don't think I've seen it modeled much before, plus I love the old flying boats.

I've attached the jpg of the Rhino model for an idea of the beast.

I've done quite a bit of thinking about this one and have finally settled on a sectional foam construction method for the fuselage, a la Keith Sparks PBM Mariner. The wing will be hotwired foam.

I've chosen this methods as:
  • I thought it looked interesting and I'm always up for something new,
  • I've discovered that I hate strip planking balsa,
  • I wanted something that will not rot if a bit of water penetrates the hull, and
  • foam makes sense to me for water duties as it is inherently waterproof


The real life plane was a monster at 40m wingspan, so I've decided to do at a decent scale of 1:20 for a 2m (78") span model and a fuse length of about 1.3m.

So far I have the sections cut out and am proceeding with the hollowing out and sticking together. Once that's sanded back I'll move onto the wing which should be relatively simple affair.. 4 panels, 2 of which are constant chord and the other 2 have an even taper. Perfect for hotwire.


Slow and steady, here we go.
Mat

Posted by Wormboy | Jul 12, 2014 @ 12:28 AM | 10,858 Views
Well the maiden went reasonably well.

She survived the first flight with out sustaining any damage other than a little paintwork scrape on the bottom of the hull. Which is to be expected I suppose.

First flights were very hairy due to a pronounced nose up tendency.
CG was as per the plans but I think the wing incidence is to blame. Even moving the CG 15mm forward of that marked on the plan, and well forward of what I would have expected, she flew very tail heavy.

When scaling down the plan, I didn't decrease the incidence angle of the motor and wing. I think it was 5 deg from memory, which I think is too much now that the plane is lighter and smaller.

I plan to push the CG a little further forward and shim the motor down a bit to see if that will help the situation any. Unfortunately the Horizontal stabiliser / wing angle is set in epoxy now.

On the bright side, water handling was excellent, power is great and she lives to fly another day!

Pics attached and video below. Thanks MrWaz, for making her look even better than in real life

Please feel free to exmine the evidence and post your advice or comments re the pitching issue, I'm very much open to suggestions.

MrWaz haz done quite a good job of making my flight look a lot smoother than it actually was (or at least felt). I will post up a "warts and all" video for critique.

Sikorsky S-39 Spirit of Africa - maiden flight (2 min 55 sec)


Uncut version for analysis.

Sikorsky S-39 "Spirit of Africa" maiden flight - uncut version (4 min 14 sec)

-Mat-
Posted by Wormboy | Jun 14, 2014 @ 12:43 AM | 11,771 Views
Well it's not so much of a build log as the build is almost complete.
I just thought I'd take the opportunity to post up a couple of pictures of my Sikorsky S39 build, started in September 2013 and hopefully finished within a 12 month period. Span is 1.4m (55" in imperial speak).

I got hooked on the design when I saw the Spirit of Igor online. It is just such a distinctive plane I couldn't resist. Now that the registration numbers are on, I've got to follow through with all those giraffe spots

My version is a reduced version of the Bob Rich design. I couldn't fit an orginal sized one so I reduced it down to 55" to be able to get it in my car.
My target weight is 38oz to give a wing loading of 12.4 oz/sq ft.
Power train will be electic and draw about 500w on a 4S system. This should be well over powered and I want to just be able to putt around on 1/2 throttle and keep the amps minimal.


The pictures are pretty self explanatory...

I had a real hassle with a couple of parts of the build that are a worth noting for any future builders.

1) As I scaled down the original plans I ran into issues with the rudder linkage. The design called for a flexible cable routed down a boom. With the reduced size of the plane the rudder linkage radius also shrunk, meaning that it bound terribly. I have figured out a pull pull system that will work better and is strangely similar to the full size plane through sheer coincidence.

2) The tip floats I found were too...Continue Reading