old4570's blog View Details
Archive for December, 2017
Posted by old4570 | Dec 29, 2017 @ 08:04 PM | 6,923 Views


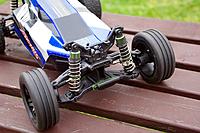
I may have mentioned I picked up some bargains just before Christmas and the WLtoys A303 buggy was one of them .

Remote Distance: 50m
Type: RC Off-road Electric Car
Speed: About 35km/h
Charging Time: About 3 hours
Playing Time: 10mins
Car Battery: 6.4V 1000mAh Rechargeable Battery
Motor: 390 brushed motor
Brand: WLtoys
Material: Electronic components, Plastic, Metal
Remote Control: 2.4GHz Wireless Radio Control
Transmitter Power: 3 x 1.5V AA battery

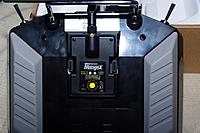
The transmitter looks to be the same as the one bundled with the 12428 4x4 buggy from WLtoys .

The A303 is perhaps a little on the chunky side @ 938 Grams wet .

The A303 is almost as big as the 12428 ( Wheel base )

The 303 does sit a little low to the ground to be a true off road'er . I found the 303 was really dragging itself over the grass in our back yard . I would imagine this would really load up the motor / esc possibly creating heat and other issues . I would suggest this buggy might be ideal for flat dirt tracks / roads and such where the ground clearance would not be an issue .

I really like the turning circle on this one , much tighter than the 12428 . In fact I found it a little disconcerting at times as I over corrected ( having got used to the 12428 ) You can move the control rods so as to make steering less sensitive ( larger turning circle .

In fact there is a reasonable amount of tuning that can be done to the A303 to change its handling ( See Pictures )

I don't know that the A303 is in...Continue Reading
Posted by old4570 | Dec 28, 2017 @ 07:24 PM | 6,642 Views
I think I mentioned I picked up some Bargains before Christmas ( The last of them came today ) ..
One of those bargains was a WL Toys A303 Buggy .. ( We are talking bargain )

Anyhow , the battery does appear to be a 2s 3.3v per cell ( Life ? ) ..
Well , there is no balance lead .. And checking after installing said balance lead , yeah ! There is a need for it ...

A) I unwrapped the battery just enough to expose the contacts ..
B) With your Multi Meter find the contact for the back or front of the batteries where they are joined for series .. On the MM this will show the individual voltage of each cell
C) Once you find the contact for the middle wire , solder in your balance lead
D) Make sure your solder joints are good
E) Re wrap the battery

I really like balance charging ( really I do ) . Not doing so can lead to all sorts of possible issues ..


Its not hard ! Positive and negative contacts are already a given .. Simply solder your Balance lead wires to these contacts ...
What is just a fraction challenging is finding a contact point for the series connection . ( Thats why you own a Multi Meter ? - Right ? )
So there you have it , another bush league mod !

2s Balance lead :

A lot of these have a black wire in the middle and a yellow wire on the outside ...
Just remember the middle wire goes to where the battery pack is connected in series ( no mater its color ) and the outside wires go to positive and negative where your power lead is connected . ( At least they use Red for the positive wire )
Posted by old4570 | Dec 27, 2017 @ 10:21 PM | 6,509 Views


Before Christmas there was some seriously ( serious ) bargains to be had .
So good in fact one could not do anything other than simply hand over the money and wait !
And wait I have . But at last the WL toys 686k is here .
It be a simple 1s brushed quad with a plug in Wifi camera ( I will most likely remove it ) .

The advertised protocol for this quad is Flysky V6x6 ( Not mine )
This one is Q2x2 / Q222 ( just in case anyone has had issue binding to their IRX4 multi protocol module ...

Speaking of the IRX4 , I bound my 686 to my Taranis Q x7 / IRX4+ .
In menu 6 ( OpenTx ) I set the channel order to ( Works for me )
Ch1 = Ail
Ch2 = Ele
Ch3 = Thr
Ch4 = Rud

So when you first bind , be careful because if your channel order is out you may need to peel the 686 from the ceiling .
Might want to remove the props or hold the 686 firmly in your hand ..

Flying the 686 :

This is one stable and responsive quad .. Fully noob friendly with the factory Tx ( yes I tried it ) .
With the Q x7 everything was sweet except the yaw/ruder . It was slow / lethargic ...
I expect I will have to jack the rates up to make it a little more lively / responsive .
But seriously , for the money I paid , this is crazy insane value ...
If you have a itch for the 686 and you see it for good money , it is worth while having ..

Yes , I do recommend the 686 if you have an itch for it ..
Its Noob friendly , solid , and responsive .
The pittance I paid for mine , geez ..
Just don't know how they could do it .

My previous WL quad was the 959 and I think the 686 is actually easier to fly , more stable and more responsive to control input ( Fact Tx )
I can't complain about my sample , actually performed better than expected .

Was sitting here , and realized ... Hmmm can I run the camera from the 959 in the 686 ( ? ) I will have to check that
Posted by old4570 | Dec 26, 2017 @ 10:28 PM | 5,752 Views
I got me a solar PowerBank some time ago and I always meant to pull it apart to see what made it go tick tock .

It does have issues :

a) Solar panel does not recharge
b) Parasitic drain

Anyhow , I pulled the SPB apart today ( 34deg C outside ) , and then used my MM to see what sort of Voltage and current the solar panel produced . To be fair it was weak . 3.237 volts and some 67mAh .. Sorry to say that is not enough to recharge a lipo .. If there is a dedicated charge circuit in the PB then it would soak up that power before any made it to the battery .

The parasitic drain would seem to be due to a LED Light that is always on ? ( For what reason ? )
Anyhow , I had a look on Feebay to see how much these panels cost and @ $1.75 Ozzi Bananas for a 5v 1W ( Claimed ) power output , I will actually see if :
a) The panel can live up to said claims
b) Actually make this PB work as a solar powerbank .

So I guess there will be a second part to this post when the solar panel gets here ...

Its hot , its windy .. ( Thats Australia @ Xmas )
Posted by old4570 | Dec 25, 2017 @ 02:13 AM | 5,994 Views
Its a nice day but the wind is up and a little harsh ...
So I was thinking whats on the back burner ...
The Eachine VR006 goggles for FPV sent to me for review by Banggood.com ..
I really was impressed by how nice they were , but there was this little focus issue ( My eyes are nearly 55 ) and I simply can not focus that far down . ( close )

So I opened up the googles and moved the screen about trying to see just where the screen might focus correctly ..
Yeah

Right in front of my eyes is the correct position for a nice crisp / sharp focus .. There is no way I can move the screen there .
It occurred to me that perhaps some corrective measures could be taken ..
Replacing the original focus screen , or adding focus screen to correct my focus limited eyes ..
I get the feeling the focus screen needs more magnification for my eyes ...
So thats my project : ( I really want to enjoy those goggles )

While I remember .. I did shoot a email off the Eachine about it .. ( probably had a few by now ) .
As well focus screen in Ebay ( feebay to some ) , are some what cheap ... So I purchased a few different ones to play with .
Being plastic , one can always cut to size ..

With the mail fully snail , I hope to be doing experiments in the new year .
Posted by old4570 | Dec 23, 2017 @ 08:01 PM | 6,607 Views
Product link = https://goo.gl/A7Vehj ( Sponsor / affiliate link )
Use this link if you hate supporting sponsors ( of reviews ) = https://www.banggood.com/search/taranis-q-x7.html

Transmitters I have owned :

1980's
Sanwa 2ch
Futaba 2ch
JR FM 5ch

1990's
Futaba 7ch FM

2010 onward
Flysky 6ch PC programmed x2
9x x3 Flysky and Turnigy
7ch ( I forget the brand computer Tx )
Turnigy 9XR
Turnigy 9XR pro
Devo 7e
Turnigy i10 x2

And all those cheap controllers ... + XK transmitters

Anyhow , I have owned and still own a few transmitters from the lower end of the $$ spectrum . Recently the opportunity became available to own the Taranis Q x7 which has been on my to own list for quite a long time .

I think its fair to say this is quite probably the most plush feeling transmitter I have ever owned . For some strange reason some actually complain about the gimbals (?) , I don't get it . On my transmitter they are simply superb , butter smooth and precise .
The very first thing I did on receiving my Q x7 was to see what battery solutions people had come up with to avoid using AA batteries . I personally find that NIMH batteries drop voltage too quickly so there for decided to seek another solution . There were a lot of interesting solutions on Youtube and unfortunately I found many of them to be problematic rather than viable solutions for me .

I went with a modified battery carrier and two 18650 ( I have a good collection of...Continue Reading
Posted by old4570 | Dec 23, 2017 @ 09:25 AM | 5,861 Views
Well its Christmas eve here in Oz , just moments ago there was a very light sprinkling of rain ..
Time to go to bed ... 1.24am

Wishing all a merry Christmas and a happy and safe new year ...


Posted by old4570 | Dec 17, 2017 @ 11:15 PM | 15,620 Views
Bush League Modz ! ( Don't you just love them ? )

Here is one I just did today ...
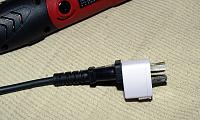
I just love my DrillPro ( http://old4570.com/stuff/drill_pro.html ) = Review on my web ..

Anyhow .. The only thing that really was a bummer about this motor tool was the US plug ( Sorry guys ) .
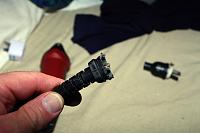
And once I really came to the conclusion I loved this motor tool , I really needed to cut its plug off !

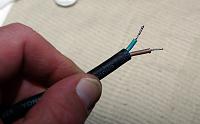
Once the plug was cut / butchered / removed I then cut and trimmed the + - wires and tinned them ( Solder )
I then screwed in the wires and put some electrical tape in the lead so as to be able to fit the plug cover firmly onto the lead and use a zip tie to hold it in place .

And if that sound easy , it was ! ( A seriously bush league mod )

Now my motor tool has the correct plug on it and we can live happily ever after ( ? ) ....
But seriously , this is one awesome motor tool that deserved the right plug on it ....Continue Reading
Posted by old4570 | Dec 16, 2017 @ 08:21 PM | 5,653 Views
I am still trolling and saw some really good prices on wings at banggood . https://goo.gl/t5FsLn .
The spirit 600 was about $21 USD and the spirit 500 about $17.50 USD

Also BG is having a Christmas FPV sale https://goo.gl/RQ9jxL

Those wings make for some good cheap fun ..
I am still waiting for the day BG puts out a BNF version ( That would be so cool )
A sub $50 USD BNF wing
Posted by old4570 | Dec 15, 2017 @ 10:54 PM | 5,540 Views
I tried FPV ( quad copter ) for the first time .. Its a lot of fun .
I just need FPV goggles that my eyes will focus on correctly ( fault of my eyes )
The ones I have , I just can't focus well enough and I am bumping into a lot of stuff ..
I also have a LCD screen for FPV , this is good , but I am striving for a sense of depth .. ( Why goggles are so good )

Anyhow .. The other morning we had a fantastic RC morning / amazing really .
So I pulled out my Eachine H8 mini and had the best time ..

So this fired up my RC neurons .. And I played with my RC buggy ( WL toys ) that was sent to me by banggood.com for review ( Thank you banggood )
I had a ball with the buggy .. ( wind was up by now )

Anyhow , this reminded me of the FPV experiment I tried with the buggy .

Now over a year ago a friend gave me a FPV camera and LCD screen receiver for said camera that came from a quad he had .
So the other day I had just removed the useless internal battery and installed a plug for an external battery ...

Anyhow 1+1 = 2 ( or an idea in this case )

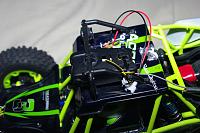
I thought this cam might just fit my buggy just right
And it did ...

All that was needed was some zip ties , and the cam hooked up sweet .
Just wondering if hot wiring will activate recording or fry the cam ? ( Cam has a Micro SD card slot )
Anyhow enjoy the included pictures ..
Might be time to go outside and give it a try ...
Posted by old4570 | Dec 09, 2017 @ 06:57 PM | 10,859 Views
Ok , I bound the XK X6 transmitter to a futaba Rx micro quad ...

A lot of folks might wonder just how you would go about that when the Tx has no bind button .

Apparently the XK transmitters go through a quick bind process when you turn them on .. ( remember this )
So take your Rx , and get it into bind mode .
Then turn on the X6 or X7 transmitter .
As the transmitter boots it will go through its bind process and bind with your Rx .
Turn of the Rx and turn of your X6 / X7 transmitter ..

Now you have to turn on the Rx first , then the Tx just like with a lot of micro quads N stuff ..
If you turn on the Tx first , you will not get a bind . ( Because the Tx needs to go through its bind process on starting )

So there .. ( Hope this helps )
Posted by old4570 | Dec 08, 2017 @ 10:53 PM | 9,021 Views
Hmmm , Yep ! ( I blame those sales )
I got me a XK X251 ( See Pic 1 ) , but this post is not about the quad ! But rather the battery and charger it comes bundled with ..
As well I am becoming a little disillusioned with many of the reviewers that are sent product on a regular basis .
So I will just have to take on the roll of the DEVILS advocate ...

If you look at Pic 2 you will notice the battery only has a balance plug , and the supplied 2s charger ( Pic 9 ) does NOT balance charge .. In fact it does a horrible job of charging and I would rate this charger @ POS ( Pic 9 ) . The only other charger I had capable of charging this battery is a half decade or more older charger that came with one of my first 450 heli bundles ( Pic 10 ... and yes it was on special ) . Now this charger also does not balance charge , but does a better job than the supplied charger ( Pic 9 ) .

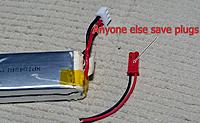
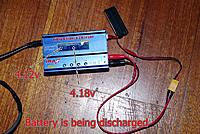
I found the situation some what intolerable so decided to add a plug so I could charge VIA my hobby charger ( Pic 8 ) . The first thing to do was get out a sharp ( Thats very sharp folks ) knife to peel away the coverings of the supplied battery ( Pic 3 ) . What I had to do was get to the positive and negative terminals so as to solder on a plug . ( Pic 5 ) Generally I dont throw away plugs , I sort of collect them for just in case circumstances ( like this one ) . Pic 6

Pic 7 shows the completed job . We all know how to solder and we all know not to short the lipo ( Right ? )...Continue Reading
Posted by old4570 | Dec 07, 2017 @ 09:30 PM | 7,951 Views


Christmas ( Xmas for some ) is creeping up on us , rather uncomfortably quickly to boot .
This year I took advantage of all these crazy sales ( some may have noticed ) and the Bugs 6 is what I got my brother . ( Yeah it was on sale )
Came today , so it's currently wrapped and parked next to the plastic Xmas tree .
I did take a peek and it does look like a quality ( plastic ) quad .

Maybe after Xmas my brother will let me play with it ?
Posted by old4570 | Dec 06, 2017 @ 08:47 PM | 8,527 Views

Mini DLG pro assembled and sorted


That small 6ch Rx looks big in the Mini DLG

...Continue Reading
Posted by old4570 | Dec 06, 2017 @ 05:35 PM | 7,962 Views
Came yesterday !
Wow , was on sale !
Got it relatively cheap with free postage !


Wow HK has made for a really good Xmas this year ! ( Thanks HK ) , did anyone else hit the HK Xmas deals or pre Xmas deals ..
Some of those deals were seriously good , I mean good !

So for future reference if anyone else pics up one of these !

You want the smallest stuff ( Rx , Batt , UBEC or Voltage booster ) in the nose ... Why you ask ?
Because it balances very close to the recommended CG with next to nothing in the nose - that's why .

The sample I got ! Beautifully made ...

Ok .... Assembly ! ( This was fun )
It looks plug and play , but its not !

Start with the elevator .. Make sure the push rod wire is the correct length ( Oh I lucked out big time here )
I botched this big time ( calculations ) and by pure luck got it perfect ...

So plug in your Rx , and sort out the elevator first , I reversed the servo connector ( turned it upside down ) to clear the wing ..
Once your elevator is sorted , then plug in the wing ...

With the ailerons I had to trim the length of the control rods as they were so long as to bind the ailerons ...
I think most know how to sort out their ailerons ..
With 2 servos you will need to do a little mixing ..
I will be using my Taranis Q x7 with the IRX4+ multi protocol module bound to a DSM2-22 Rx

Anyhow , this is where I sort of ran into problems ( CG )
300mAh 2s , UBEC + 6 Ch DSM2 Rx and my CG is around 60/65mm from the LE rather than the recommended 80mm

Well , the DLG is sorted but I will have to go with a better in the guts solution .

So around 1am I ordered a smaller 4 ch Rx ( DSM2 ) , smaller UBEC , as well as some 1s to 5v boosters to run 1s batteries ( I have a few )
So there you go , just too much weight in the nose at the moment .
Just have to wait to play with the Mini DLG pro
Posted by old4570 | Dec 05, 2017 @ 12:29 AM | 13,113 Views
9x and the iRangeX IRX4 plus module bound to my JJRC H36 (2 min 30 sec)


Must be a real Bear for folks that dont want to run Open Tx , flash their firmware , or learn something new just to have fun !
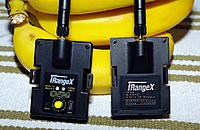
Well iRangeX has brought out the IRX4+ ( plus ) which allows folks to just run PPM output and manually select the protocol from the back of the module .

Both my 9XR and 9XR pro have been flashed with firmware that allow the use of the older IRX4 module .
So the only Transmitter I had lying around gathering dust ( literally ) was my older Flysky 9x . Now the original module did not fit the 9x due to the design of the IRX4 case around the pins .. This has been corrected with the IRX4+ and I am happy to say the new IRX4+ fits in the back of my 9x perfectly .

To use the new IRX4+ one merely needs to chose PPM for the output , pop in the module and chose the protocol to run ..
From 1 to 15 there is no green light . From 16 - 31 you need to activate the green light .
Activating ( de ) the green light .

Push down the bind button , turn on the transmitter , hold the bind button for about 3 seconds - green light comes on .. Now you can select a protocol from the 16 - 31 range .
The JJRC H36 uses protocol 16 and binds automatically when the transmitter is turned on .
To turn off the green light = Push the bind button and turn on the Tx holding the bind button for about 3 seconds .

You need to be out off the green mode to chose between...Continue Reading
Posted by old4570 | Dec 04, 2017 @ 09:29 PM | 8,229 Views
I have been waiting - and waiting - and it seems like for ever !
Only just came like about 30 minutes ago , so havent fired it up yet ..
Posted some pictures of OLD IRX4 and the NEW IRX4+

Just about to fire up a quad ...

I just put a battery through my JJRC H36 ..
No issues no problems .. Just plug in the module and go .. ( Ok no setting up needed as I was using the transmitters as the older module )
So its a plug and play replacement .
Posted by old4570 | Dec 03, 2017 @ 12:37 AM | 14,669 Views
18650 Battery tray for the Taranis Q x7 (1 min 44 sec)


Having just got my Taranis Q x7 , I got on youtube to see what alternative battery solutions folks have come up with .
In all fairness some of them were Dodgy to be sure if not possibly Dangerous .
It's amazing the ingenuity of people as well their lack of fear or may I suggest common sense !
Who the heck wants to turn their RC transmitter into a ( Lets just say ) Puff the magic dragon ! ( Some people do )
So in anyway , I thought what would I do ? ( Well I actually did it )

I scrounged around and found some 18650 trays that are in series ( 8.4v ) and got right into doing some mods .
First the tray had to fit the battery bay , a little trimming was needed .
Adding the 18650 meant that the thickness of the tray lifted the 18650 high enough so you cant close the lid .
Obvious answer is to lower the batteries in the tray .
So using my motor tool I cut some slots in the bottom of the tray so the 18650 could sit lower and the lid could be closed .

Once the tray with batteries fit in the battery bay ( lid on ) . It was time to solder the 2s balance plug ...
Be sure to use something like pliers to heatsink to whilst soldering or you may melt the plastic tray around the contacts ..
Lastly hot glue the leads so as not to stress the solder joints .. and your done !
You now have a 18650 tray and you didn't have to do any dodgy battery mods .
Posted by old4570 | Dec 02, 2017 @ 08:42 PM | 9,602 Views
http://magazinelib.com/?s=Aero+Modeller = Link to some free Aero Modeller Magazines from 2017 ( This year )
Posted by old4570 | Dec 01, 2017 @ 06:24 PM | 9,901 Views
I was really looking forward to an intravenous hit of stuff , but I am really getting strung out here with nothing arriving .
Actually , Friday saw the arrival of my Taranis Q x7 Transmitter . ( Interesting )


I did ( I think ) update the firmware , put in my iRangeX IRX4 module , bind to my H8mini , JJRC H36 , and my Eachine E010 .
The Q x7 is seriously enough different to my 9XR pro .. It's actually like no other transmitter I have owned ( now or in the past ) .
I have been flying my micro's as much as possible last evening , to get a feel for the Q x7 .
And now its time to switch back to the 9XR pro ( comparison )