Prof100's blog View Details
Posted by Prof100 | May 17, 2013 @ 10:20 PM | 29,236 Views
OrangeRx R710 DSM2 Compatible receiver
1 x Bind Plug
NOTE:
1) Accepted by the MAAA in Australia, see the MAAA MOP58 for guidance
2) This is not a Spektrum receiver, nor is it a copy of a Spektrum Receiver.
The Spektrum brand is a trademark of Horizon Hobbies USA.
3) Price of this receiver may fluctuate (up or down) due to cost of electronic components.
4) This is not an underground manufactured fake Spektrum receiver. OrangeRx quality is guaranteed.

Chl 1-Throttle
Chl 2-Aileron
Chl 3-Elevator
Chl 4-Rudder
Chl 5-Gear
Chl 6-Flaps
Chl 7-Aux

Below is the Guardian Installation for 4 channel HK Yak55 3D plane.

Posted by Prof100 | Apr 07, 2013 @ 12:03 AM | 25,518 Views
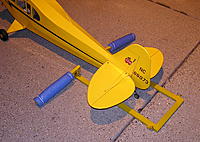
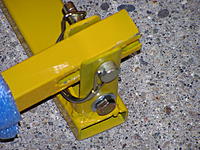
Here is my homemade plane restraint. I had plenty of material and TIG welder in my shop so I made this safety restraint for my new Hangar 9 gasser.

The restraint is made of thin wall tubing. The spikes are 12" nails. The beauty of this design is the uprights can be simply lifted and let fall to the side. The pivot holes accept 2.5 inch long by 5/16" both on the bottom and the removable pin on the top that permits pivoting out of the way. Vertical tubing is 7/8" square by .083" wall. the tubing has an open slot on the bottom and captured slow above it tto control the drop to the sides The base is rectangular tubing which I never measured. This was again a piece of material I had laying around in the shop.

The 12" nails have 3/4" square tubing T handles welded to them. They're galvanized with a rather thick coating which made Tig welding problematic in that it was a son of gun to get all the coating ground off.

I painted it with Duplicolor rust preventing zinc chromate primer and then a couple of coats of school bus yellow acrylic enamel.
Posted by Prof100 | Mar 16, 2013 @ 10:49 PM | 28,311 Views
NOTE: OPEN UP and scroll down to read about Guardian installation on gasser.

Update: Mid Air Collision Sept. 14, 2013. Plane repair described below. REMAIDENED on Saturday 10-13-13. Plane flew perfectly! No trim required. It is as good as new!


Sept, 14-15 2013 -- Mid air collision with 40% scale during formation flying. This CUB was inverted and flying slow and aft of 1/3 scale CUB. 40% scale CUB pulled up and broke right wing off at the wing tip and 16" inboard. Washout is built in but unknown and Horizon won't tell me because it is proprietary.

Cub Yellow HANU884 Ultracote covering.


Views: 11


Views: 11

Amazingly it was landed with the wing damaged, spar bent, and right side fuselage where wing attaches ripped out.

...Continue Reading
Posted by Prof100 | Mar 03, 2013 @ 09:41 PM | 23,347 Views
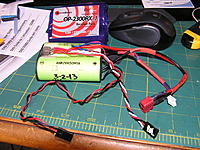
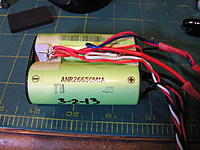
Since I just bought my first 1/4 scale gasser (used but like new) I decided to upgrade the 4 cell 1700 mah Nicad RX pack with a A123 pack. I went down two paths. One was to build a 2S2P 2200 mah A123 pack from four Black and Decker VPX cells (two VPX packs sacrificed).

The other pack I wanted was to simply buy a 2S 2300 A123 pack from Hobbyking and add a switch connector lead (male), balance leads and a Deans plug.

4 VPX CELLS
First, I built a 2s2p pack using four Blacker and Decker 1100 mah A123 pack cells. I installed a Deans style plus, added a three wire JST XH balance tap and intalled a 2 wire male servo connector to plug into the Receiver. I subsequently bought an Electrodynamics EDC-77N Ultraswitch II ED-NANO which is wired internally to permit using all three wires of the 3 wire servo male lead as balance tap from the RX pack to connect to the switch. A EDN CP4S-JR Cellpro to JR Node/Balance adapter cord allows the Cellpro 4S to balance charge the pack through the switch. (See below for a picture of adapter charge cord.)

The EDC-77N Ultraswitch II has a output via a 2 wire male connector for powering the receiver. CAUTION: This pack has to be used with a switch that has a two wire output to power a receiver. If I want to bypass the switch and use it directly for powering a receiver I will have to add two wire male servo connector (black and red) or simply remove the white wire from male servo connector end. Confused? Don't be, the next pack I built has both.
...Continue Reading
Posted by Prof100 | Feb 03, 2013 @ 07:06 PM | 39,776 Views
The new EPA / Carb compliant gas cans are the law of the land. The premise of the new law is to minimize gasoline vapors and spills. Unfortunately, the new gas cans have no traditional vent opposite the spout of the can. You could just drill a hole but without being able to cap it there are obvious safety and contamination concerns. The new legal dispensing nozzle is supposed to let air back into the gas can and these tend to be "rube goldberg" contraptions that are awkard to use and the dispensing time and effort are frustrating at best. Most of these new style cans just leak and spill gasoline when dispensing which is what they were supposed to prevent.

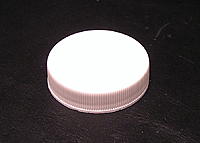
I bought the new gas can for field fueling of my gasser. The stock cap and nozzle assembly of these EPA / Carb compliant gas is worthless for our applications. Nevermind the complete PITA they are if you are using one to refuel your lawnmower.

So, the question becomes is how does one "back-convert" the gas can to an old style vented can. That said, you first have to buy one to get started.

Step 1 -- Buy a gas can. I went to O'Reilly auto parts and purchased a 2 gallon Midwest gas can. The price was $15. You can also buy them at Harbor Freight for a $1 less. THIS MODIFICATION ONL'y applies to MIDWEST GAS CANS. Blitz gas cans are similar but I don't know of any caps that work with them them except for the $32 aluminum and anodized one made by Fox that Tower Hobbies sells.

Step 2 -- Install a Gas...Continue Reading
Posted by Prof100 | Jan 23, 2013 @ 10:20 PM | 22,109 Views
For $150 I bought and installed a MrRCSound Budget B sound system. It outputs engine sound at 97 db.

Here is a short video.
Bills T28 Sound (0 min 28 sec)
Posted by Prof100 | Oct 13, 2012 @ 11:21 PM | 24,444 Views
Bare airframe kit purchased for $100 plus $15 shipping. Kit is very complete and full equipped.

Last year I bought a 1W40 with a wemo mini pro fan from fh64_lucky. It now has a home. It will run on a 5S 40C 3300 Sky Lipo (cheap).
Below are some test numbers by EDF Hobbies:

--RClander Shroud 3300kv Wemo mini pro rotor 5s lipo/18.5v 89 amps / 1890 watts / 2.6kg thrust
--RClander Shroud 3300kv Wemo mini pro rotor 6s lipo/22.2v 96.0 amps / 2060 watts / 2.8kg thrust

I will run mine on 5S 3300.

Motor: Sapac MB1 and fan which will provide 1100 watts on a 4S and 1600 watts on a 5S was considered but I settled on a HET 1W40 installed in Wemo Mini Pro.
ESC: Hobbywing Pro 100 amp
Battery: 5S 3300 40C

Video link to install Eflite retracts. This corrects errors in the manual relating to the steering arm:
http://www.youtube.com/watch?feature...&v=p9DrEH3zxW8

to finish the bare fram I used Styrospray 1000 (aka Liquid Sheeting) on the fuselage and Evercoat Polyflex on the wing. The Styrospray 1000 requires you to encapsulate the foam. Failure to do so will result in in lifting. It is not flexible either. Hence, I used Evercoat Polyflex filler which can deflect up 77 degrees. Here is a link to the data sheet.
http://www.evercoat.com/imgs/salesflyers/POLYFLEX.pdf

Unfortunately, it does not adhere very well to the Z foam.


Modifications:
  • ESC mounted in the inlet duct and held in with silicone RTV. 15 inch long stock motor- to- ESC 14
...Continue Reading
Posted by Prof100 | Aug 12, 2012 @ 10:22 PM | 23,066 Views
Here is a video of how to reverse a servo (and HXT500)

http://www.youtube.com/watch?v=hnd1zwouWV4

How to Manually Reverse a Servo (3 min 58 sec)

Posted by Prof100 | Aug 03, 2012 @ 10:10 PM | 32,216 Views
EDIT (5-12-130: GUARDIAN and a DX8 -- setup by Choochoo32
A DX8 works well with a Guardian and a six channel rx is all you need for full control of a 4 ch plane. Do the following:
  • Plug the mode wire into channel 6 and use the flap switch to select 2D/off/3D modes.
  • Plug the gain wire into the gear channel.
  • Go into the setup menu, the one you access by pressing the roller while powering the DX8 on.
  • Locate the switch assignment submenu.
  • Find where it says "Gear:" and change it to inhibit.
  • Find where it says "Knob:" and change it to gear.
  • Undo any other settings or mixes etc, that you may have made for the Guardian. The most sure way is to first reset the model memory before doing the above.
This will give you full mode control on the flap switch and master gain control on the knob. You can reverse these channels to make the controls work to your liking. I like the gain to go up clockwise on the knob, for example, like a volume control.

The V1.18 update shouldn't matter for you unless your Guardian is mounted upside down.

++++++++++++++++++++++++++++++++++++++++++++++++++ ++++++++


I bought two units from ReadymadeRC and installed them in my old Superfly and the Leadfeather scratchbuilt delta. Both are hardly used and if I crash them I don't care.

Both are deltas with elevons. Superfly has no rudder but the Leadfeather delta does.

All radio mixes for elevons are deleted and reset to standard aircraft. The Guardian does the elevon...Continue Reading
Posted by Prof100 | Jul 14, 2012 @ 12:33 PM | 22,006 Views
Freewing designed F9F Panther made from EPO and with a top loading battery hatch. The Starmax version (tad larger) has larger intakes and cleaner ductwork. This plane has a cheater on the bottom to let in more air to make up for the smaller, but scale air inlets.

EPO is great for crashworthiness but it can move around in hot weather or slight load when storing. To prevent warping I added 1.5 mm CF in the wings (front and cross) and horizontal stab.

Purchased from ValueHobbies on a $10 off sale for $69.99.

Assembled using 5 minute and 15 minute epoxy.

The battery compartment doesn't willingly accept a 3S 2200 30C without modifying it. Simple cutting out of the wood floor and the battery drops to the floor. Velcro added to the foam foam plus the strap keeps the battery in place.
  • Motor: 4800 KV Don's Wicked with a balanced fan
  • ESC: 40 amp Pentium w/switchmode BEC
  • 485 watts with 51.4 mm thrust tube
  • Servos: stock
  • Receiver: Orange Hobbyking spektrum (set up with spoilerons)
Aileron control horn snapped (brittle plastic) so I added Dubro micro horns.

UPDATE: Maiden flight required moving battery forward and adding half ounce to the nose. The large exhaust seems to be limiting the speed of this nice looking EDF plus lack of real intake ducting and cheater holes make this thing sound like a hair dryer.

THRUST TUBE
I added a mylar thrust tube to reduce the outlet 51.4 mm. I used 7 mil mylar to make the tube. The Cone Layout program made the pattern to layout the shape on the mylar. Dimensions are:
  • Outlet 51.4 mm
  • Large end: 66 mm
  • Length 151 mm.
Transparent tape holds the thrust tube together and Foam Tac glue was used to adhere the fan housing to the tube. The exhaust outlet was made concentric with the foam outlet by some deft place of low temp hot glue. I have not flown it since the thrust tube addition but will when I have time.
Posted by Prof100 | Jun 29, 2012 @ 11:31 PM | 19,136 Views
For $23 each I bought three 2200-40C FMA "Platinum" 3S packs. I measured IR with the LIPO ESR Meter. All testing done at 73 degrees F.
Pack 1 -- 1 charge-discharge cycle
Total pack: 15.9 mohms
Cell 1 - 3.40
Cell 2 - 3.92
Cell 3 - 3.64

Pack 2 -- 1 charge-discharge cycle
Total pack: 17.4 mohms
Cell 1 - 3.92
Cell 2 - 4.19
Cell 3 - 4.2

Pack 3 -- Charged only
Total pack: 17.1 mohms
Cell 1 - 3.80
Cell 2 - 4.16
Cell 3 - 3.88
Posted by Prof100 | Apr 22, 2012 @ 03:21 PM | 18,413 Views
This is very reasonable HH and Rate gyro available from Hobbypartz.com.


Melnic's thread has a link to an excellent video that describes how to set it up for rudder use. The information describes how to control it via the gear channel of DX7 and how to shut of Heading Hold Mode, The way he programs it the gyro can also be disabled.

http://www.mycoolrc.com/gyro/ruddergyroinstall1.html

There are two YOUTUBE videoes in the above link that take you step-by-step on the installation.

The above link has part 1 and 2 videos.

Below is a link to Video 3 in the series.
Gyro on an Airplane Setup Part 3 gyro selection (7 min 28 sec)
#!
Posted by Prof100 | Apr 12, 2012 @ 08:01 PM | 18,493 Views
These are a must if you stay in the hobby. The tips are hardened and machined. Pricey but I have had mine for 15 years.


http://miponline.com/store/mip_thorp...ex_driver.html
Posted by Prof100 | Apr 05, 2012 @ 06:29 PM | 18,882 Views
It's very easy to set throttle range.

Step 1 -- Turn on radio and move throttle to the top (wide open).
Step 2 -- Plug in the battery on your plane's ESC, wait 2 seconds.
Step 3 -- Beep-Beep tone should be emitted, means throttle range highest point have been correctly confirmed.
Step 4 -- Move throttle stick to the bottom, several "beep" tones should be emitted, representing the number of cells in the lipo.
Step 5 -- A long "beep" should be emitted, means lowest point in throttle range been confirmed.

DONE.
Posted by Prof100 | Mar 04, 2012 @ 11:45 AM | 19,856 Views
Here is a comparison video made by 3M for Dual Lock and Hook and Loop.
3M™ Dual Lock™ Reclosable Fasteners vs. 3M™ Hook and Loop Fasteners (2 min 1 sec)

Posted by Prof100 | Feb 26, 2012 @ 11:58 PM | 21,141 Views
Update April 2018
APC 13x10 with 580 Kv on a 5s delivers about 1000 Watts

Warning: make smooth throttle movements to maintain synch with the Hobbywing ESC when running a 5s.

Tests done to find the right combo.

I teśted the 580 kv motor with a 13x9 APC pattern prop on a 4s and 5s.

On a 4s the 13x9 it pulled 550 watts. On the stock 3 blade prop it pulled 800 watts on a 4s. The stock prop on this motor with a 5s it pulled 1450 watts and about 78 amps. and risked self destructing the prop

APC 13x9 prop deserved the 5s test. It pulled 950 to 975 watts peak and settled in at 900 watts. That is a workable combination. It deserves a flight test. The two unopened lower pitch props will be exchanged for a 13x10.

13x10 prop tested with a 5S and the wats measured were about 1000 with a partially discharged older pack.

I ordered the 4258 650 kv motor from Motion RC. It may or may not get installed pending the 5s flight testing with 13" APC props. If I do upgrade I suspect a new stamped steel and bent universal mount from HeadsupRc may be the mount I need to avoid trying to drill out the V1 stamped steel mount.

I am still flying with the 580 kv motor, 5S and 13x10 APC prop.


Edit from an old post to fix screeching of the motor on a 5S
It is not timing. I thought it was too having experienced before on other motor combinations. I am using a 80 amp Hobbywing Pentium. Hobbywing makes the Turnigy ESCs. I have tried low, medium and high timing....Continue Reading
Posted by Prof100 | Jan 01, 2012 @ 09:27 PM | 21,865 Views
http://beta.ivc.no/wiki/index.php/AXN_Clouds_Fly_Setup

The above is a good link for someone new to the AXN Clouds Fly.

Below is a 3 part build video of the AXN from RC Reviews:
AXN Clouds Fly Floater Jet RC plane build video (part 1 of 3) (20 min 20 sec)

AXN Clouds Fly Floater Jet RC plane build video (part 2 of 3) (26 min 34 sec)
...Continue Reading
Posted by Prof100 | Dec 31, 2011 @ 11:25 PM | 21,424 Views
I like this version.