bnrusso's blog View Details
Posted by bnrusso | Oct 02, 2020 @ 02:46 PM | 6,416 Views
CAUTION: A friend purchased the EFL01250 P51.
Never try to do forward programming on this plane in the air.
The elevator goes out during try to forward program.
According to Horizon Hobby the AR637TA is designed not to allow customers to make any changes they are allowed to make in the older AR363 RX or the new AR637T.
It's called a locked, pre-programmed RX. You can't make any changes via the Spektrum programmer either.
I found this out after I contacted HH because he had moved the RX forward, changing RX orientation and replaced the elevator servo with one that runs backwards. AS3X requires changes in the RX, not the TX so he had to replace the RX with an older AR636 but that has no forward programming.
Posted by bnrusso | Dec 05, 2019 @ 01:55 AM | 9,046 Views
UPDATING from 2.3.2 or older to the real OTX 2.3.3 or newer
BRUNO N. RUSSO JR.·WEDNESDAY, DECEMBER 30, 2019
FYI: I know 2.3.2 says Open-TX but it is a test release from Jumper.
That's why there is no T16 in Companion before 2.3.3 RC1

pre req.:

Download and install https://quadmeup.com/stm32-virtualco...r-for-windows/
select "ready for download".
download and install https://impulserc.com/pages/downloads

Firmware updating to latest OTX and latest MPM
1. go to http://www.open-tx.org/ and select the latest NEWS for the version you will use.
2. near the bottom of the new page SELECT, download, save and install COMPANION and start it.
3. when you run companion, connect your T16 in bootloader mode (L&R trims IN while pressing power) check or install radio profile and settings, tab2. Application.., releases stable. Tab1. TYPE Jumper T16, AETR is recommended for default ***, mode ? (2 for me), select internal and lua and Flex for me.
4. select the download icon and “check for updates”. Download the bin file then change name to OR... for Official Release. Also download the latest SD card contents. (USE the latest zip file.)
5. Extract all (I used DOWNLOAD folder), open the SD card folder, for faster writing, open sounds and delete all but native language, “ENglish” for me, and back out to directories.
6. Open drive letter for t16 SD that shows all the folders starting with FIRMWARE, (mine is E:, put them side by side and drag and drop...Continue Reading
Posted by bnrusso | Nov 04, 2019 @ 02:50 PM | 7,590 Views
Trying to do external charging without having charge wires go through back to front of case. Decided to add charge port to the battery case.
1. epoxy socket to case as shown. Sits on SD card side with slotted side up to not interfere.
2. carefully strip wires to solder charge wires without shorting to each other.
3.solder charge wires inside neg first, center to center next and positive last.
4. Protect solder areas with silicone.
Notch case cover to match location.
Now I can use a cheap parallel charger with a double ended extension to charge the battery externally.without unplugging the battery.
Posted by bnrusso | Oct 09, 2019 @ 11:37 PM | 10,579 Views
This process will update my Jumper T12 from Jumper-Tx to the now REAL Opentx 2.3.x
I am using a Windows 10 AMD PC.
Since Companion2.3 says that one has to have a previous version of opentx at least 2.2 to properly update to the next, this first update is done without using Companion for the WRITE FIRMWARE.

QUESTION: Does one have to first update to 2.3.0 before going to 2.3.1?
ANSWER: No. I went from JUMPERTX 2.2.3 to OPENTX 2.3.1

QUESTION: without companion, where Do I find the 2.3.1 firmware?
ANSWER: I used companion 2.3 to start a new T12 and selected my options and then downloaded the t12 open tx via the download button.
I placed it directly into the empty FIRMWARE folder for the T12 SDcard.

I started a unmodified Jumper T-12, mine has Jumper-tx 2.2.3, to update to OPEN-TX 2.3.1
ASSUMPTION: battery installed that will not drop below 5V as that's the limit for best TX output.

GET READY:
* go to Open-TX.org
under NEWS select the newest (2.3.1 at this time The ones called nightlies is not ready to be released yet)
Bottom of page are download link for Companion 2.3

* download and install Companion2.3

GET SET
* use companion 2.3 to download the latest T-12 OPEN-TX firmware.
...I created a profile for my T12. (NewT12)
...I set settings. (selected RADIO TYPE T-12)
...default stick MODE2
...default channel order AETR THis is default for the multimodule. Even if you will use Spektrum (default TAER) use AETR because the radio will convert the output to TAER...Continue Reading
Posted by bnrusso | Feb 17, 2019 @ 09:47 PM | 8,192 Views
The very first time you update a MPM without the bootloader it has to be done in this manner if direct connect fails.
If the bootloader is installed then one can update directly from the TX. I'll follow up on this soon.

I had almost no problem updating the IrangeX.
Opened the case (2 screws). Be careful removing the board as to not damage antenna connection. I left mine plugged in as removal and replacement is not a good idea. Also take note which way the antenna cable loops back into the case.
I added, by soldering the 4 pin header to the Gnd, Tx, Rx, Vcc.
I used a short piece of wire to jumper Boot0 to 3.3V and soldered it too.
I connected and FTDI serial ttl converter at 3.3v gnd to gnd, Tx to RX, and Rx to Tx. https://www.ebay.com/itm/3-3V-5V-FTD...o/382655837965
Downloaded and installed flash-multi from here: https://github.com/benlye/flash-multi
follow the instructions to load drivers.
Flash-multi,exe is the application file to run.
I plugged the ftdi in the USB serial port.
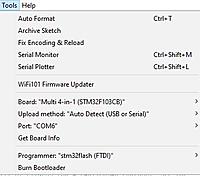
From my windows machine I found, via device manager, usb serial on com7 so I set the flash-multi to com7.
I downloaded the firmware file from the link in flash-multi. I used: multi-stm-opentx-aetr-inv-v1.2.1.85.bin
aetr is the default for the MPM. It will reroute TAER to DSM selection automatically. Many have problems when not doing this. If you choose a different default you will have to set the Transmitting controller and install the same defaulted channel firmware.
After carefully connecting the out of case MPM to the transmitter, and made sure the 2 wires were going from the MPM to the FTDI I applied power to the TX. browsed to add the firmware I just downloaded I pressed upload on the flash-multi.
It takes a minute or so to complete.
When done successfully I shut down all and disconnected.
I removed the MPM, cut the Boot0 jumper, re-assembled the module and I was done.
When you select the setting EXT RF to MULTI and whatever protocol you will see the new version under status.
Posted by bnrusso | Feb 14, 2019 @ 08:11 PM | 10,842 Views
Updated 2/14/2019

This is how to update firmware for 4in1 modules. I own 2 types at this time.
Since there are several modules and a few ways to update I will try to cover what I know and I hope you will help. My goal is to try to add whatever helps to have a step by step approach to do any type.
For reference I followed Pascal Langer's process. HERE:https://github.com/pascallanger/DIY-...iling_STM32.md


T-12 4-in-1 V 1.2
Since I was first successful with this one I will start here.
The version should be determined first.
AFAIK there are currently 2 versions of the PC board. V1.1 and V1.2
I had to open the case to determine my PCB version.
If you don't have to remove the PCB coax connector then don't. These types of connectors can give out after a few disconnects and re-connects.
The V1.2 already has an active mini USB port and it can be updated via that port without any jumpers or soldering.
The only tool I used was a miniUSB to my windows 10 PC
Plugging into this port activates the Boot 0 and makes it ready to update.
My 4in1 showed up in my device manager as Silicon Labs CP210x USB to UART Bridge (Com6)
I was able to upload the new firmware with the module out of the TX

I started with the Pascal's Preparation step and followed every step
Install arduino ide, upgrade Java, follow the downloaded the multiprotocol source by clicking on the HERE in step i.........
When I got to the upload step this is whatTools looked like just before UPLOAD.
Name: tools before upload.JPG
Views: 157
Size: 26.6 KB
Description:

Upload finished with a...Continue Reading
Posted by bnrusso | Jan 15, 2019 @ 04:20 PM | 14,677 Views
My goal is to update the firmware, and add a multi protocol module.
BACKGROUND:I recently purchased this working TX from an auction. I already owned 2 older 9X, 1 Turnigy and 1 frsky. I decided to try to do a firmware upgrade and after lots of research and you-tube videos (mostly quite old ones) I decided to document these adventures for 2019.
#1 what firmware to use:
This TX came with it's original Turnigy 9x software.
I very much like OPEN-tx (thanks to you-tube edu-macation by R Scott Page) which I have in 2 current radios. A Jumper T12 using a modified version called Jumper TX and a new for Christmas Taranis QX7s. As I now understand https://www.rcgroups.com/forums/atta...d=11564993only an older version 2.0 Open-TX would work on this older radio. Another choice, an even older OS as OPEN-9X.
Since I've been reading about an alternative ER9X and the work of Mike Blandford I decided this will be my go-to first attempt.
Mike also has a version of ER9x that seems to support the T-12 too.

#2.Here are the details of how I went about getting this working.
I purchased a USBasp board from a local US ebay vendor for around $4.click here for my E-BAY link
I could have got it cheaper but CA to AZ was quick for a little more.
I also purchased a 10-pin to 6pin adapter for $.99 click here for E-bay link
When I attempted to use this USBasp on my windows 10 computer it did not install correctly.
Research pointed me to This Zadig website for the correct drivers.
Following the install...Continue Reading
Posted by bnrusso | Oct 05, 2018 @ 01:56 AM | 14,683 Views
Well, I just got the Jumper T12 with the multiprotocol Module. I was able to get started in only the simplest functions. I'm reading posts, taking notes and watching Youtube video but I have a lot of questions and I don't see or understand the answers. I'll try to ask and take questions and post answers in this original post/blog. I'll even break down the points I've already learned below or direct you or I to a video or post with the answers or details. I'll see how it goes from here.

1. Youtube video's and reviews explain the basics.
THIRD GENERATION JUMPER REMOTE!!! -- T12 -- OPEN TX (28 min 57 sec)
minutes 5 to 12:30 buttons and basics

Jumper T12 OpenTX Transmitter Review �� (29 min 53 sec)
  • How to choose and install battery. A 2s Lipo seems to be best. I got a 2000MAH 2S from E-bay but it required a slight internal battery case mod to get it to fit. link here soon
  • How to turn on/off.
  • How to use the keys.
    ENTER and EXIT on left. (ENTER has long press option in some cases),
    on right UP and DOWN, MENU and PAGE MENU forward , (page back is long press PAGE MENU forward)
  • How to get int the RADIO MENU and the MODEL MENU.
  • How to set the low battery alarm.
  • How to load the required files onto an SD card, giving you sounds and the wizard to help create models.(PLANE, DELTA or MULTI) https://www.youtube.com/watch?v=3z7xxt4eJBc 3:10 to 4:08 of the video
    Jumper T12 OpenTX Radio Transmitter (11 min 35 sec)
  • How not to load Open TX firmware. Several
...Continue Reading
Posted by bnrusso | Oct 03, 2018 @ 12:54 PM | 10,015 Views
I just got my T-12. Excited to see how I can use it for different aircraft.
I just got a Syma clone X5C-1 to respond to Bayang setup and even got a switch to act as MOTOR ON-OFF.

I will add to this as I learn more.
Very cool.
Posted by bnrusso | Jan 23, 2012 @ 12:06 AM | 10,611 Views
I finally went to leaders hobby and purchased the 9x.
http://www.leaderhobby.com/product.asp?ID=9394001220239
I purchased mine from leader because I wanted to try different modules and I did not want to cut the antenna wire which was required of the HobbyKing Turnigymodel.
I have been using the standard firmware.
So far the only problem has been the top line of the display is OFF (deffective). It does not light. With the standard firmware this has not been a problem.
__________________________________________________ ______________
My first mod was to add the backlight.
I ordered the green from HobbyKing. https://www.hobbyking.com/hobbyking/s...dProduct=17128
I chose green because it seemed to have the best contrast for me.
I followed the instructions on Youtube from foamfighters and HobbyKing.
HobbyKing - Quick Guide: Install Back Light on Turnigy 9X (3 min 28 sec)
I had 2 problems with this video.
1. the foam pad at time 1:15 was really hard to remove. I used my heat gun to warm it up and it came off much better.
2. my backlight wires locations made it difficult to miss the switch as shown at time 1:50. I had to bend mine and I have heard that some have ripped off the led and had to glue it back.
I also decided to remove all the connectors to work on the board away from the tx base.
I'm satisfied with the results, the backlight looks great.
__________________________________________________ ______________

My next mod will be to add the ability to change the program. I ordered the programmer and some pogo pins from ebay.I wanted to leave the pogo pin link but my supplier is no longer showing any items. I do hope I get my parts. The programmer I ordered is this one:
http://www.ebay.com.au/itm/180768377568
I have also reviewed this video on Youtube on how to wire a programming connector. I need to verify this is the same for my radio.
T9X - TH9x - Er9x - Cable Installation (15 min 33 sec)
Posted by bnrusso | Aug 27, 2010 @ 08:15 PM | 11,817 Views
I just received 2 HobbyKing Spektrum compatible Rxs.
no longer available.
What I first noticed.
  • They had no covering, just a pc-board.
  • The antennas are just wires, not coax.
  • Some of the solderjoints on one, near the servo connector needed additional solder.
  • The antennas needed a bit of glue support so they wouldn't break from use.
  • There were no instructions.
I decided to wrap the body with heat shrink tubing which will protect the circuit and give me a surface to mount
my velcro adhesive. They are designed so the RX status LED is at the top so you can see it if the heat shrink goes up to, but not over the antennas.
There are some pictures in the FILES section at the bottom of the ad which showed me the proper connections.

The bind process or bind procedure:
1. Plug in the bind plug to the BAT connector.
2. Plug in the batery to any other position.
negative closest to the PCboard level.Black wire(Futaba), brown wire (JR)*
the RX status LED will begin to flash quickly.
3. Lower the throttle on the TX to set the throttle cut failsafe.**
4. Hold the bind button on the TX and turn on the TX power.
5. Let go of the bind button as soon as the RX status LED goes OFF.
Wait for the RX status LED to come back on flashing,
then wait untill it goes out and comes back ON SOLID.
6. Remove the battery plug from the RX.
7. Remove the bind plug from the RX.
8. Power off the TX.
bind is complete.

  • When I power up the RX with the TX OFF the status LED will blink and go out. A few seconds
...Continue Reading
Posted by bnrusso | Aug 24, 2010 @ 08:29 AM | 11,830 Views
I took a pass at the last notification to buy the Turnigy 9X when they were in stock.
Several guys have reported that their sticks are requiring service/cleaning.
If this radio does not use quality pots then I'm concerned that a purchase would be a waste of money.
Am I overreacting??
Posted by bnrusso | Oct 06, 2009 @ 12:56 AM | 11,551 Views
I range tested my system today.
An associate operated the TX on the road near our field.
I drove my car down the road.
Line of sight on this road gave me .5mi and full control.
I did loose signal when I lost line of sight due to the dips in the road.
I couldn't get any farther as on this road it was from peak to peak.
I will try to go a longer distance when I find a better road.
I could barely see the associate at this distance so my foamy plane would be just a spec.
Posted by bnrusso | Oct 01, 2009 @ 04:51 PM | 15,198 Views
I find these systems to be a fantastic value. I know there are variations but I'd like to keep the topic only on the identical looking 6 channel systems and the same 6 channel RX with the satellite RX and where you can buy them.
Only those that are programmable via your PC using what is called the t-6 config utility. I also want to note any differences and RX failsafes (no TX signal)

The main thread with lots of information and additional transmitters is HERE

So lets get started.
EXCEED Xheli.com - hobbyparttz.com - nitroplanes.com
FAILSAFE (my 2 rx) of neutral on ch4 and ch5. All other channels have no signal.

HOBBY KING hobbycity.com NO LONGER COMPATIBLE, NOW V2
V2 is a frequency hopping system and requires different RX. You can read more about V2 in RCGroups thread here

FAILSAFE JULEZ reports that " My 2 HobbyKing RXes give out no signal at all pins."

FLY SKY rcmodelparts.com NO LONGER COMPATIBLE NOW V2 (B)
enjoyhobbies.biz - snhobbies.com TX only -snhobbbies.com tx&rx

Elite-6 centuryheli.com

TUBORIX r2hobbies.com NO LONGER COMPATIBLE NOW V2

FAILSAFE JULEZ reports "Well, my Turborix RX gives out no signal on #3 and centers all other channels upon loss of signal."


Please feel free to comment or add to this. I will add your info to the main post and log the changes.