burkefj's blog View Details
Archive for December, 2011
Posted by burkefj | Dec 28, 2011 @ 12:09 PM | 12,946 Views
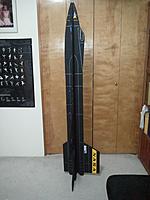
I still wanted to see if I could build a tail boosted glider that could work without balast shifting and use the G-12 32mm motor. I decided the best platform an upscale of my InteR-Ceptor. The original RC/RG I built was 42" long and used an E-6 and weighed 9 oz rtf. I decided to just go with a single ply top view, except doubling it at the rear for the motor mount, and adding a kline-fogelman(KF) step on the wing bottom to help stiffen it, hide the spar, and generate a bit more lift. I used double ply 6mm for the fuse, however it is only 4" accross so about half of the x-15.

WS is 34" and length is around 75"

Here is how it looks so far.

Update 12/28 Completed the build, with all electronics and a bit of ballast installed it is at 17 oz. Battery will be 1.5 ounces and motor 4.4

Update 12/29, finished the markings and CG. AUW is 23 ounces with motor and battery. Did most of the markings with sharpie for panel lines, stars and bars from sig, vinyl letters from coverite, and the rest is trim monokote cut to fit. I decided to put some fake gear doors and flaps etc and some gun ports. I had some random military plane placards from an old trim sheet I had, so I used those.

Update 1/07/2012 Got in a perfect test flight on a G-12, really docile on boost and trivial to land, just a little wing wobble when too slow, but no stall.


...Continue Reading
Posted by burkefj | Dec 24, 2011 @ 11:13 AM | 9,673 Views
I got tired of sanding on the X-15, and was staring at the ceiling, and got the bug to rework my X-3 into a cruciform style and rocket motor. Originally I had done the fuse as pure profile which worked fine for stiffening the stinger for the pusher motor, but now with rocket motor, I could put the motor more forward at the motor exhaust area and use a top view as well and save weight.

I also wanted to just use full flying tail instead of aileron/elevator to save one servo, and had to do a bit of creative stiffening of the tail using some carbon and basswood supports, and by running my pushrods inside carbon tubes to allow me to push them more forward. I was worried the stiffness of the tail would be an issue but turned out it flew perfect off the board. The CG was more forward than my fuse only version which only helps lateral stability which I had an issue on on the first flight of my profile only model.

Only needed one test flight. Since I had the tail mounted high I was worried that the roll would be off axis, but this didn't turn out to be a problem. I had my boost trim slightly off as it pitched toward the spine, but was easily corrected and trimmed out at the top. My glide trim was spot on and it was nice and easy. Pitch was very responsive and I over-flared to a "plop" down landing

Here's my original pusher version: https://www.rcgroups.com/forums/show...2#post11192997
Frank
Posted by burkefj | Dec 21, 2011 @ 03:43 AM | 13,844 Views
I decided to do an upscale of my X-15. The tail pieces are also laminated 6mm grooved with the torque tube inside. Fuse is two pieces of 6mm spliced and laminated. The top view has a 1/4" spar hidden in the laminated pieces. Took 3.5 sheets of 6mm and 3 sheets of 3mm. Total airframe weight is 18.5 ounces.

Update 12/21 Slotted and tabbed the fuse/wing, mounted the rail buttons on a spruce slat inlayed into the side, laminated some styrene on the nose and tail for landing skids, mounted a 29mm mount and got the bottom glued in place.

Just need to round the edges of the wing and top fuse, glue on the top fuse and install the electronics.

Update 12/26, finished the model and electronics install:

Got in two flights today. First flight on a G-25 was majestic, it chuffed a couple of times like they tend to do, and then a nice graceful boost to around 600 feet, pitched over and hit the glide trim, and it was perfect, nice and slow and plenty of authority to flare for a tail first touchdown.

The second flight I liked a bit better on a G33, much more growl and faster boost, again arrow straight, pitch over and nice glide. The 6' rail worked perfectly.

All in all, I'm very happy and will now do the painting and panel lines. Thanks to John for digging the motors out of the archives/vault. Only got one cell phone picture that is blurry on the G-25. I think the perfect motor will be a G-40.


Update 12/29/2011 Finished painting and applying panel lines with silver...Continue Reading
Posted by burkefj | Dec 07, 2011 @ 02:37 AM | 11,347 Views
Well the X-37 didn't work out too well, and I hated looking at a failure, and I hated to waste the nice rounded fuse I made, so I chopped off the rear end, reprofiled the nose, added a new rear former and motor mount, a tail, cut lightening holes in the bottom of the old fuse, cut off the wings, made a new wing, and glued it to the fuse. It is now a close scale Buran

It will also allow me to get a more rounded nose and bottom front.

Looks like it has a slightly more rearward CG than my shuttle, and is about a half to an ounce lighter.

Here's the flight video from this evening, I had to pitch forward to keep it out of the low fog...

Scratch built Russian Buran shuttle Rocket boosted RC glider (1 min 14 sec)


Frank
Posted by burkefj | Dec 04, 2011 @ 03:32 AM | 3,216 Views
Now that the shuttle is under my belt and I learned a bit with foam bending, i'm working on the real thing that peaked my interest after seeing another builder do one as a piggyback glider off of an airplane. This is 41" long, and 25" wingspan, made quite a bit of progress today. Not sure if the V tail will have enough authority to roll it enough by itself or not, and the wing is small and forward, so CG may take some non-trivial nose weight.

Made some good progress today, ran aluminum tubes through spruce strips to support the full flying tail at an angle, the servos will be vertical right against the fuse center line and will easily align with the control horns.

I'll glue the control horns to the stabilizors once the rear top sheet is in place, I used aluminum bushings to space the tail far enough away from the fuse top and gluing the control horn in place with lock it in.

Update 11/04/2011

A bit more progress this morning, fit and attached the rear shroud, and then installed the servos, everything looks good, did a few glide tests.


...Continue Reading